


Springboot与数据的访问有常用的有以下几种 JDBC,Druid数据源,Mybastis,和SpringDataJPA
(1)JDBC,引入相关pom


配置yml,配置文件,使用driver为jdbc
效果:
默认是用
org.apache.tomcat.jdbc.pool.DataSource
作为数据源;
数据源的相关配置都在
DataSourceProperties
里面;
自动配置原理:
org.springframework.boot.autoconfifigure.jdbc
:
1
、参考
DataSourceConfifiguration
,根据配置创建数据源,默认使用
Tomcat
连接池;可以使用
spring.datasource.type
指定自定义的数据源类型;
2
、
SpringBoot
默认可以支持;
org.apache.tomcat.jdbc.pool.DataSource
、
HikariDataSource
、
BasicDataSource
、
3
、自定义数据源类型
/**
* Generic DataSource configuration.
*/
@ConditionalOnMissingBean
(
DataSource
.
class
)
@ConditionalOnProperty
(
name
=
"spring.datasource.type"
)
static class
Generic
{
@Bean
public
DataSource dataSource
(
DataSourceProperties properties
) {
//
使用
DataSourceBuilder
创建数据源,利用反射创建响应
type
的数据源,并且绑定相关属性
return
properties
.
initializeDataSourceBuilder
().
build
();
}
}
4
、
DataSourceInitializer
:
ApplicationListener
;
作用:
1
)、
runSchemaScripts();
运行建表语句;
2
)、
runDataScripts();
运行插入数据的
sql
语句;
默认只需要将文件命名为:
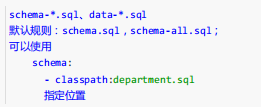
5
、操作数据库:自动配置了
JdbcTemplate
操作数据库
(将建表语句,还有操作语句,写在sql文件中,启动自动加载)使用较少
2
、整合
Druid
数据源
@Bean
public
DataSource dataSource
(
DataSourceProperties properties
) {
//
使用
DataSourceBuilder
创建数据源,利用反射创建响应
type
的数据源,并且绑定相关属性
return
properties
.
initializeDataSourceBuilder
().
build
();
}
}
//
配置
Druid
的监控
//1
、配置一个管理后台的
Servlet
@Bean
public
ServletRegistrationBean statViewServlet
(){
ServletRegistrationBean bean
=
new
ServletRegistrationBean
(
new
StatViewServlet
(),
"/druid/*"
);
Map
<
String
,
String
>
initParams
=
new
HashMap
<>
();
initParams
.
put
(
"loginUsername"
,
"admin"
);
initParams
.
put
(
"loginPassword"
,
"123456"
);
initParams
.
put
(
"allow"
,
""
);
//
默认就是允许所有访问
initParams
.
put
(
"deny"
,
"192.168.15.21"
);
bean
.
setInitParameters
(
initParams
);
return
bean
;
}
//2
、配置一个
web
监控的
filter
@Bean
public
FilterRegistrationBean webStatFilter
(){
FilterRegistrationBean bean
=
new
FilterRegistrationBean
();
bean
.
setFilter
(
new
WebStatFilter
());
Map
<
String
,
String
>
initParams
=
new
HashMap
<>
();
initParams
.
put
(
"exclusions"
,
"*.js,*.css,/druid/*"
);
bean
.
setInitParameters
(
initParams
);
bean
.
setUrlPatterns
(
Arrays
.
asList
(
"/*"
));
return
bean
;
}
}
配置一个Druid的监控页面,监控后台数据库操作,包括执行SQL语句,执行次数时间,返回结果
3
、整合
MyBatis
引入pom
<dependency>
<groupId>
org.mybatis.spring.boot
</groupId>
<artifactId>
mybatis‐spring‐boot‐starter
</artifactId>
<version>
1.3.1
</version>
</dependency>
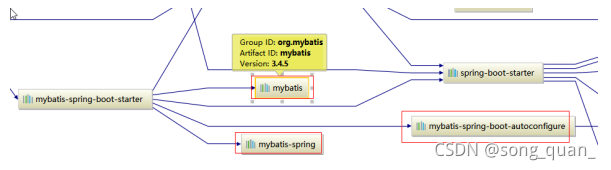
starter中包含的是,mubatis的自动配置属性,及相关配置
步骤:
1
)、配置数据源相关属性(见上一节
Druid
)
2
)、给数据库建表
3
)、创建
JavaBean
4
)、注解版
//
指定这是一个操作数据库的
mapper
@Mapper
public interface
DepartmentMapper
{
@Select
(
"select * from department where id=#{id}"
)
public
Department getDeptById
(
Integer
id
);
@Delete
(
"delete from department where id=#{id}"
)
public
int
deleteDeptById
(
Integer
id
);
@Options
(
useGeneratedKeys
=
true
,
keyProperty
=
"id"
)
@Insert
(
"insert into department(departmentName) values(#{departmentName})"
)
public
int
insertDept
(
Department department
);
@Update
(
"update department set departmentName=#{departmentName} where id=#{id}"
)
public
int
updateDept
(
Department department
);
}
(配置mapper接口,使用注解方式讲接口与sql绑定)
问题:
自定义
MyBatis
的配置规则;给容器中添加一个
ConfifigurationCustomizer
;
@org
.
springframework
.
context
.
annotation
.
Configuration
public class
MyBatisConfig
{
@Bean
public
ConfigurationCustomizer configurationCustomizer
(){
return new
ConfigurationCustomizer
(){
@Override
public
void
customize
(
Configuration configuration
) {
configuration
.
setMapUnderscoreToCamelCase
(
true
);
}
};
}
}
(作用,在地段映射时,初心数据库字段与配置字段对对应,通过该配置进行字段映射,统一使用驼峰命名)
使用
MapperScan
批量扫描所有的
Mapper
接口;
@MapperScan
(
value
=
"com.atguigu.springboot.mapper"
)
@SpringBootApplication
public class
SpringBoot06DataMybatisApplication
{
public static
void
main
(
String
[]
args
) {
SpringApplication
.
run
(
SpringBoot06DataMybatisApplication
.
class
,
args
);
}
}
(使用scan进行扫描,不用再类中配置@mapper进行映射)
5
)、配置文件版
mybatis
:
config‐location
:
classpath
:
mybatis/mybatis‐config.xml
指定全局配置文件的位置
mapper‐locations
:
classpath
:
mybatis/mapper/*.xml
指定
sql
映射文件的位置
方法和文件中的字段进行映射
如果不使用注解开发,在mapper.xml映射文件中,对应的配置id,对应mapper接口文件进行对应,注明传入参数类型,和返回结果类型
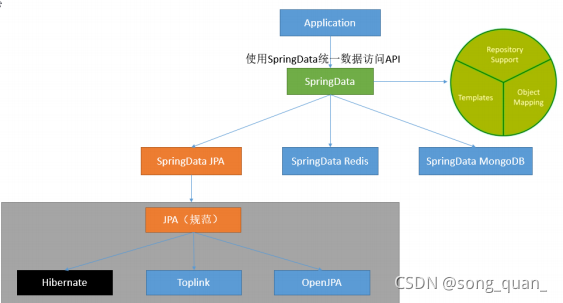
4
、整合
SpringData JPA
1
)、
SpringData
简介
2
)、整合
SpringData JPA
JPA:ORM
(
Object Relational Mapping
);
1
)、编写一个实体类(
bean
)和数据表进行映射,并且配置好映射关系;
//
使用
JPA
注解配置映射关系
@Entity
//
告诉
JPA
这是一个实体类(和数据表映射的类)
@Table
(
name
=
"tbl_user"
)
//@Table
来指定和哪个数据表对应
;
如果省略默认表名就是
user
;
public class
User
{
@Id
//
这是一个主键
@GeneratedValue
(
strategy
=
GenerationType
.
IDENTITY
)
//
自增主键
private
Integer
id
;
@Column
(
name
=
"last_name"
,
length
=
50
)
//
这是和数据表对应的一个列
private
String
lastName
;
@Column
//
省略默认列名就是属性名
private
String
email
;
2
)、编写一个
Dao
接口来操作实体类对应的数据表(
Repository
)
//
继承
JpaRepository
来完成对数据库的操作
public interface
UserRepository
extends
JpaRepository
<
User
,
Integer
>
{
}
3
)、基本的配置
JpaProperties
spring
:
jpa
:
hibernate
:
#
更新或者创建数据表结构
ddl‐auto
:
update
#
控制台显示
SQL
show‐sql
:
true
(启动后,后自动创建,表,并警醒相应操作,不需配置mapper)


 23万+
23万+

 被折叠的 条评论
为什么被折叠?
被折叠的 条评论
为什么被折叠?
 到【灌水乐园】发言


