


本文使用 Dify v0.11.1 版本,主要介绍 Dify 中获取应用(Chatflow)对话记录的过程和原理。
一.查看日志页面
1.查看所有会话记录
点击"日志与标注",可以查看指定筛选条件下的所有会话记录,如下所示:
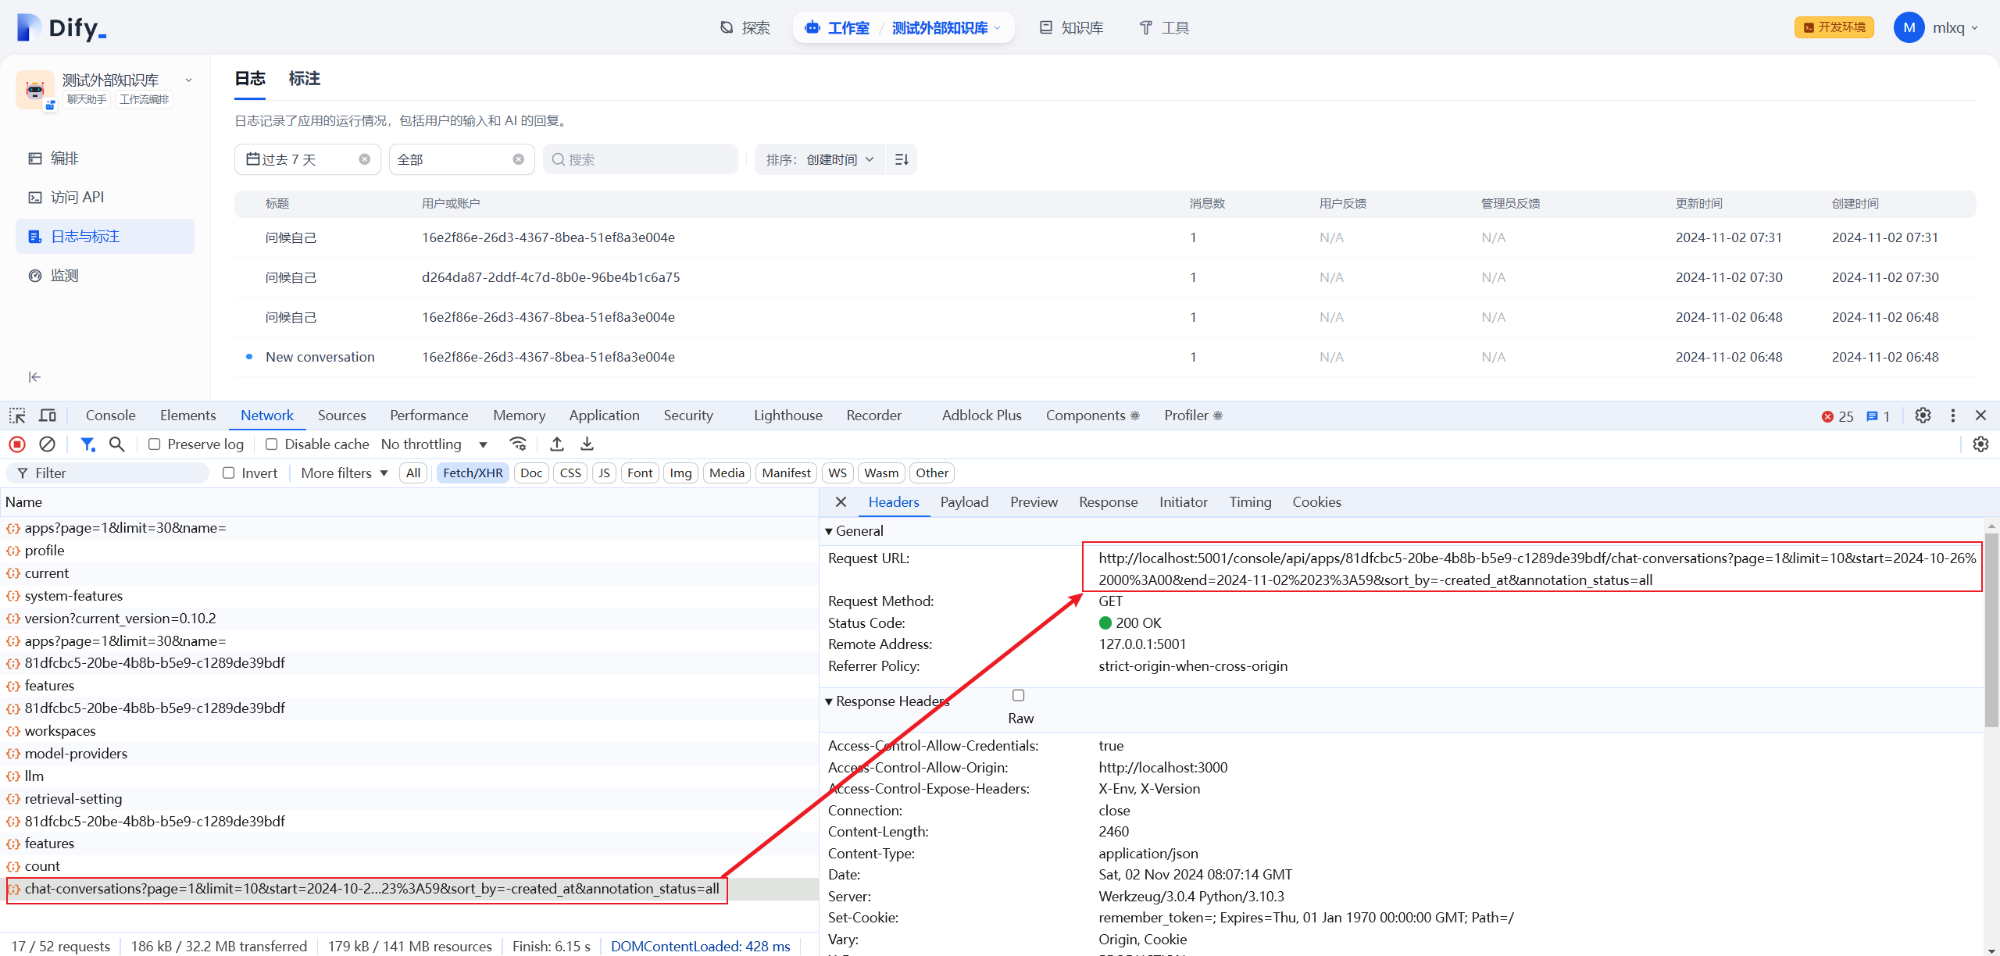
http://localhost:5001/console/api/apps/81dfcbc5-20be-4b8b-b5e9-c1289de39bdf/chat-conversations?page=1&limit=10&start=2024-10-26%2000%3A00&end=2024-11-02%2023%3A59&sort_by=-created_at&annotation_status=all
说明:上述记录中有一列为用户(没有登录用户)或账户(登录用户),简单理解用户是 end_users 数据表中的 session_id 字段(由于用户没有登录就使用 session 信息),而账号是 accounts 数据表中的 id 字段。
2.请求接口的 Payload
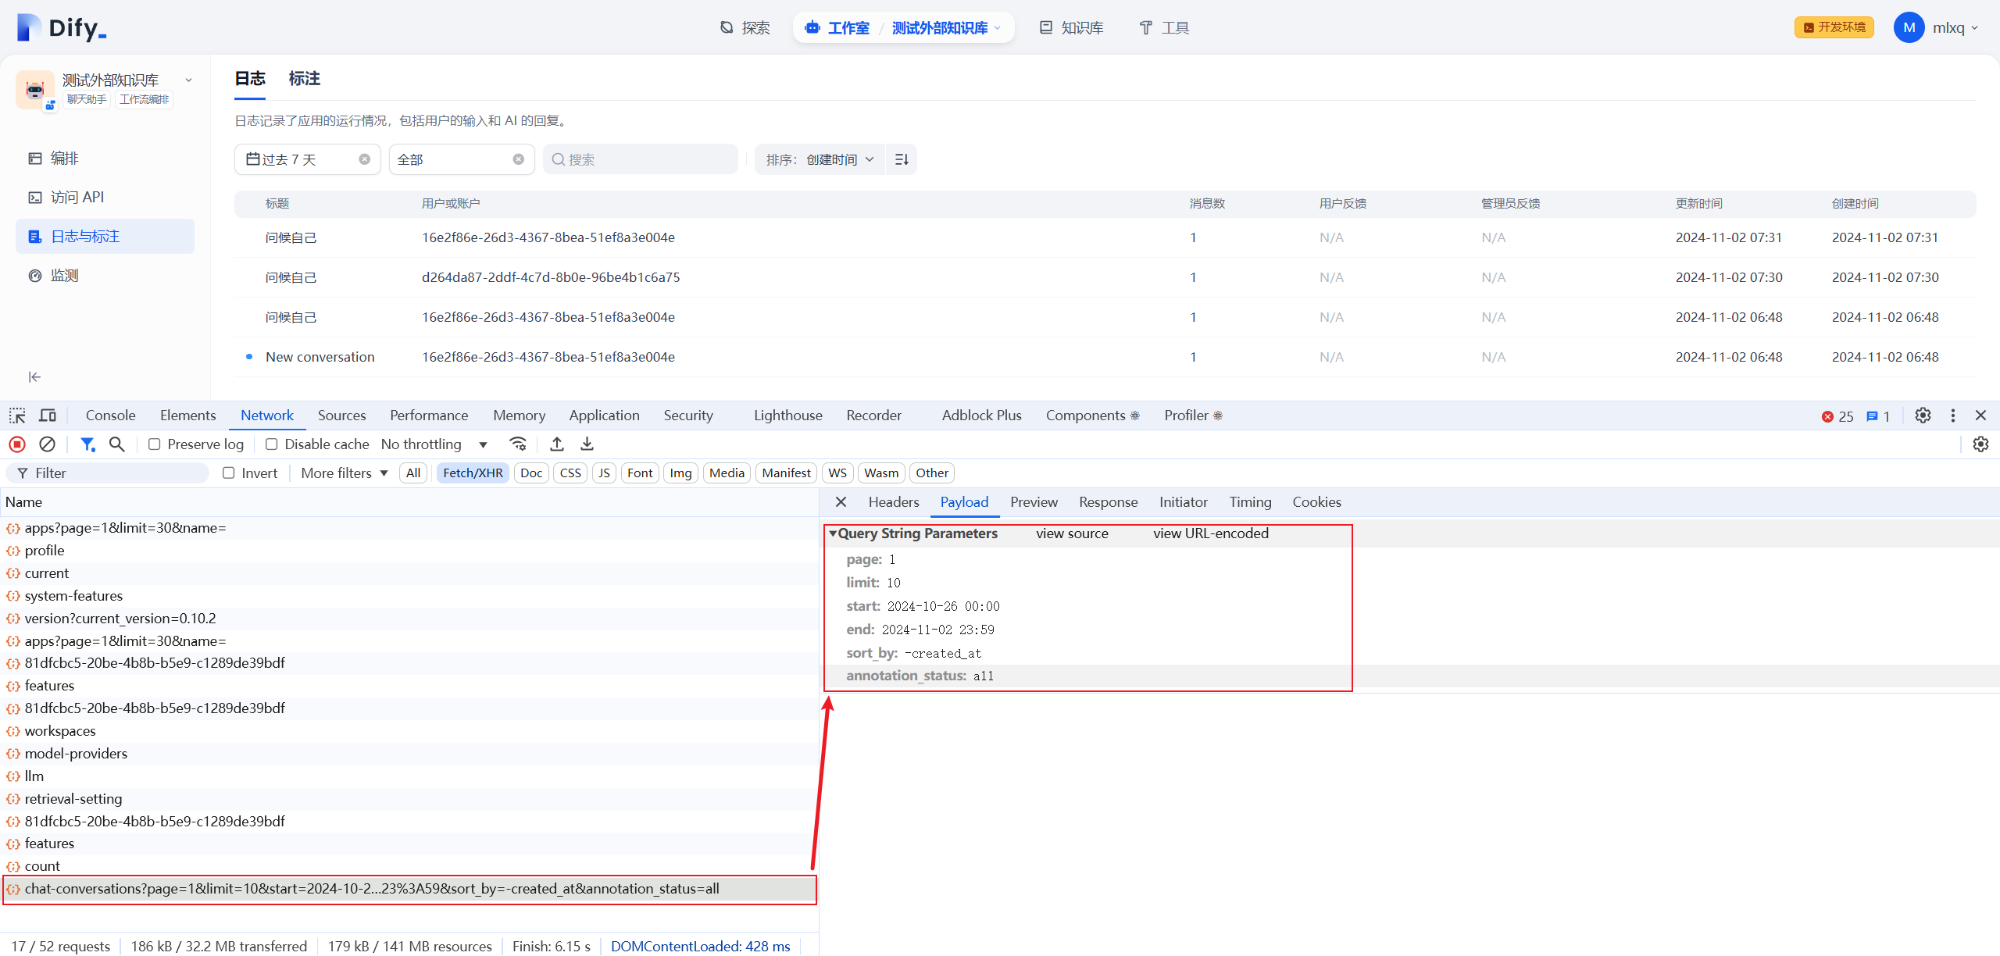
请求接口的 Payload 内容,如下所示:
page: 1
limit: 10
start: 2024-10-26 00:00
end: 2024-11-02 23:59
sort_by: -created_at
annotation_status: all
3.请求接口响应内容
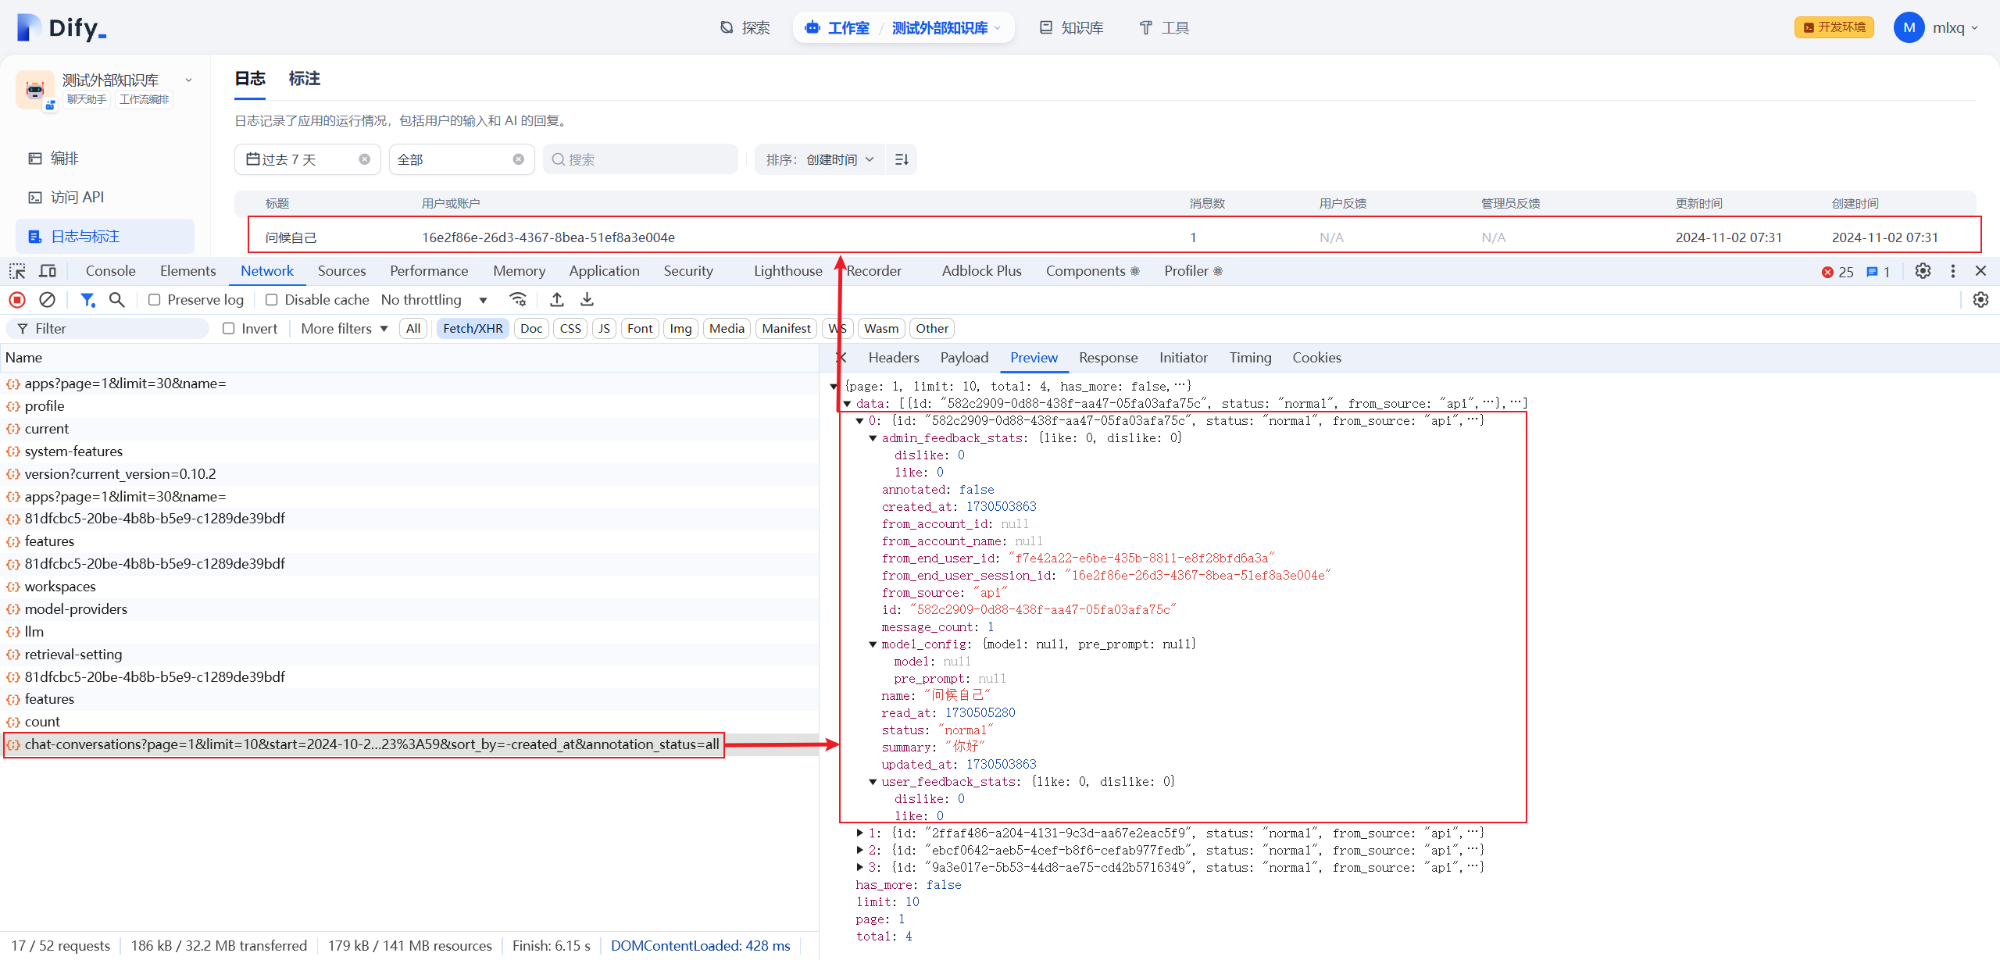
请求接口的具体响应内容,如下所示:
{
    "page": 1,
    "limit": 10,
    "total": 4,
    "has_more": false,
    "data": [
        {
            "id": "582c2909-0d88-438f-aa47-05fa03afa75c",
            "status": "normal",
            "from_source": "api",
            "from_end_user_id": "f7e42a22-e6be-435b-8811-e8f28bfd6a3a",
            "from_end_user_session_id": "16e2f86e-26d3-4367-8bea-51ef8a3e004e",
            "from_account_id": null,
            "from_account_name": null,
            "name": "问候自己",
            "summary": "你好",
            "read_at": 1730505280,
            "created_at": 1730503863,
            "updated_at": 1730503863,
            "annotated": false,
            "model_config": {
                "model": null,
                "pre_prompt": null
            },
            "message_count": 1,
            "user_feedback_stats": {
                "like": 0,
                "dislike": 0
            },
            "admin_feedback_stats": {
                "like": 0,
                "dislike": 0
            }
        },
        ......
        {
            "id": "9a3e017e-5b53-44d8-ae75-cd42b5716349",
            "status": "normal",
            "from_source": "api",
            "from_end_user_id": "f7e42a22-e6be-435b-8811-e8f28bfd6a3a",
            "from_end_user_session_id": "16e2f86e-26d3-4367-8bea-51ef8a3e004e",
            "from_account_id": null,
            "from_account_name": null,
            "name": "New conversation",
            "summary": "你好",
            "read_at": null,
            "created_at": 1730501284,
            "updated_at": 1730501284,
            "annotated": false,
            "model_config": {
                "model": null,
                "pre_prompt": null
            },
            "message_count": 1,
            "user_feedback_stats": {
                "like": 0,
                "dislike": 0
            },
            "admin_feedback_stats": {
                "like": 0,
                "dislike": 0
            }
        }
    ]
}
其中,from_end_user_id 表示 end_users 数据表中的 id 字段,from_end_user_session_id 表示 end_users 数据表中的 session_id 字段。
二.打开日志记录
1.获取指定会话记录
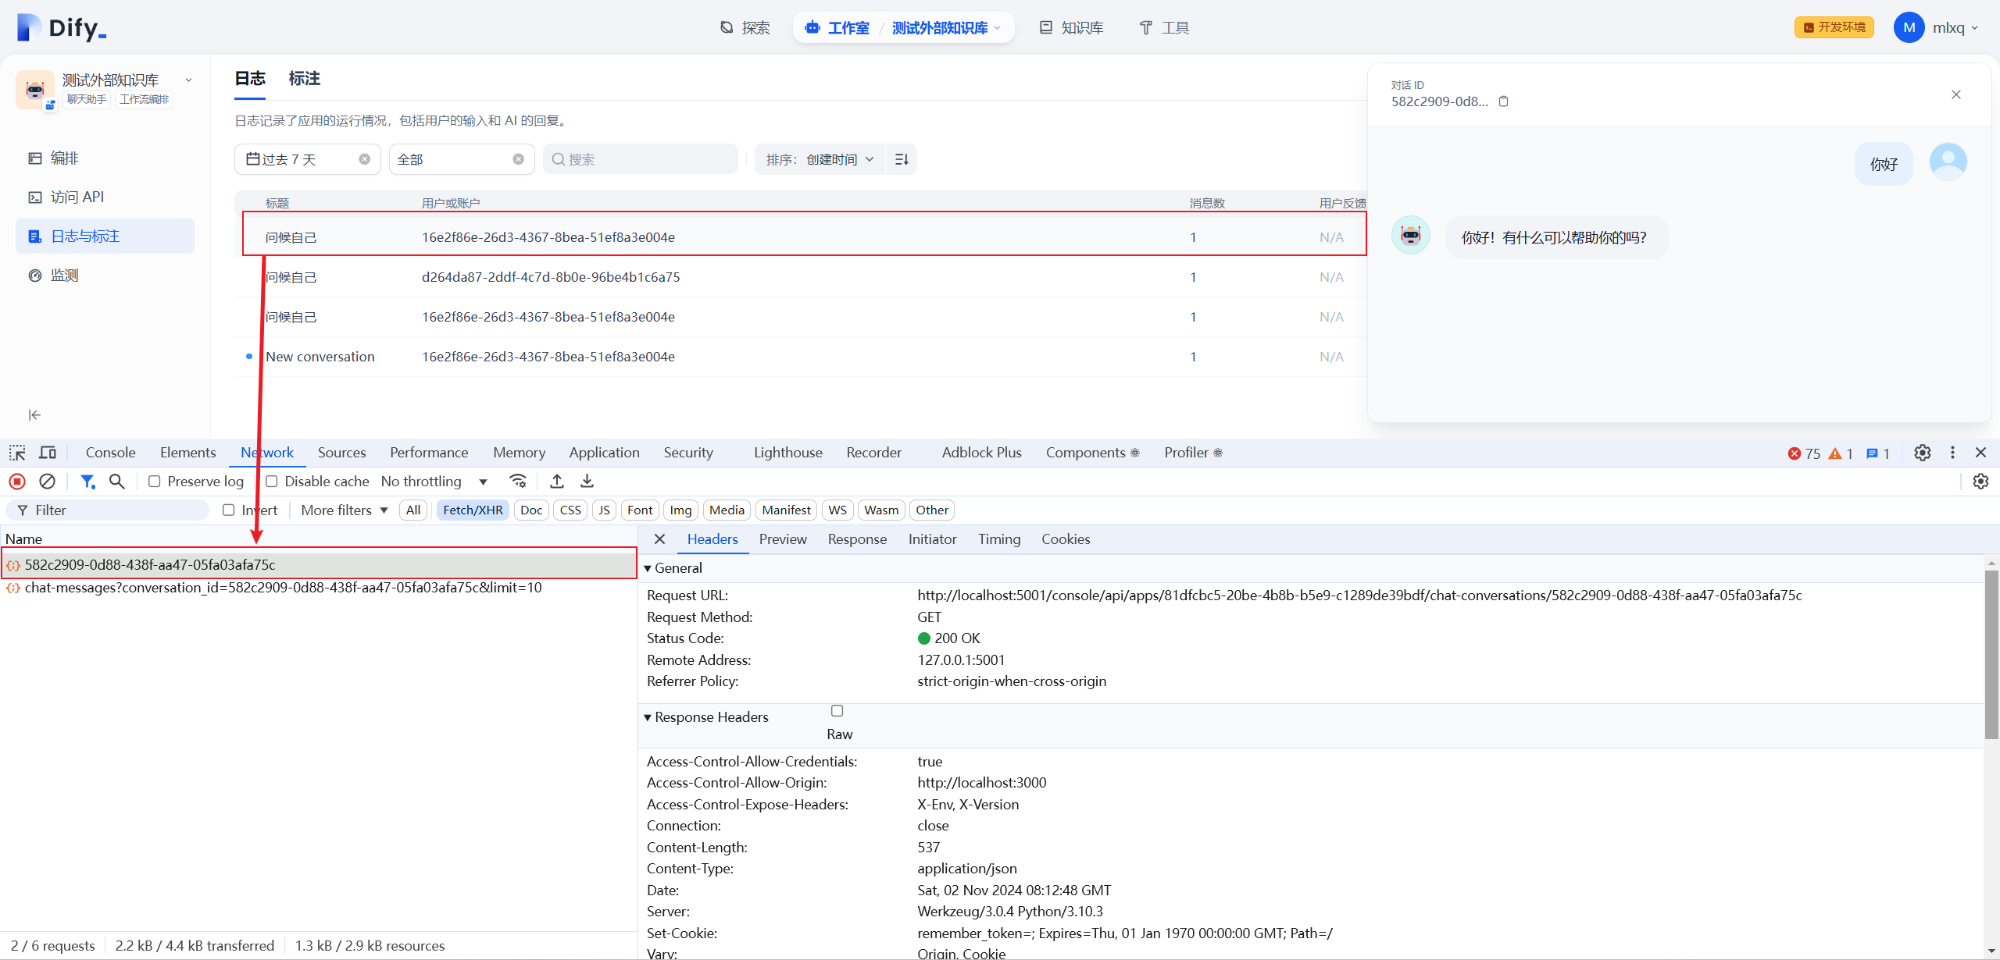
获取指定会话记录的请求链接,如下所示:
http://localhost:5001/console/api/apps/81dfcbc5-20be-4b8b-b5e9-c1289de39bdf/chat-conversations/582c2909-0d88-438f-aa47-05fa03afa75c
获取指定会话记录的响应内容,如下所示:
{
    "id": "582c2909-0d88-438f-aa47-05fa03afa75c",
    "status": "normal",
    "from_source": "api",
    "from_end_user_id": "f7e42a22-e6be-435b-8811-e8f28bfd6a3a",
    "from_account_id": null,
    "created_at": 1730503863,
    "updated_at": 1730503863,
    "annotated": false,
    "introduction": "",
    "model_config": {
        "opening_statement": "",
        "suggested_questions": [],
        "model": null,
        "user_input_form": null,
        "pre_prompt": null,
        "agent_mode": null
    },
    "message_count": 1,
    "user_feedback_stats": {
        "like": 0,
        "dislike": 0
    },
    "admin_feedback_stats": {
        "like": 0,
        "dislike": 0
    }
}
2.获取指定会话消息
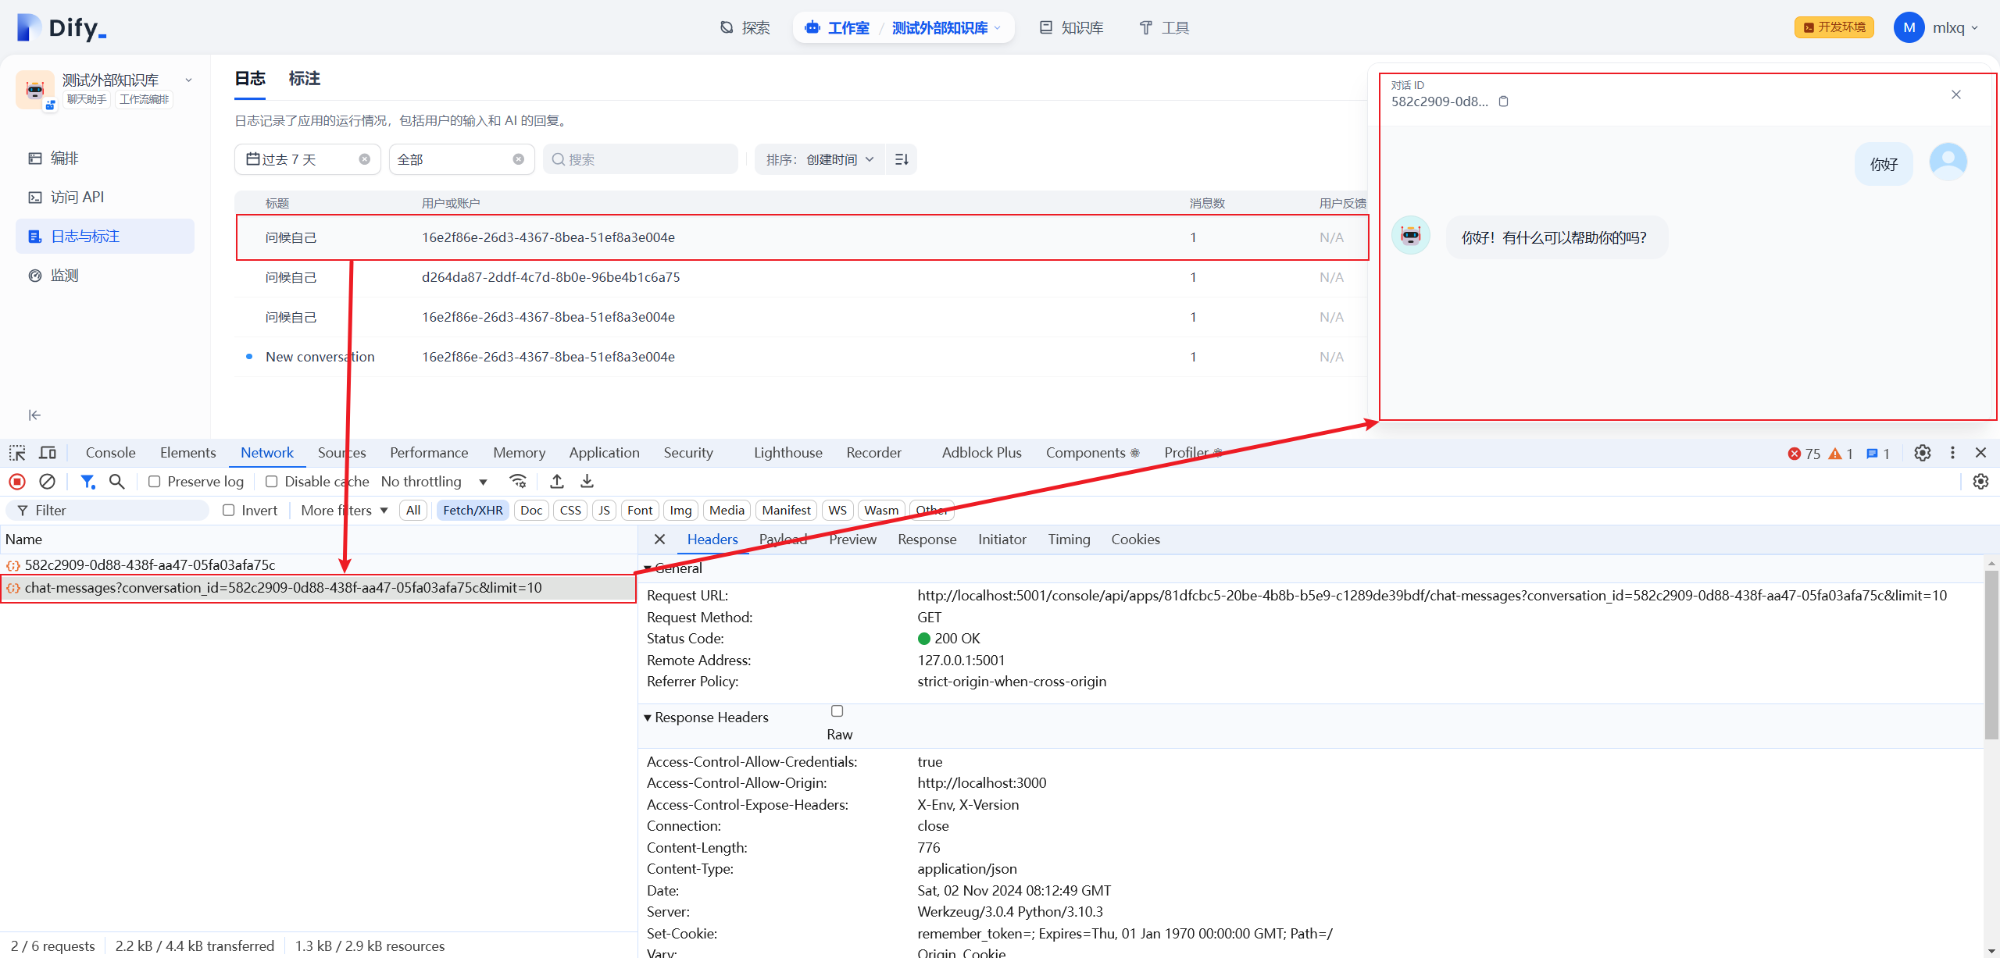
获取指定会话消息的请求链接,如下所示:
http://localhost:5001/console/api/apps/81dfcbc5-20be-4b8b-b5e9-c1289de39bdf/chat-messages?conversation_id=582c2909-0d88-438f-aa47-05fa03afa75c&limit=10
请求接口的 Payload 内容,如下所示:
conversation_id: 582c2909-0d88-438f-aa47-05fa03afa75c
limit: 10
获取指定会话消息的响应内容,如下所示:
{
    "limit": 10,
    "has_more": false,
    "data": [
        {
            "id": "96ed7598-4a43-4488-8f88-9c4bbcd5f815",
            "conversation_id": "582c2909-0d88-438f-aa47-05fa03afa75c",
            "inputs": {},
            "query": "你好",
            "message": "",
            "message_tokens": 30,
            "answer": "你好!有什么可以帮助你的吗?",
            "answer_tokens": 7,
            "provider_response_latency": 0.43903179999324493,
            "from_source": "api",
            "from_end_user_id": "f7e42a22-e6be-435b-8811-e8f28bfd6a3a",
            "from_account_id": null,
            "feedbacks": [],
            "workflow_run_id": "7ef946ee-f3d5-495d-a650-f57eb27a68eb",
            "annotation": null,
            "annotation_hit_history": null,
            "created_at": 1730503863,
            "agent_thoughts": [],
            "message_files": [],
            "metadata": {},
            "status": "normal",
            "error": null,
            "parent_message_id": null
        }
    ]
}
三.接口调用过程
1.获取所有会话记录

实际调用接口,如下所示:
http://localhost:5001/console/api/apps/81dfcbc5-20be-4b8b-b5e9-c1289de39bdf/chat-conversations
源码位置:dify\api\controllers\console\app\conversation.py
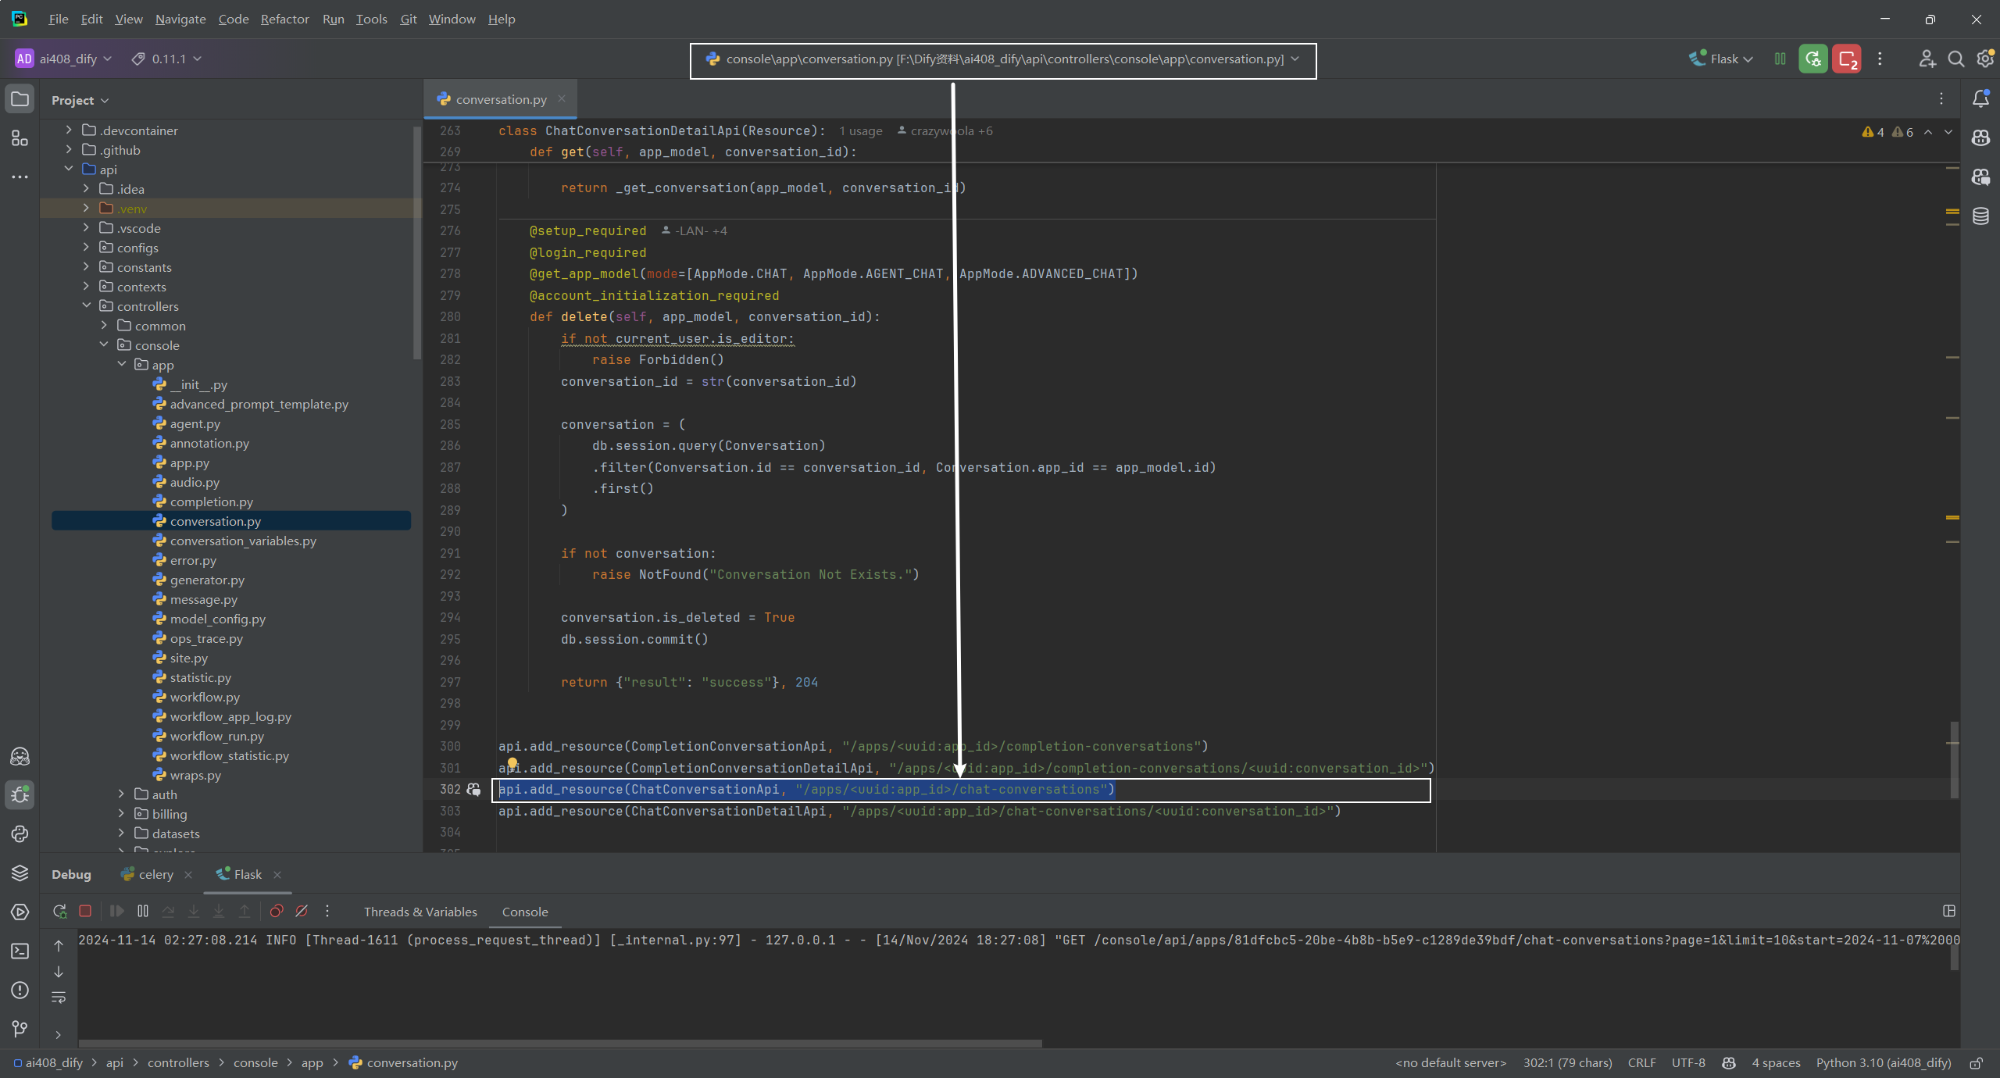
由于 ChatConversationApi(Resource)中的 get(self, app_model)方法较长,所以该方法的源码分析总结到另外一方文章中,详细参考文献[1]。
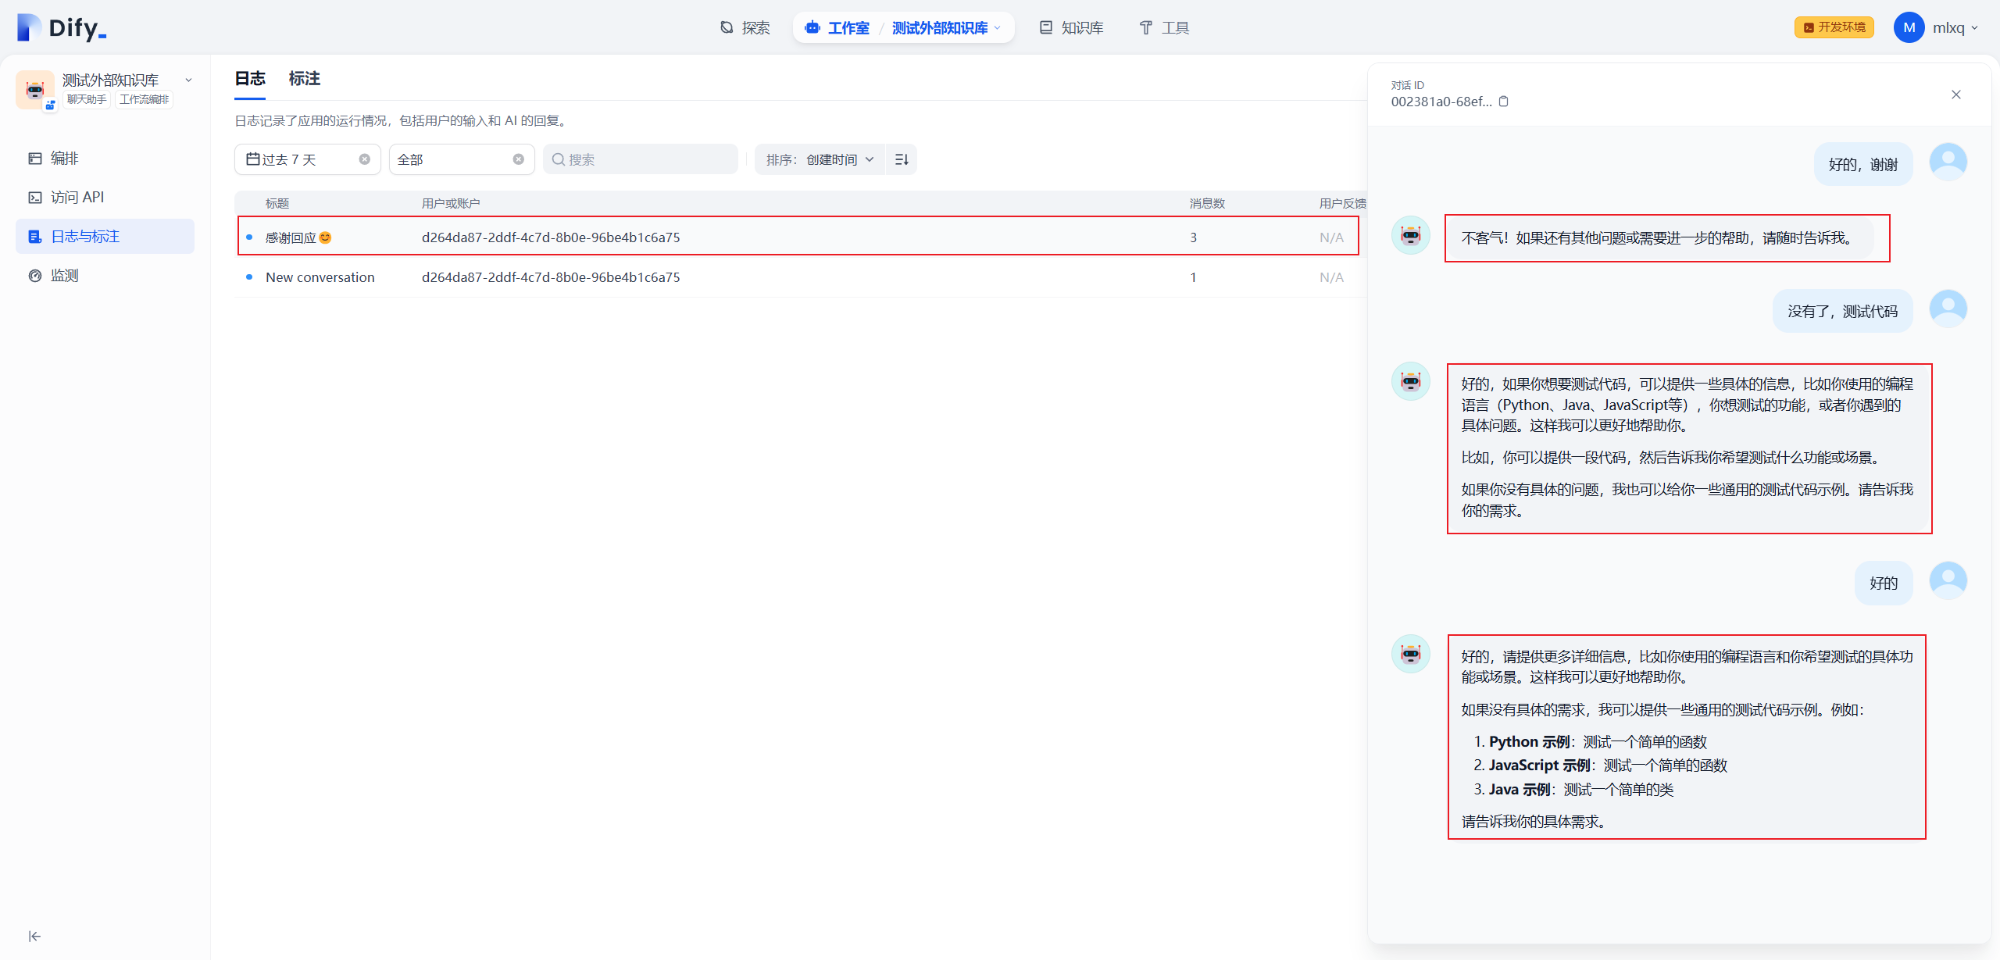
2.获取指定会话记录
实际调用接口,如下所示:
http://localhost:5001/console/api/apps/81dfcbc5-20be-4b8b-b5e9-c1289de39bdf/chat-conversations/002381a0-68ef-4bda-b9f9-cc250ba193bd
源码位置:dify\api\controllers\console\app\conversation.py
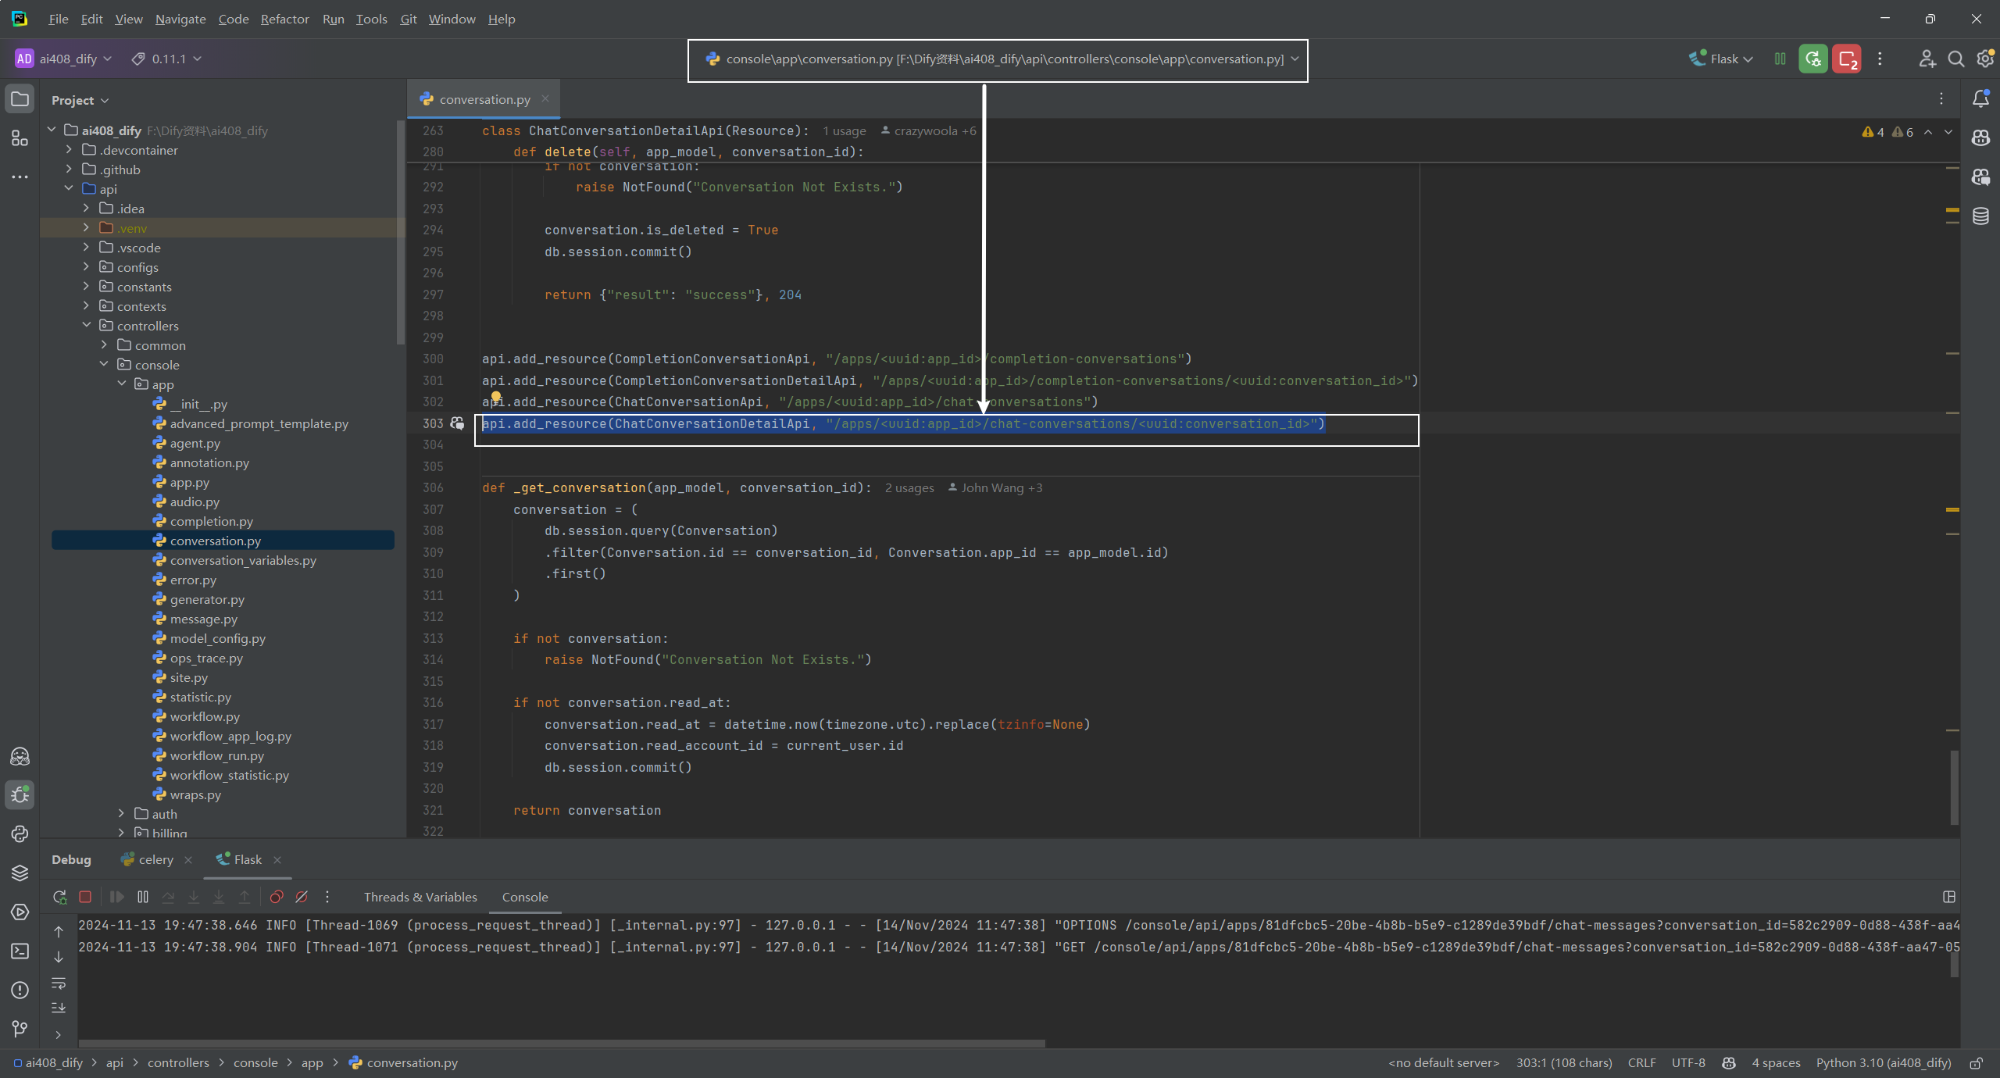
ChatConversationDetailApi 类的 get()方法核心函数为_get_conversation(app_model, conversation_id),如下所示:
class ChatConversationDetailApi(Resource):
    @setup_required
    @login_required
    @account_initialization_required
    @get_app_model(mode=[AppMode.CHAT, AppMode.AGENT_CHAT, AppMode.ADVANCED_CHAT])
    @marshal_with(conversation_detail_fields)
    def get(self, app_model, conversation_id):
        if not current_user.is_editor:
            raise Forbidden()
        conversation_id = str(conversation_id)

        return _get_conversation(app_model, conversation_id)
_get_conversation(app_model, conversation_id)根据 app_id 和 conversation_id 筛选条件,从 conversations 数据表中获取一条记录,如下所示:
def _get_conversation(app_model, conversation_id):
    conversation = (
        db.session.query(Conversation)
        .filter(Conversation.id == conversation_id, Conversation.app_id == app_model.id)
        .first()
    )

    if not conversation:
        raise NotFound("Conversation Not Exists.")

    if not conversation.read_at:
        conversation.read_at = datetime.now(timezone.utc).replace(tzinfo=None)
        conversation.read_account_id = current_user.id
        db.session.commit()

    return conversation
3.获取指定会话消息
实际调用接口,如下所示:
http://localhost:5001/console/api/apps/81dfcbc5-20be-4b8b-b5e9-c1289de39bdf/chat-messages?conversation_id=002381a0-68ef-4bda-b9f9-cc250ba193bd&limit=10
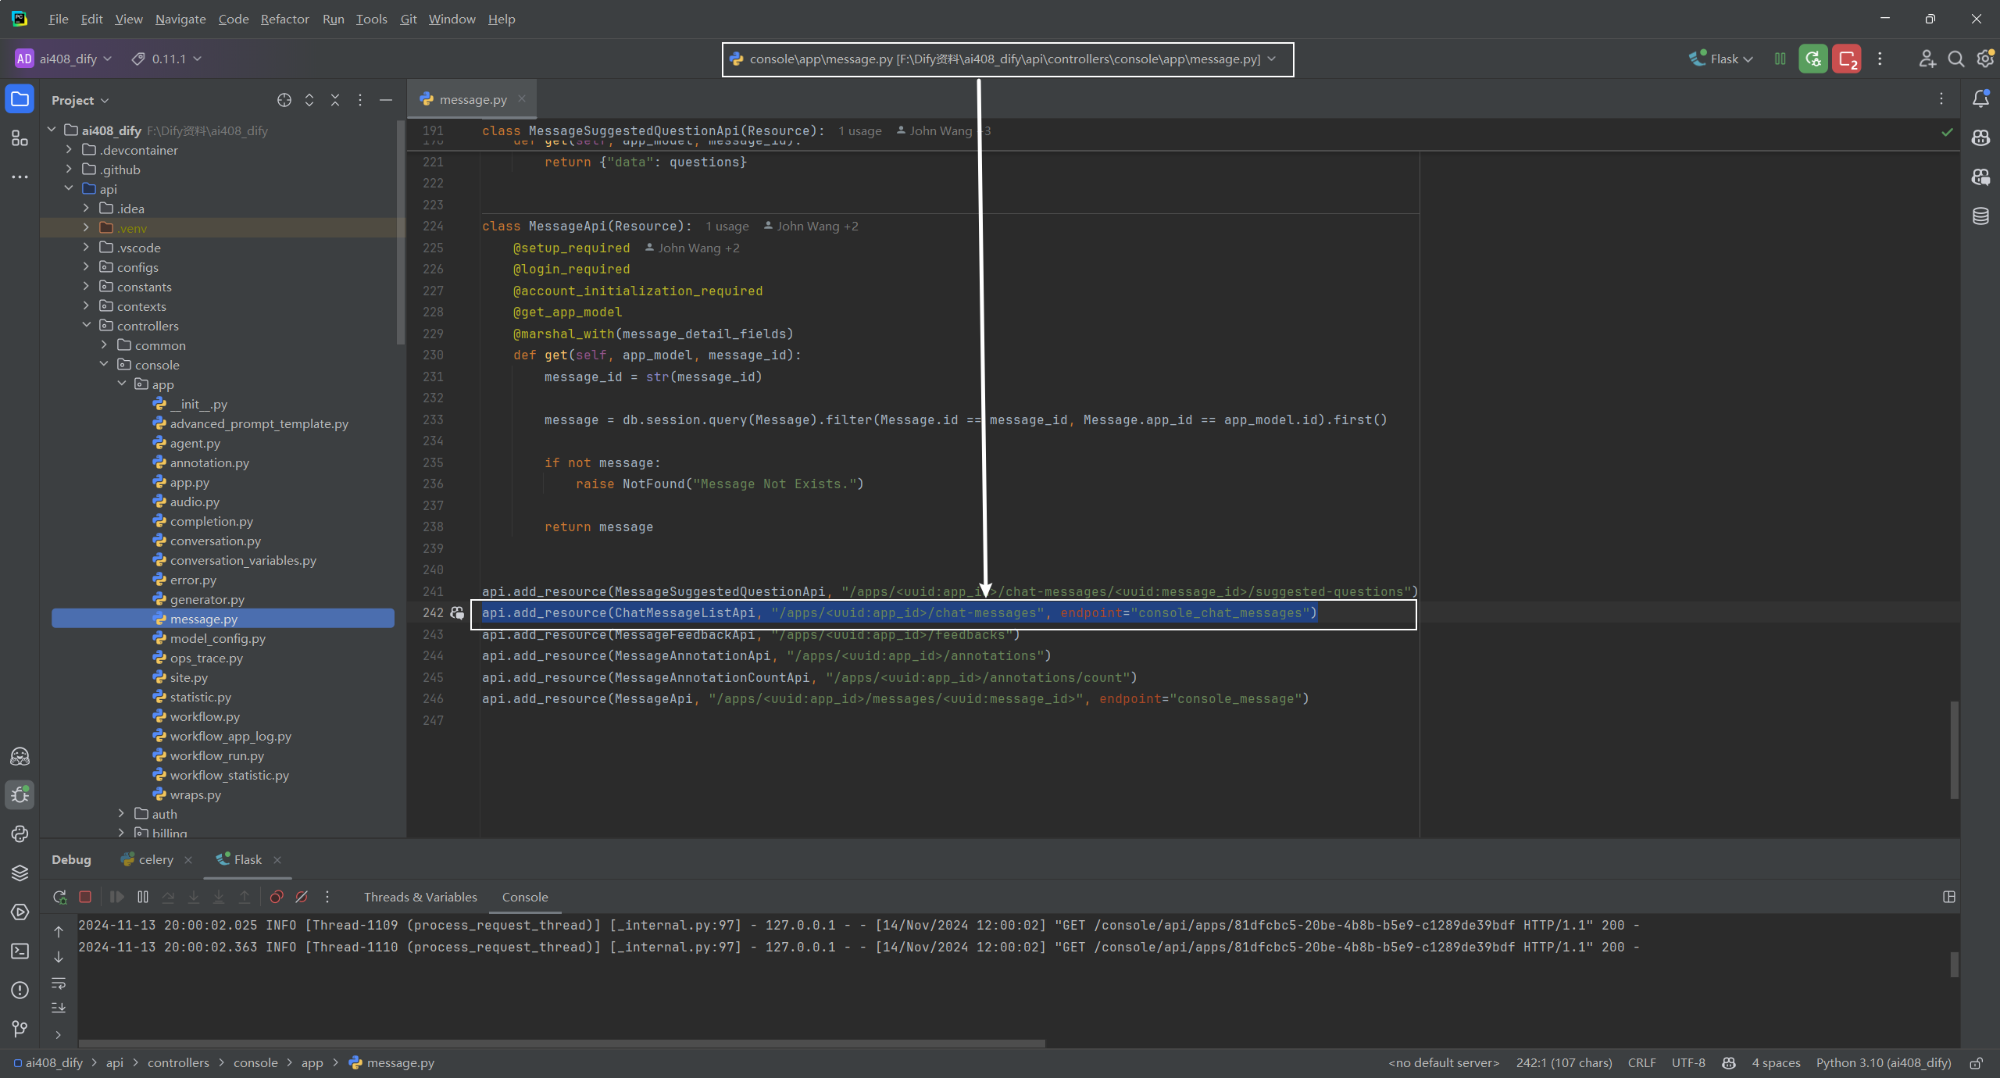
源码位置:dify\api\controllers\console\app\message.py
(1)get() 和解析请求参数
- 该方法是
ChatMessageListApi类中的一个 HTTP GET 请求处理函数。 - 使用
reqparse.RequestParser创建一个参数解析器。 - 添加三个参数:
conversation_id(必需,UUID 类型),first_id(可选,UUID 类型),limit(可选,整数类型,默认值为 20)。 - 调用
parse_args方法解析请求参数并存储在args变量中。
(2)查询会话
- 使用 SQLAlchemy 查询数据库中的
Conversation表,查找与conversation_id和app_model.id匹配的会话。 - 如果未找到会话,抛出
NotFound异常。
(3)查询消息
-
如果提供了
first_id参数:- 查询
Message表,查找与conversation_id和first_id匹配的消息。 - 如果未找到消息,抛出
NotFound异常。 - 查询
Message表,查找在first_message之前创建的消息,按创建时间降序排列,限制返回条数为limit。
- 查询
-
如果未提供
first_id参数:- 查询
Message表,查找与conversation_id匹配的消息,按创建时间降序排列,限制返回条数为limit。
- 查询
其中,first_id 默认 null,本质就是一个 message_id。由于一个会话是包含多条消息记录的,如果设置 first_id 参数,然后返回一个会话在该 message_id 之前(不包括该 message_id)创建的消息。first_id 用途是 has_more=True 时,需要分页返回的场景。
(4)检查是否有更多消息
-
初始化
has_more为False。 -
如果返回的消息数量等于
limit:- 获取当前页的第一条消息。
- 查询
Message表,查找在current_page_first_message之前创建的消息数量。 - 如果剩余消息数量大于 0,设置
has_more为True。
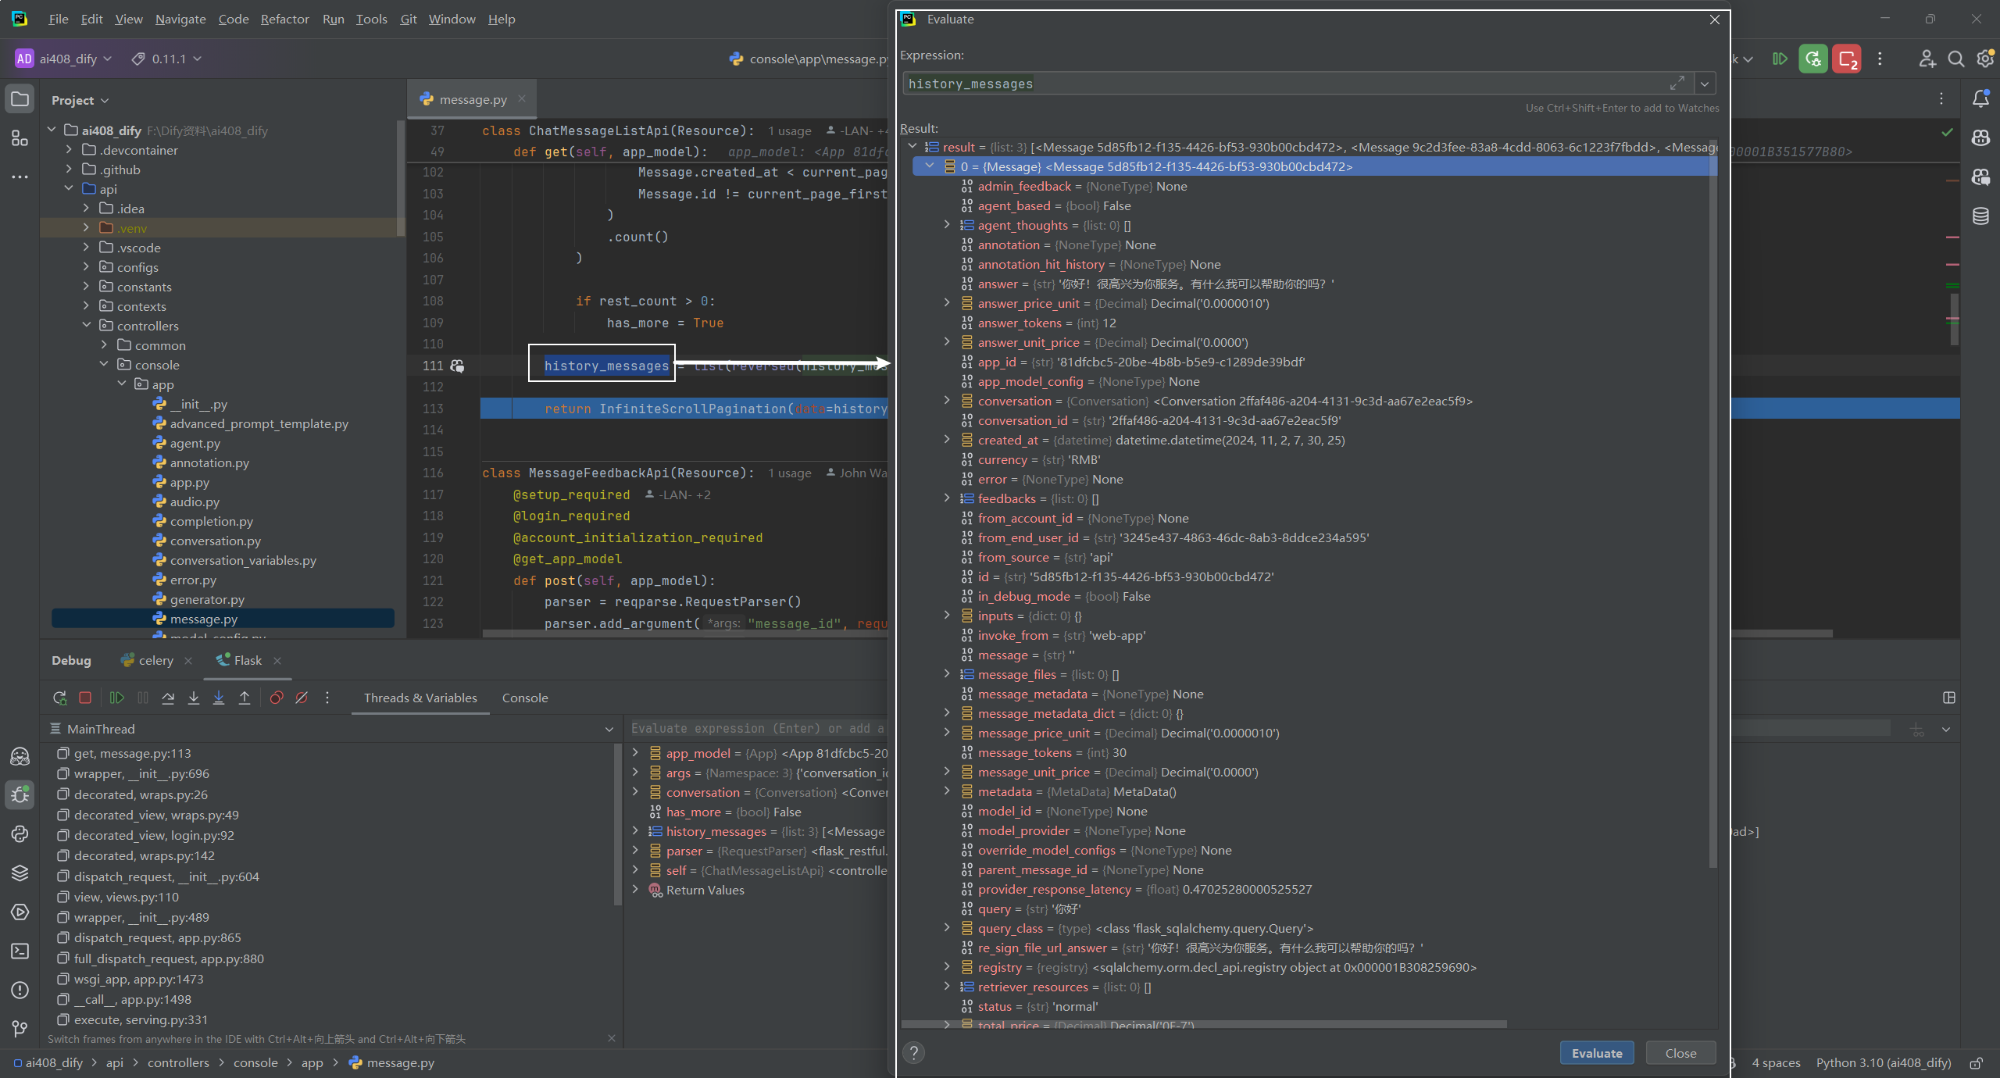
(5)返回结果
- 将
history_messages列表反转,使其按创建时间升序排列。 - 返回
InfiniteScrollPagination对象,包含消息数据、限制条数和是否有更多消息的标志。
四.对话记录相关知识点
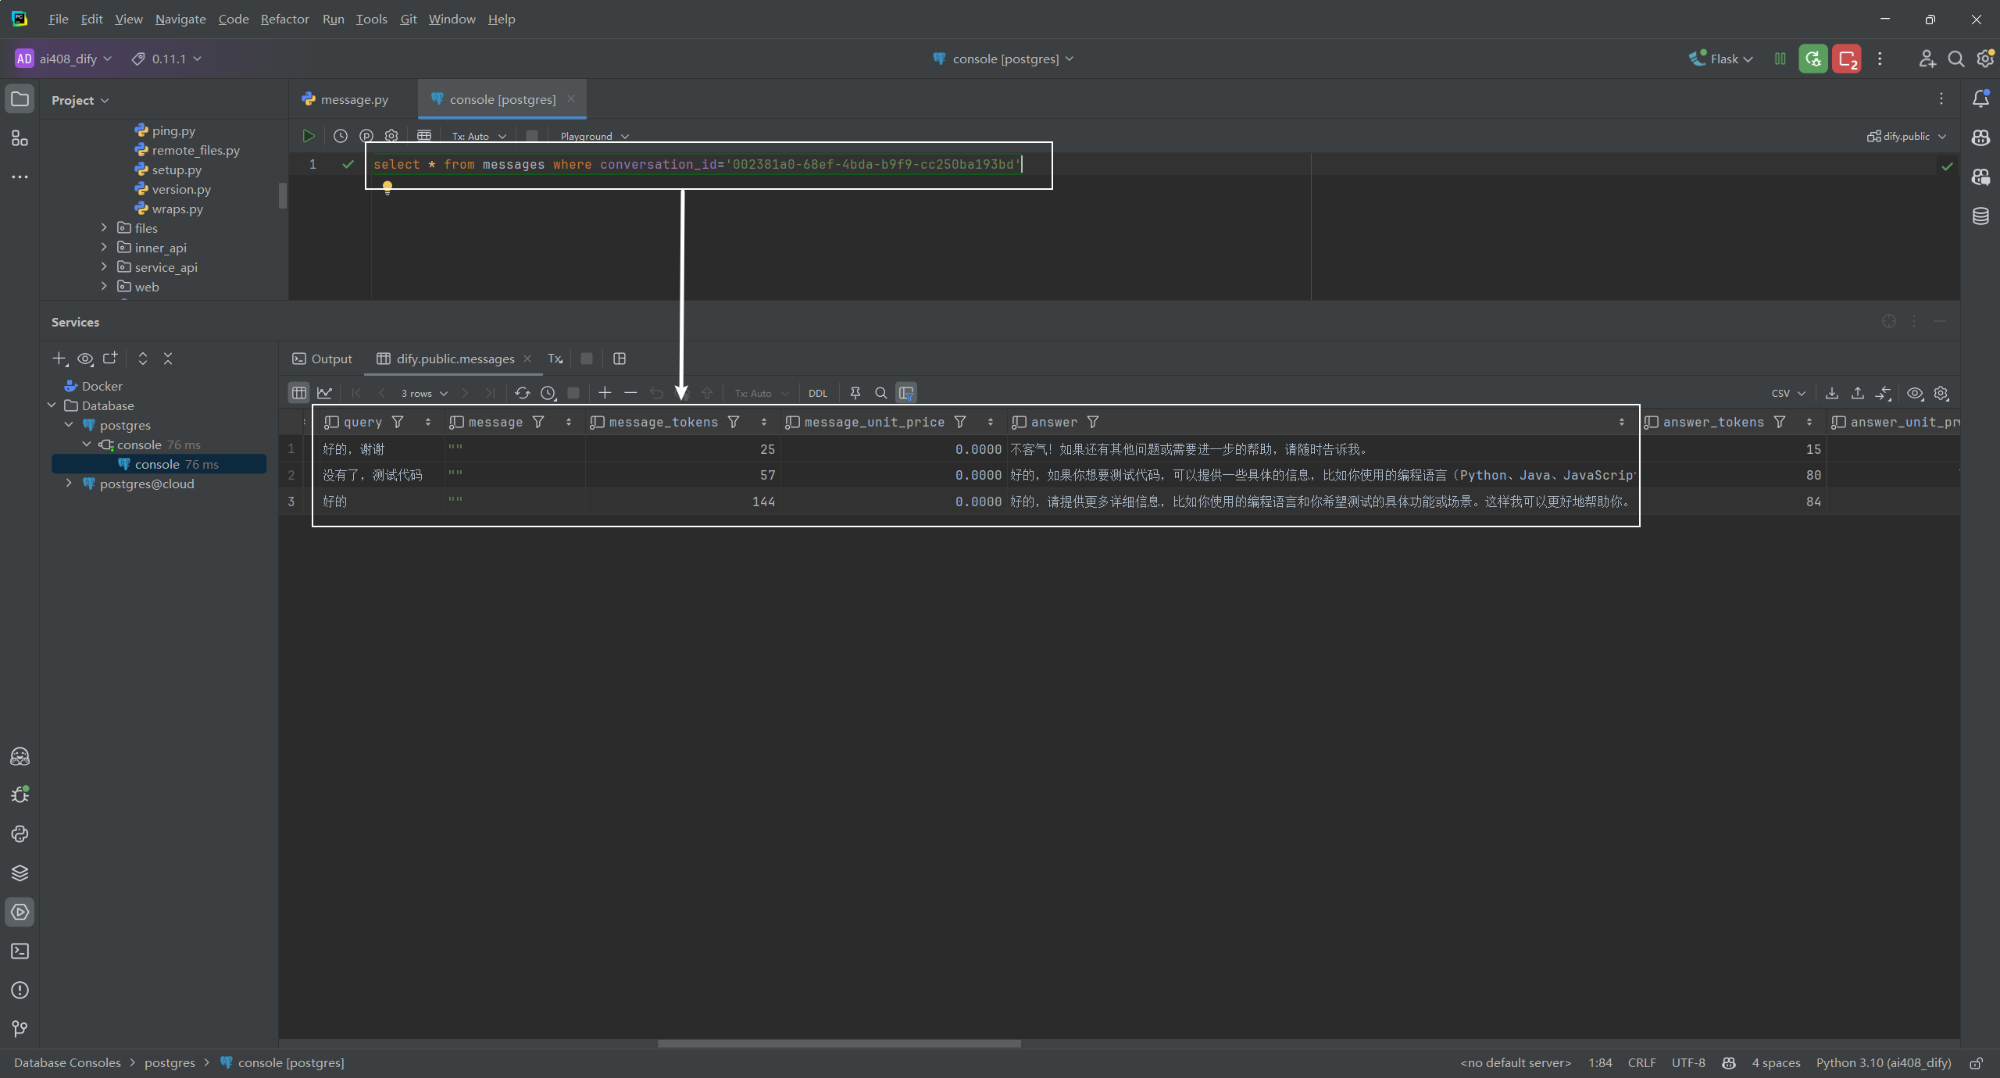
1.通过会话 ID 查询消息记录
select * from messages where conversation_id='002381a0-68ef-4bda-b9f9-cc250ba193bd'
2.@marshal_with 注解
@marshal_with 注解用于将返回的数据格式化为指定的字段结构。在这个例子中,它将返回的数据格式化为 message_infinite_scroll_pagination_fields 定义的结构。
message_infinite_scroll_pagination_fields = {
    "limit": fields.Integer,
    "has_more": fields.Boolean,
    "data": fields.List(fields.Nested(message_detail_fields)),
}
3.InfiniteScrollPagination 辅助类
InfiniteScrollPagination 是一个辅助类,用于处理大数据集的分页。它允许在用户滚动时分块加载数据,而不是一次性加载所有数据。这样可以通过减少初始加载时间和内存使用来提高性能和用户体验。
class InfiniteScrollPagination:
    def __init__(self, data, limit, has_more):
        self.data = data
        self.limit = limit
        self.has_more = has_more
4.分页请求使用示例
针对分页请求使用场景(has_more=True),要进行下一次请求,需要在请求参数中传递当前页最后一条消息的 ID 作为 first_id,这样服务器就会从这条消息之后的记录开始返回。使用代码进行下一次请求,如下所示:
import requests

# 假设这些是从上一次请求中得到的
conversation_id = "your_conversation_id"  # API端点
last_message_id = "last_message_id_from_previous_response"  # 上一次请求返回的最后一条消息的ID
limit = 20

# 构建请求参数
params = {
    "conversation_id": conversation_id,
    "first_id": last_message_id,
    "limit": limit
}

# 发送请求
response = requests.get("your_api_endpoint", params=params)

# 处理响应
if response.status_code == 200:
    data = response.json()
else:
    print("请求失败:", response.status_code)
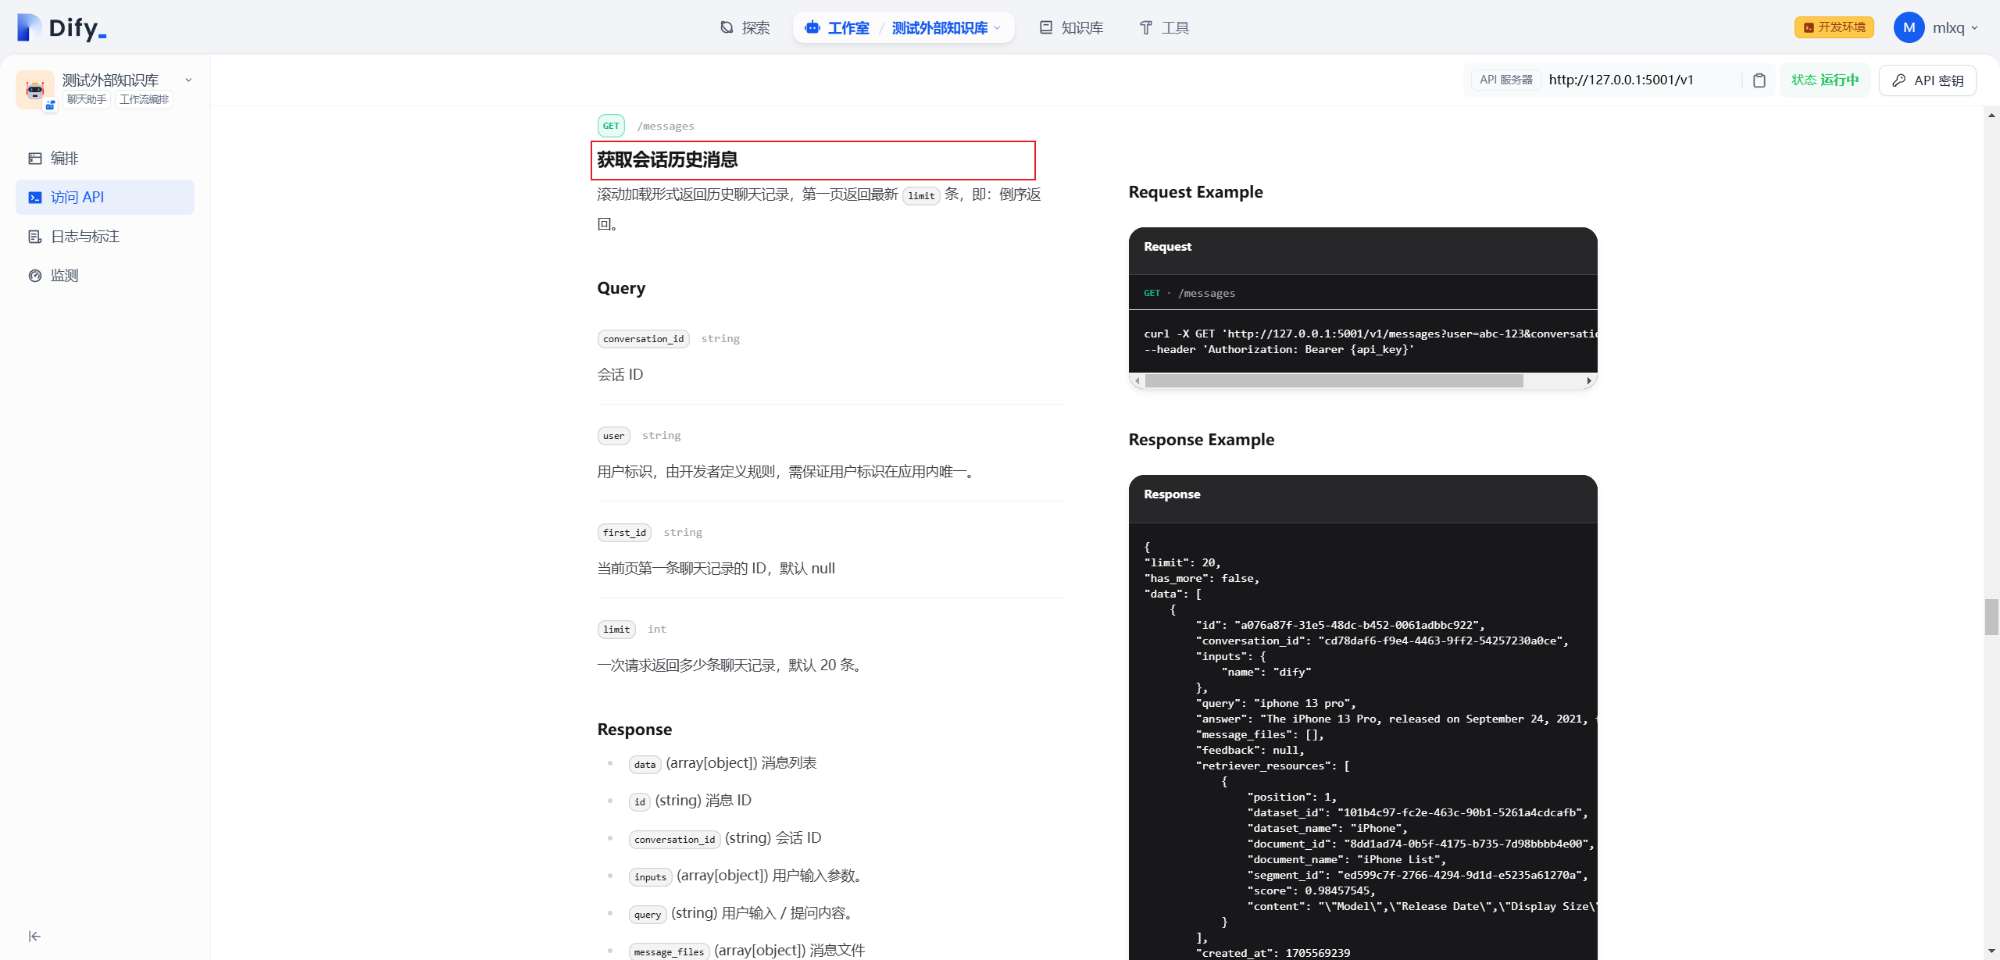
5.Dify 获取会话历史消息接口
GET /messages 获取会话历史消息,滚动加载形式返回历史聊天记录,第一页返回最新 limit 条,即倒序返回。
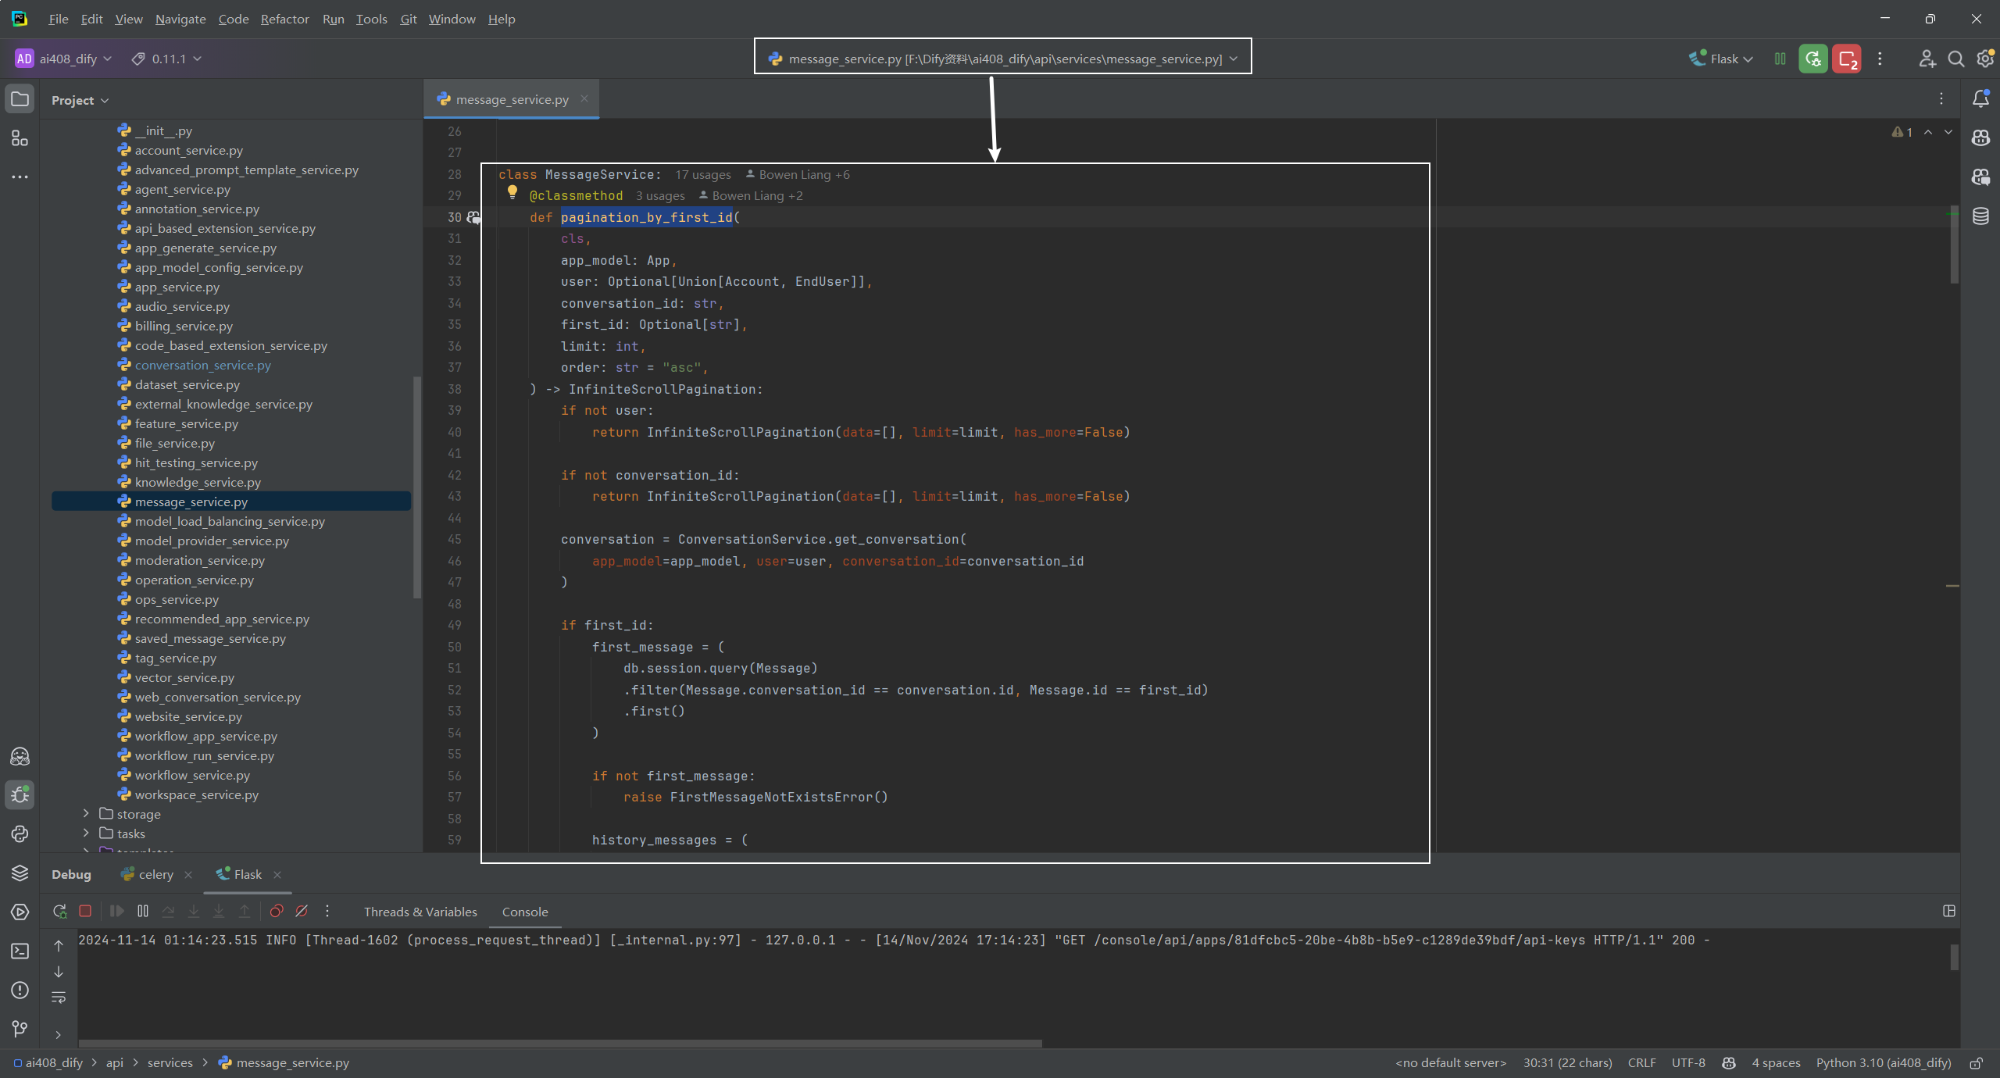
源码位置:dify\api\controllers\service_api\app\message.py
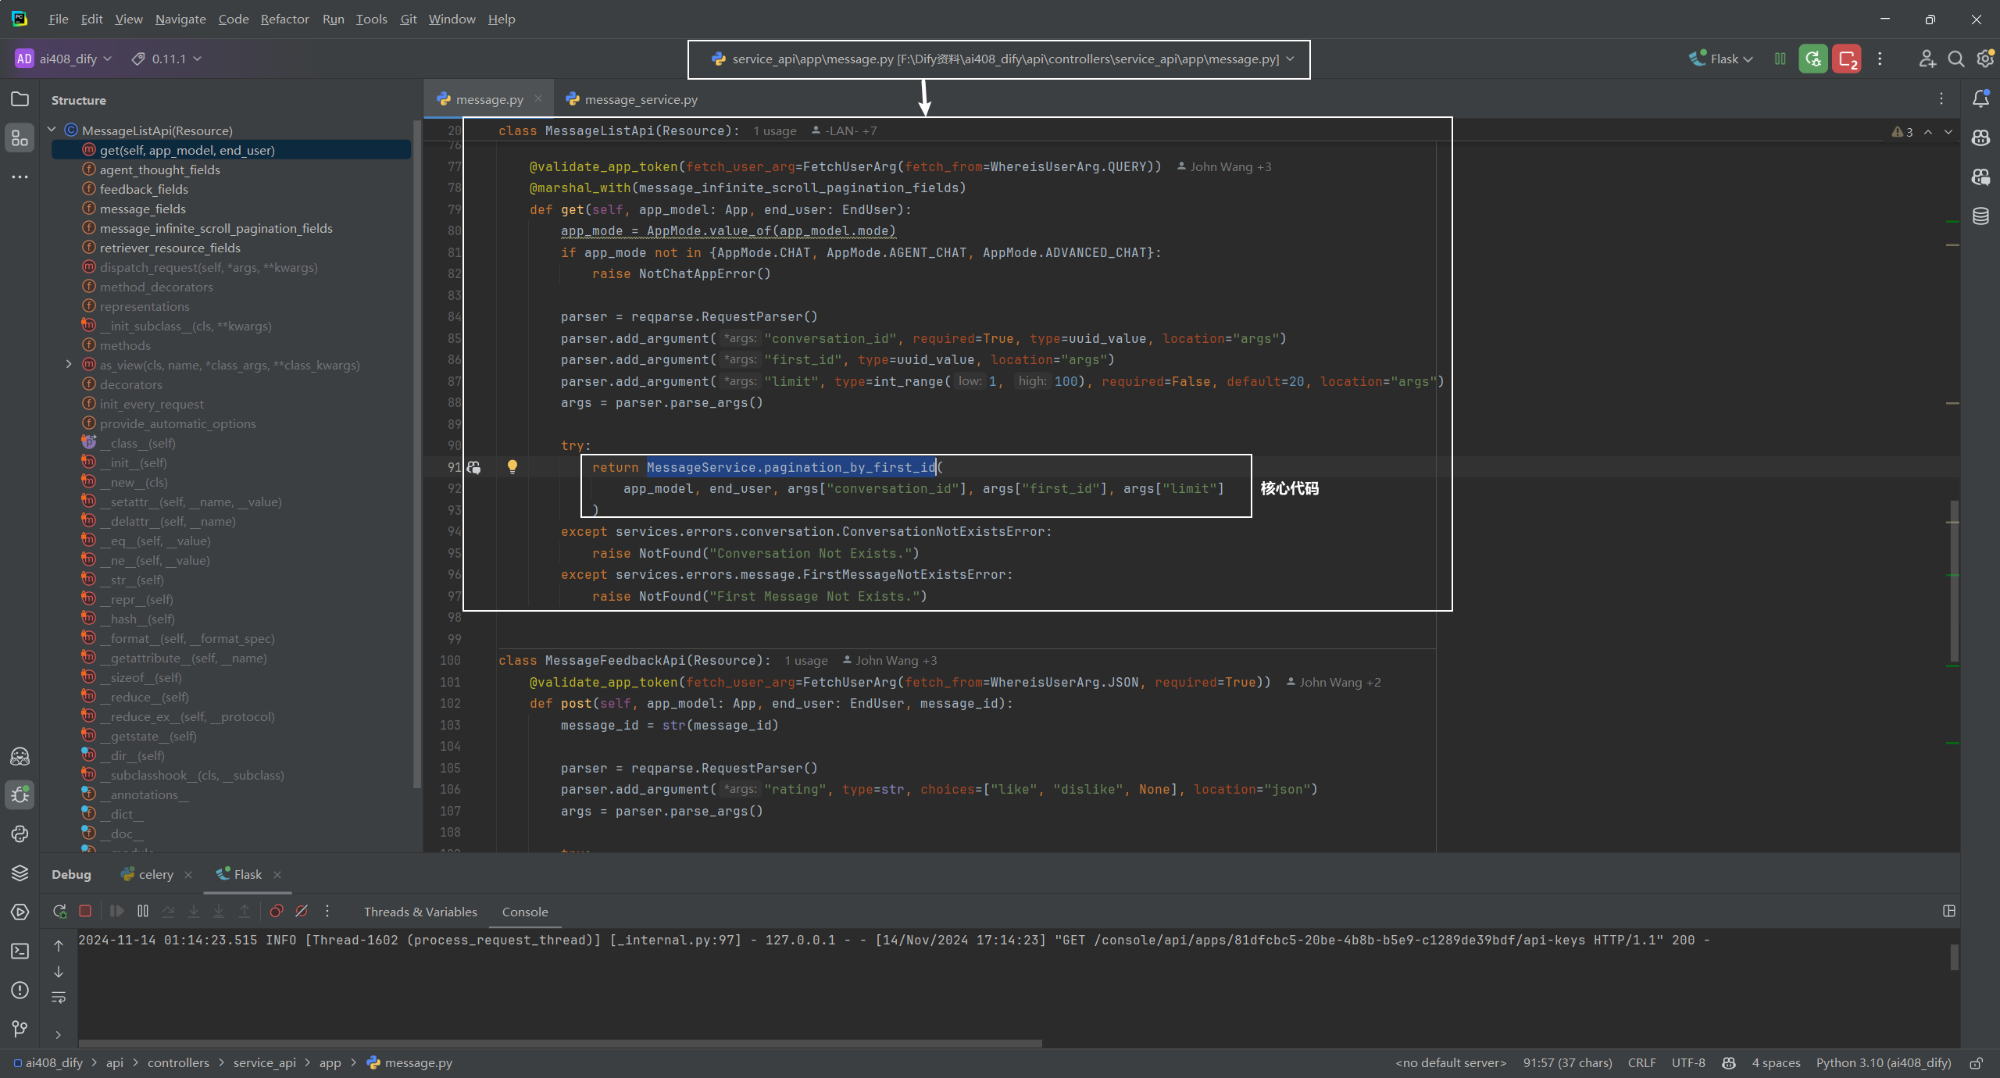
MessageService.pagination_by_first_id(app_model, end_user, args["conversation_id"], args["first_id"], args["limit"]) 核心代码实现逻辑和本文第三章第 3 节基本完全一样,不再赘述。
再阐述下该接口倒序返回的含义,假如每页 20 条记录,共有 10 页。该会话共有 200 条消息记录(创建时间从小到大),那么会首先返回第 10 页消息记录,并且消息记录的创建时间从小到大。
参考文献
[1] Dify 中获取所有会话记录方法:https://z0yrmerhgi8.feishu.cn/wiki/NmZBwBSWnimI4skR1Ryc3DwhnBe


 368
368

 被折叠的 条评论
为什么被折叠?
被折叠的 条评论
为什么被折叠?
 到【灌水乐园】发言


