


注:本文最初在oschina上发布,但最近发现被关了,原因不明。现转到csdn.
一、OpenCV中DNN模块
OpenCV自3.3版本开始,加入了对深度学习网络的支持,即DNN模块,它支持主流的深度学习框架生成与到处模型的加载。
OpenCV中的深度学习模块(DNN)只提供了推理功能,不涉及模型的训练,支持多种深度学习框架,比如TensorFlow,Caffe,Torch和Darknet。
轻量型。DNN模块只实现了推理功能,代码量及编译运行开销远小于其他深度学习模型框架。
使用方便。DNN模块提供了内建的CPU和GPU加速,无需依赖第三方库,若项目中之前使用了OpenCV,那么通过DNN模块可以很方便的为原项目添加深度学习的能力。
通用性。DNN模块支持多种网络模型格式,用户无需额外的进行网络模型的转换就可以直接使用,支持的网络结构涵盖了常用的目标分类,目标检测和图像分割的类别。
函数介绍
1、dnn.blobFromImage
根据输入图像,创建维度N(图片的个数),通道数C,高H和宽W次序的blobs。
2、dnn.NMSBoxes
根据给定的检测boxes和对应的scores进行NMS(非极大值抑制)处理。
3、dnn.readNet
加载深度学习网络及其模型参数
model: 训练的权重参数的模型二值文件,支持的格式有:.caffemodel(Caffe)、.pb(TensorFlow)、.t7 或 .net(Torch)、 .weights(Darknet)、.bin(DLDT).
config: 包含网络配置的文本文件,支持的格式有:.prototxt (Caffe)、.pbtxt(TensorFlow)、.cfg (Darknet)、.xml (DLDT).
4、加载函数
1)、加载采用Caffe的配置网络和训练的权重参数
readNetFromCaffe(prototxt, caffeModel=None)
2)、加载采用Darknet的配置网络和训练的权重参数
readNetFromDarknet(cfgFile, darknetModel=None)
3)、加载采用Tensorflow 的配置网络和训练的权重参数
readNetFromTensorflow(model, config=None)
4)、加载采用 Torch 的配置网络和训练的权重参数
readNetFromTorch(model, isBinary=None)
5)、加载 .onnx 模型网络配置参数和权重参数
readNetFromONNX(onnxFile)
二、手部关键点检测
手部关键点如下图所示:
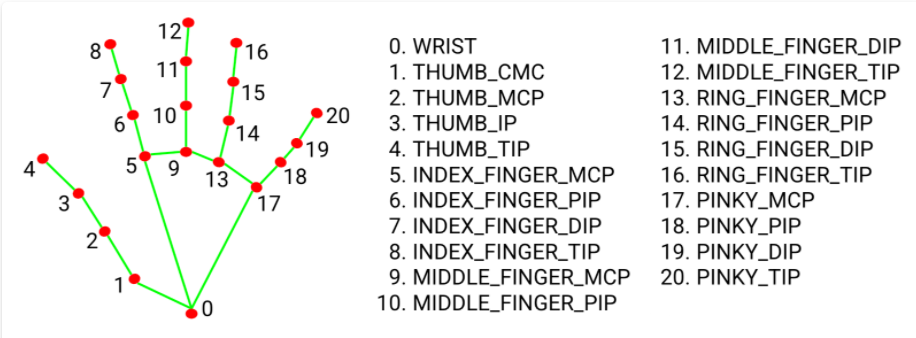
可以使用Opencv的深度神经网络DNN模块 检测手部21个关键点。
1、加载模型
参考代码:
Net net;
bool readNet=false;


void loadData()
{
    if(readNet)return;
    readNet=true;
    //模型文件
    string model_file = "handPose/pose_deploy.prototxt";  //模型
    string model_weight = "handPose/pose_iter_102000.caffemodel";//训练权重

    //加载caffe模型
    net = readNetFromCaffe(model_file, model_weight);

}
2、手势关键点检测
参考代码:
void handKeypointsDetect(Mat src, vector<Point>& handKeypoints,vector<double> &Prob)
{
    //模型尺寸大小
    int width = src.cols;
    int height = src.rows;
    float ratio = width / (float)height;
    int modelHeight = 368;  //由模型输入维度决定
    int modelWidth = int(ratio*modelHeight);

    //将输入图像转成blob形式
    Mat blob = blobFromImage(src, 1.0 / 255, Size(modelWidth, modelHeight), Scalar(0, 0, 0));

    //将图像转换的blob数据输入到网络的第一层“image”层,见deploy.protxt文件
    net.setInput(blob, "image");

    //结果输出
    Mat output = net.forward();

    int H = output.size[2];
    int W = output.size[3];

    for (int i = 0; i < KeyPointCount; i++)
    {
        //结果预测
        Mat probMap(H, W, CV_32F, output.ptr(0, i));
        resize(probMap, probMap, Size(width, height));

        Point keypoint; //最大可能性手部关键点位置
        double classProb;  //最大可能性概率值

        minMaxLoc(probMap, NULL, &classProb, NULL, &keypoint);


        handKeypoints[i] = keypoint; //结果输出,即手部关键点所在坐标
        Prob[i]=classProb;
    }

}
三、手势识别
根据检测出的手势关键点数据,依次检测拇指、食指、中指、无名指、小指的是否张开。
参考代码:
int handPoseRecognition(vector<Point>&handKeypoints, vector<double> &probVec)
{
    int fingers[5];//依次代表拇指、食指、中指、无名指、小指的是否张开
    for (int i=0;i<5;i++  )
        fingers[i]=-1;// -1 不能识别  0 收缩  1 张开

    for (int i=0;i<21;i++)
        qDebug("\t keypoint: %d classProb: %f  ( %d , %d)",i,probVec[i],handKeypoints[i].x,handKeypoints[i].y);

    //如果食指、拇指的关键点位置混乱,表示识别错误
    auto wrong=getDistance(handKeypoints[1],handKeypoints[5])<getDistance(handKeypoints[1],handKeypoints[2]) ;
    if(wrong) return -1;


    //拇指 1~4
    if(probVec[1]>0.1 && probVec[2]>0.1  && probVec[3]>0.1  && probVec[4]>0.1 ){//如果识别出
        //张开  关键点2-1向量 与关键点4-1向量的夹角最小
        auto theta=angle(handKeypoints[4], handKeypoints[1], handKeypoints[2]);
        debugX("拇指 theta:"<<theta);
        if(theta>25)
            fingers[0]=0;
        else
            fingers[0]=1;

    }

    // 食指 5~8
    if (handKeypoints[8].y < handKeypoints[7].y)
        fingers[1] = 1; // 张开   8的Y值小于7的Y值
    else
        fingers[1] = 0;

    // 中指 9~12
    if (handKeypoints[12].y < handKeypoints[11].y && handKeypoints[11].y < handKeypoints[10].y)
        fingers[2] = 1;// 张开
    else
        fingers[2] = 0;

    // 无名指 13~16
    if (handKeypoints[16].y < handKeypoints[15].y)
        fingers[3] = 1;// 张开
    else
        fingers[3] = 0;

    // 小指 17~20
    if (handKeypoints[20].y < handKeypoints[19].y)
        fingers[4] = 1;// 张开
    else
        fingers[4] = 0;

    qDebug("拇指  %d ,食指 %d ,中指 %d, 无名指 %d ,小指  %d)",fingers[0],fingers[1],fingers[2],fingers[3],fingers[4]);

    //5个手指都收缩
    if(fingers[0]==0 && fingers[1]==0 && fingers[2]==0 && fingers[3]==0 &&fingers[4]==0)
        return 0;

    //只有食指张开
    if(fingers[0]==0 && fingers[1]==1 && fingers[2]==0 && fingers[3]==0 &&fingers[4]==0)
        return 1;

    //只有食指和中指张开
    if(fingers[0]==0 && fingers[1]==1 && fingers[2]==1 && fingers[3]==0 &&fingers[4]==0)
        return 2;

    //只有食指和拇指收缩
    if(fingers[0]==0 && fingers[1]==0 && fingers[2]==1 && fingers[3]==1 &&fingers[4]==1)
        return 3;

     //只有小指和拇指收缩
    if(fingers[0]==0 && fingers[1]==1 && fingers[2]==1 && fingers[3]==1 &&fingers[4]==0)
        return 3;

    //只有拇指收缩
    if(fingers[0]==0 && fingers[1]==1 && fingers[2]==1 && fingers[3]==1 &&fingers[4]==1)
        return 4;

    //全张开
    if(fingers[0]==1 && fingers[1]==1 && fingers[2]==1 && fingers[3]==1 &&fingers[4]==1)
        return 5;

    //只有小指和拇指张开
    if(fingers[0]==1 && fingers[1]==0 && fingers[2]==0 && fingers[3]==0 &&fingers[4]==1)
        return 6;

    //只有食指和拇指张开
    if(fingers[0]==1 && fingers[1]==1 && fingers[2]==0 && fingers[3]==0 &&fingers[4]==0)
        return 8;

    return-1;//未识别
}
四、显示识别结果
参考代码:
void resultImage(Mat& src, vector<Point>&handKeypoints, int& count)
{
    //画出关键点所在位置
    for (int i = 0; i < KeyPointCount; i++)
    {
        circle(src, handKeypoints[i], 3, Scalar(0, 0, 255), -1);
        putText(src, to_string(i), handKeypoints[i], FONT_HERSHEY_COMPLEX, 0.8, Scalar(0, 255, 0), 2);
    }
    //将识别结果显示在原图中
    putText(src, to_string(count), Point(20, 60), FONT_HERSHEY_COMPLEX, 2, Scalar(0, 0, 128), 3);
}
五、调用示例
参考代码:
#include<iostream>
#include<opencv2/opencv.hpp>
#include<opencv2/dnn.hpp>
using namespace std;
using namespace cv;
using namespace cv::dnn;
//手部关键点数目
const int KeyPointCount = 21;


//此代码用于集成于《QT插件化图像算法研究平台》
void handPose(Mat &input, Mat &output) {
    loadData();
    vector<Point> handKeypoints(KeyPointCount);
    vector<double> probVec(KeyPointCount);
    handKeypointsDetect(input, handKeypoints, probVec);

    int count = handPoseRecognition(handKeypoints, probVec);

    resultImage(input, handKeypoints, count);
    output = input;
}


//此代码用于独立运行
int main() {
    loadData();
    vector<Point> handKeypoints(KeyPointCount);
    vector<double> probVec(KeyPointCount);
    Mat input=imread("hand.jpg");
    handKeypointsDetect(input, handKeypoints, probVec);

    int count = handPoseRecognition(handKeypoints, probVec);

    resultImage(input, handKeypoints, count);
    imshow("result",input);
}
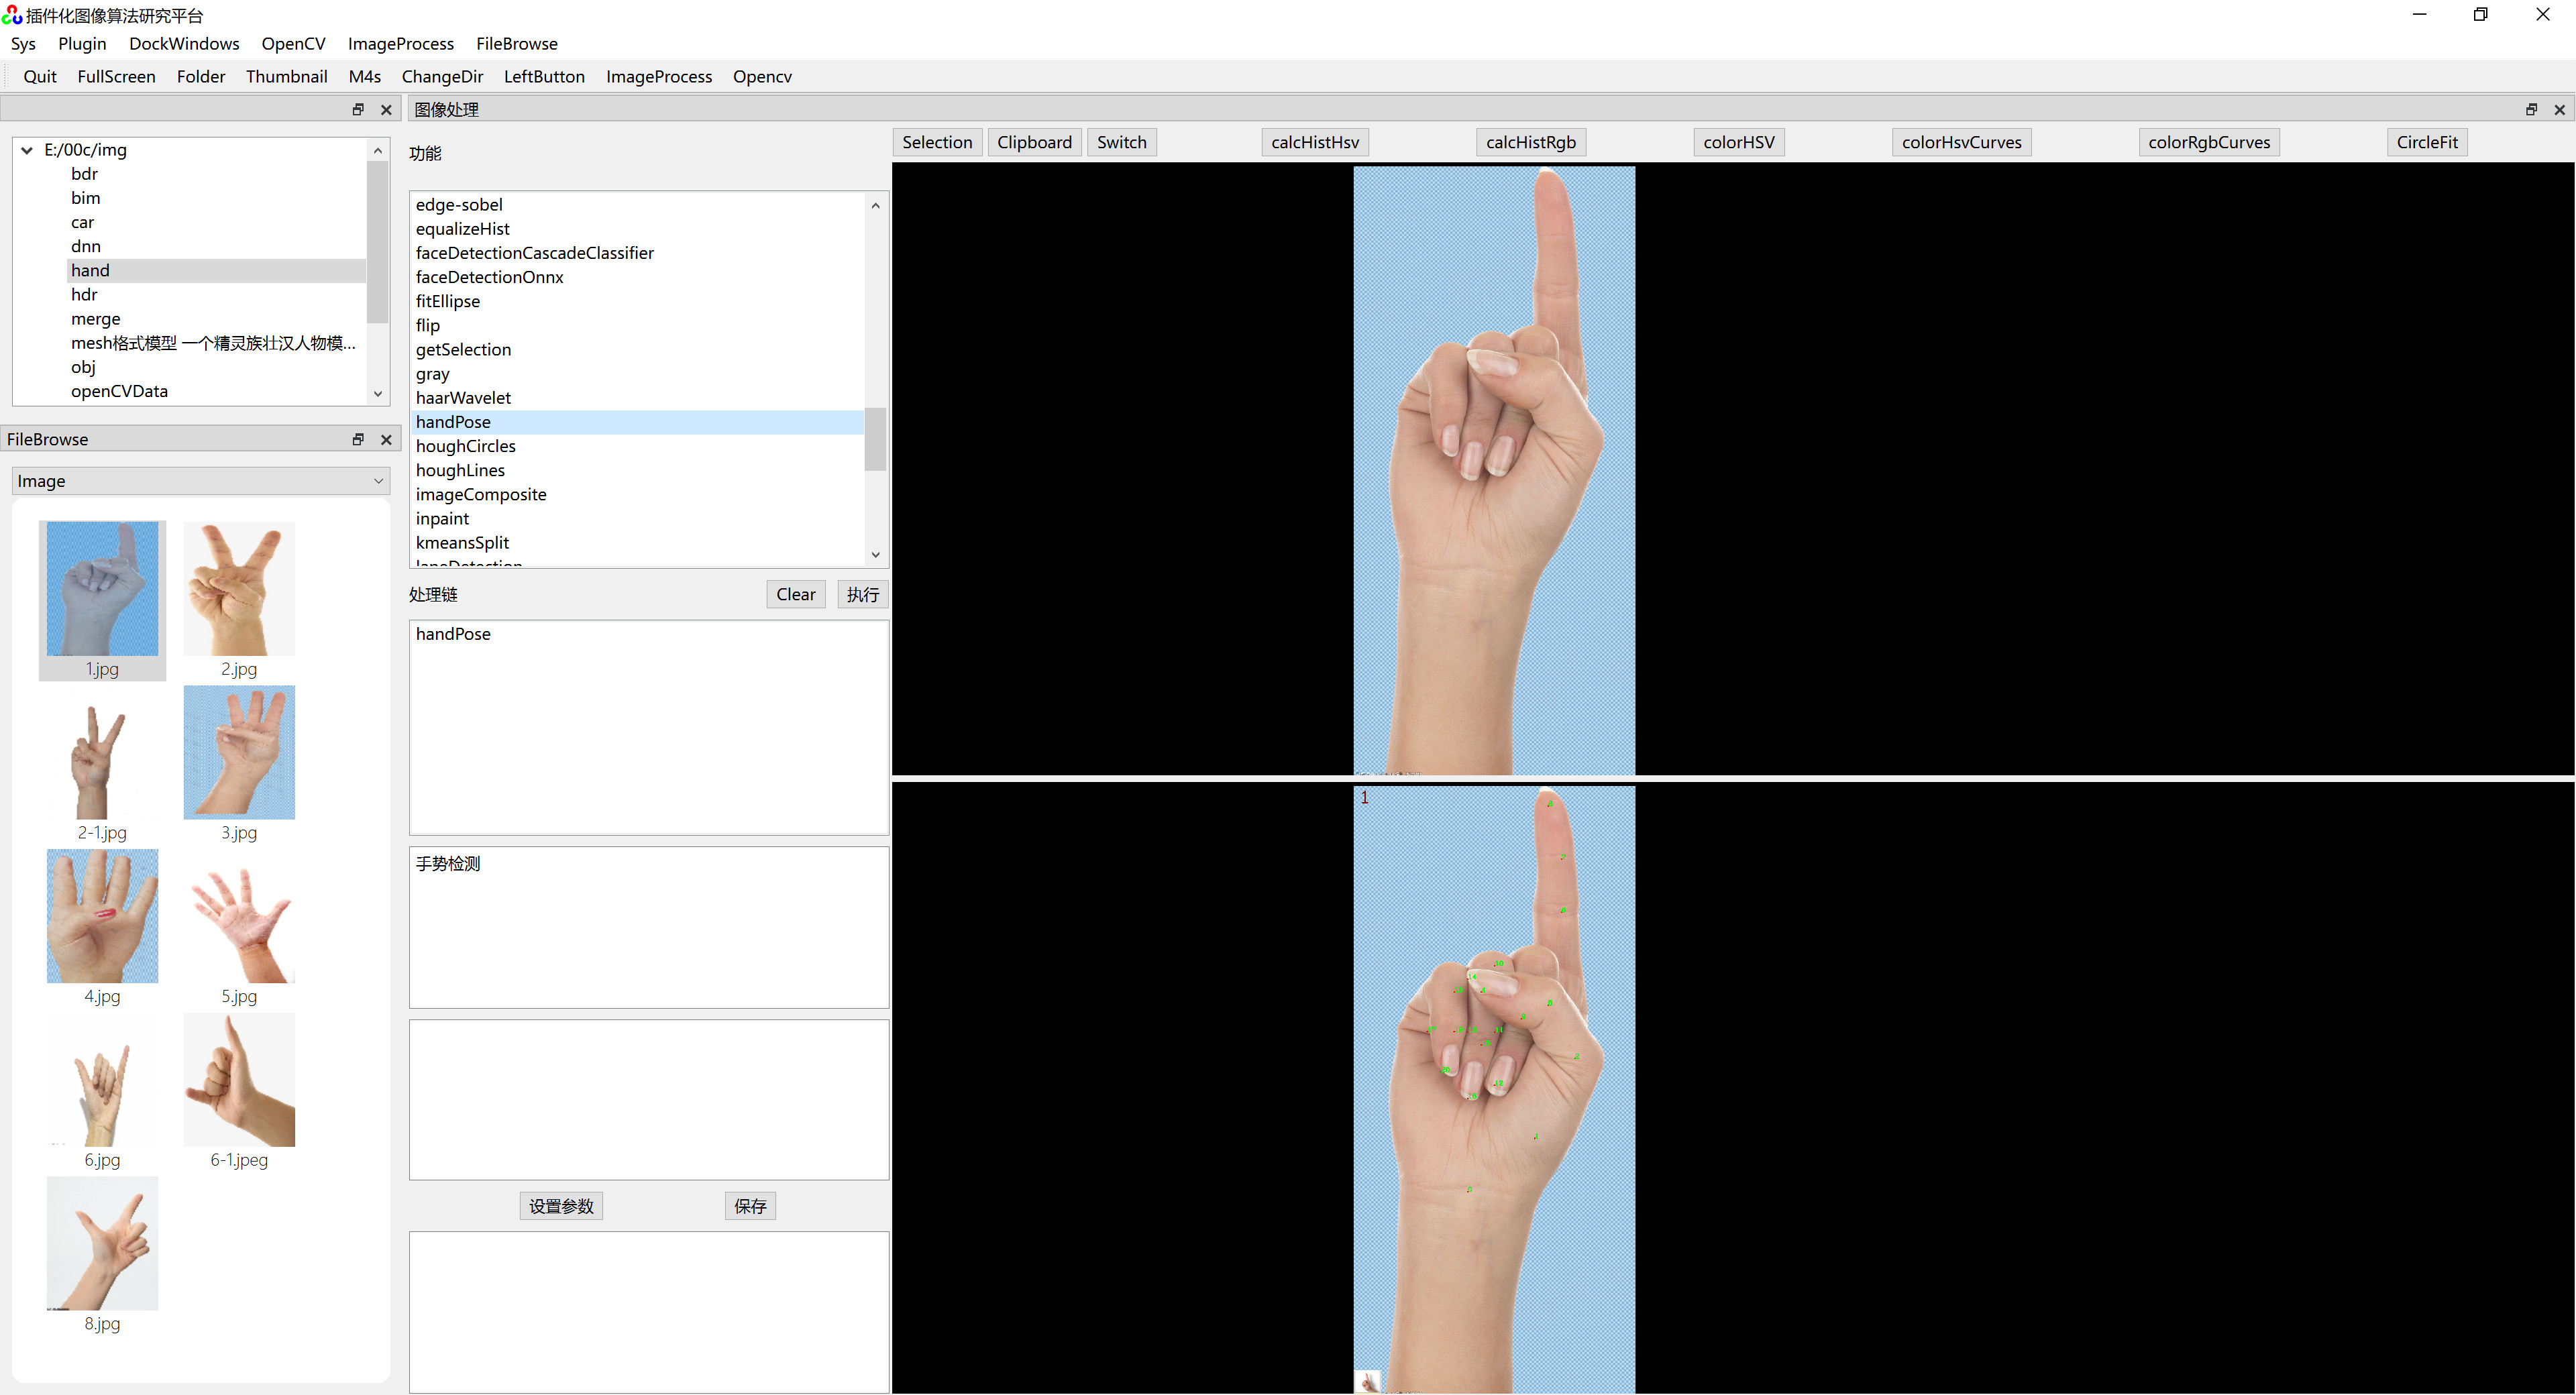
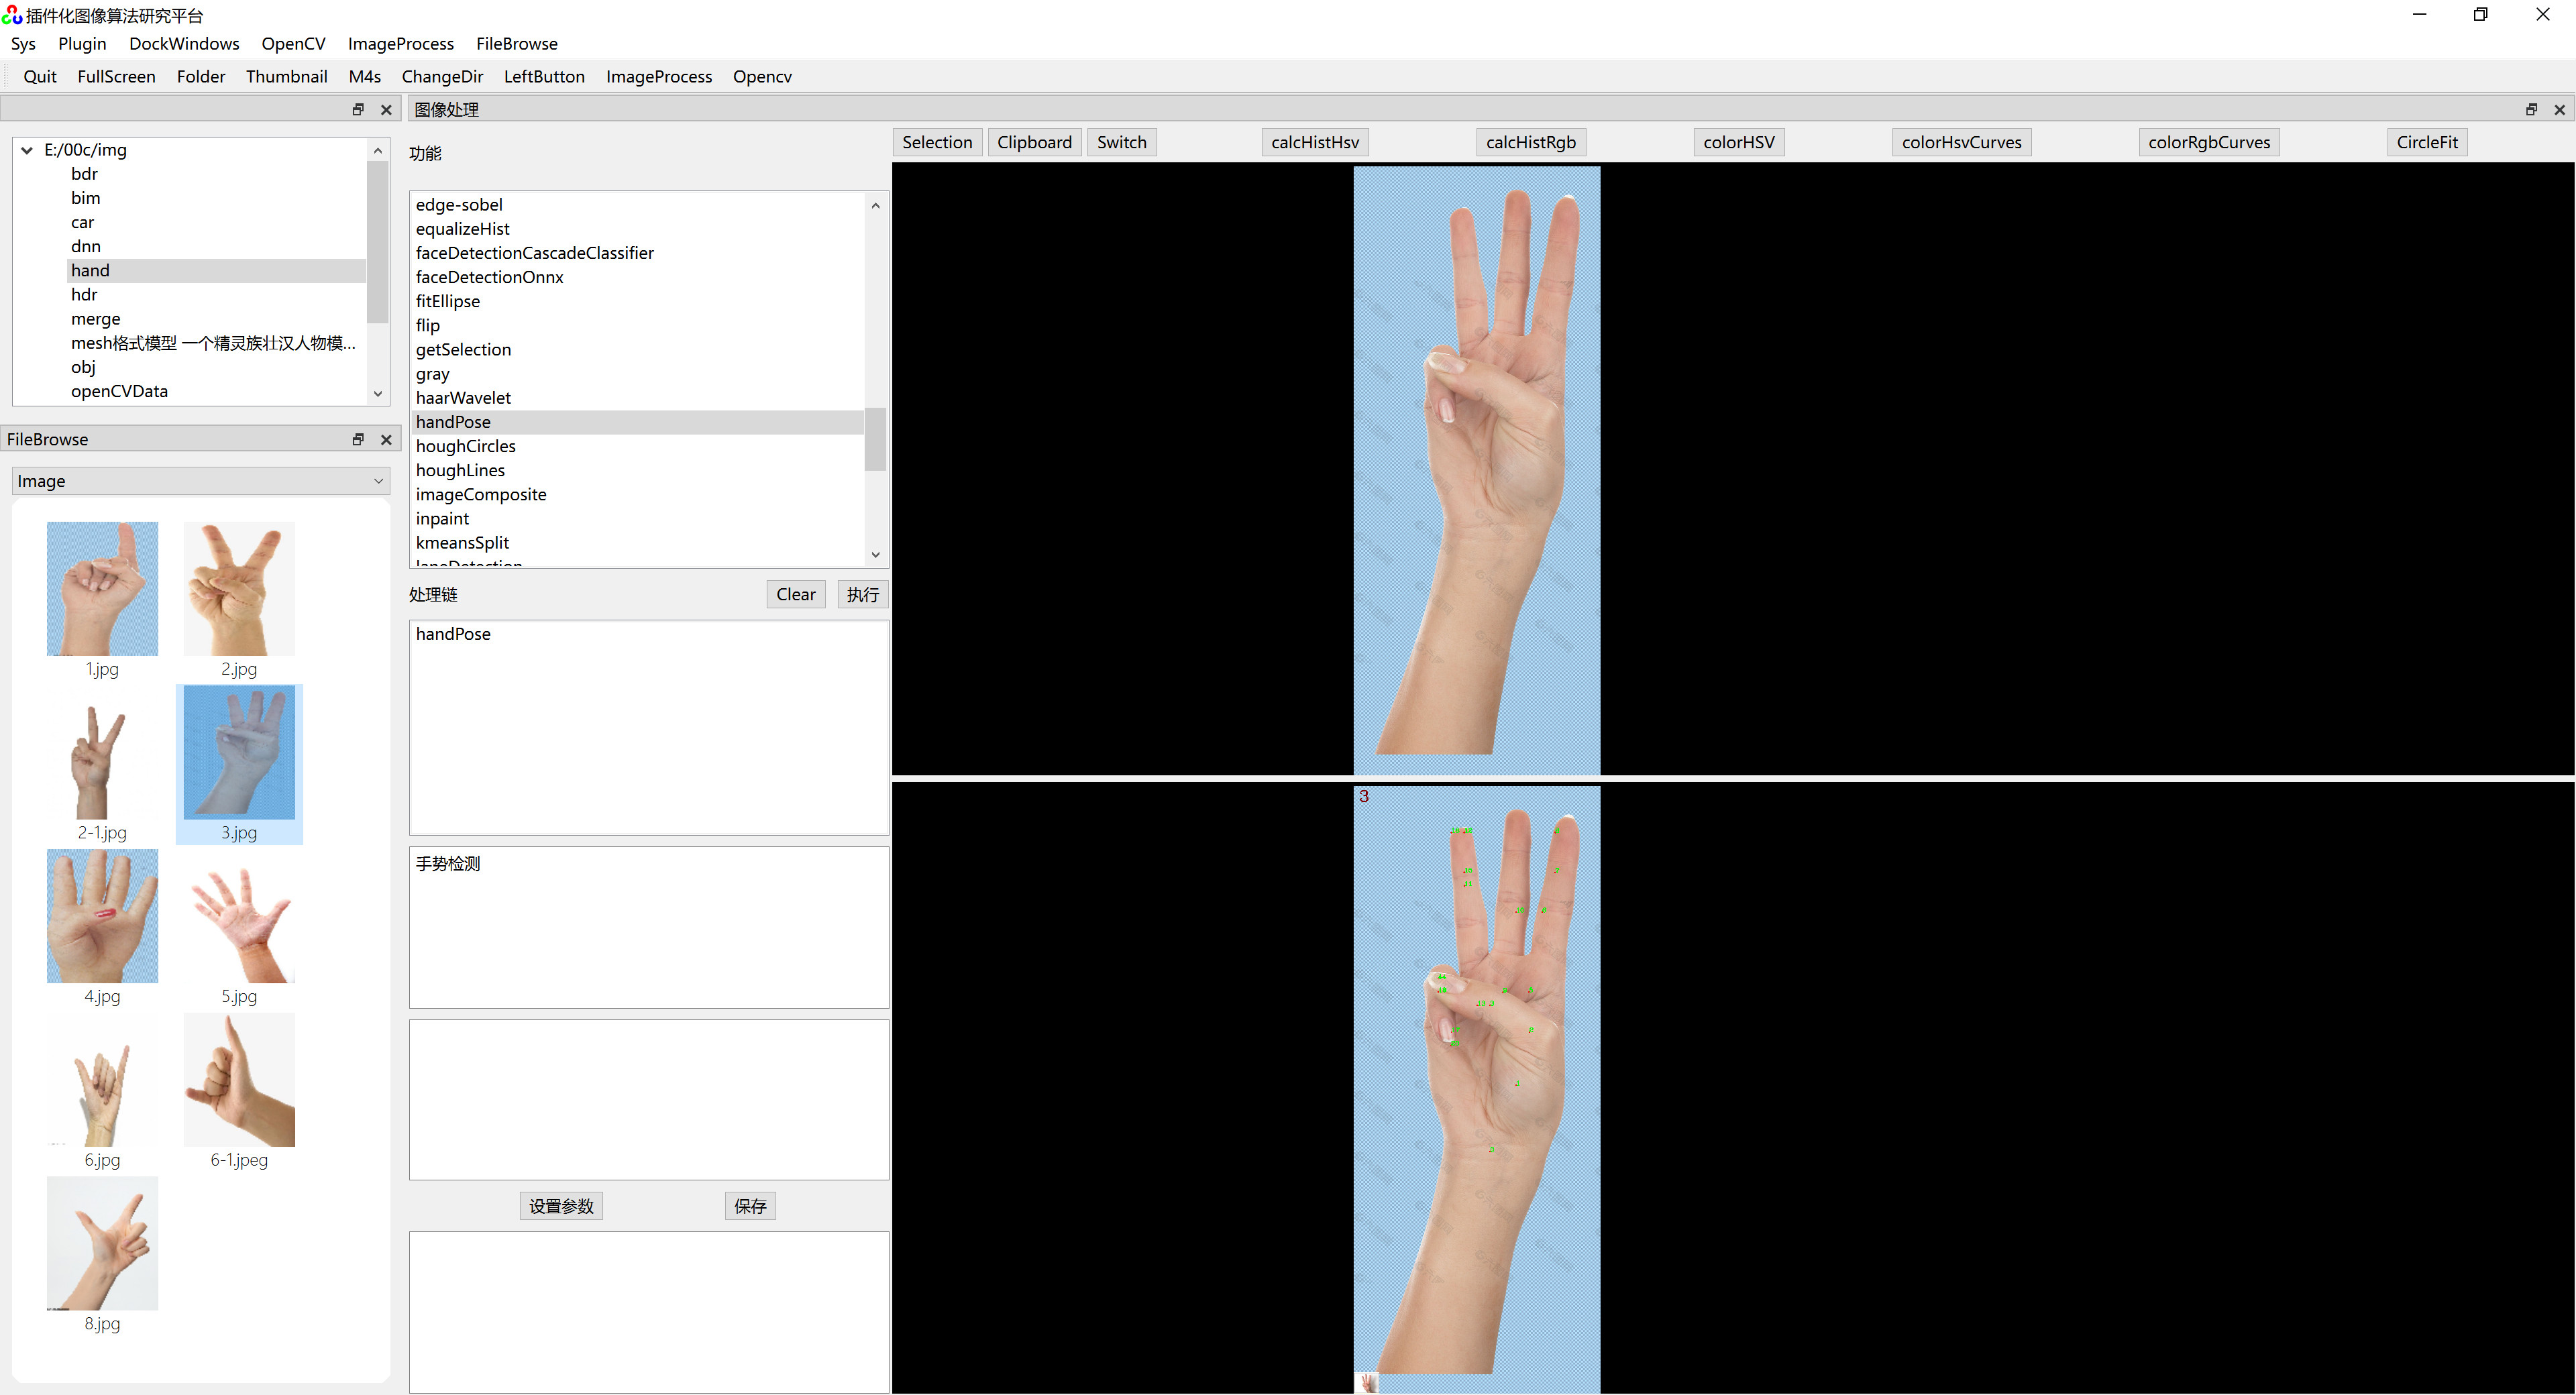
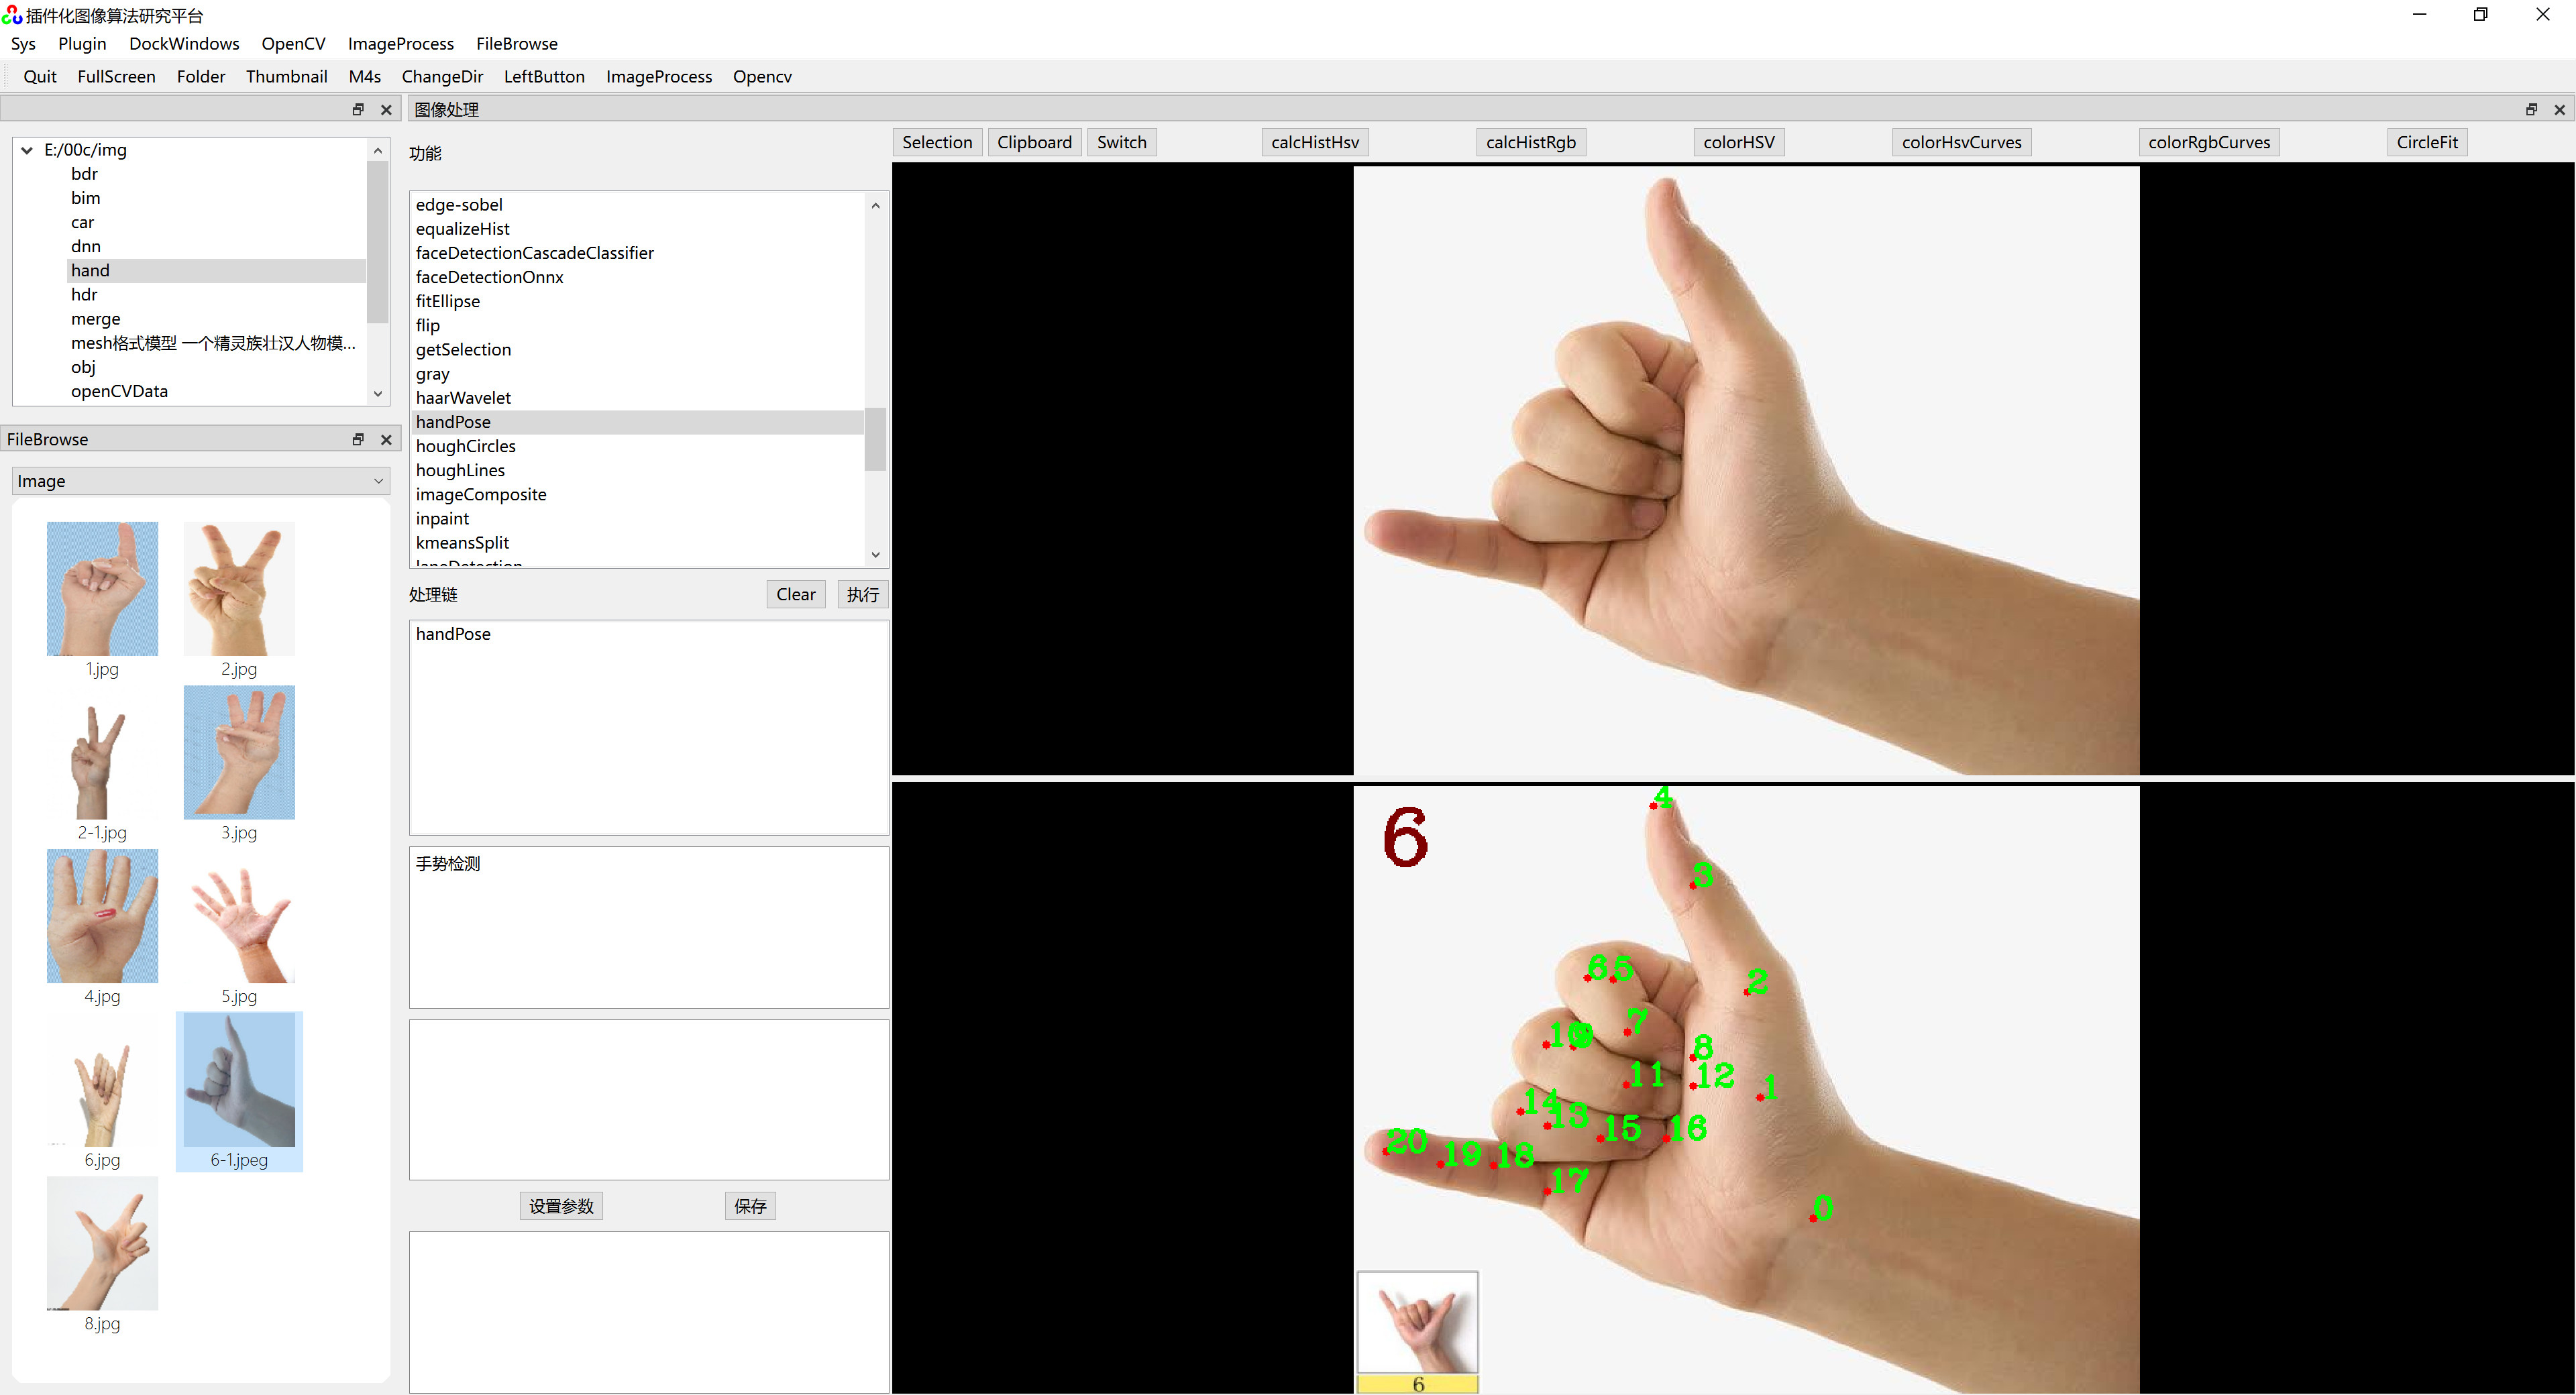
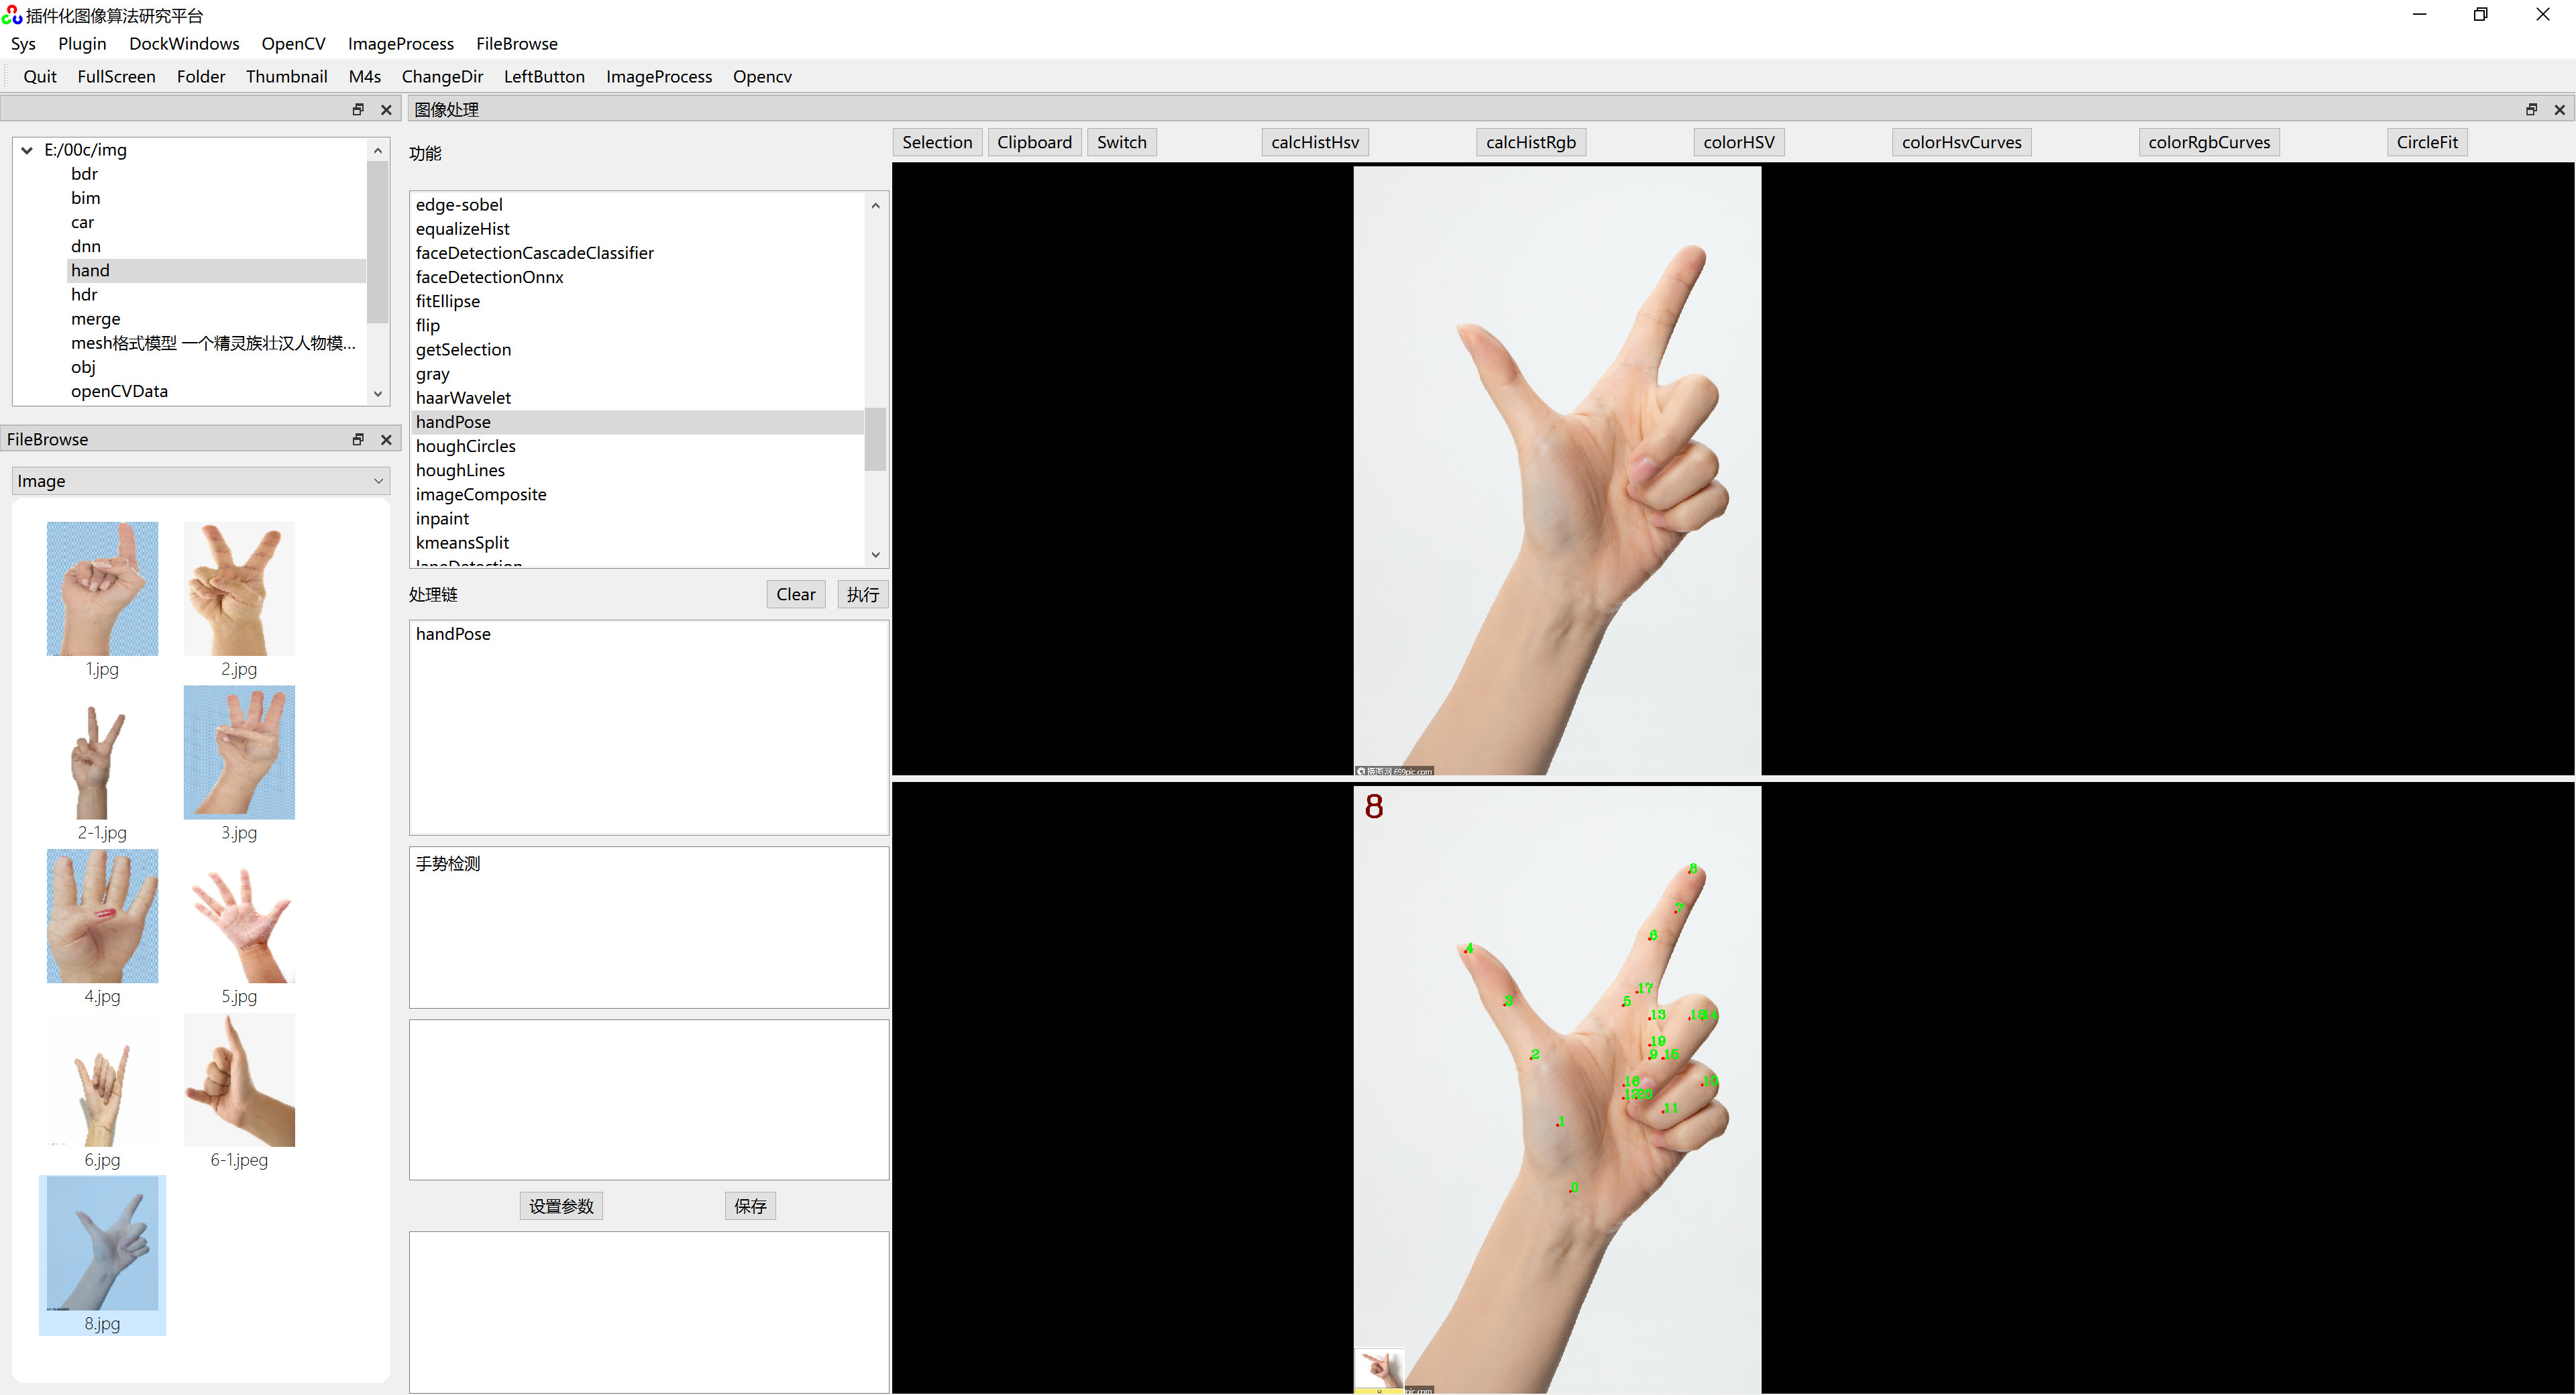
六、运行效果
在《 插件化算法研究平台》上运行效果如下图:

《插件化算法研究平台》其它内容:


 3945
3945

 被折叠的 条评论
为什么被折叠?
被折叠的 条评论
为什么被折叠?
 到【灌水乐园】发言


