


作者:taco
前言
11beta版本的iServer中将图例(legend)的已经单独做出来了一个窗口,可以通过请求直接获取到桌面配好的地图图例。那么既然能拿到图例了,如何在三维场景中使用呢?如何将地图的图例也展示在三维场景之中。本片文章将简单说明一下如何使用。
一、初始化一个容器
1.新增容器
		this.legendContainer = document.createElement('div');
		this.legendContainer.classList.add('legend-container');
		this.legendContainer.id = 'legend-container';
		this.view.container.appendChild(this.legendContainer);
2.配置容器样式
this.styleDom = document.createElement('style');
		this.styleDom.innerHTML = `
            .legend-container {
                position: absolute;
                bottom: 0;
                right: 10px;
                background-color: whitesmoke;
                z-index: 999;
                box-sizing: border-box;
                padding: 10px;
                max-width: 360px;
                max-height: 500px;
                overflow: hidden;
                overflow-y: scroll;
            }

            .legend-box {
                display: flex;
                justify-items: center;
                font-size: 12px;
                margin: 4px 0 4px 10px;
            }

            .legend-box img {
                width: 22px;
                height: 22px;
            }

            .legend-box label {
                margin-left: 10px;
            }

            .legend-title {
                font-size: 14px;
                color: #323232;
                font-weight: 600;
                margin: 0 0 0.5rem 0;
            } `
		$('head').append(this.styleDom)
二、获取配置请求地址并加载图例json
1.配置请求地址
		let path = 'legend.json';
		if (this.legendQueryParameter) {
			if (this.legendQueryParameter.bbox) {
				let bbox = this.legendQueryParameter.bbox;
				path += `?bbox=${bbox[0]},${bbox[1]},${bbox[2]},${bbox[3]}`;
			}
			if (this.legendQueryParameter.layers) {
				path += path.includes('bbox=') ? `&layers=${this.legendQueryParameter.layers}` :
					`?layers=${this.legendQueryParameter.layers}`;
			}
			for (let key in this.legendQueryParameter) {
				if (this.legendQueryParameter.hasOwnProperty(key)) {
					if (key === 'bbox' || key === 'layers') {
						continue;
					}
					path += `&${key}=${this.legendQueryParameter[key]}`
				}
			}
		}
		return path;
2.加载图例js
		let str = this.getLoadPath();
		return new Promise((resove, reject) => {
			let length = this.layerInfos.length;
			let i = 0;
			this.legendsData.length = 0;
			this.layerInfos.forEach((layerObj) => {
				i++;
				let url = layerObj.layer.imageryProvider.url + str;
				$.ajax({
					url: url,
					method: "GET",
					success: (data) => {
						if (data.layerLegends && data.layerLegends.length > 0) {
							this.legendsData.push({
								title: layerObj.title,
								layerLegends: data.layerLegends,
							});
						}
						if (i === length) resove(true);
					},
					error: (err) => {
						console.log(err);
						length--;
						if (i === length) resove(false);
					}
				});
			})
		})
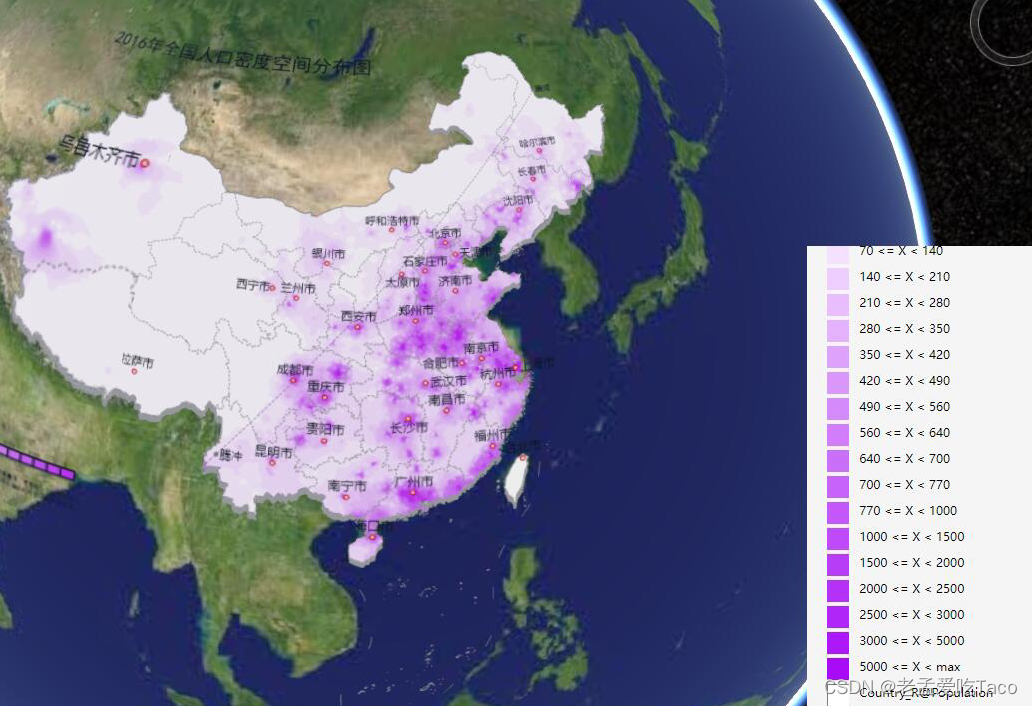
显然这样已经满足了我们的初步需求。图例已经能正常的拿到了。但是这个时候会发现。我不同高度配的图例明明是不一样的,但是他会一直返回我们初始化时候的图例。主要原因还是我们这里还没有去对他进行一个实时更新的操作。接下来我们要去更新我们的图例。
三、监听相机更新图例
1.监听相机
		if (this.hideLayersNotInCurrentView || this.respectLayerVisibility) {
			this.RemoveCallback = this.view.camera.changed.addEventListener(() => {
				if (this._visible) {
					this.update()
				}
			})
		}
2.更新图例
		let flag = false;
		this.layerInfos.forEach((layerObj, index) => {
			if (this.respectLayerVisibility) {
				flag = (this.showConfig[index] != layerObj.layer.show) || flag;
				this.showConfig[index] = layerObj.layer.show;
			}
			if (this.hideLayersNotInCurrentView) {
				let _maximumTerrainLevel = layerObj.layer._maximumTerrainLevel;
				let _minimumTerrainLevel = layerObj.layer._minimumTerrainLevel;
				//根据当前图层显隐设置图例显隐,数据暂时没合适的就没写
				//  this.legendsData[index].layers.
				// this.showConfig[index] = layerObj.layer.show;
			}
		})
		if (flag) this.createLegendsDom();
四、创建模板进行展示
		this.htmlString = '';
		this.legendsData.forEach((legendData, index) => {
			if (this.showConfig[index]) {
				this.htmlString +=
					`<h${this.headingLevel} class='legend-title'> ${legendData.title}</h${this.headingLevel}>`;
				for (let i = 0, j = legendData.layerLegends.length; i < j; i++) {
					let layerLegend = legendData.layerLegends[i];
					layerLegend.legends.forEach((leg) => {
						this.htmlString +=
							`<div class="legend-box">
                            <img src="data:image/gif;base64,${leg.imageData}" alt="Base64 encoded image" style="width:${leg.width}px;height:${leg.height}px">
                            <label >${leg.label}</label>
                        </div>`;
					})
				}
			}
		})
		if (this.legendsData.length == 0 || this.htmlString == '') {
			$('#legend-container').html(`<h${this.headingLevel} class='legend-title'>无图例</h${this.headingLevel}>`);
			return
		}
		$('#legend-container').html(this.htmlString)
五、调用接口,加载图例
var layer = viewer.imageryLayers.addImageryProvider(new Cesium.SuperMapImageryProvider({
					url: 'http://localhost:8090/iserver/services/map-TJFXSD/rest/maps/TJFXSD'
				}));

				let legend = new Legend({
					view: viewer,
					layerInfos: [{
						layer: layer,
						title: 'map-China100'
					}],
					legendQueryParameter: {
						/**
						 * 查询与此矩形框有交集的图层的图例,当layers参数未设置时,bbox是必填参数。格式:bbox=[xmin,ymin,xmax,ymax]
						 */
						bbox: [-11114986.75, -13985793.06, 17476839.21, 14439297.2],
						/**
						 * 图层过滤,当bbox参数未设置时,layers是必填参数。语法:[show|hide]:layerName1,layerName2。show表示只返回指定图层的图例,hide表示指定图层图例不返回,其他查询出来的图层图例都返回。例如:show:country@World@@World,表示只返回country@World@@World图层的图例。
						 */
						// layers:'show:MapDivision_L',
						/**
						 * 是否只返回当前地图范围内可见要素的图例。默认为false。
						 */
						returnVisibleOnly: true,
						/**
						 * 地图比例尺。当returnVisibleOnly为true时,mapScale是必填参数
						 */
						mapScale: 1.0,
						/**
						 * 图例图片是否背景透明。默认为true。当图例图片是固定图片时(比如标签专题图,固定用LabelUniform.png),不支持设置transparent参数。
						 */
						transparent: true,
						/**
						 * 返回图例的宽度。默认16像素。
						 */
						width: 22,
						/**
						 * 返回图例的高度。默认16像素。
						 */
						height: 22,
					}
				})
				legend.init();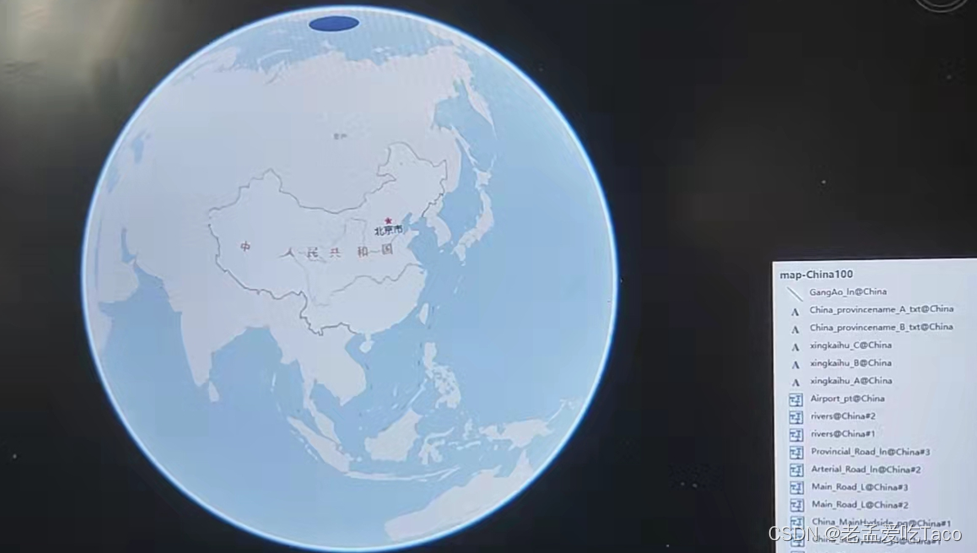
到这里我们在三维场景中加载图例的需求算是已经完成了。完整的代码已经放置到资源共享中了。大家可以直接拿过来使用。


 2235
2235


 被折叠的 条评论
为什么被折叠?
被折叠的 条评论
为什么被折叠?
 到【灌水乐园】发言


