


一 什么是线程池
1.1 线程池的概念
所谓的 线程池 就是 提前创建一批线程,当任务来临时,线程直接从任务队列中获取任务执行,可以提高整体效率;同时一批线程会被合理维护,避免调度时造成额外开销。
1.2 池化技术
像这种 把未来会高频使用到,并且创建较为麻烦的资源提前申请好的技术称为 池化技术,池化技术 可以极大地提高性能,最典型的就是 线程池,常用于各种涉及网络连接相关的服务中,比如 MySQL 连接池、**HTTP** 连接池、**Redies** 连接池 等。
除了线程池外还有内存池,比如 STL 中的容器在进行空间申请时,都是直接从 空间配置器 allocator 中获取的,并非直接使用系统调用来申请空间。
池化技术 的本质:空间换时间
1.2.1 池化技术的优点
线程池 的优点在于 高效、方便
- 线程在使用前就已经创建好了,使用时直接将任务交给线程完成,节约创造线程的时间
- 线程会被合理调度,确保 任务与线程 间能做到负载均衡 ,程序员通过线程池规划线程的行为,避免额外开销,或者是错误行为。
线程池 中的线程数量不是越多越好,因为线程增多会导致调度变复杂,具体创建多少线程取决于具体业务场景,比如 处理器内核、剩余内存、网络中的 socket 数量等。
1.3 线程池的应用场景
线程池 有以下几种应用场景:
- 存在大量且短小的任务请求,比如Web中的网页请求,使用 线程池 就非常合适,因为网页点击量众多,任务量大多偏小,并且大多都没有长时间连接访问。
- 对性能要求苛刻,力求快速响应需求,比如游戏服务器,要求对玩家的操作做出快速响应。
- 突发大量请求,但不至于使服务器产生过多的线程,短时间内,在服务器创建大量线程会使得内存达到极限,造成出错,可以使用 线程池 规避问题。
二 线程池的实现
2.1 第一版线程池
「朴素版」:实现最基本的线程池功能,直接使用系统提供的接口
所谓朴素版就是不加任何优化设计,只实现 线程池 最基础的功能,便于理解 线程池
首先要理解线程池的核心: 一批线程和待实现的任务队列
当客户端发出请求时,任务队列新增任务,线程获取任务,执行任务,同时,我们也需要保证线程互斥和同步,以此来合理利用线程池。
2.1.1 ThreadPool.hpp 头文件
我们ThreadPool.hpp头文件的内容大概如下:
- 一批线程,通过容器管理
- 任务队列,存储就绪的任务
- 互斥锁
- 条件变量
2.1.1.1 基本框架
代码如下:
#pragma once

#include<vector>
#include<string>
#include<iostream>
#include<pthread.h>
#include<unistd.h>
#include<queue>

#define THREAD_NUM 10

template<class T>
class ThreadPool{

   public:
     ThreadPool(int num=THREAD_NUM)
      :_threads(num) //注意 这里我们需要提前扩容,避免越界
      ,_num(num)
     {
        pthread_mutex_init(&_mtx,nullptr);
        pthread_cont_init(&_cond,nullptr);
     }

     ~ThreadPool(){
        pthread_mutex_destroy(&_mtx);
        pthread_cond_destroy(&_cond);
     }

     void init(){
            // 其他信息初始化(当前不需要)
     }

    void start(){
            // 启动线程池
            // ...
    }

    // 提供给线程的回调函数
    static void *threadRoutine(void *args){
        // 业务处理
        // ...
    }

   //提供给线程的回调函数需要设置为静态,否则线程调不动(参数不匹配),因为类中的函数默认第一个传入的参数为this指针

   private:
    std::vector<pthread_t> _threads;
    int _num;
    std::queue<T> _tasks;
    pthread_mutex_t _mtx;
    pthread_cond_t _cnd;
};
2.1.1.2 填充函数
初始化线程池
init()— 位于ThreadPool类
当前场景只需要初始化 互斥锁 和 条件变量,在 构造函数 中完成就行了,所以这里的 init() 函数不需要补充
启动线程池
start()— 位于ThreadPool类
启动 线程池 需要先创建出一批线程,这里直接循环创建即可
   void start(){
            // 启动线程池
            //创建一批线程并启动
            for(int i=0;i<_num;i++){
                pthread_create(&_threads[i],nullptr,threadRoutine,nullptr);
                sleep(1);
            }
    }
线程的回调函数
threadRoutine()— 位于ThreadPool类
这里进行简单测试,打印当前线程的线程 ID 就行了,并且直接分离线程,主线程无需等待次线程运行结束 。
   // 提供给线程的回调函数
    static void *threadRoutine(void *args){
        //避免线程等待,直接剥离
        pthread_detach(pthread_self());
        while(true){
            std::cout<<"Thread Running..."<<pthread_self()<<std::endl;//查看当前线程id
            sleep(1);
        }
    }
主进程代码:
#include"ThreadPool.hpp"
#include<memory>

int main(){
     std::unique_ptr<ThreadPool<int>> ptr(new ThreadPool<int>());

    ptr->init();
    ptr->start();

    return 0;
}
线程池 还需要提供一个重要的接口 pushTask(),将用户需要执行的业务装载至 任务队列 中,等待线程执行
装载任务
pushTask()— 位于ThreadPool类
装载任务的本质就是在生产任务,相当于用户充当生产者,通过这个接口将任务生产至任务队列中,而线程充当消费者,从任务队列中获取任务并消费
代码如下:
    // 装载任务
    void pushTask(const T &task){
        // 本质上就是在生产商品,因此需要加锁保护
        pthread_mutex_lock(&_mtx);
        _tasks.push(task);

        // 唤醒消费者进行消费
        pthread_cond_signal(&_cond);
        pthread_mutex_unlock(&_mtx);
    }
所以线程的回调函数需要从 任务队列 中获取任务,进行消费
- 检测是否有任务
- 有 -> 消费
- 没有 -> 等待
线程回调函数
threadRoutine()— 位于ThreadPool类
   // 提供给线程的回调函数
    static void *threadRoutine(void *args){
        // 避免等待线程,直接剥离
        pthread_detach(pthread_self());
        while (true){
            // 任务队列是临界资源,需要保护
            pthread_mutex_lock(&_mtx);
            // 等待条件满足 是否有资源
            while (_tasks.empty()){
                pthread_cond_wait(&_cond, &_mtx);//为空则唤醒生产者
            }
            T task = _tasks.front();
            _tasks.pop();
            // task(); // 进行消费(存疑)
            pthread_mutex_unlock(&_mtx);
        }
    }
注意: 判断任务队列是否为空需要使用 while**,确保在多线程环境中不会出现问题**
因为 任务队列、互斥锁、条件变量 是类内成员,而这里的 threadRoutine() 函数是一个静态函数,并没有 this 指针以访问类内成员,因此进行消费是错误的,这里我们可以采取传递 this 指针的方式解决问题
启动线程池
start()— 位于ThreadPool类
更改为:
    void start(){
        // 启动线程池
        // 创建一批线程并启动
        for (int i = 0; i < _num; i++){
            pthread_create(&_threads[i], nullptr, threadRoutine, this);
            sleep(1);
        }
    }
线程回调函数
threadRoutine()— 位于ThreadPool类
更改为:
// 提供给线程的回调函数
    static void *threadRoutine(void *args){
        // 避免等待线程,直接剥离
        pthread_detach(pthread_self());
        auto ptr = static_cast<ThreadPool<T>*>(args);
        while (true){
            // 任务队列是临界资源,需要保护
            pthread_mutex_lock(&_mtx);
            // 等待条件满足
            while (_tasks.empty()){
                pthread_cond_wait(&_cond, &_mtx);//没有资源,先解锁,等待
            }
            T task = ptr->_task.front();
            ptr->_tasks.pop();
            pthread_mutex_unlock(&_mtx);
        }
    }
2.1.1.3 简单封装
为了使得提高代码的可阅读性及可拓展性,这里将会封装一批接口,供函数调用。
加锁、解锁 — 位于
ThreadPool类
   void lockQueue(){
        pthread_mutex_lock(&_mtx);
    }

    void unlockQueue(){
        pthread_mutex_unlock(&_mtx);
    }
等待、唤醒 — 位于
ThreadPool类
    //线程等待
    void threadWait(){
       pthread_cond_wait(&_cond, &_mtx);
    }

    //唤醒线程
    void threadWakeUp(){
      pthread_cond_signal(&_cond);
   }
判空、获取任务 — 位于
ThreadPool类
 //判断任务队列是否为空
   bool isEmpty(){
       return _tasks.empty();
   }

 //获取任务,配合消费者进行消费
   T popTask(){
       T task = _tasks.front();
       _tasks.pop();
       return task;
   }
接口封装完毕后,可以顺便修改之前的代码,比如 生产任务 pushTask()
生产任务
pushTask()— 位于ThreadPool类
// 装载任务
   void pushTask(const T &task){
       // 本质上就是在生产商品,需要加锁保护
       lockQueue();
       _tasks.push(task);
       // 唤醒消费者进行消费
       threadWakeUp();
       unlockQueue();
   }
以及 消费者 threadRountine()
线程回调函数
threadRoutine()— 位于ThreadPool类
   //提供给消费者的回调函数
   static void *threadRoutine(void*args){
      //分离线程
      pthread_detach(pthread_self());

      auto ptr=static_cast<ThreadPool<T>*> (args);

      while(true){
          ptr->lockQueue();

          while(ptr->empty()){
            ptr->threadWait();
          }

          T task=ptr->popTask();
          ptr->unlockQueue();

         task();//执行任务,是我们要写的一个类
      }
   }
细节: 轮到线程执行任务时,不需要加锁,这就好比你买桶泡面回家,是不必担心别人会和你争抢,可以慢慢消费;同样的,你也不应该占用锁资源,主动让出锁资源以提高整体效率
2.1.2 task.hpp 文件
在这个头文件里,我们封装一个计算器类,用来模拟我们这次消费者拿到资源后要执行的任务
这个文件大概有以下几个要点:
- 我们只进行两个数字的计算,拟定为_x 和 _y
- 只具有四则运算的基本功能,既只包含 + - / * 这四种基本运算符
- 需要有错误标识函数负责检查结果
代码如下:
#pragma once
#include"ThreadPool.hpp"
#include<string>

namespace MyPool{

template<class T>
class Task{
public:
     Task(T x = 0, T y = 0, char op = '+')
        :_x(x)
        ,_y(y)
        ,_op(op)
        ,_res(0)
        ,_err(0)
     {}

     //这里重载运算操作
     void operator()(){
         switch (_op){
         case '+':
             _res = _x + _y;
             break;
         case '-':
             _res = _x - _y;
             break;
         case '*':
             _res = _x * _y;
             break;
         case '/':
             if (_y == 0)
                 _err = -1;
             else
                 _res = _x / _y;
             break;
         case '%':
             if (_y == 0)
                 _err = -2;
             else
                 _res = _x % _y;
             break;
         default:
             _err = -3;
             break;
         }
     }

       //获取计算结果并检测错误函数
        std::string getResult(){
            // 根据错误标识,返回计算结果
            std::string ret = std::to_string(_x) + " " + _op + " " + std::to_string(_y);
            if(_err){
                ret += " error";
                // 判读是 / 错误还是 % 错误
                if(_err == -1)
                    ret += " [-1] \t / 0 引发了错误";
                else if(_err == -2)
                    ret += " [-2] \t % 0 引发了错误";
                else
                    ret += " [-3] \t 不合法的操作符,只能为 [+-*/%]";
            }
            else{
                ret += " = " + std::to_string(_res);
            }
            return ret;
        }

private:
      T _x;
      T _y; //准备计算的两个数字
      char _op;//运算符
      T _res;//运算结果
      int _err;//错误标识
};

}
轮到 main.cc 进行操作了,逻辑很简单:创建线程池对象,初始化线程池,启动线程池,装载任务,等待运行结果
补充
main.cc
#include "ThreadPool.hpp"
#include <memory>
#include "Task.hpp"

typedef MyPool::Task<int> type;

// 回调函数
void callBack(type& task){
    // 获取计算结果后打印
    std::string ret = task.getResult();
    std::cout << "计算结果为: " << ret;
}

int main(){
    std::unique_ptr<MyPool::ThreadPool<type>> ptr(new MyPool::ThreadPool<type>(callBack));
    ptr->init();
    ptr->start();
    // 还有后续动作
    while(true){
        // 输入 操作数 操作数 操作符
        int x = 0, y = 0;
        char op = '+';
        std::cout << "输入 x: ";
        std::cin >> x;
        std::cout << "输入 y: ";
        std::cin >> y;
        std::cout << "输入 op: ";
        std::cin >> op;
        // 构建任务对象
        type task(x, y, op);
        // 装载任务
        ptr->pushTask(task);
    }
    return 0;
}
现在还有最后一个问题:如何获取计算结果?可以在 线程 执行完任务后,直接显示计算结果,也可以通过传入回调函数的方式,获取计算结果,前者非常简单,只需要在 threadRoutine() 中加入这行代码即可
线程回调函数
threadRoutine()— 位于ThreadPool类'
void *threadRoutine(void *args)
{
	// ...

    // 显示计算结果
    std::cout << task.getResult() << std::endl;
}
除此之外,我们也可以通过 回调函数 的方式获取计算结果
目标:给线程传入一个回调函数,线程执行完任务后,将任务传给回调函数,回调函数结合业务逻辑,灵活处理结果
单纯打印的话,很容易就可以写出这个回调函数
回调函数
callBack()— 位于main.cpp源文件
// 回调函数
void callBack(type& task)
{
    // 获取计算结果后打印
    std::string ret = task.getResult();

    std::cout << "计算结果为: " << ret;
}
为了能让 线程 在执行任务后能回调,需要将这个函数对象作为参数,传递给 ThreadPool 对象
源文件
main.cpp
std::unique_ptr<ThreadPool<type>> ptr(new ThreadPool<type>(callBack));当然,这边传递了一个对象,那边就得接收此对象,为了存储该函数对象,ThreadPool 新增一个类成员:_func,函数对象类型为 void (T&)
修改
ThreadPool.hpp头文件
// ...
#include <functional>
namespace MyPool
{
#define THREAD_NUM 10
template<class T>
class ThreadPool
{
using func_t = std::function<void(T&)>; // 包装器
public:
ThreadPool(func_t func, int num = THREAD_NUM)
:_threads(num), _num(num), _func(func)
{
// 初始化互斥锁和条件变量
pthread_mutex_init(&_mtx, nullptr);
pthread_cond_init(&_cond, nullptr);
}
// ...
private:
// ...
func_t _func;
};
}
修改完成后,创建 ThreadPool 对象时,支持传入一个类型为 void(T&) 的函数对象
获取函数对象后,需要让 线程 在执行完任务后进行回调,但又因为这玩意是一个类内成员,同样需要借助外部传入的 this 指针进行访问,这里直接封装成一个接口,顺便进行调用
回调函数对象
callBack()— 位于ThreadPool类
func_t callBack(T &task)
{
    _func(task);
}
线程回调函数 threadRoutine() — 位于 ThreadPool 类
// 提供给线程的回调函数
static void *threadRoutine(void *args)
{
// ...
task(); // 执行任务
ptr->callBack(task); // 回调函数
}
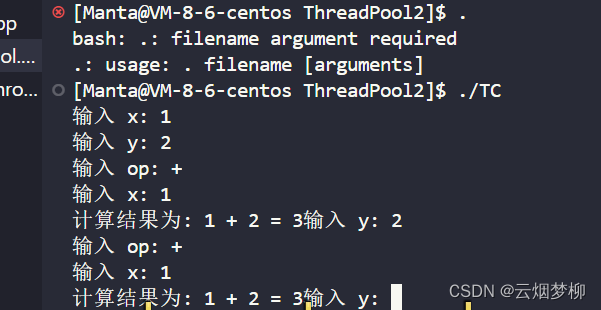
}做完上述准备工作后,可以进行测试:
程序结果正常,不必在意打印问题,因为屏幕也是被多线程并发访问的资源,没加锁保护,导致出现问题
2.1.3 完整ThraedPool.hpp头文件
#pragma once

#include <vector>
#include <string>
#include <iostream>
#include <pthread.h>
#include <unistd.h>
#include <queue>
#include <memory>
#include <functional>
#include"Thread.hpp"
namespace MyPool
{

#define THREAD_NUM 10

    template <class T>
    class ThreadPool
    {
        using func_t = std::function<void(T &)>; // 包装器
    public:
        ThreadPool(func_t func, int num = THREAD_NUM)
            : _threads(num), _num(num), _func(func)
        {
            pthread_mutex_init(&_mtx, nullptr);
            pthread_cond_init(&_cond, nullptr);
        }

        ~ThreadPool()
        {
            pthread_mutex_destroy(&_mtx);
            pthread_cond_destroy(&_cond);
        }

        void init()
        {
            //
        }

        void start()
        {
            // 创建一批线程并启动
            for (int i = 0; i < _num; i++)
                pthread_create(&_threads[i], nullptr, threadRoutine, this); // 传递 this 指针
        }

        // // 提供给线程的回调函数
        // static void *threadRoutine(void *args)
        // {
        //     // 避免线程等待,直接剥离
        //     pthread_detach(pthread_self());
        //     while (true)
        //     {
        //         std::cout << "Thread Running..." << pthread_self() << std::endl; // 查看当前线程id
        //         sleep(1);
        //     }
        // }
        // // 提供给线程的回调函数需要设置为静态,否则线程调不动(参数不匹配),因为类中的函数默认第一个传入的参数为this指针

        // // 提供给线程的回调函数
        // static void *threadRoutine(void *args){
        //     // 避免等待线程,直接剥离
        //     pthread_detach(pthread_self());
        //     auto ptr = static_cast<ThreadPool<T> *>(args);
        //     while (true){
        //         // 任务队列是临界资源,需要保护
        //         pthread_mutex_lock(&_mtx);
        //         // 等待条件满足
        //         while (_tasks.empty()){
        //             pthread_cond_wait(&_cond, &_mtx); // 为空则唤醒生产者
        //         }
        //         T task = ptr->_task.front();
        //         ptr->_tasks.pop();
        //         pthread_mutex_unlock(&_mtx);
        //     }
        // }

        // 线程加锁
        void lockQueue()
        {
            pthread_mutex_lock(&_mtx);
        }

        // 线程解锁
        void unlockQueue()
        {
            pthread_mutex_unlock(&_mtx);
        }

        // 线程等待
        void threadWait()
        {
            pthread_cond_wait(&_cond, &_mtx);
        }

        // 唤醒线程
        void threadWakeUp()
        {
            pthread_cond_signal(&_cond);
        }

        // 判断任务队列是否为空
        bool isEmpty()
        {
            return _tasks.empty();
        }

        // 获取任务,配合消费者进行消费
        T popTask()
        {
            T task = _tasks.front();
            _tasks.pop();
            return task;
        }

        // 装载任务
        void pushTask(const T &task)
        {
            // 本质上就是在生产商品,需要加锁保护
            lockQueue();
            _tasks.push(task);
            // 唤醒消费者进行消费
            threadWakeUp();
            unlockQueue();
        }

        // 提供给消费者的回调函数
        static void *threadRoutine(void *args)
        {
            // 分离线程
            pthread_detach(pthread_self());

            auto ptr = static_cast<ThreadPool<T> *>(args);

            while (true)
            {
                ptr->lockQueue();

                while (ptr->isEmpty())
                {
                    ptr->threadWait();
                }

                T task = ptr->popTask();
                ptr->unlockQueue();

                task();
                ptr->callBack(task);
            }
        }

        func_t callBack(T &task)
        {
            _func(task);
        }

    private:
        std::vector<pthread_t> _threads;
        int _num;
        std::queue<T> _tasks;
        pthread_mutex_t _mtx;
        pthread_cond_t _cond;
        func_t _func;
    };

}
2.2 第二版线程池
我们上一个内存池写的太过于简陋,为此我们可以进行一下封装,这里我们不在借用系统的线程库,而是使用我们自己的线程库
2.2.1 Thread.hpp 头文件
在这里,我们将对自己的线程库提出以下要求
- 以类的形式实现我们的线程库
- 具有易识别的线程名称和线程状态
- 具有我们自己编写的线程启动和等待函数
代码如下:
#pragma once

#include<iostream>
#include<string>
#include<pthread.h>

enum class Status{
    NEW=0,//代表新建线程
    RUNNING,//代表运行
    EXIT //已退出线程
};
// 参数、返回值为 void 的函数类型
typedef void (*func_t)(void*);

class Thread{
public:
   Thread(int num=0,func_t func=nullptr,void *args=nullptr)
     :_tid(0)
     ,_status(Status::NEW)
     ,_func(func)
     ,_args(args)
   {
    //写入线程名字
    char name[128];
    snprintf(name,sizeof name,"thraed-%d",num);
    _name=name;
   }

   ~Thread(){}

   //获取线程id
   pthread_t getTID() const{
    return _tid;
   }

   //获取线程名字
   std::string getName() const{
     return _name;
   }


   //获取线程状态
   Status getStatus() const{
    return _status;
   }

     // 回调方法
    static void* runHelper(void* args){
        Thread* myThis = static_cast<Thread*>(args);
        // 很简单,回调用户传进来的 func 函数即可
        myThis->_func(myThis->_args);
    }

     // 启动线程
    void run(){
        int ret = pthread_create(&_tid, nullptr, runHelper, this);
        if(ret != 0){
            std::cerr << "create thread fail!" << std::endl;
            exit(1); // 创建线程失败,直接退出
        }
        _status =  Status::RUNNING; // 更改状态为 运行中
    }

    // 线程等待
    void join(){
        int ret = pthread_join(_tid, nullptr);
        if(ret != 0){
            std::cerr << "thread join fail!" << std::endl;
            exit(1); // 等待失败,直接退出
        }
        _status = Status::EXIT; // 更改状态为 退出
    }
private:
    pthread_t _tid; // 线程 ID
    std::string _name; // 线程名
    Status _status; // 线程状态
    func_t _func; // 线程回调函数
    void* _args; // 传递给回调函数的参数
};
2.2.2 ThreadPool.hpp 封装版
将我们以前使用的库里的函数,改为我们自己的线程库
#pragma once

#include <vector>
#include <string>
#include <iostream>
#include <pthread.h>
#include <unistd.h>
#include <queue>
#include <memory>
#include <functional>
#include"Thread.hpp"
#include"Task.hpp"


namespace MyPool
{
    #define THREAD_NUM 10
    template <class T>
    class ThreadPool{
        using func_t = std::function<void(T &)>; // 包装器
    public:
        ThreadPool(func_t func, int num = THREAD_NUM)
            : _num(num), _func(func)
        {
            pthread_mutex_init(&_mtx, nullptr);
            pthread_cond_init(&_cond, nullptr);
        }

        ~ThreadPool(){
             // 等待线程退出
            for(auto &t : _threads){
               t.join();
            }
            pthread_mutex_destroy(&_mtx);
            pthread_cond_destroy(&_cond);
        }

        void init()
        {
            // 创建一批线程
            for(int i = 0; i < _num; i++)
                _threads.push_back(Thread(i, threadRoutine, this));
        }

        void start()
        {
       // 启动线程
            for(auto &t : _threads){
                t.run();
            }

        }


        // 装载任务
        void pushTask(const T &task)
        {
            // 本质上就是在生产商品,需要加锁保护
            lockQueue();
            _tasks.push(task);
            // 唤醒消费者进行消费
            threadWakeUp();
            unlockQueue();
        }
       // 提供给消费者的回调函数
        static void threadRoutine(void *args)
        {
            // 分离线程
            pthread_detach(pthread_self());

            auto ptr = static_cast<ThreadPool<T> *>(args);

            while (true)
            {
                ptr->lockQueue();

                while (ptr->isEmpty())
                {
                    ptr->threadWait();
                }

                T task = ptr->popTask();
                ptr->unlockQueue();

                task();
                ptr->callBack(task);
            }
        }
   protected:
           // 线程加锁
        void lockQueue()
        {
            pthread_mutex_lock(&_mtx);
        }

        // 线程解锁
        void unlockQueue()
        {
            pthread_mutex_unlock(&_mtx);
        }

        // 线程等待
        void threadWait()
        {
            pthread_cond_wait(&_cond, &_mtx);
        }

        // 唤醒线程
        void threadWakeUp()
        {
            pthread_cond_signal(&_cond);
        }

        // 判断任务队列是否为空
        bool isEmpty()
        {
            return _tasks.empty();
        }

        // 获取任务,配合消费者进行消费
        T popTask()
        {
            T task = _tasks.front();
            _tasks.pop();
            return task;
        }

        func_t callBack(T &task)
        {
            _func(task);
        }

    private:
        std::vector<Thread> _threads; //更换为我们自己封装的线程
        std::queue<T> _tasks;
        pthread_mutex_t _mtx;
        pthread_cond_t _cond;
        func_t _func;
        int _num;
    };

}
测试结果如下:
2.3 优化版线程池
我们已经写了两版本的线程池,可是这两版本显然不够智能,目前我们有两个能优化的问题。
1 生产和消费功能不太智能,建议引入生产者和消费者模型
2 加锁和解锁还需要手动执行 ,建议 引入 RAII 编程思想 实现自动化加锁解锁
2.3.1 修改ThreadPool.cpp
在这个头文件中,我们把 确保任务装载及获取时的线程安全问题 全部交给 新写的生产者和消费者 头文件。
仅在这个头文件中,保留和任务处理有关的函数。
#pragma once

#include <vector>
#include <string>
#include <iostream>
#include <pthread.h>
#include <unistd.h>
#include <queue>
#include <memory>
#include <functional>
#include"Thread.hpp"
#include"Task.hpp"
#include"BlockingQueue.hpp"

namespace MyPool{

    #define THREAD_NUM 10

    template <class T>
    class ThreadPool{
        using func_t = std::function<void(T &)>; // 包装器
    public:
        ThreadPool(func_t func, int num = THREAD_NUM)
            : _num(num)
            , _func(func)
        {
            //和锁有关的任务全部交给 生产者和消费者模型
        }

        ~ThreadPool(){
             // 等待线程退出
            for(auto &t : _threads){
               t.join();
            }
        }

        void init() {
            // 创建一批线程
            for(int i = 0; i < _num; i++)
                _threads.push_back(Thread(i, threadRoutine, this));
        }

        void start(){
         // 启动线程
            for(auto &t : _threads){
                t.run();
            }
        }

        // 装载任务
        void pushTask(const T &task){
            _blockqueue.Push(task);
        }

       // 提供给消费者的回调函数
        static void threadRoutine(void *args){
            // 分离线程
            pthread_detach(pthread_self());
            auto ptr = static_cast<ThreadPool<T> *>(args);
            while (true) {
                T task = ptr->popTask();
                task();
                ptr->callBack(task);
            }
        }
   protected:
        // 获取任务,配合消费者进行消费
        T popTask(){
            T task;
            _blockqueue.Pop(&task);
            return task;
        }

        func_t callBack(T &task){
            _func(task);
        }

    private:
        std::vector<Thread> _threads; //更换为我们自己封装的线程
        int _num; // 线程数量
        BlockingQueue<T> _blockqueue; // 阻塞队列
        func_t _func;
    };
}
2.3.2 LockGuard.hpp
这里我们实现一个RAII风格的锁,即初始化时创建,析构时销毁。
只需要简单几行代码即可实现:
#pragma once

#include<pthread.h>

class LockGuard{
    public:

     LockGuard(pthread_mutex_t *pmtx)
      :_mtx(pmtx)
     {
        pthread_mutex_lock(_mtx);
     }

     ~LockGuard(){
        pthread_mutex_unlock(_mtx);
     }
    private:
    pthread_mutex_t *_mtx;
};
2.3.3 生产者消费者模型 BlockingQueue.hpp
在这个头文件中,我们需要实现以下功能:
1 具有消费者和生产者的基本功能,即消费任务和生产任务
2 引入LockGuard.hpp文件,即实现RAII特性的锁
#pragma once

#include<queue>
#include<pthread.h>
#include"LockGuard.hpp"

//命名空间 避免冲突
namespace MyPool{

  #define MAXCAP 10

  template<class T>
  class BlockingQueue{
    public:

       BlockingQueue(size_t cap=MAXCAP)
        :_cap(cap)
       {
          pthread_mutex_init(&_mtx,nullptr);
          pthread_cond_init(&_pcond,nullptr);
          pthread_cond_init(&_ccond,nullptr);
       }

       ~BlockingQueue(){
         pthread_mutex_destroy(&_mtx);
         pthread_cond_destroy(&_pcond);
         pthread_cond_destroy(&_ccond);
       }

       //生产数据 -- 入队列
       void Push(const T& inData){
          //实现RAII风格的加锁
          LockGuard lock(&_mtx);
          //循环判断条件是否满足
          while(IsFull()){
            pthread_cond_wait(&_pcond,&_mtx);
          }
          //将任务入队列
         _queue.push(inData);
         //唤醒消费者
         pthread_cond_signal(&_ccond);
       }

       void Pop(T* outData){
          // 加锁(RAII 风格)
            LockGuard lock(&_mtx);
            // 循环判读条件是否满足
            while(IsEmpty()){
                pthread_cond_wait(&_ccond, &_mtx);
            }
            *outData = _queue.front();
            _queue.pop();
            // 可以加策略唤醒,比如消费完后才唤醒生产者
            pthread_cond_signal(&_pcond);
            // 自动解锁
       }
    private:
     bool IsFull(){
        return _queue.size()==_cap;
     }

     bool IsEmpty(){
        return _queue.empty();
     }
    private:
    std::queue<T> _queue;
    size_t _cap; //阻塞队列的容量
    pthread_mutex_t _mtx;
    pthread_cond_t _pcond; //生产者条件变量
    pthread_cond_t _ccond;//消费者条件变量
  };
}
最后引入main.cpp文件
#include "ThreadPool.hpp"
#include <memory>
#include "Task.hpp"

typedef MyPool::Task<int> type;

// 回调函数
void callBack(type& task){
    // 获取计算结果后打印
    std::string ret = task.getResult();
    std::cout << "计算结果为: " << ret<<std::endl;
}

int main(){
    std::unique_ptr<MyPool::ThreadPool<type>> ptr(new MyPool::ThreadPool<type>(callBack));
    ptr->init();
    ptr->start();
    // 还有后续动作
    while(true){
        // 输入 操作数 操作数 操作符
        int x = 0, y = 0;
        char op = '+';
        std::cout << "输入 x: ";
        std::cin >> x;
        std::cout << "输入 y: ";
        std::cin >> y;
        std::cout << "输入 op: ";
        std::cin >> op;
        // 构建任务对象
        type task(x, y, op);
        // 装载任务
        ptr->pushTask(task);
        sleep(1);
    }
    return 0;
}
测试用例:
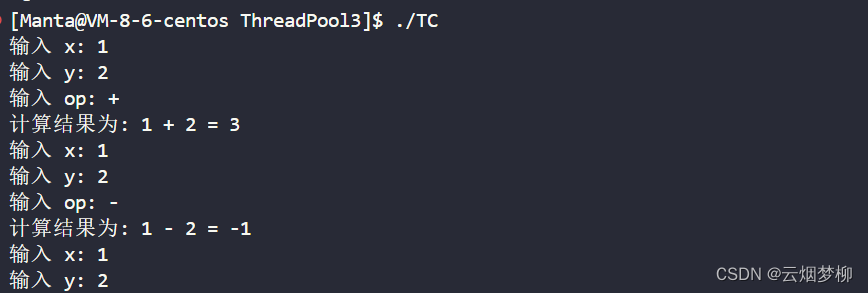


 172
172


 被折叠的 条评论
为什么被折叠?
被折叠的 条评论
为什么被折叠?
 到【灌水乐园】发言


