


Quartz 2D之渐变和裁剪
渐变分为两种: 线性渐变和径向渐变, 我们将学习使用它:
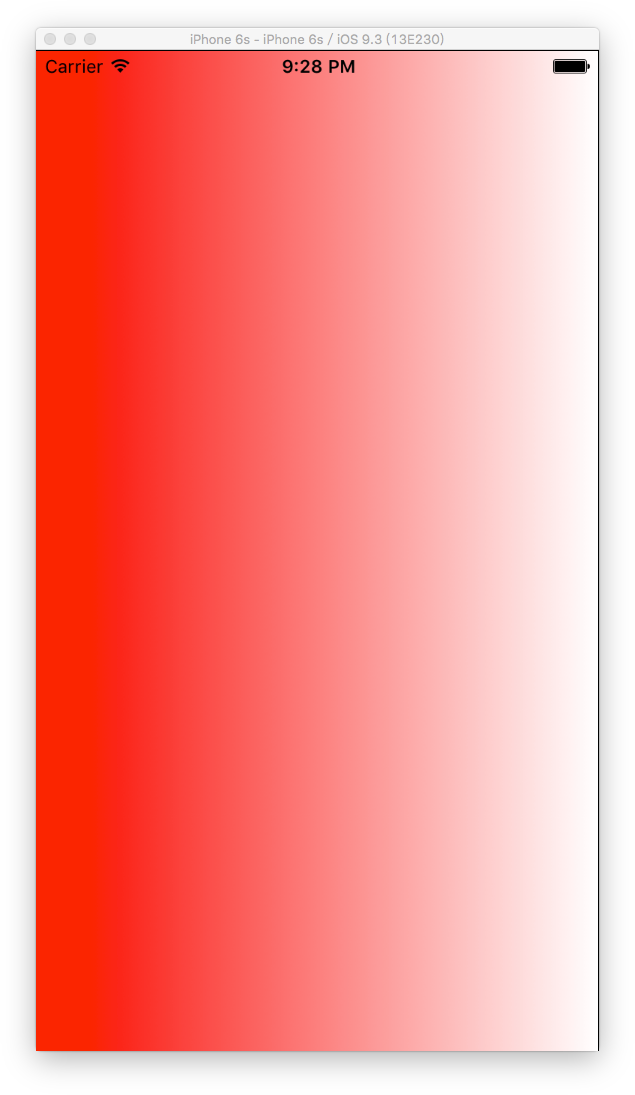
1. 线性渐变
// MARK: - 绘制渐变
// MARK: 线性渐变
func drawGradient(context: CGContextRef?) {
    // 1. 绘制渐变

    // 创建渐变
    let components: [CGFloat] = [1.0, 0.0, 0.0, 1.0, 1.0, 1.0, 1.0, 1.0]
    let locations: [CGFloat] = [0.0, 1
    let gradient = CGGradientCreateWithColorComponents(CGColorSpaceCreateDeviceRGB(), components, locations, 2)

    // 绘制渐变
    CGContextDrawLinearGradient(context, gradient, CGPoint(x: 0.0, y: 0.0), CGPoint(x: self.frame.size.width, y: 0.0), .DrawsAfterEndLocation)
}
我们在drawRect()中调用它, 然后运行程序:
创建渐变的方法:
@available(iOS 2.0, *)
public func CGGradientCreateWithColorComponents(space: CGColorSpace?, _ components: UnsafePointer<CGFloat>, _ locations: UnsafePointer<CGFloat>, _ count: Int) -> CGGradient?
参数说明:
colorSpace: 颜色空间
components: 数组, 每4个一组, 表示一个颜色,如 {r, g, b, a, r, g, b, a}
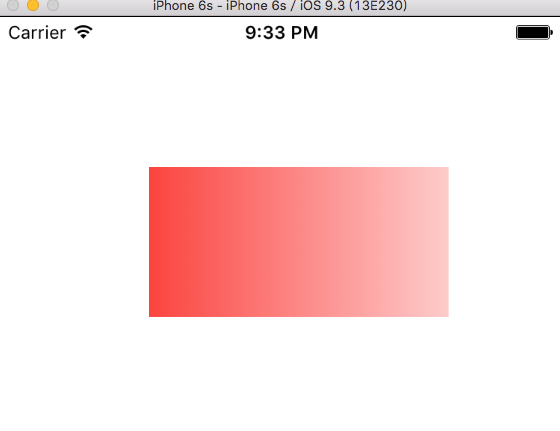
location: 表示渐变开始的位置2. 裁剪
在上面的代码中的创建渐变和绘制渐变之间添加下面的代码
// 渐变的区域裁剪
CGContextClipToRect(context, CGRect(x: 100, y: 100, width: 200, height: 100))
运行程序:
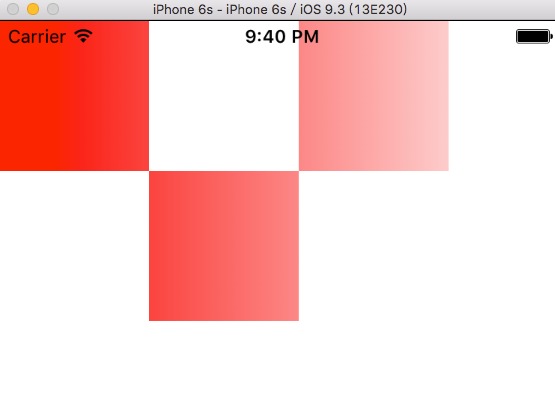
我们也可以一次创建多个裁剪区域,使用下面的代码替换上面的裁剪:
let rects = [
    CGRect(x: 0, y: 0, width: 100 , height: 100),
    CGRect(x: 100, y: 100, width: 100, height: 100),
    CGRect(x: 200, y: 0, width: 100, height: 100)
]
CGContextClipToRects(context, rects, 3)
运行程序:
3. 径向渐变
// MARK: 径向渐变
func drawGradient2(context: CGContextRef?) {
    // 创建渐变
    let components: [CGFloat] = [1.0, 0.0, 1.0, 1.0, 1.0, 1.0, 1.0, 1.0]
    let locations: [CGFloat] = [0.5, 1.0]

    let gradient = CGGradientCreateWithColorComponents(CGColorSpaceCreateDeviceRGB(), components, locations, 2)

    // 绘制渐变
    CGContextDrawRadialGradient(context, gradient, CGPoint(x: self.frame.width/2, y: self.frame.height/2), 0, CGPoint(x: self.frame.width/2, y: self.frame.height/2), 150, .DrawsAfterEndLocation)

}
运行程序:

绘制径向渐变的方法的定义如下:
@available(iOS 2.0, *)
public func CGContextDrawRadialGradient(c: CGContext?, _ gradient: CGGradient?, _ startCenter: CGPoint, _ startRadius: CGFloat, _ endCenter: CGPoint, _ endRadius: CGFloat, _ options: CGGradientDrawingOptions)

参数:
    c: 上下文
    gradient: 渐变
    startCenter: 起始中心点
    startRadius: 起始半径
    endCenter: 截止中心点
    endRadius: 截止半径
    options:渐变的填充方式
明天入职新的公司,新的开始哦! \( ̄︶ ̄)/
4. 全部代码
GradientView.swift:
import UIKit

// 渐变
class GradientView: UIView {

    override init(frame: CGRect) {
        super.init(frame: frame)
        self.backgroundColor = UIColor.whiteColor()
    }

    required init?(coder aDecoder: NSCoder) {
        fatalError("init(coder:) has not been implemented")
    }

    // Only override drawRect: if you perform custom drawing.
    // An empty implementation adversely affects performance during animation.
    override func drawRect(rect: CGRect) {
        // Drawing code

        let context = UIGraphicsGetCurrentContext()
//        self.drawGradient(context)
        self.drawGradient2(context)
    }

    // MARK: - 绘制渐变
    // MARK: 线性渐变
    func drawGradient(context: CGContextRef?) {
        // 1. 绘制渐变

        // 创建渐变
        let components: [CGFloat] = [1.0, 0.0, 0.0, 1.0, 1.0, 1.0, 1.0, 1.0]
        let locations: [CGFloat] = [0.0, 1.0]
        /**
            参数说明:
                1. colorSpace 颜色空间, rgb
                2. components 数组, 每4个一组, 表示一个颜色 {r, g, b, a, r, g, b, a}
                3. location 表示渐变开始的位置
        */
        let gradient = CGGradientCreateWithColorComponents(CGColorSpaceCreateDeviceRGB(), components, locations, 2)

        // 渐变的区域裁剪
//        CGContextClipToRect(context, CGRect(x: 100, y: 100, width: 200, height: 100))

        let rects = [
            CGRect(x: 0, y: 0, width: 100 , height: 100),
            CGRect(x: 100, y: 100, width: 100, height: 100),
            CGRect(x: 200, y: 0, width: 100, height: 100)
        ]
        CGContextClipToRects(context, rects, 3)

        // 绘制渐变
        CGContextDrawLinearGradient(context, gradient, CGPoint(x: 0.0, y: 0.0), CGPoint(x: self.frame.size.width, y: 0.0), .DrawsAfterEndLocation)
    }

    // MARK: 径向渐变
    func drawGradient2(context: CGContextRef?) {
        // 创建渐变
        let components: [CGFloat] = [1.0, 0.0, 1.0, 1.0, 1.0, 1.0, 1.0, 1.0]
        let locations: [CGFloat] = [0.0, 1.0]
        /**
         参数说明:
         1. colorSpace 颜色空间, rgb
         2. components 数组, 每4个一组, 表示一个颜色 {r, g, b, a, r, g, b, a}
         3. location 表示渐变开始的位置
         */
        let gradient = CGGradientCreateWithColorComponents(CGColorSpaceCreateDeviceRGB(), components, locations, 2)

        // 绘制渐变
        CGContextDrawRadialGradient(context, gradient, CGPoint(x: self.frame.width/2, y: self.frame.height/2), 0, CGPoint(x: self.frame.width/2, y: self.frame.height/2), 150, .DrawsAfterEndLocation)

    }

}
ViewController.swift:
import UIKit

class ViewController: UIViewController {

    override func viewDidLoad() {
        super.viewDidLoad()
        // Do any additional setup after loading the view, typically from a nib.

        let view = GradientView(frame: self.view.bounds)
        self.view.addSubview(view)
    }

    override func didReceiveMemoryWarning() {
        super.didReceiveMemoryWarning()
        // Dispose of any resources that can be recreated.
    }
}


 1684
1684


 被折叠的 条评论
为什么被折叠?
被折叠的 条评论
为什么被折叠?
 到【灌水乐园】发言


