


📖 飞书二次开发系列文章:
飞书二开系列之创建测试企业与企业应用等准备工作(一)
飞书二开系列之开发流程解析与示例代码(二)
➡️ 飞书二开系列之SpringBoot实现通讯录显示请假状态(三)
一、前言
这是飞书二开的最后一篇,以上两篇都做了很详细的教程,没看过的伙伴可以看看,这里为什么使用springboot呢,首先springboot自带tomcat所以无需搭建web服务,maven项目直接打包jar包,jar包传到服务器直接运行就能用了,还是挺方便的。
二、代码结构
2.1 目录结构
├── HELP.md
├── feishu.iml
├── mvnw
├── mvnw.cmd
├── pom.xml
├── src
│   ├── main
│   │   ├── java
│   │   │   └── com
│   │   │       └── yishuo
│   │   │           └── feishu
│   │   │               ├── FeishuApplication.java
│   │   │               ├── config
│   │   │               │   └── CorsConfig.java
│   │   │               ├── controller
│   │   │               │   └── FeishuController.java
│   │   │               ├── service
│   │   │               │   └── impl
│   │   │               │       ├── FeiShu.java
│   │   │               │       └── impl
│   │   │               │           └── FeiShuImpl.java
│   │   │               └── utils
│   │   │                   ├── FeishuNotifyDataDecrypter.java
│   │   │                   └── HttpRequests.java
│   │   └── resources
│   │       └── application.yml
│   └── test
│       └── java
│           └── com
│               └── yishuo
│                   └── feishu
│                       └── FeishuApplicationTests.java
└── target
    ├── classes
    │   ├── application.yml
    │   └── com
    │       └── yishuo
    │           └── feishu
    │               ├── FeishuApplication.class
    │               ├── config
    │               │   └── CorsConfig.class
    │               ├── controller
    │               │   └── FeishuController.class
    │               ├── service
    │               │   └── impl
    │               │       ├── FeiShu.class
    │               │       └── impl
    │               │           └── FeiShuImpl.class
    │               └── utils
    │                   ├── FeishuNotifyDataDecrypter.class
    │                   └── HttpRequests.class
    ├── generated-sources
    │   └── annotations
    ├── generated-test-sources
    │   └── test-annotations
    ├── maven-archiver
    │   └── pom.properties
    ├── maven-status
    │   └── maven-compiler-plugin
    │       ├── compile
    │       │   └── default-compile
    │       │       ├── createdFiles.lst
    │       │       └── inputFiles.lst
    │       └── testCompile
    │           └── default-testCompile
    │               ├── createdFiles.lst
    │               └── inputFiles.lst
    ├── surefire-reports
    │   ├── TEST-com.yishuo.feishu.FeishuApplicationTests.xml
    │   └── com.yishuo.feishu.FeishuApplicationTests.txt
    └── test-classes
        └── com
            ├── yishuo
            │   └── feishu
            │       └── FeishuApplicationTests.class
            └── yishuo
                └── feishu
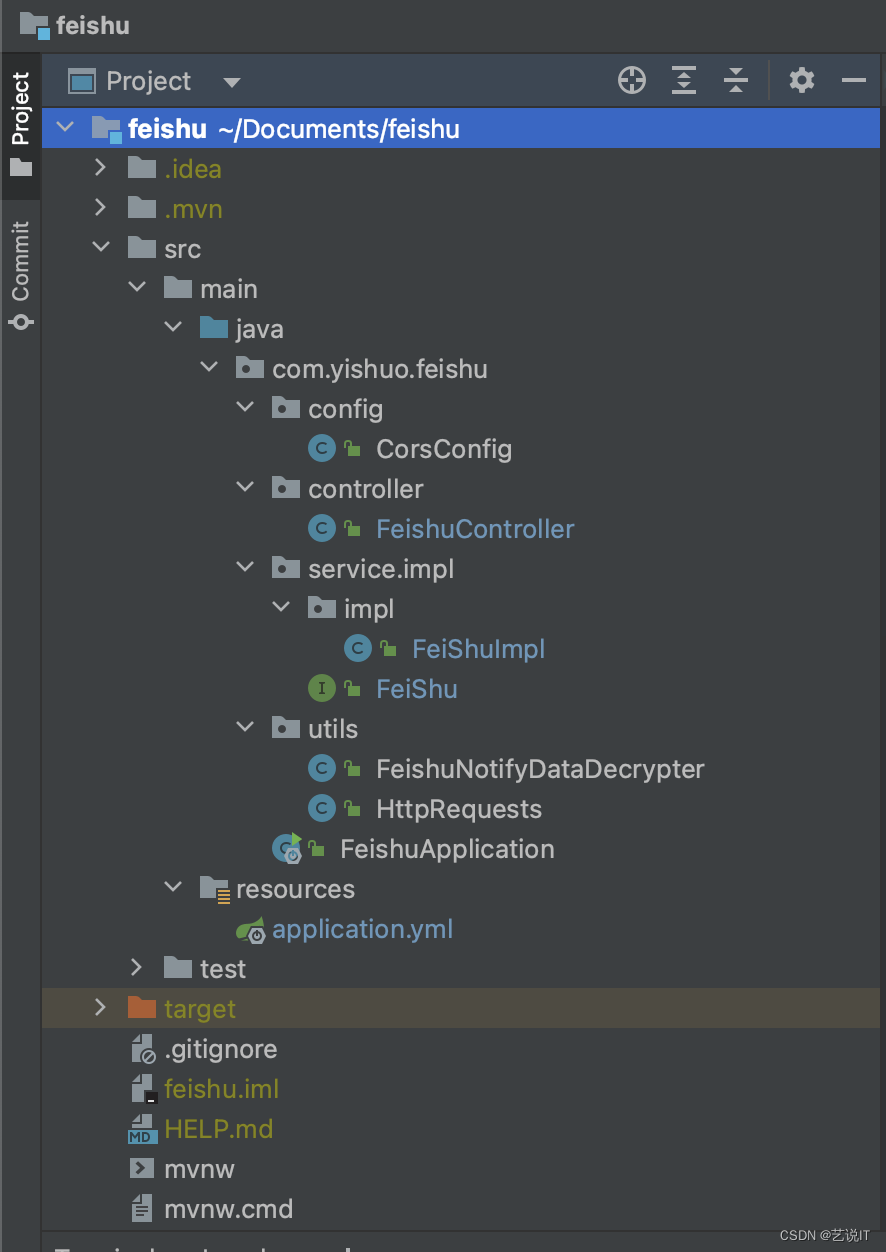
2.2 目录解析
# config 配置文件目录
CorsConfig - 跨域请求配置文件
# controller 前端控制器目录
FeishuController - controller接口
# serivce 数据服务层目录
Feishu - 定义服务层功能接口
## impl 数据服务的实现接口目录
FeishuImpl - 服务层功能接口的实现类
# utils 目录工具类
FeishuNotifyDataDecrypter - 飞书response解密工具类
HttpRequests	-	封装好的http post请求工具类
三、核心代码解析
3.1 application.yml
application.yml 主要是定义一些配置信息,需要用就直接从application.yml里取就行了,后期定义修改就方便很多,不需要大量改动代码,代码健壮性就比较强。
# 服务端口
server:
  port: 8080

# 飞书相关配置信息
feiShuParam:
	# 加密key
  encrypt-key: Lp73MrSVKja7nhToYwSYDcY2WFdZRZfKWzApoZTH
  # 应用ID
  app-id: cli_a4beae8504389013
  # 应用密钥
  app-secret: dVHRj7wiKlnKuscDwfUyQdfIc0NPZDkI
  # 获取用户token接口
  tenant-access-token-url: https://open.feishu.cn/open-apis/auth/v3/tenant_access_token/internal
  # 请假同步日历接口
  timeoff-events-url: https://open.feishu.cn/open-apis/calendar/v4/timeoff_events?user_id_type=user_id
3.2 controller
FeishuController.class 定义了一个post接口,接口访问路径如:http://127.0.0.1/feishu/Ny7d4dH54z7yYvvve 这些你都可以自定义,主要通过这个接口与飞书服务器通讯。
package com.yishuo.feishu.controller;

import com.alibaba.fastjson2.JSONObject;
import com.yishuo.feishu.service.impl.FeiShu;
import org.springframework.beans.factory.annotation.Autowired;
import org.springframework.web.bind.annotation.*;

/**
 * UserController
 *
 * @version 0.1
 * 2022/11/21 12:20
 **/

@RestController
@RequestMapping("/feishu")
@CrossOrigin
public class FeishuController {

    @Autowired
    private FeiShu feiShu;

    @PostMapping("/Ny7d4dH54z7yYvvve")
    public String loginController(@RequestBody String body) {
        System.out.println(body);
        JSONObject data = JSONObject.parseObject(body);
        String res = feiShu.eventFeiShu(data);
        return res;
    }

}
3.3 service
Feishu接口,就定义功能方法,具体逻辑实现在Impl实现。
package com.yishuo.feishu.service.impl;

import com.alibaba.fastjson2.JSONObject;


/**
 * feishu
 *
 * @version 0.1
 * @date 2023年03月25日 15:25
 **/
public interface FeiShu {

    String getToken();

    String eventFeiShu(JSONObject data);

    void leaveSchedule(String token, JSONObject data);
}
FishuImpl 就是对Fishu接口的具体功能的实现。
package com.yishuo.feishu.service.impl.impl;
import com.alibaba.fastjson2.JSONObject;
import com.yishuo.feishu.utils.FeishuNotifyDataDecrypter;
import com.yishuo.feishu.utils.HttpRequests;
import com.yishuo.feishu.service.impl.FeiShu;
import org.springframework.beans.factory.annotation.Value;
import org.springframework.stereotype.Service;
import java.util.regex.Matcher;
import java.util.regex.Pattern;
/**
* FeiShuImpl
* 功能实现类
*
* @version 0.1
* @date 2023年03月25日 15:26
**/
@Service
public class FeiShuImpl implements FeiShu {
@Value("${feiShuParam.encrypt-key:}")
private String encryptKey;
@Value("${feiShuParam.app-id}")
private String app_id;
@Value("${feiShuParam.app-secret}")
private String app_secret;
@Value("${feiShuParam.tenant-access-token-url}")
private String tenant_access_token_url;
@Value("${feiShuParam.timeoff-events-url}")
private String timeoff_events_url;
/**
* 数值匹配正则表达式
*/
private static final Pattern NUM_PATTERN = Pattern.compile("^\\d{4}-\\d{1,2}-\\d{1,2}");
/**
* 获取token
*
* @return
*/
@Override
public String getToken() {
try {
String data = String.format("{\n" +
" \"app_id\": \"%s\",\n" +
" \"app_secret\": \"%s\"\n" +
"}", app_id, app_secret);
String requests = HttpRequests.requests(tenant_access_token_url, data, "");
JSONObject challengeObject = JSONObject.parseObject(requests);
String token = challengeObject.getString("tenant_access_token");
return token;
} catch (Exception e) {
System.out.println("获取token error: " + e);
}
return "获取token error";
}
/**
* 监听飞书
*
* @param data
* @return
*/
@Override
public String eventFeiShu(JSONObject data) {
if (data.containsKey("encrypt")) {
try {
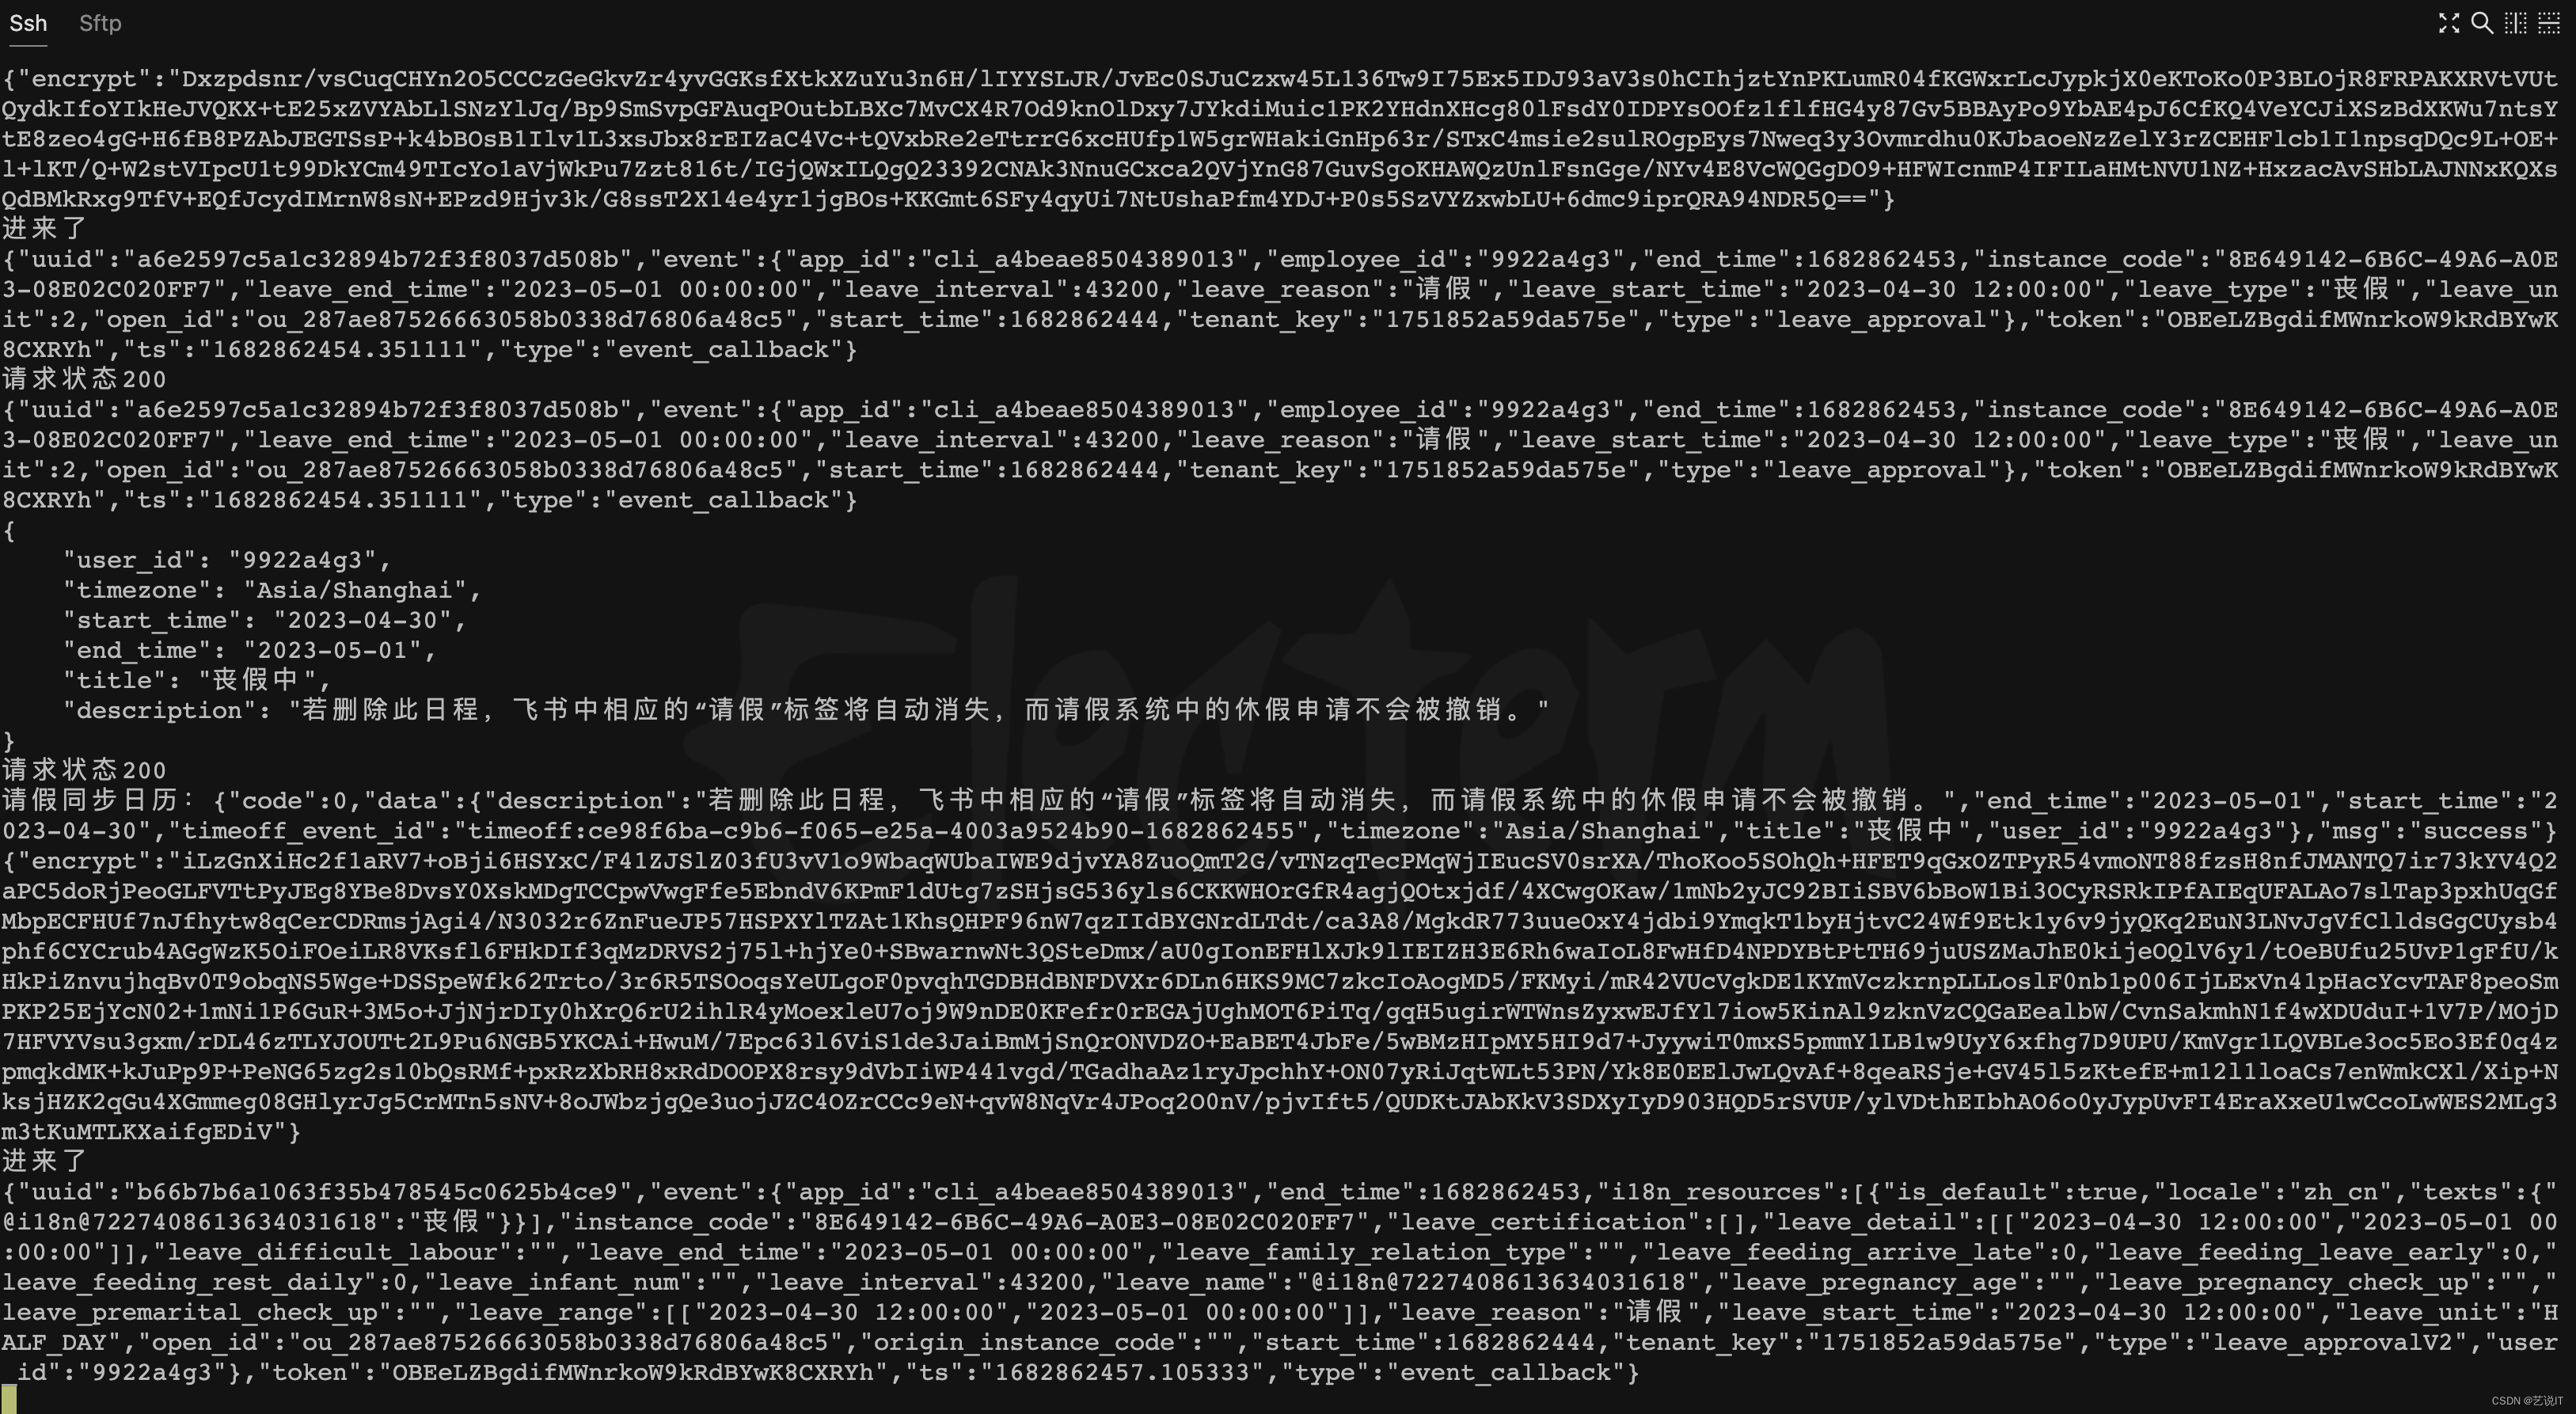
System.out.println("进来了");
FeishuNotifyDataDecrypter feishuNotifyDataDecrypter = new FeishuNotifyDataDecrypter(encryptKey);
String encrypt = data.getString("encrypt");
String challenge = feishuNotifyDataDecrypter.decrypt(encrypt);
JSONObject challengeObject = JSONObject.parseObject(challenge);
System.out.println(challengeObject);
if (challengeObject.containsKey("challenge")) {
String newChallenge = challengeObject.getString("challenge");
String result = String.format("{\"challenge\":\"%s\"}", newChallenge);
return result;
} else {
String event = challengeObject.getString("event");
JSONObject eventObject = JSONObject.parseObject(event);
if (eventObject.containsKey("leave_type")) {
leaveSchedule(getToken(), challengeObject);
} else {
return event;
}
}
} catch (Exception e) {
System.out.println("服务器验证 error: " + e);
}
}
return "ok";
}
/**
* 请假同步日历
*
* @param token
* @param data
*/
@Override
public void leaveSchedule(String token, JSONObject data) {
try {
System.out.println(data);
String employee_id = data.getJSONObject("event").getString("employee_id");
String leave_type = data.getJSONObject("event").getString("leave_type");
String start_time = data.getJSONObject("event").getString("start_time");
String end_time = data.getJSONObject("event").getString("end_time");
if (leave_type.equals("年假") || leave_type.equals("婚假")|| leave_type.equals("产假")|| leave_type.equals("陪产假")|| leave_type.equals("丧假")){
start_time = formatDate(data.getJSONObject("event").getString("leave_start_time"));
end_time = formatDate(data.getJSONObject("event").getString("leave_end_time"));
}
String jsonData = String.format("{\n" +
" \"user_id\": \"%s\",\n" +
" \"timezone\": \"Asia/Shanghai\",\n" +
" \"start_time\": \"%s\",\n" +
" \"end_time\": \"%s\",\n" +
" \"title\": \"%s中\",\n" +
" \"description\": \"若删除此日程,飞书中相应的“请假”标签将自动消失,而请假系统中的休假申请不会被撤销。\"\n" +
"}", employee_id, start_time, end_time, leave_type);
System.out.println(jsonData);
String requests = HttpRequests.requests(timeoff_events_url, jsonData, "Bearer " + token);
System.out.println("请假同步日历:" + requests);
} catch (Exception e) {
System.out.println("请求创建请假日常接口: " + e);
}
}
/**
* 解析字符串中数值
*
* @param text 含有数值的字符串,例如,库存剩余200件
* @return 数值
*/
public static String formatDate(String text) {
Matcher matcher = NUM_PATTERN.matcher(text);
StringBuilder sb = new StringBuilder();
while (matcher.find()) {
sb.append(matcher.group());
return matcher.group();
}
return text;
}
}
3.4 utils
飞书response 解密,官方文档也写有,拿来用就行。
package com.yishuo.feishu.utils;

import javax.crypto.BadPaddingException;
import javax.crypto.Cipher;
import javax.crypto.IllegalBlockSizeException;
import javax.crypto.NoSuchPaddingException;
import javax.crypto.spec.IvParameterSpec;
import javax.crypto.spec.SecretKeySpec;
import java.nio.charset.StandardCharsets;
import java.security.InvalidAlgorithmParameterException;
import java.security.InvalidKeyException;
import java.security.MessageDigest;
import java.security.NoSuchAlgorithmException;
import java.util.Base64;

/**
 * 飞书解密
 */
public class FeishuNotifyDataDecrypter {

    private byte[] key;

    /**
     * @param encryptKey 飞书应用配置的 Encrypt Key
     */
    public FeishuNotifyDataDecrypter(String encryptKey) {
        MessageDigest digest = null;
        try {
            digest = MessageDigest.getInstance("SHA-256");
        } catch (NoSuchAlgorithmException e) {
            // won't happen
        }
        key = digest.digest(encryptKey.getBytes(StandardCharsets.UTF_8));
    }

    /**
     * 解密
     * @param encrypt 请求json encrypt的对应的值
     */
    public String decrypt(String encrypt) throws InvalidAlgorithmParameterException, InvalidKeyException, BadPaddingException, IllegalBlockSizeException, NoSuchPaddingException, NoSuchAlgorithmException {

        byte[] decode = Base64.getDecoder().decode(encrypt);

        Cipher cipher = Cipher.getInstance("AES/CBC/NOPADDING");

        byte[] iv = new byte[16];
        System.arraycopy(decode, 0, iv, 0, 16);

        byte[] data = new byte[decode.length - 16];
        System.arraycopy(decode, 16, data, 0, data.length);

        cipher.init(Cipher.DECRYPT_MODE, new SecretKeySpec(key, "AES"), new IvParameterSpec(iv));

        byte[] r = cipher.doFinal(data);
        if (r.length > 0) {
            int p = r.length - 1;
            for (; p >= 0 && r[p] <= 16; p--) {
            }

            if (p != r.length - 1) {
                byte[] rr = new byte[p + 1];
                System.arraycopy(r, 0, rr, 0, p + 1);
                r = rr;
            }
        }

        return new String(r, StandardCharsets.UTF_8);
    }
}
用网上封装好的http post类就行。
package com.yishuo.feishu.utils;


import org.apache.commons.httpclient.HttpClient;
import org.apache.commons.httpclient.methods.InputStreamRequestEntity;
import org.apache.commons.httpclient.methods.PostMethod;
import org.apache.commons.httpclient.methods.RequestEntity;

import java.io.*;

/**
 * post请求
 **/
public class HttpRequests {

    /**
     * 向指定 URL 发送POST方法的请求
     *
     * @param url      发送请求的 URL
     * @param jsonData 请求参数,请求参数应该是Json格式字符串的形式。
     * @return 所代表远程资源的响应结果
     */
    public static String requests(String url, String jsonData, String bearer) {
        PrintWriter out = null;
        BufferedReader in = null;
        String result = "";
        try {
            HttpClient client = new HttpClient(); // 客户端实例化
            PostMethod postMethod = new PostMethod(url); // 请求方法post,可以将请求路径传入构造参数中

            postMethod.addRequestHeader("Content-type", "application/json; charset=utf-8");
            postMethod.addRequestHeader("Authorization", bearer);
            byte[] requestBytes = jsonData.getBytes("utf-8"); // 将参数转为二进制流

            InputStream inputStream = new ByteArrayInputStream(requestBytes, 0, requestBytes.length);
            // 请求体
            RequestEntity requestEntity = new InputStreamRequestEntity(inputStream, requestBytes.length, "application/json; charset=utf-8");
            postMethod.setRequestEntity(requestEntity); // 将参数放入请求体
            int i = client.executeMethod(postMethod); // 执行方法
            System.out.println("请求状态" + i);

            // 这里因该有判断的,根据请求状态判断请求是否成功,然后根据第三方接口返回的数据格式,解析出我们需要的数据
            byte[] responseBody = postMethod.getResponseBody(); // 得到相应数据
            String s = new String(responseBody);
            result = s;
        } catch (Exception e) {
            System.out.println("发送 POST 请求出现异常!" + e);
            e.printStackTrace();
        }

        // 使用finally块来关闭输出流、输入流
        finally {
            try {
                if (out != null) {
                    out.close();
                }
                if (in != null) {
                    in.close();
                }
            } catch (IOException ex) {
                ex.printStackTrace();
            }
        }

        return result;
    }
}
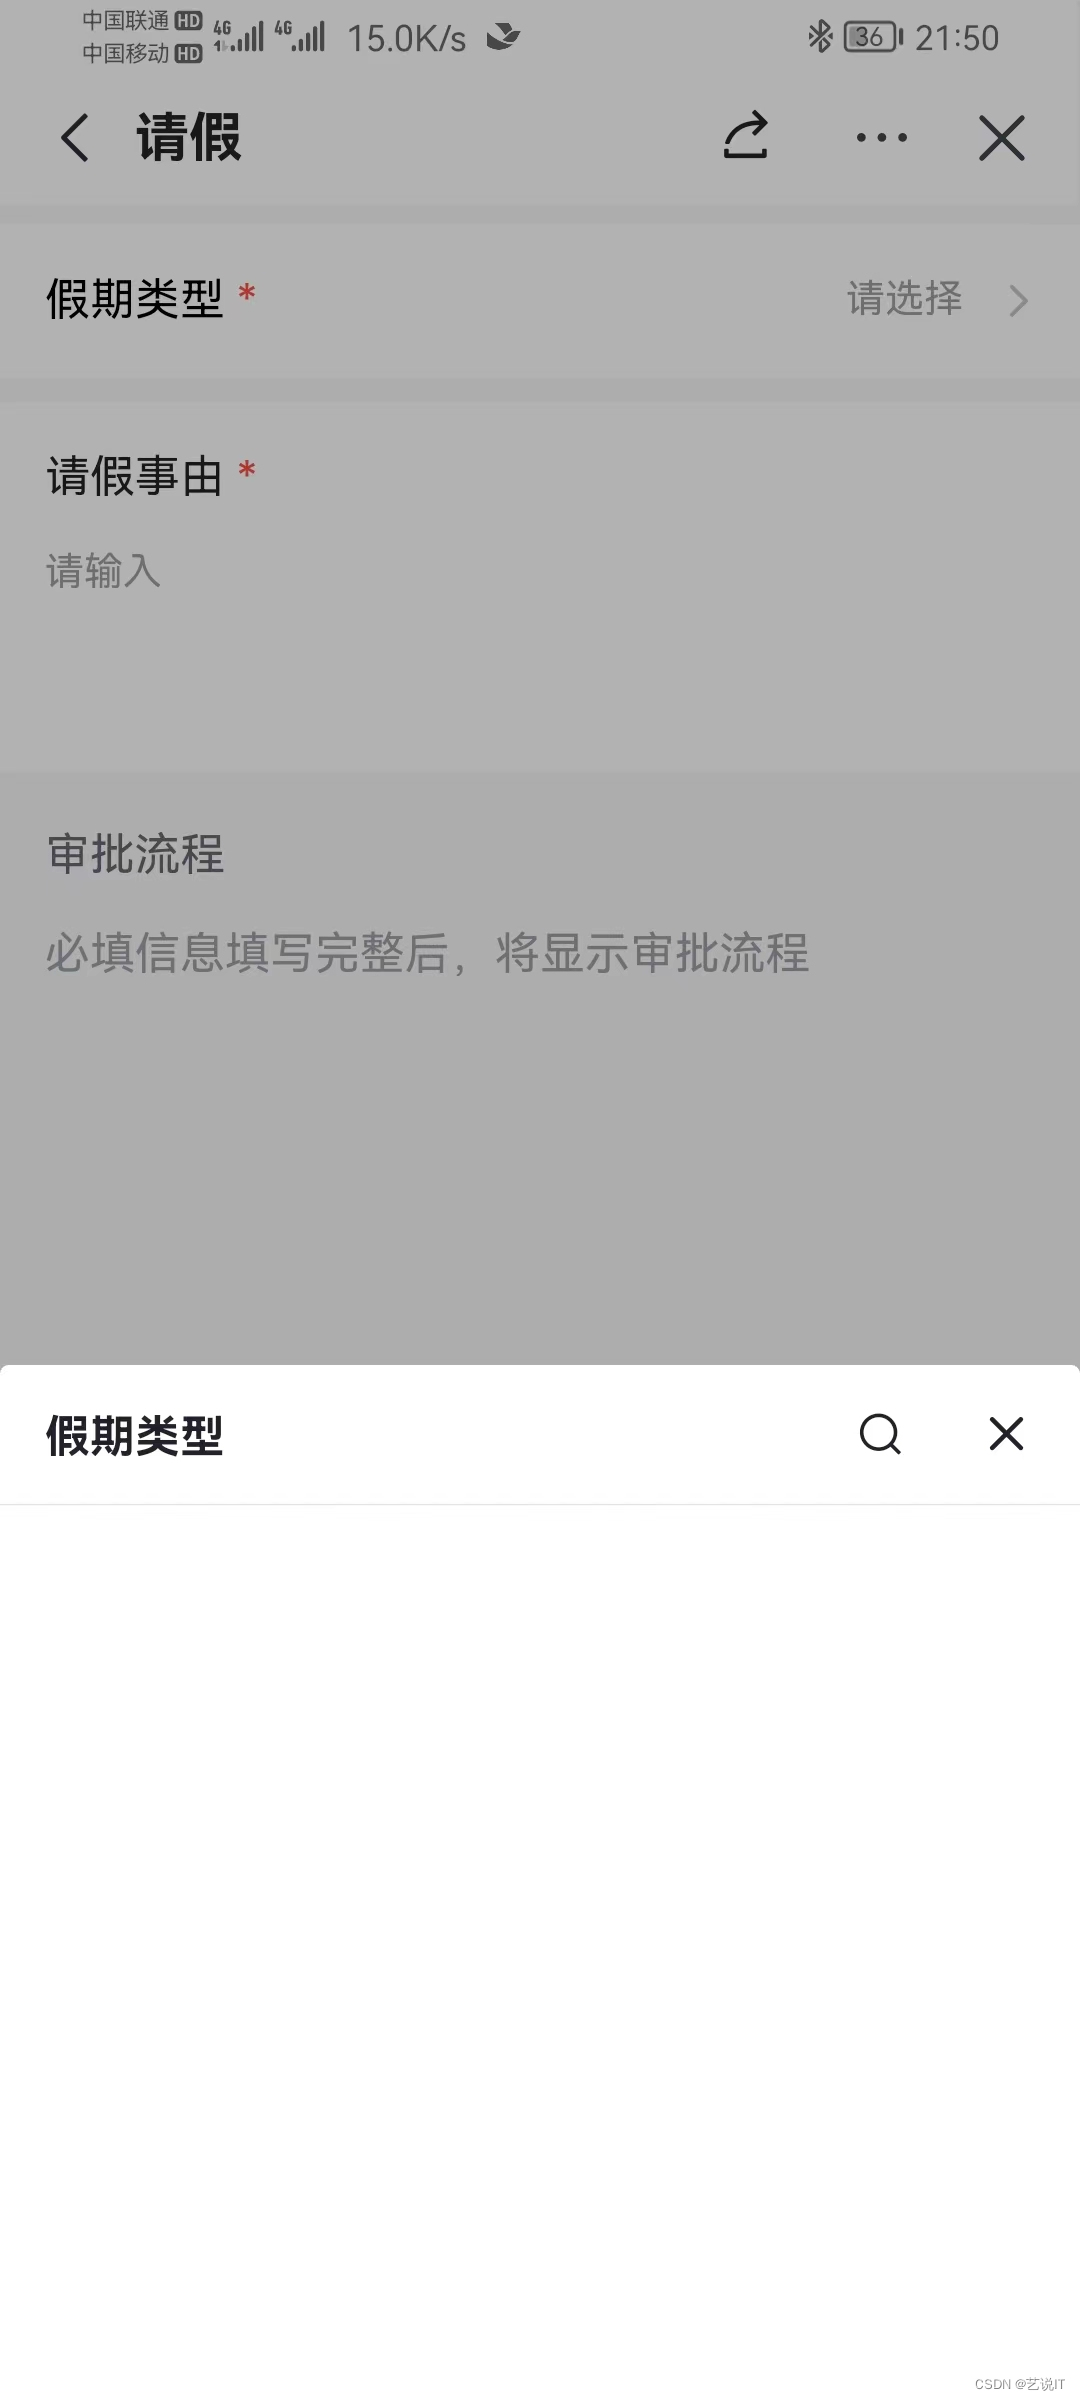
四、补充飞书创建审批没有选项的问题
问题如下图,测试的时候点击审批却发现请假类型为空,没有选项,这时候就要去后台开启请假类型。
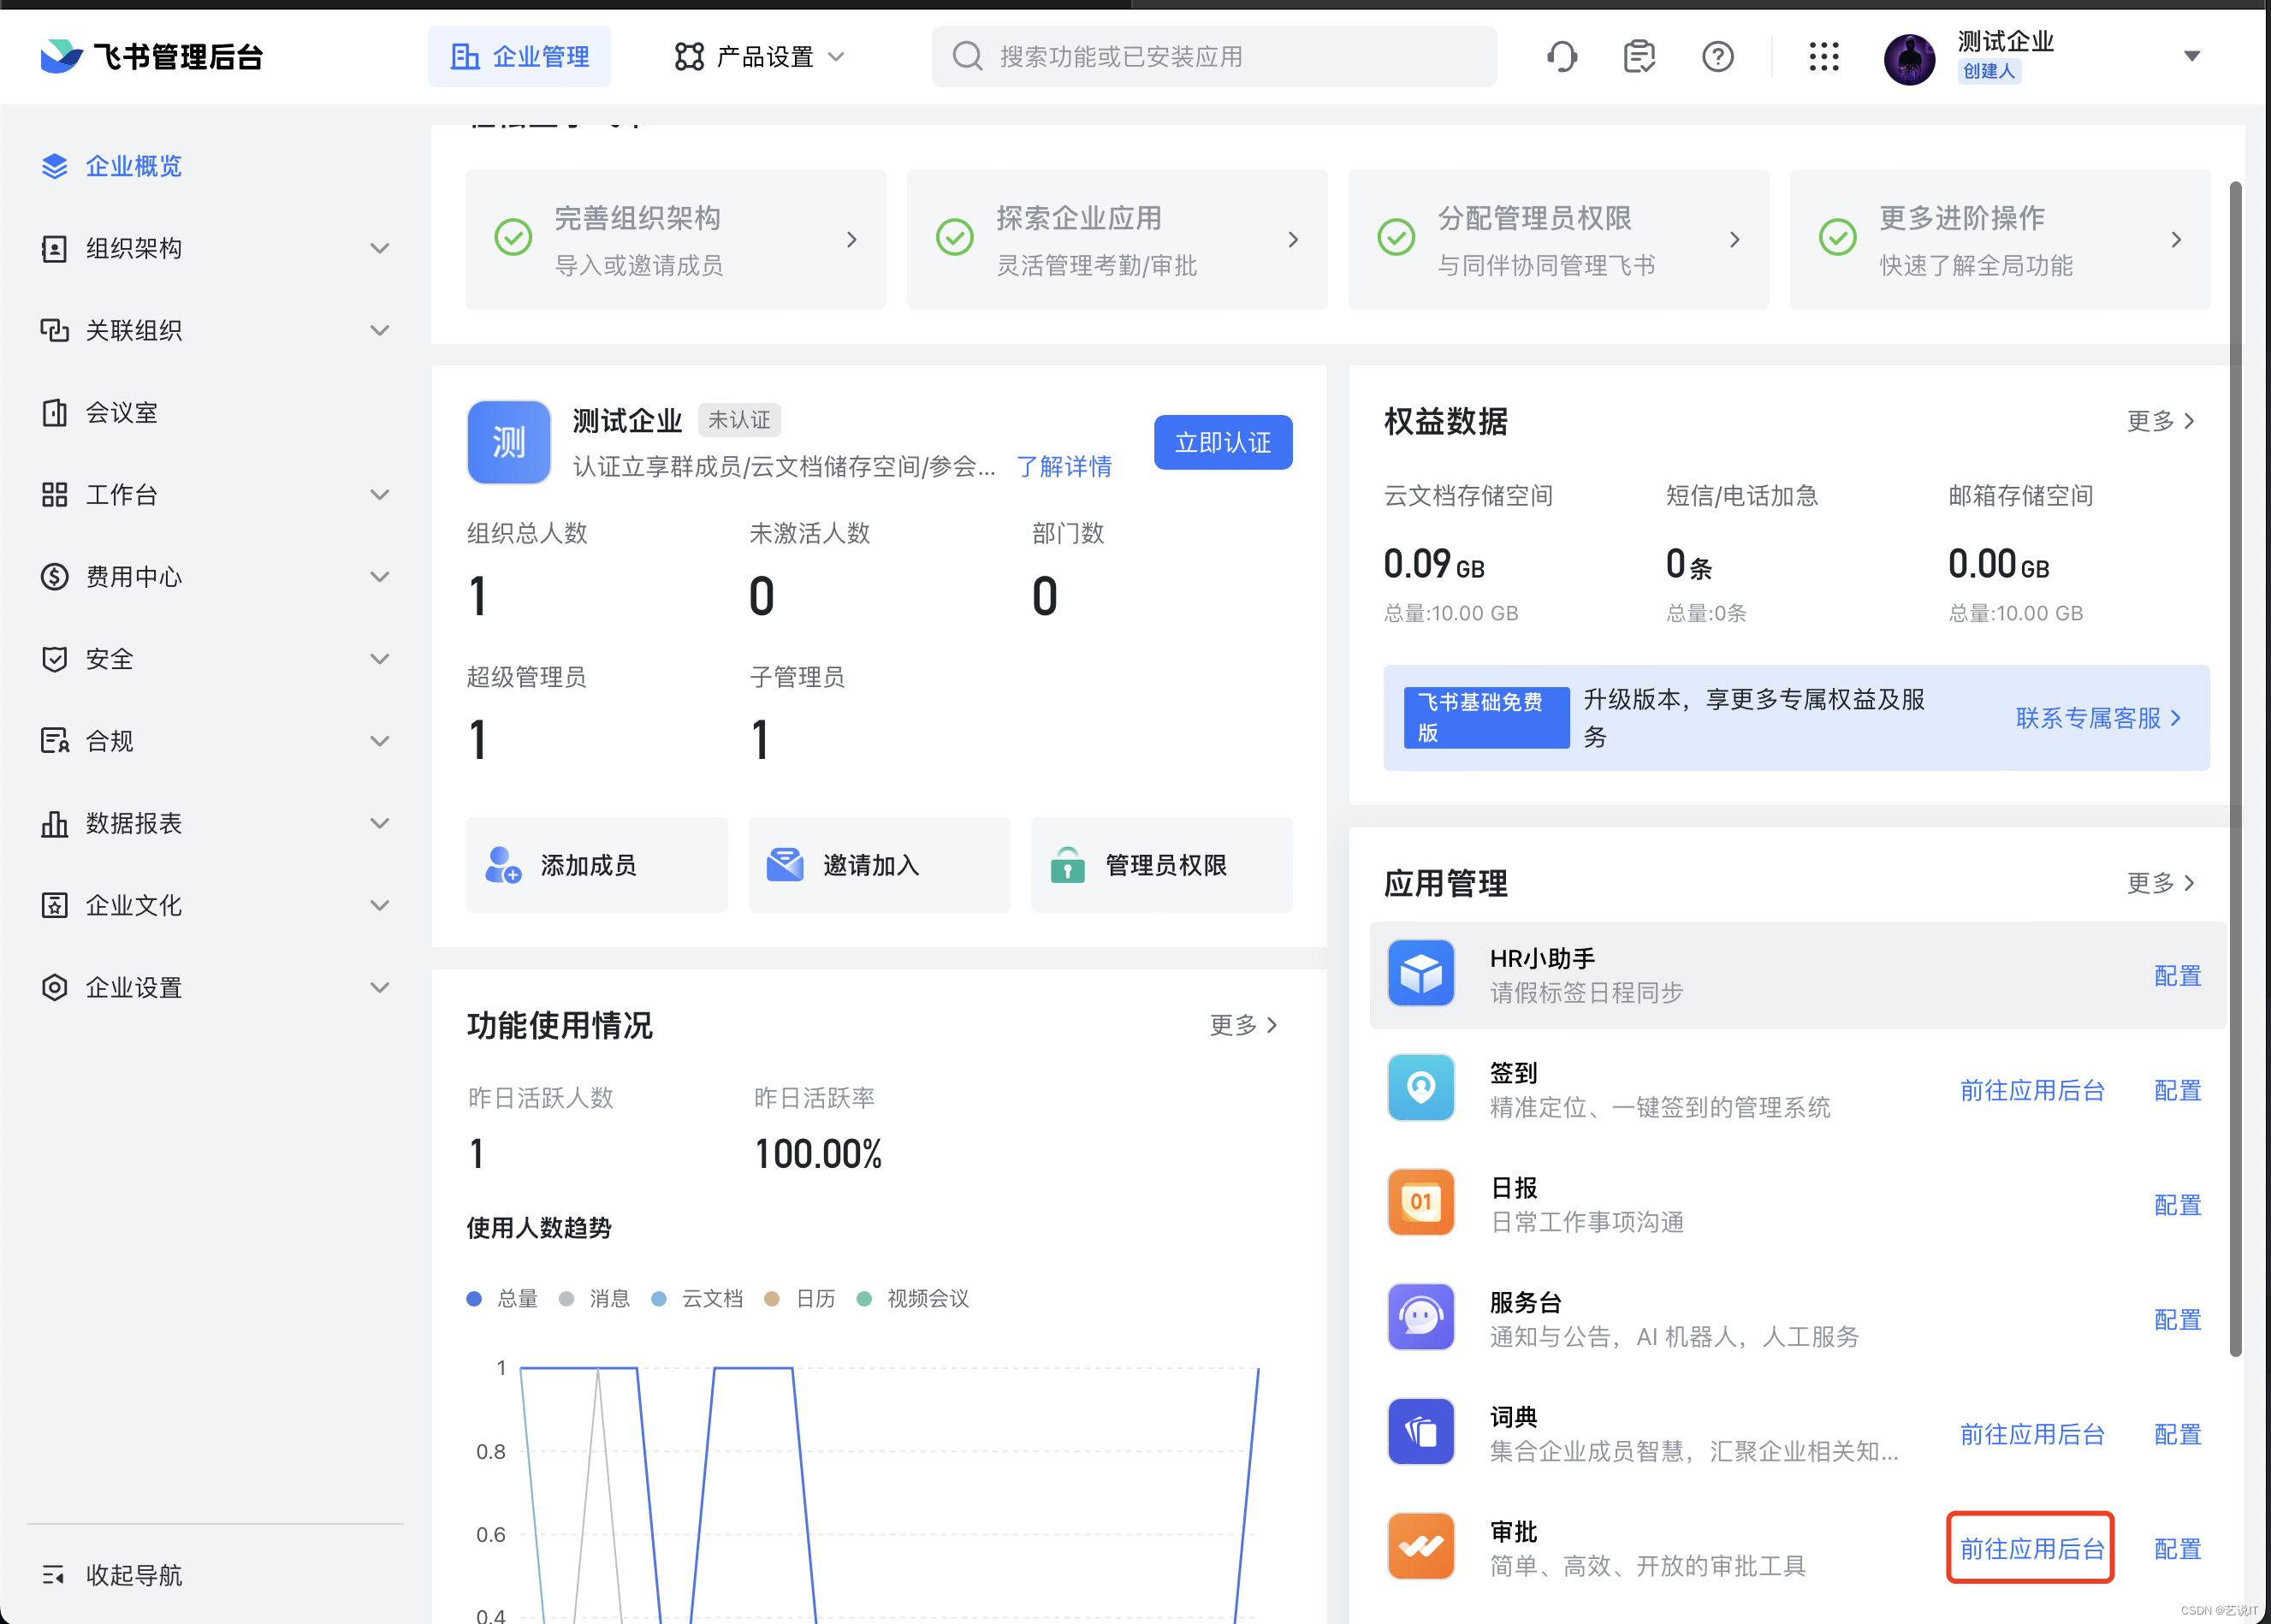
# 管理后台
https://feishu.cn/admin
在审批应用处点击前往应用后台。
点击请假管理 -> 前往考勤管理后台。
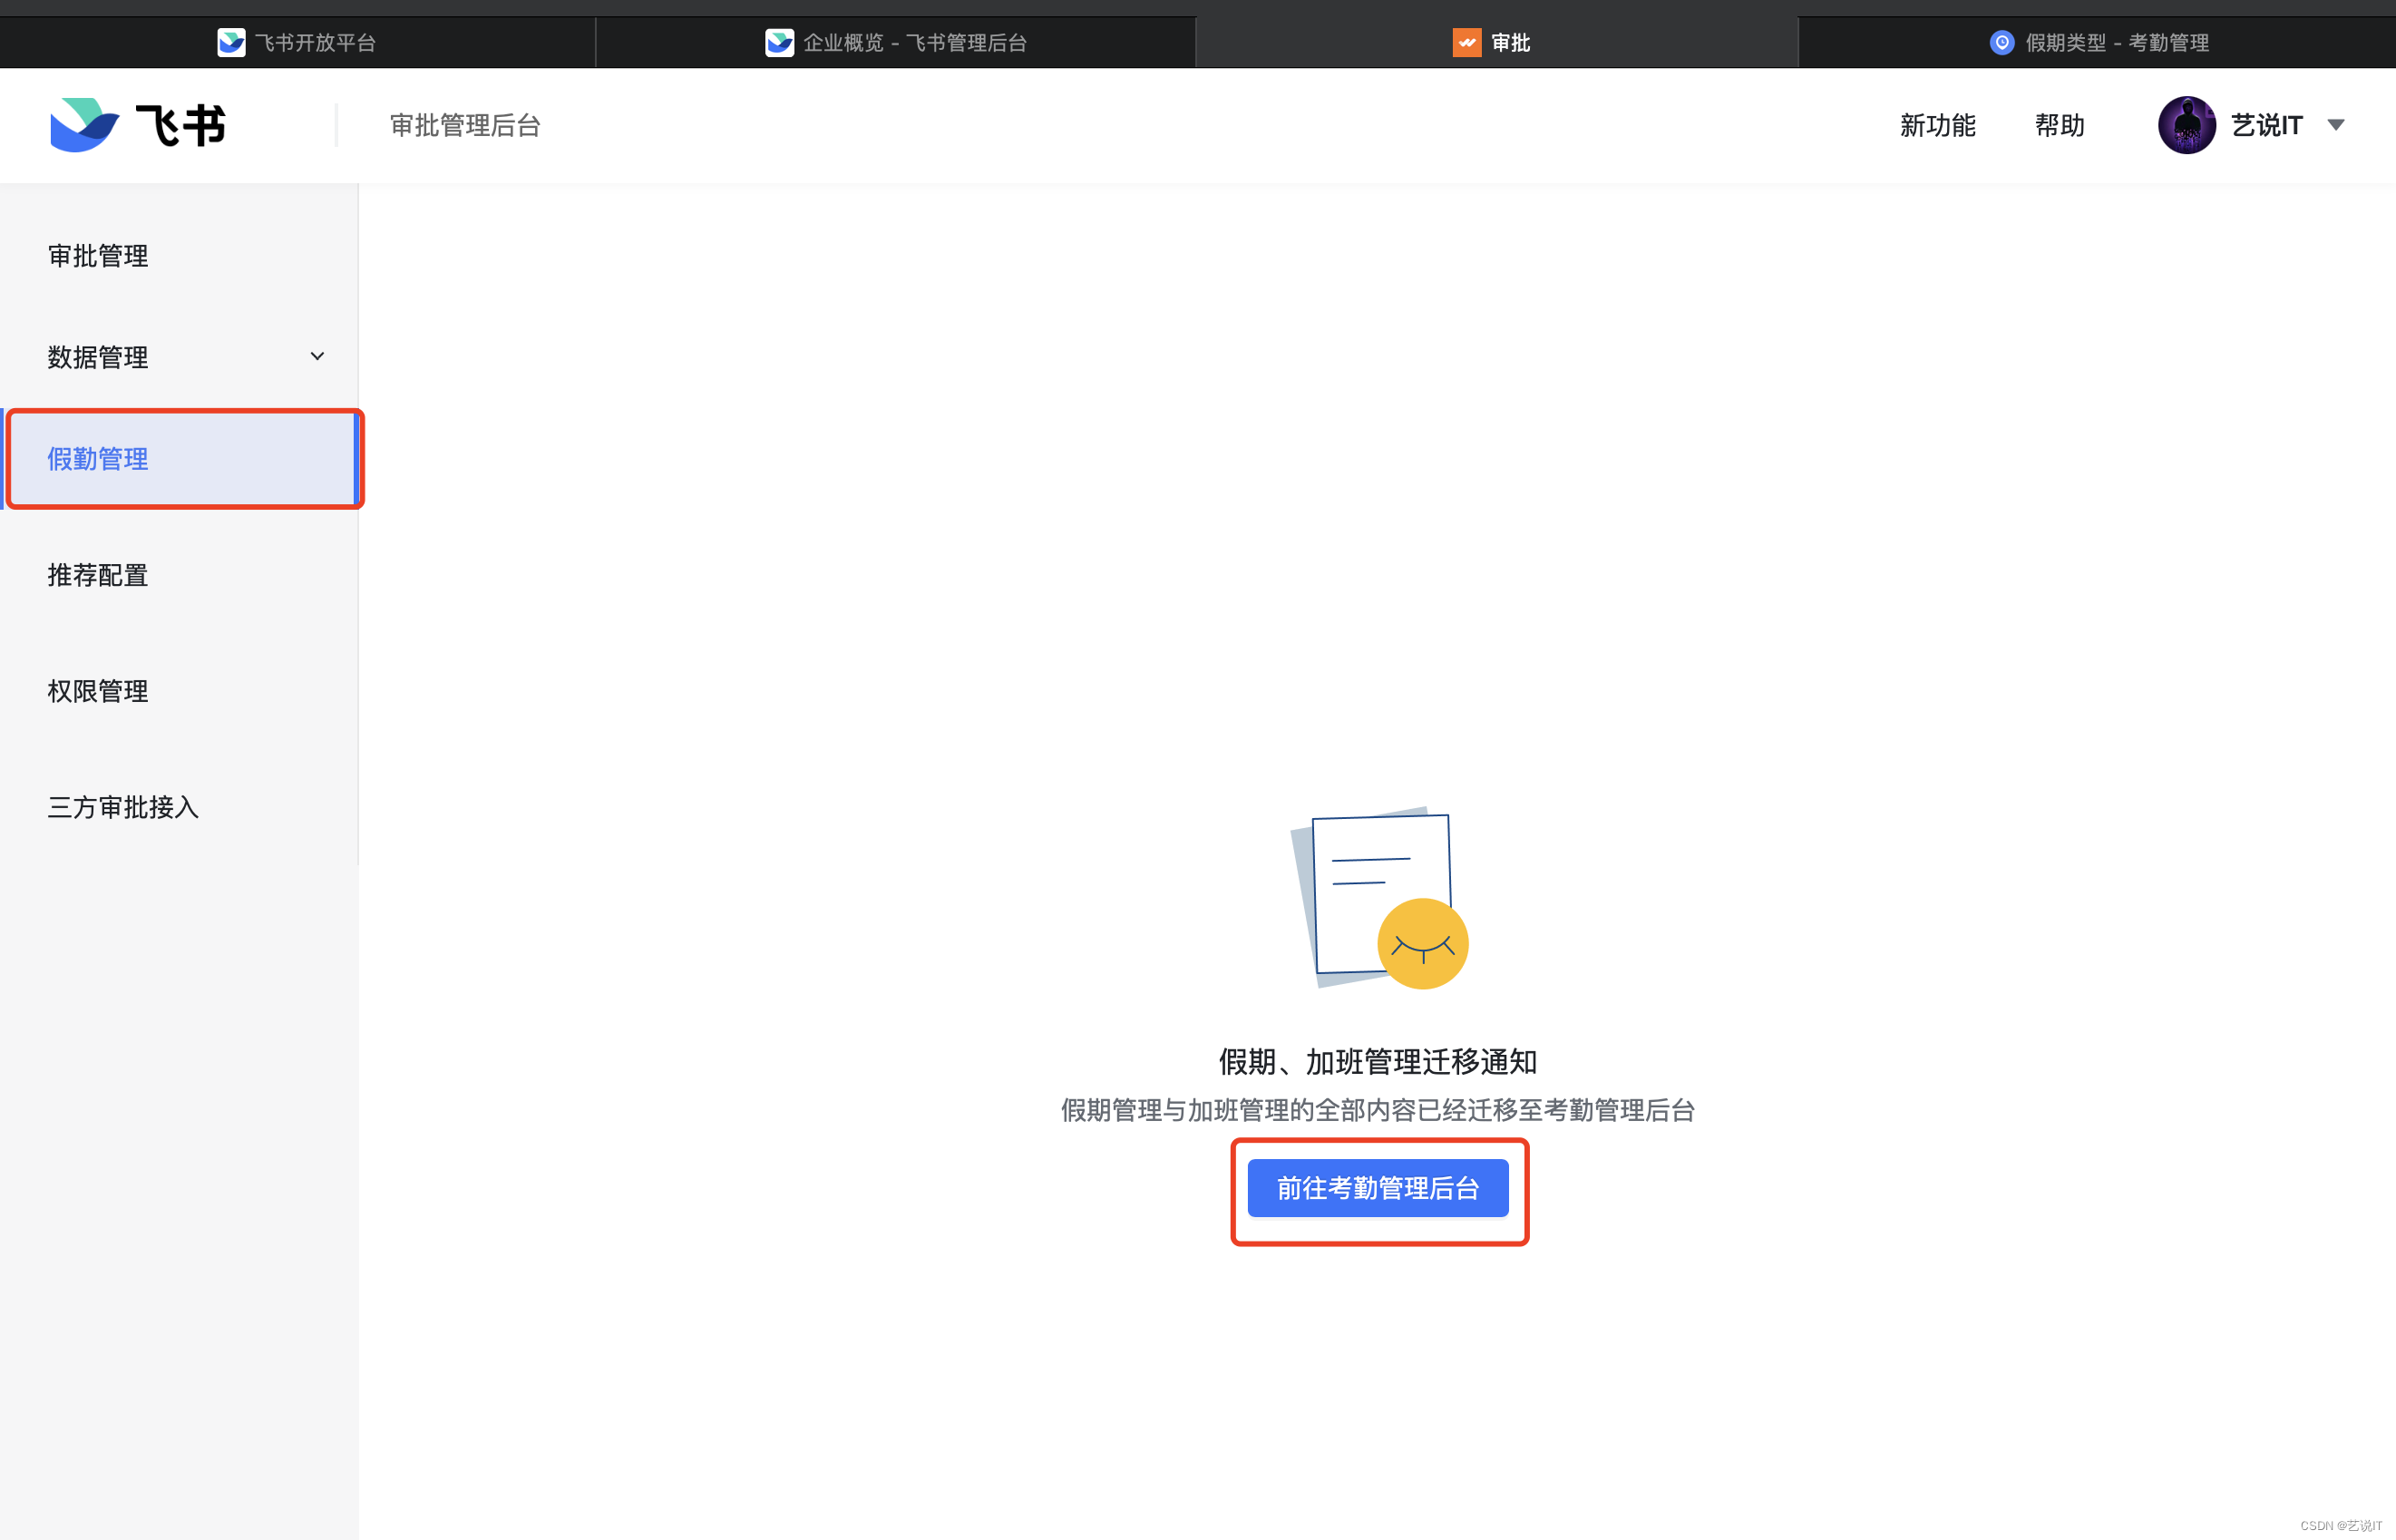
需要什么请假就开启什么请假类型。
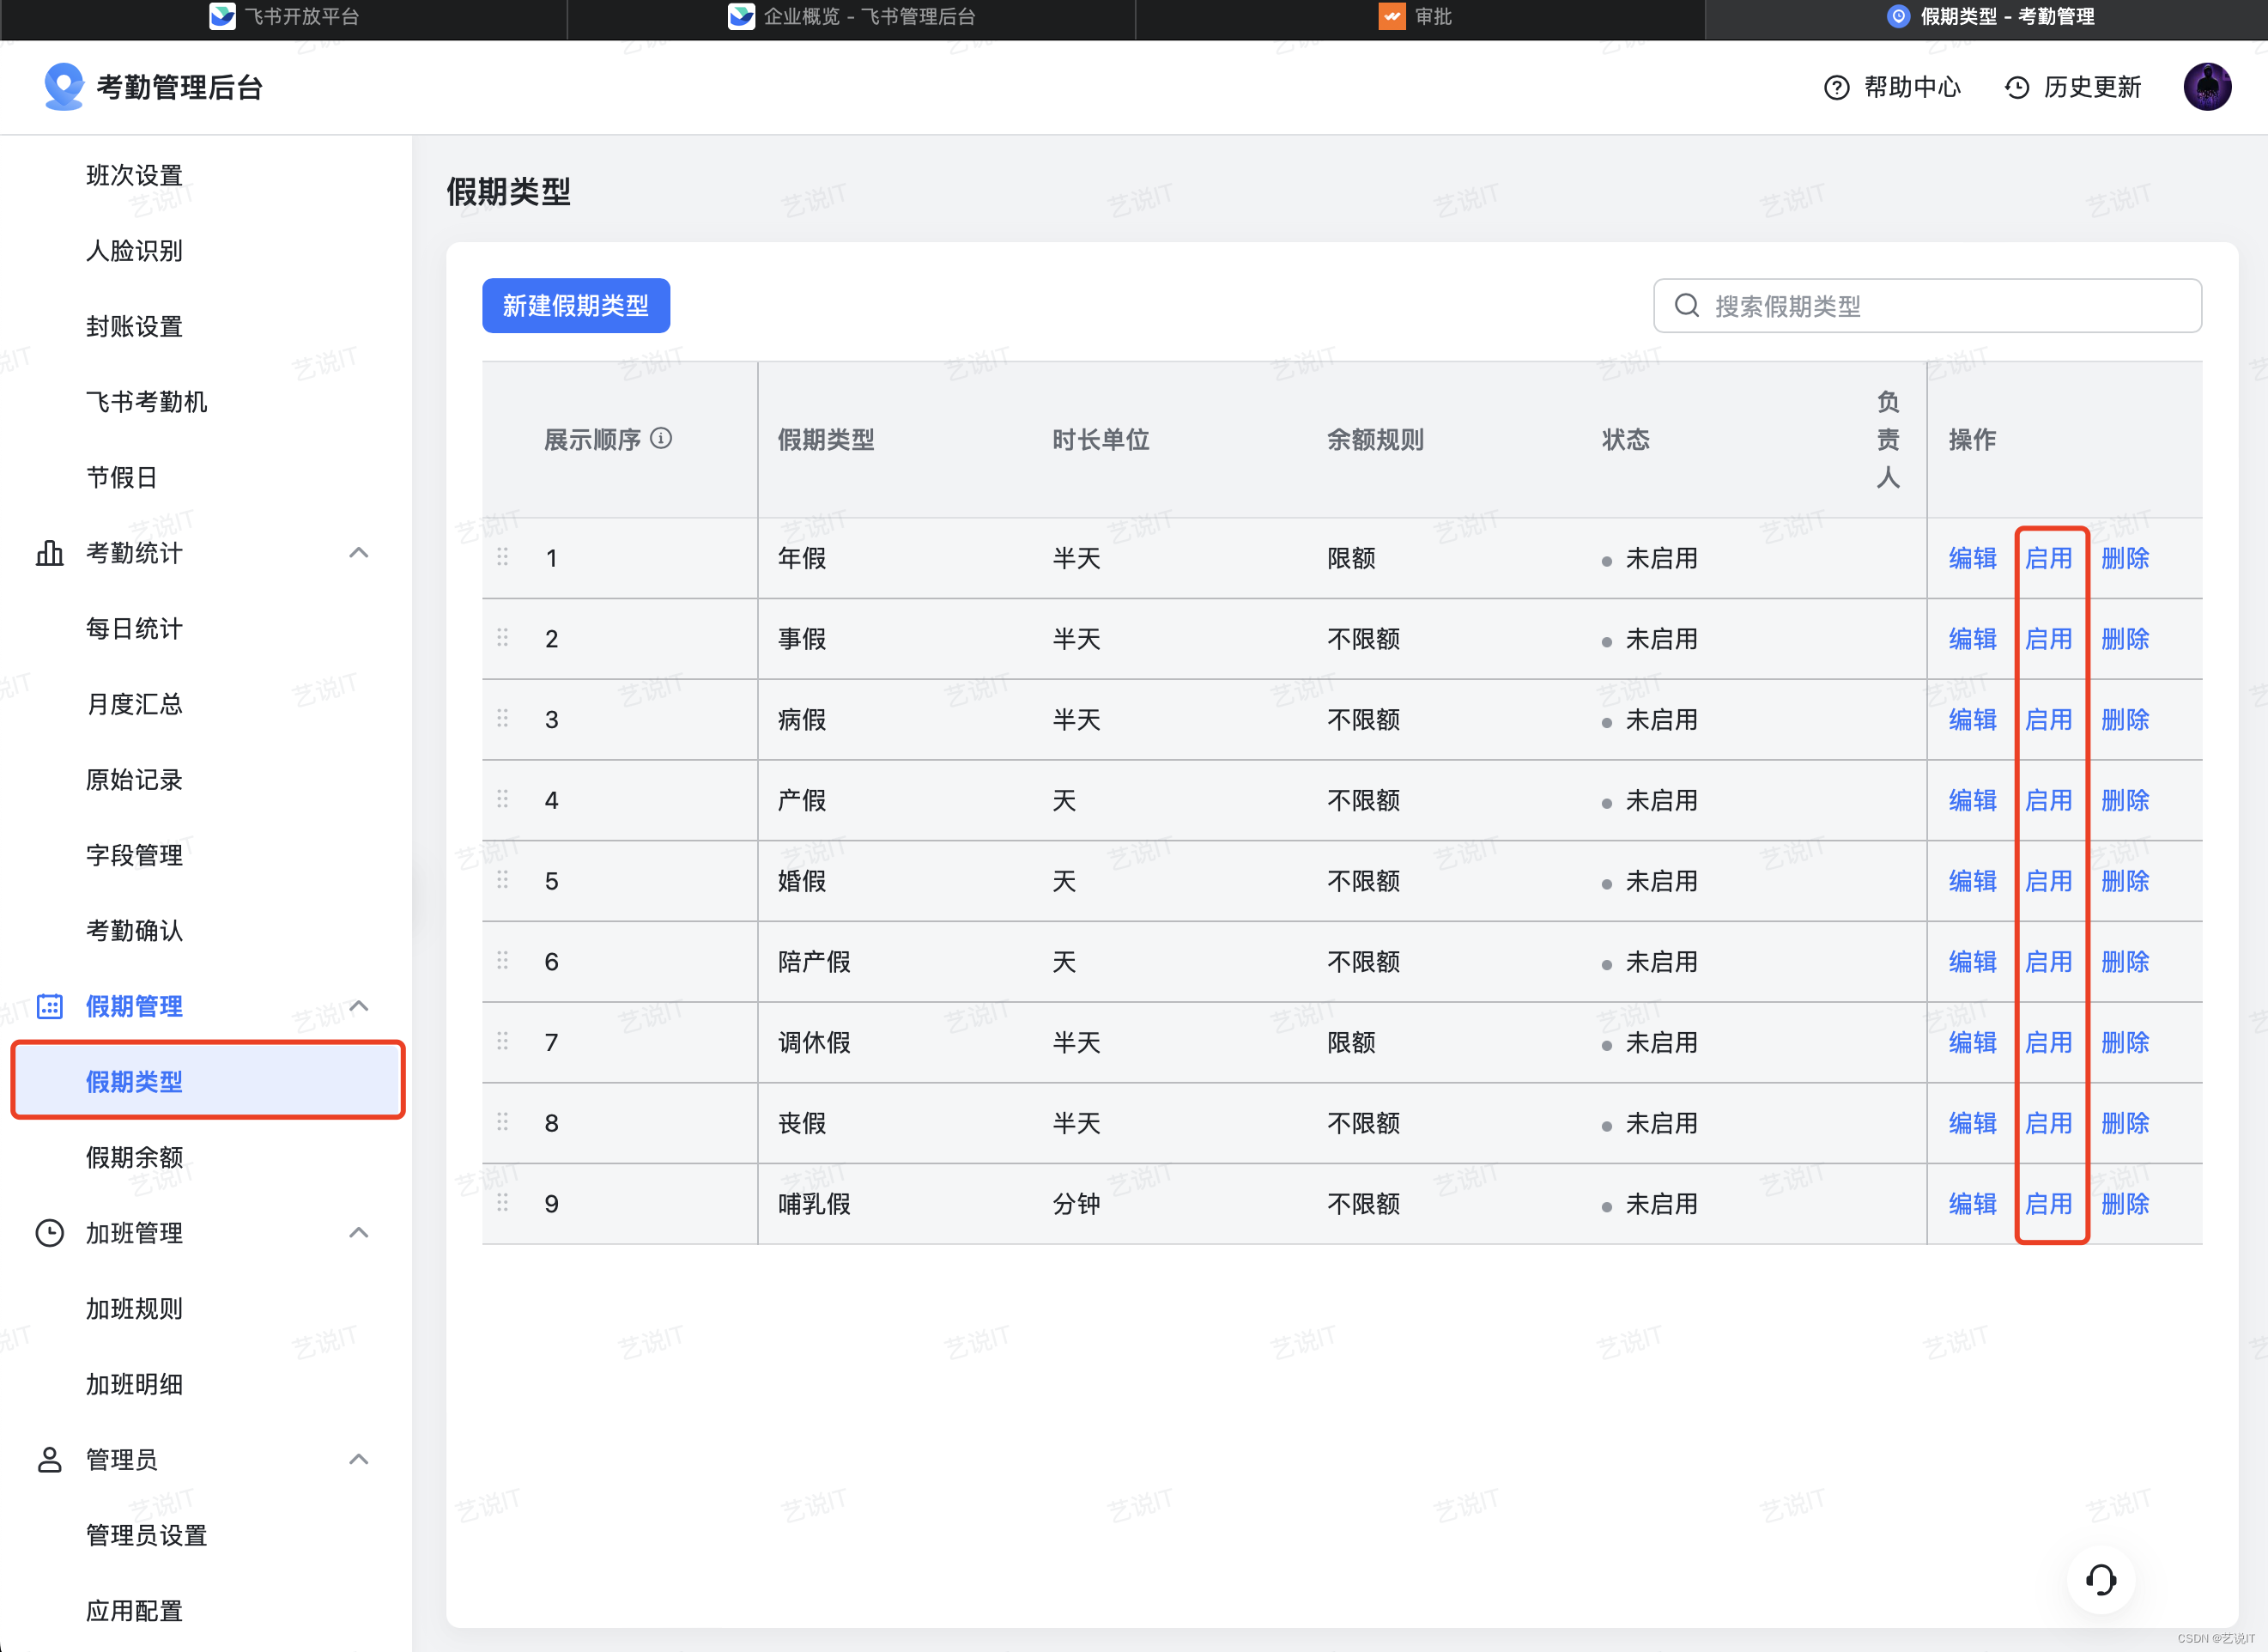
启动成功后就能看到了。
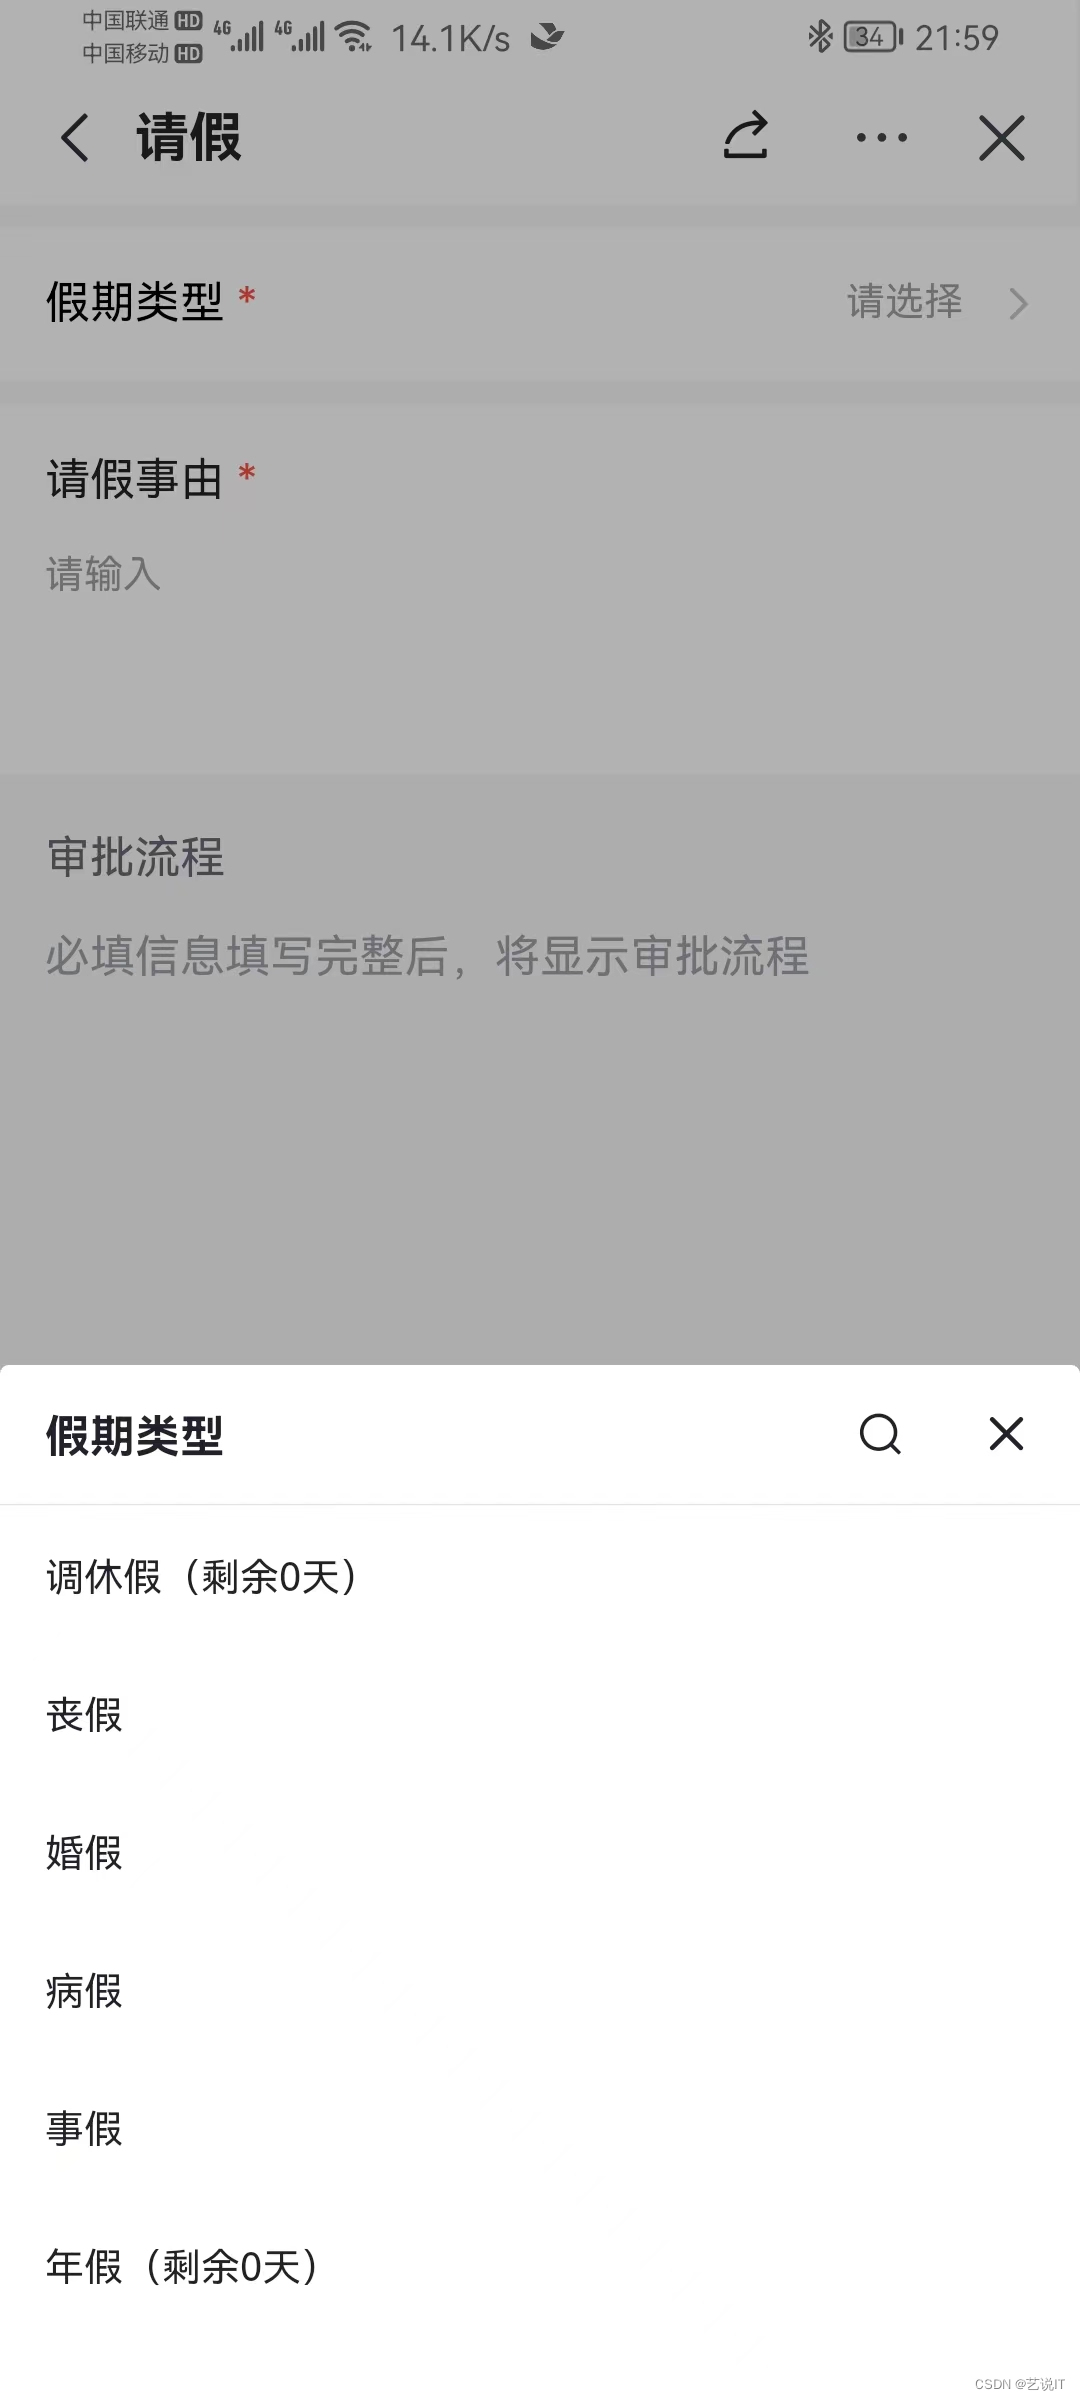
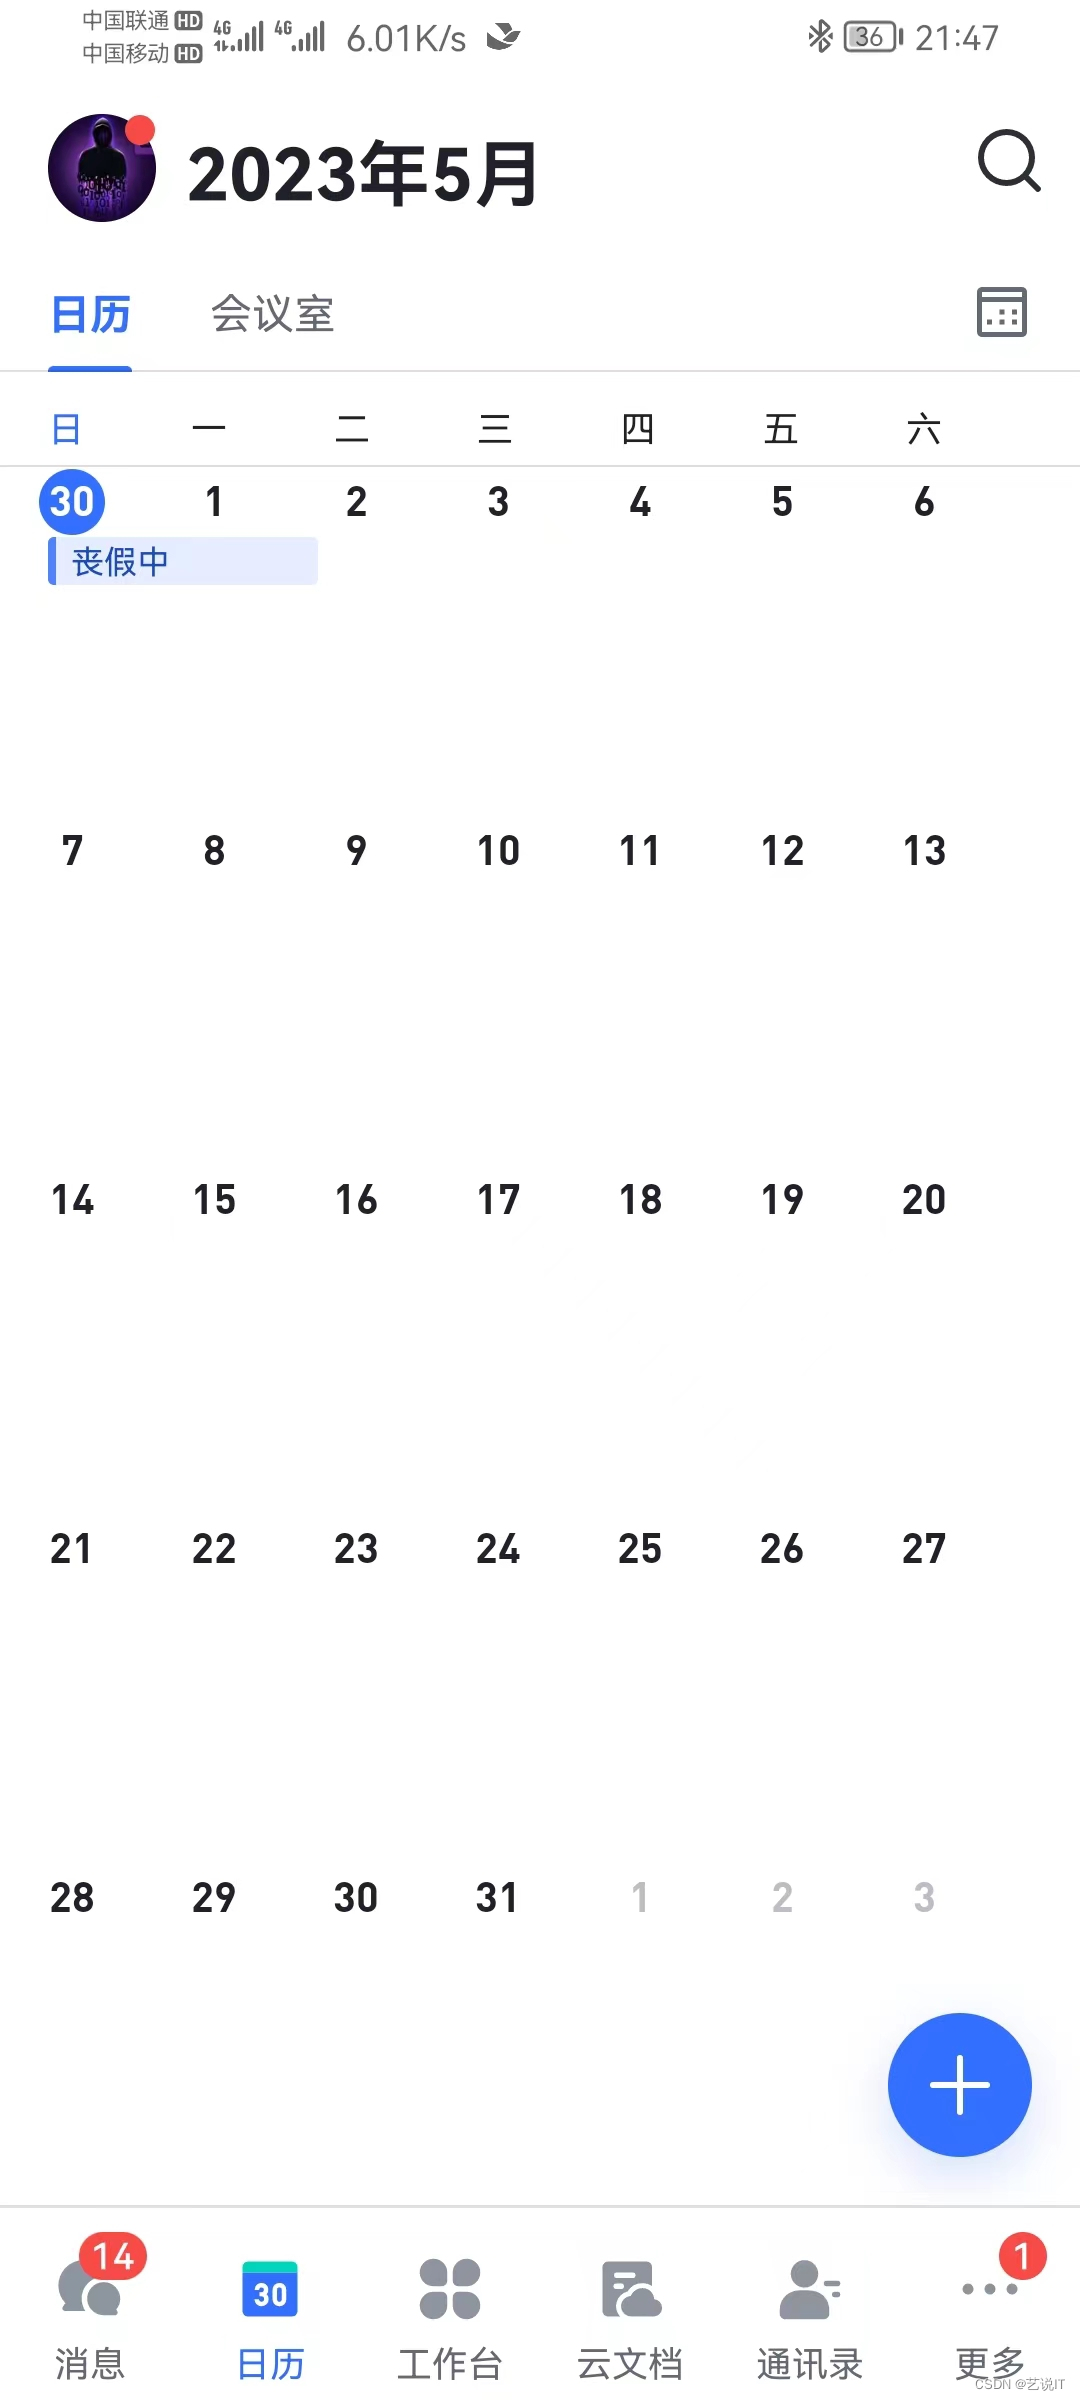
五、实现效果
把打包好的jar包上传到服务器,装好java环境,然后执行就行了
# 上传命令
scp ./feishu-0.0.1-SNAPSHOT.jar root@127.0.0.1:/root/feishu/

# 运行命令
java -jar feishu-0.0.1-SNAPSHOT.jar
当飞书请假申请同意后,服务器端就监听到请假同意的响应,这里我只是把结果打印出来,没有用到日志,所以需要的小伙伴就自己拿来改改。
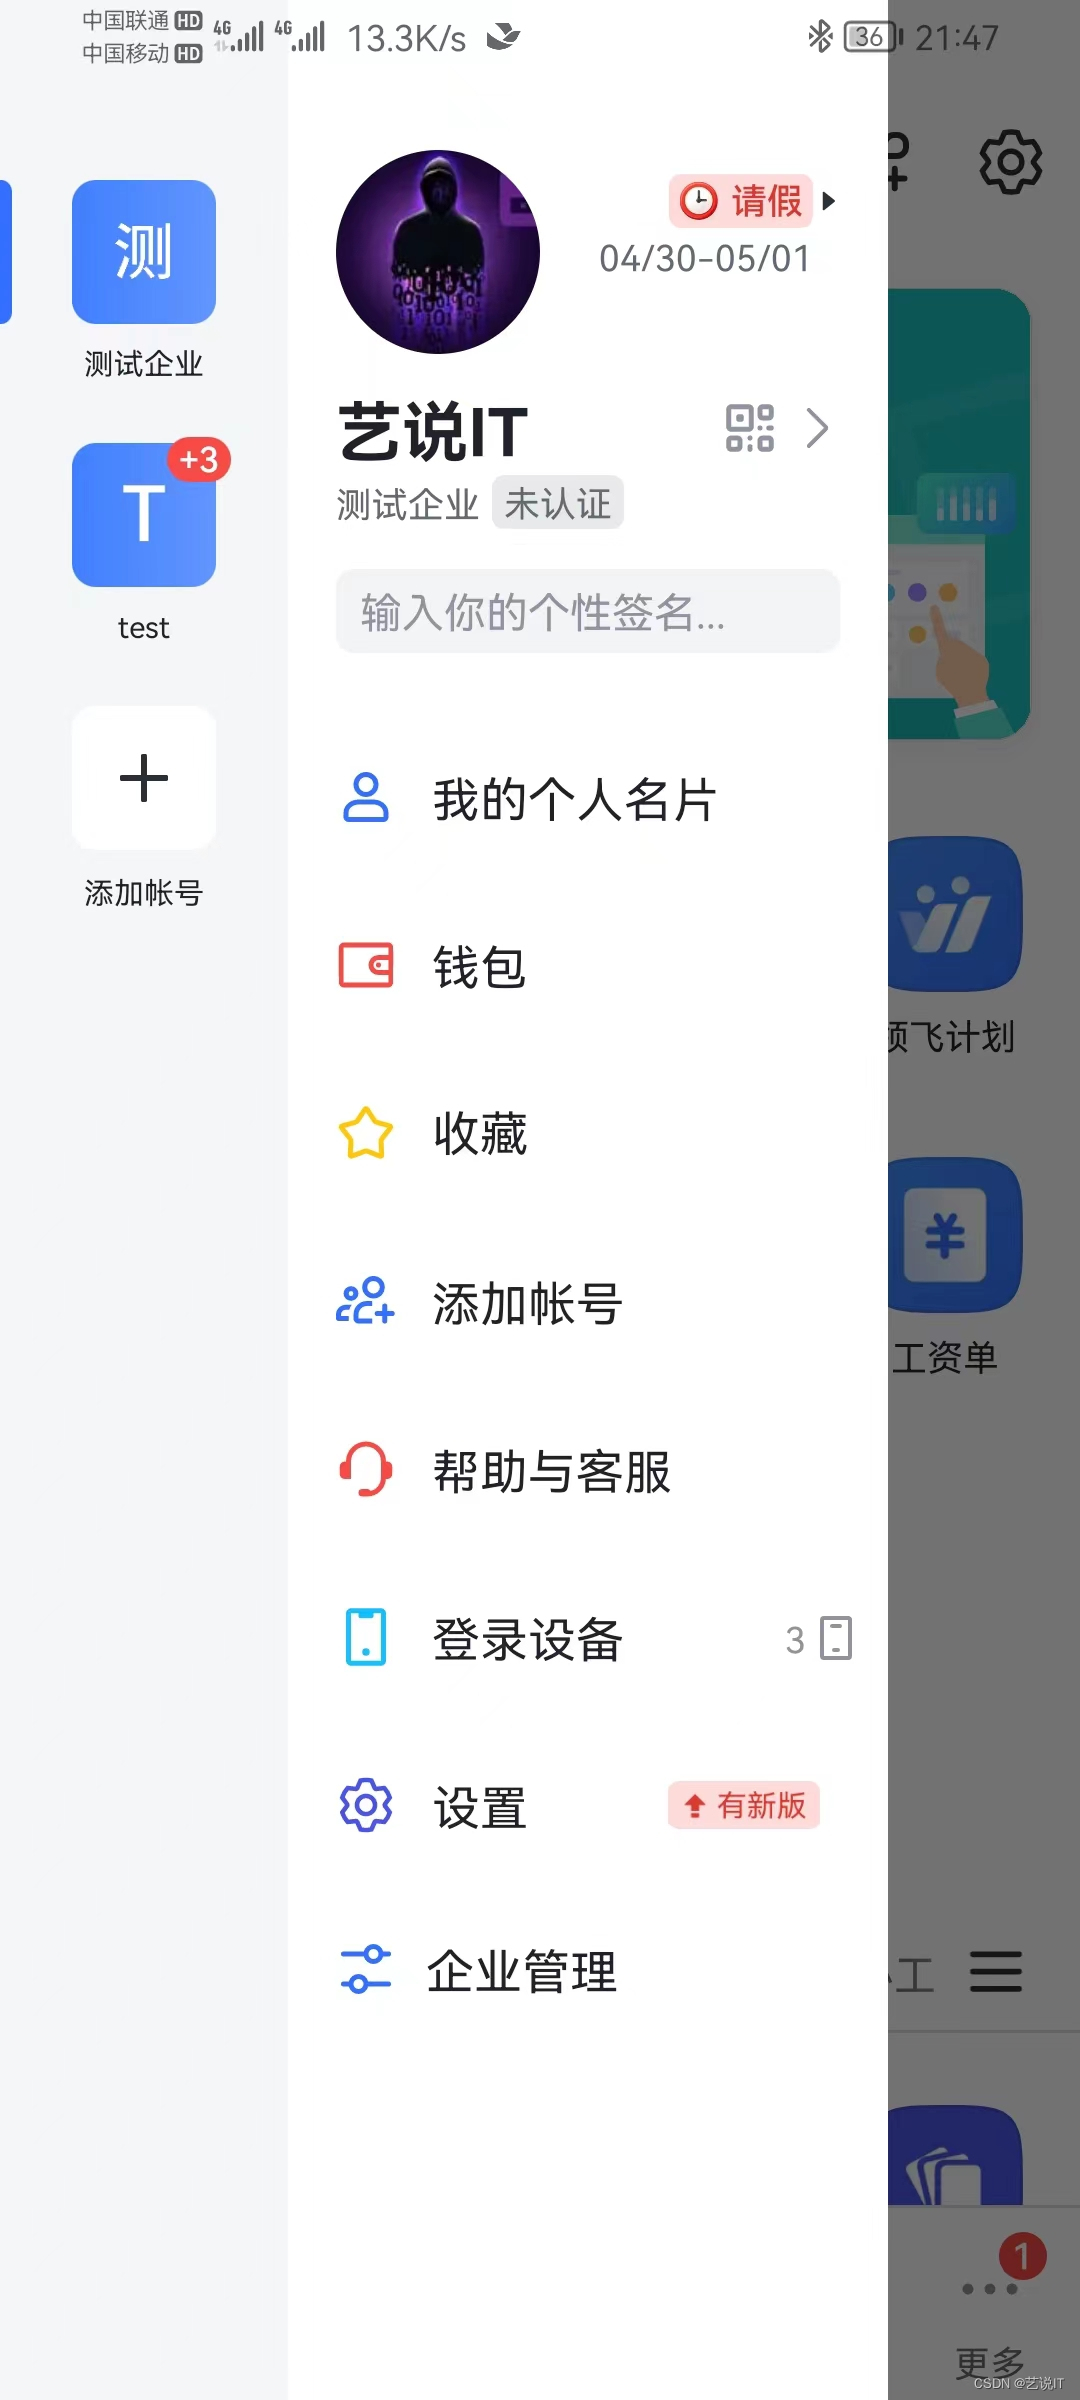
飞书上的请假状态标签就出来了。
前面的请假类型都拿去测试了,哈哈哈,就剩丧假,大吉大利,今晚吃鸡。
六、源码链接
# github
https://github.com/Stephen-S0/feishu
# gitee
https://gitee.com/stephen_s0/feishu
七、总结
本章节为飞书二开最后一章,使用java springboot进行飞书二开,描述了目录结构、代码解析,还有在请假审批中无选项问题的解决步骤,最后也附上了源码,如果你也遇到飞书二开的需求,而且没有思路如何进行开发,那么这个系列的文章还是推荐看一下,从测试环境的搭建到开发流程的解析,到最后代码的实现都能提供一些思路,再根据自己的需求去改动,省时又省力,后续还有更多的原创技术文章,感谢支持。微信公众号搜索关注艺说IT学习更多内容,对你有用的话请一键三连,感谢。


 被折叠的 条评论
为什么被折叠?
被折叠的 条评论
为什么被折叠?
 到【灌水乐园】发言


