


文章目录
一、基于EXTI按键中断led亮灭
1、外部中断基本结构

2、外部中断简介
3、 AFIO

4、EXTI内部框图

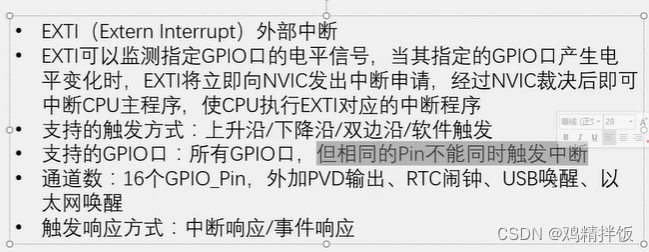
1、20根输入线进来。
2、 首先选择上升沿或者下降沿触发,也可不做选择,选择软件触发中断
3、分为两路,上面为中断触发,下面为事件触发
4、触发中断的话,先置一个请求挂起寄存器,可以通过读取该寄存器判断是哪个通道触发的中断
5、中断屏蔽寄存器置1,另一个输入无论是什么都直接输出。若置0,只能输出0
5、NVIC基本结构

通过以上的基本简介,我们可以知道要想触发中断,就要
1、配置IO口以及选择对应IO中断引脚(开启io口时钟以及AFIO时钟)
2、EXTI控制器配置
3、NVIC配置
6、代码(有详细注释)
中断部分
#include "stm32f10x.h"                  // Device header
#include "led.h"


void exti_key_Init()
{
	RCC_APB2PeriphClockCmd(RCC_APB2Periph_GPIOB,ENABLE);//B端口外设时钟开启
	RCC_APB2PeriphClockCmd(RCC_APB2Periph_AFIO,ENABLE); //AFIO时钟

	//配置GPIO
	GPIO_InitTypeDef GPIO_Initstructure;
	GPIO_Initstructure.GPIO_Mode=GPIO_Mode_IPU;//上拉输入模式,默认为高电平,所以按键一端接地,一端接IO口
	GPIO_Initstructure.GPIO_Pin=GPIO_Pin_1;//PB1
	GPIO_Initstructure.GPIO_Speed=GPIO_Speed_50MHz;
	GPIO_Init(GPIOB,&GPIO_Initstructure);

	//AFIO配置
	GPIO_EXTILineConfig(GPIO_PortSourceGPIOB,GPIO_PinSource1);  //选择B作为外部中断源,EXTI1号中断线路

	//EXTI配置
	EXTI_InitTypeDef EXTI_Initstructrue;
	EXTI_Initstructrue.EXTI_Line=EXTI_Line1;//中断线路,;
	EXTI_Initstructrue.EXTI_LineCmd=ENABLE;//使能
	EXTI_Initstructrue.EXTI_Mode=EXTI_Mode_Interrupt;        //外部中断模式,分为中断和事件模式
	EXTI_Initstructrue.EXTI_Trigger=EXTI_Trigger_Falling;                  //触发信号方式 ,下降沿触发
	EXTI_Init(&EXTI_Initstructrue);


	//NVIC配置
	NVIC_PriorityGroupConfig(NVIC_PriorityGroup_2);//配置抢占优先级,响应优先级的大小

	NVIC_InitTypeDef NVIC_Initstructrue;
	NVIC_Initstructrue.NVIC_IRQChannel=EXTI1_IRQn;//中断线路,这里需要注意EXTI5~9与EXTI10~15
	NVIC_Initstructrue.NVIC_IRQChannelCmd=ENABLE;
	NVIC_Initstructrue.NVIC_IRQChannelPreemptionPriority=1;//抢占优先级配置
	NVIC_Initstructrue.NVIC_IRQChannelSubPriority=1;//响应优先级配置
	NVIC_Init(&NVIC_Initstructrue);
}
led灯端口初始化
#include "stm32f10x.h"                  // Device header


void LED_Init()
{ RCC_APB2PeriphClockCmd(RCC_APB2Periph_GPIOA,ENABLE);//开启A口时钟

	GPIO_InitTypeDef GPIO_InitStructure;//GPIO结构体
	GPIO_InitStructure.GPIO_Mode=GPIO_Mode_Out_PP;//推挽输出模式
	GPIO_InitStructure.GPIO_Pin=GPIO_Pin_0;//选择A口的第0个引脚
	GPIO_InitStructure.GPIO_Speed=GPIO_Speed_50MHz;//输出速度选择50mhz;

	GPIO_Init(GPIOA,&GPIO_InitStructure);//读取GPIO结构体参数,最后写入GPIO配置寄存器
}
主函数
#include "stm32f10x.h"                  // Device header
#include "exti_key.h"
#include "led.h"

//操作IO口的三个步骤
//1、使用RCC开启GPIO时钟
//2、使用GPIO_Init函数初始化GPIO
//3、使用输出或输入函数控制GPIO口
uint8_t led=1;

int main()
{
	LED_Init();//led灯端口初始化函数
	exti_key_Init();//按键中断初始化函数
	while(1)
	{
	}

}
//中断函数,当按键按下触发
void EXTI1_IRQHandler()
{
	if(EXTI_GetFlagStatus(EXTI_Line1)==SET)//中断标志位判断,判断是不是1号线路进来
	{
		led=~led;
		if(led==1)
		{
			GPIO_WriteBit(GPIOA,GPIO_Pin_0,Bit_SET);
		}

	else
			GPIO_WriteBit(GPIOA,GPIO_Pin_0,Bit_RESET);

		EXTI_ClearITPendingBit(EXTI_Line1);//清除中断标志位
	}

}
二、串口中断
1、目的1
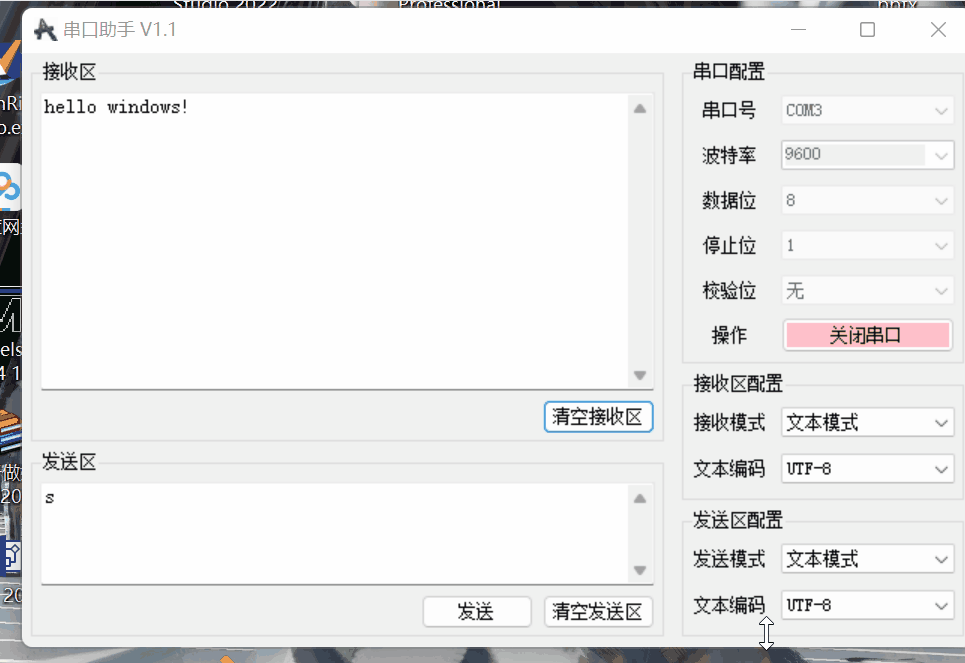
当stm32接收到1个字符“s”时,停止持续发送“hello windows!”; 当接收到1个字符“t”时,持续发送“hello windows!”
从第一部分,我们可以了解到,串口中断并不需要通过EXTI控制器。串口中断是直接控制NVIC来实现
代码
中断部分
#include "stm32f10x.h"                  // Device header
#include <stdio.h>
#include <stdarg.h>
#include "string.h" //使用strcmp头文件

uint8_t Serial_RxFlag;

uint8_t receiveFlag=1;


/**
  * 函    数:串口初始化
  * 参    数:无
  * 返 回 值:无
  */
void Serial_Init(void)
{
	/*开启时钟*/
	RCC_APB2PeriphClockCmd(RCC_APB2Periph_USART1, ENABLE);	//开启USART1的时钟
	RCC_APB2PeriphClockCmd(RCC_APB2Periph_GPIOA, ENABLE);	//开启GPIOA的时钟

	/*GPIOA_9初始化*/
	GPIO_InitTypeDef GPIO_InitStructure;
	GPIO_InitStructure.GPIO_Mode = GPIO_Mode_AF_PP;//将PA9引脚初始化为复用推挽输出
	GPIO_InitStructure.GPIO_Pin = GPIO_Pin_9;
	GPIO_InitStructure.GPIO_Speed = GPIO_Speed_50MHz;
	GPIO_Init(GPIOA, &GPIO_InitStructure);

		//GPIOA_10
	GPIO_InitStructure.GPIO_Mode = GPIO_Mode_IPU;//上拉输入模式
	GPIO_InitStructure.GPIO_Pin = GPIO_Pin_10;
	GPIO_InitStructure.GPIO_Speed = GPIO_Speed_50MHz;
	GPIO_Init(GPIOA, &GPIO_InitStructure);

	/*USART初始化*/
	USART_InitTypeDef USART_InitStructure;					//定义结构体变量
	USART_InitStructure.USART_BaudRate = 9600;				//波特率
	USART_InitStructure.USART_HardwareFlowControl = USART_HardwareFlowControl_None;	//硬件流控制,不需要
	USART_InitStructure.USART_Mode = USART_Mode_Tx|USART_Mode_Rx;			//模式,选择收发模式
	USART_InitStructure.USART_Parity = USART_Parity_No;		//奇偶校验,不需要
	USART_InitStructure.USART_StopBits = USART_StopBits_1;	//停止位,选择1位
	USART_InitStructure.USART_WordLength = USART_WordLength_8b;		//字长,选择8位
	USART_Init(USART1, &USART_InitStructure);				//将结构体变量交给USART_Init,配置USART1

	/*USART使能*/
	USART_Cmd(USART1, ENABLE);								//使能USART1,串口开始运行

	USART_ITConfig(USART1,USART_IT_RXNE,ENABLE);//启用USART1,查询中断标志位RXNE,一旦查询到置一,申请终端

	NVIC_PriorityGroupConfig(NVIC_PriorityGroup_2);//中断优先级分组

	NVIC_InitTypeDef NVIC_InitStructure;
	NVIC_InitStructure.NVIC_IRQChannel=USART1_IRQn;//NVIC通道
	NVIC_InitStructure.NVIC_IRQChannelCmd=ENABLE;
	NVIC_InitStructure.NVIC_IRQChannelPreemptionPriority=1;//高优先级
	NVIC_InitStructure.NVIC_IRQChannelSubPriority=1;//低优先级
  NVIC_Init(&NVIC_InitStructure);
}

/**
  * 函    数:串口发送一个字节
  * 参    数:Byte 要发送的一个字节
  * 返 回 值:无
  */
void Serial_SendByte(uint8_t Byte)
{
	USART_SendData(USART1, Byte);		//将字节数据写入数据寄存器,写入后USART自动生成时序波形
	while (USART_GetFlagStatus(USART1, USART_FLAG_TXE) == RESET);	//等待发送完成
	/*下次写入数据寄存器会自动清除发送完成标志位,故此循环后,无需清除标志位*/
}

/**
  * 函    数:串口发送一个数组
  * 参    数:Array 要发送数组的首地址
  * 参    数:Length 要发送数组的长度
  * 返 回 值:无
  */
void Serial_SendArray(uint8_t *Array,uint16_t Length)//发送数组
{
	uint16_t i;
	for(i=0;i<Length;i++)
	{

		Serial_SendByte(Array[i]);
	}
}


/**
  * 函    数:串口发送一个字符串
  * 参    数:String 要发送字符串的首地址
  * 返 回 值:无
  */
void Serial_SendString(char *string)
{

	uint8_t i;
	for(i=0;string[i]!='\0';i++)
	    {
				Serial_SendByte(string[i]);
			}
}

/**
  * 函    数:次方函数(内部使用)
  * 返 回 值:返回值等于X的Y次方
  */
uint32_t Serial_Pow(uint32_t X, uint32_t Y)
{
	uint32_t Result = 1;	//设置结果初值为1
	while (Y --)			//执行Y次
	{
		Result *= X;		//将X累乘到结果
	}
	return Result;
}

/**
  * 函    数:串口发送数字
  * 参    数:Number 要发送的数字,范围:0~4294967295
  * 参    数:Length 要发送数字的长度,范围:0~10
  * 返 回 值:无
  */
void Serial_SendNumber(uint32_t Number,uint8_t Length)
{
	uint8_t i;
	for(i=0;i<Length;i++)
	{
		Serial_SendByte(Number/Serial_Pow(10,Length-i-1)%10+'0');//由十进制的高位到低位依次发送
	  //加上'0'就转换为ascll码的类型,从ascll码中字符0的位置开始算,也可以改为0x30.
	}

}


/**
  * 函    数:使用printf需要重定向的底层函数
  * 参    数:保持原始格式即可,无需变动
  * 返 回 值:保持原始格式即可,无需变动
  */   //将printf的底层重定向到自己的发送字节函数
//什么是重定向?重定向是指将fputc里面的输出指向目标设备。因printf函数调用了fputc,
//而fputc输出有默认指向的目标,且不同库中的fputc输出指向不同,所以需要重写fputc

int fputc(int ch,FILE *f)   //printf重定向,为串口
{
	Serial_SendByte(ch);
	return ch;
}

/**
  * 函    数:自己封装的prinf函数
  * 参    数:format 格式化字符串
  * 参    数:... 可变的参数列表
  * 返 回 值:无
  */
void Serial_Printf(char *format, ...)
{
  char string[100];
	va_list arg;   //参数列表变量
	va_start(arg,format); //
	vsprintf(string,format,arg);
	va_end(arg);//释放参数表
	Serial_SendString(string);//发送string


}
uint8_t Serial_GetRxFlag()
{
	if(Serial_RxFlag==1)
	{
		Serial_RxFlag=0;
		return 1;
	}
	return 0;
}


	 // 发送s,t
	 void USART1_IRQHandler()//串口中断函数
   {

    	if(USART_GetFlagStatus(USART1,USART_IT_RXNE)==SET)//串口接收标志位
	   {
			 uint8_t temp=USART_ReceiveData(USART1);
			 if(temp=='s')
			 {
				 receiveFlag=0;
			 }
				 if(temp=='t')
			 {
				 receiveFlag=1;
			 }

		  USART_ClearITPendingBit(USART1,USART_IT_RXNE);//标志位清零
	   }
   }
主函数
#include "stm32f10x.h"                  // Device header
#include "Delay.h"
#include "LED.h"
#include "Serial.h"
#include "OLED.h"

//操作IO口的三个步骤
//1、使用RCC开启GPIO时钟
//2、使用GPIO_Init函数初始化GPIO
//3、使用输出或输入函数控制GPIO口
extern uint8_t receiveFlag;


int main()
{


	OLED_Init();

	Serial_Init();


		while(1)
		{

			if(receiveFlag==1)
			{
				printf("hello windows!\r\n");
				OLED_ShowNum(1,1,3,2);;//OLED显示屏函数,可根据自己需求来判断是否要添加,我主要用来更清楚的观察串口是否进入中断等
			}
			Delay_ms(500);延时函数
			if(receiveFlag==0)
			{
				OLED_ShowNum(1,1,2,2);
			}
			Delay_ms(500);

		}


}
延时函数
#include "stm32f10x.h"

/**
  * @brief  微秒级延时
  * @param  xus 延时时长,范围:0~233015
  * @retval 无
  */
void Delay_us(uint32_t xus)
{
	SysTick->LOAD = 72 * xus;				//设置定时器重装值
	SysTick->VAL = 0x00;					//清空当前计数值
	SysTick->CTRL = 0x00000005;				//设置时钟源为HCLK,启动定时器
	while(!(SysTick->CTRL & 0x00010000));	//等待计数到0
	SysTick->CTRL = 0x00000004;				//关闭定时器
}

/**
  * @brief  毫秒级延时
  * @param  xms 延时时长,范围:0~4294967295
  * @retval 无
  */
void Delay_ms(uint32_t xms)
{
	while(xms--)
	{
		Delay_us(1000);
	}
}

/**
  * @brief  秒级延时
  * @param  xs 延时时长,范围:0~4294967295
  * @retval 无
  */
void Delay_s(uint32_t xs)
{
	while(xs--)
	{
		Delay_ms(1000);
	}
}
效果图
2、目的2
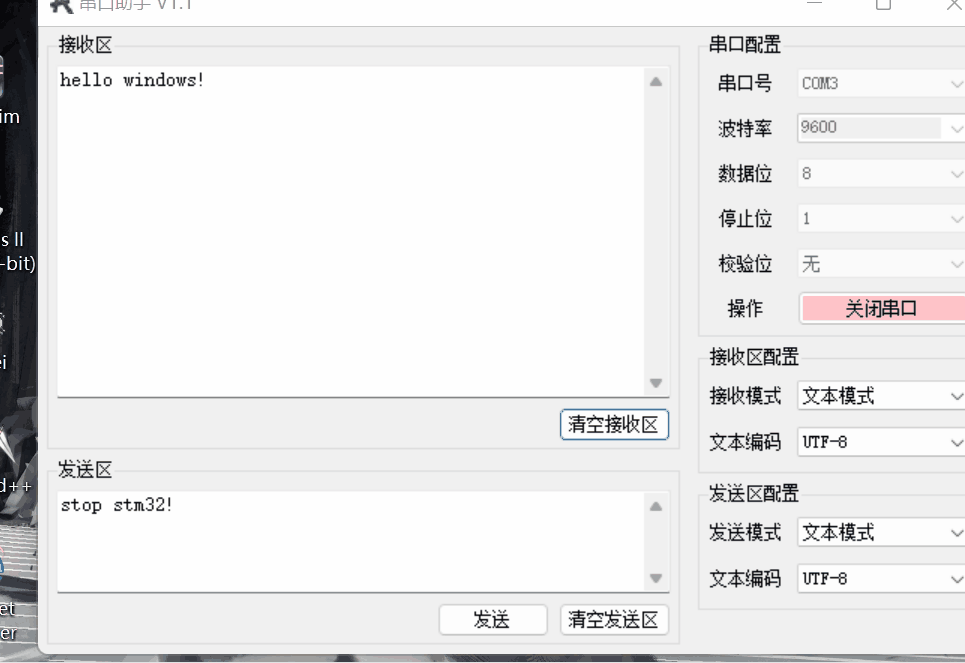
当stm32接收到字符“stop stm32!”时,停止持续发送“hello windows!”; 当接收到字符“go stm32!”时,持续发送“hello windows!”
与上面不同的是,这里接收需要接收一个字符串,所以就需要写接收字符串函数
代码
#include "stm32f10x.h"                  // Device header
#include <stdio.h>
#include <stdarg.h>
#include "string.h" //使用strcmp头文件

uint8_t Serial_RxFlag;

uint8_t receiveFlag=1;


/**
  * 函    数:串口初始化
  * 参    数:无
  * 返 回 值:无
  */
void Serial_Init(void)
{
	/*开启时钟*/
	RCC_APB2PeriphClockCmd(RCC_APB2Periph_USART1, ENABLE);	//开启USART1的时钟
	RCC_APB2PeriphClockCmd(RCC_APB2Periph_GPIOA, ENABLE);	//开启GPIOA的时钟

	/*GPIOA_9初始化*/
	GPIO_InitTypeDef GPIO_InitStructure;
	GPIO_InitStructure.GPIO_Mode = GPIO_Mode_AF_PP;
	GPIO_InitStructure.GPIO_Pin = GPIO_Pin_9;
	GPIO_InitStructure.GPIO_Speed = GPIO_Speed_50MHz;
	GPIO_Init(GPIOA, &GPIO_InitStructure);					//将PA9引脚初始化为复用推挽输出

		//GPIOA_10
	GPIO_InitStructure.GPIO_Mode = GPIO_Mode_IPU;//上拉输入模式
	GPIO_InitStructure.GPIO_Pin = GPIO_Pin_10;
	GPIO_InitStructure.GPIO_Speed = GPIO_Speed_50MHz;
	GPIO_Init(GPIOA, &GPIO_InitStructure);


	/*USART初始化*/
	USART_InitTypeDef USART_InitStructure;					//定义结构体变量
	USART_InitStructure.USART_BaudRate = 9600;				//波特率
	USART_InitStructure.USART_HardwareFlowControl = USART_HardwareFlowControl_None;	//硬件流控制,不需要
	USART_InitStructure.USART_Mode = USART_Mode_Tx|USART_Mode_Rx;			//模式,选择收发模式
	USART_InitStructure.USART_Parity = USART_Parity_No;		//奇偶校验,不需要
	USART_InitStructure.USART_StopBits = USART_StopBits_1;	//停止位,选择1位
	USART_InitStructure.USART_WordLength = USART_WordLength_8b;		//字长,选择8位
	USART_Init(USART1, &USART_InitStructure);				//将结构体变量交给USART_Init,配置USART1

	/*USART使能*/
	USART_Cmd(USART1, ENABLE);								//使能USART1,串口开始运行

	USART_ITConfig(USART1,USART_IT_RXNE,ENABLE);//启用USART1,查询中断标志位RXNE,一旦查询到置一,申请终端

	NVIC_PriorityGroupConfig(NVIC_PriorityGroup_2);//中断优先级分组

	NVIC_InitTypeDef NVIC_InitStructure;
	NVIC_InitStructure.NVIC_IRQChannel=USART1_IRQn;//NVIC通道
	NVIC_InitStructure.NVIC_IRQChannelCmd=ENABLE;
	NVIC_InitStructure.NVIC_IRQChannelPreemptionPriority=1;//高优先级
	NVIC_InitStructure.NVIC_IRQChannelSubPriority=1;//低优先级
  NVIC_Init(&NVIC_InitStructure);
}

/**
  * 函    数:串口发送一个字节
  * 参    数:Byte 要发送的一个字节
  * 返 回 值:无
  */
void Serial_SendByte(uint8_t Byte)
{
	USART_SendData(USART1, Byte);		//将字节数据写入数据寄存器,写入后USART自动生成时序波形
	while (USART_GetFlagStatus(USART1, USART_FLAG_TXE) == RESET);	//等待发送完成
	/*下次写入数据寄存器会自动清除发送完成标志位,故此循环后,无需清除标志位*/
}

/**
  * 函    数:串口发送一个数组
  * 参    数:Array 要发送数组的首地址
  * 参    数:Length 要发送数组的长度
  * 返 回 值:无
  */
void Serial_SendArray(uint8_t *Array,uint16_t Length)//发送数组
{
	uint16_t i;
	for(i=0;i<Length;i++)
	{

		Serial_SendByte(Array[i]);
	}
}


/**
  * 函    数:串口发送一个字符串
  * 参    数:String 要发送字符串的首地址
  * 返 回 值:无
  */
void Serial_SendString(char *string)
{

	uint8_t i;
	for(i=0;string[i]!='\0';i++)
	    {
				Serial_SendByte(string[i]);
			}
}

/**
  * 函    数:次方函数(内部使用)
  * 返 回 值:返回值等于X的Y次方
  */
uint32_t Serial_Pow(uint32_t X, uint32_t Y)
{
	uint32_t Result = 1;	//设置结果初值为1
	while (Y --)			//执行Y次
	{
		Result *= X;		//将X累乘到结果
	}
	return Result;
}

/**
  * 函    数:串口发送数字
  * 参    数:Number 要发送的数字,范围:0~4294967295
  * 参    数:Length 要发送数字的长度,范围:0~10
  * 返 回 值:无
  */
void Serial_SendNumber(uint32_t Number,uint8_t Length)
{
	uint8_t i;
	for(i=0;i<Length;i++)
	{
		Serial_SendByte(Number/Serial_Pow(10,Length-i-1)%10+'0');//由十进制的高位到低位依次发送
	  //加上'0'就转换为ascll码的类型,从ascll码中字符0的位置开始算,也可以改为0x30.
	}

}


/**
  * 函    数:使用printf需要重定向的底层函数
  * 参    数:保持原始格式即可,无需变动
  * 返 回 值:保持原始格式即可,无需变动
  */   //将printf的底层重定向到自己的发送字节函数
//什么是重定向?重定向是指将fputc里面的输出指向目标设备。因printf函数调用了fputc,
//而fputc输出有默认指向的目标,且不同库中的fputc输出指向不同,所以需要重写fputc

int fputc(int ch,FILE *f)   //printf重定向,为串口
{
	Serial_SendByte(ch);
	return ch;
}

/**
  * 函    数:自己封装的prinf函数
  * 参    数:format 格式化字符串
  * 参    数:... 可变的参数列表
  * 返 回 值:无
  */
void Serial_Printf(char *format, ...)
{
  char string[100];
	va_list arg;   //参数列表变量
	va_start(arg,format); //
	vsprintf(string,format,arg);
	va_end(arg);//释放参数表
	Serial_SendString(string);//发送string


}
uint8_t Serial_GetRxFlag()
{
	if(Serial_RxFlag==1)
	{
		Serial_RxFlag=0;
		return 1;
	}
	return 0;
}


//发送stop,go
void USART1_IRQHandler()//串口中断函数
   {
		 uint8_t receive[100];
    	if(USART_GetFlagStatus(USART1,USART_IT_RXNE)==SET)
	   {
		  static uint8_t x=0;
		  uint8_t temp=USART_ReceiveData(USART1);
			  if(temp!='\n')  //字符串接收函数
				{receive[x]=temp;
     	           x++;
				}
				receive[x]='\0';
		  if(strcmp((char*)receive,"stop stm32!")==0)
			{
				receiveFlag=0;
				x=0;

			}

			else if(strcmp((char*)receive,"go stm32!")==0)
			{
				receiveFlag=1;
				x=0;
			}

		  USART_ClearITPendingBit(USART1,USART_IT_RXNE);
	   }
   }
主函数与上面一个一致
效果图
三、总结
对中断有一个较浅的认识,复习了c语言中的strmp函数
参考:【STM32入门教程-2023版 细致讲解 中文字幕】 https://www.bilibili.com/video/BV1th411z7sn/?p=11&share_source=copy_web&vd_source=271598ff177b3c8edd9ca1213d38bde4


 4833
4833

 被折叠的 条评论
为什么被折叠?
被折叠的 条评论
为什么被折叠?
 到【灌水乐园】发言


