


一、前言
在实际的工作中,经常会遇到新增项目的场景,新增项目有一些些共同点:代码风格、打包配置、依赖包等大致相同,这时候如果有一个生成模版的脚手架命令就好了,只需要在控制台输入该命令,就能把项目初始化好,只需要改动小部分配置,整个项目就配置好了,从而提高开发效率。
二、正文
今天我们聊的是vue-cli 2的实现原理,在讲解源码之前先回顾下vue-cli的用法。
1、首先确保全局环境下安装了node和npm
2、然后全局安装vue-cli:
cnpm install vue-cli -g 3、查看 vue-cli 是否安装成功,不能检查vue-cli,需要检查 vue是否安装成功
vue -V // 2.9.6如果执行上述命令时候会出现版本号,证明成功安装了。
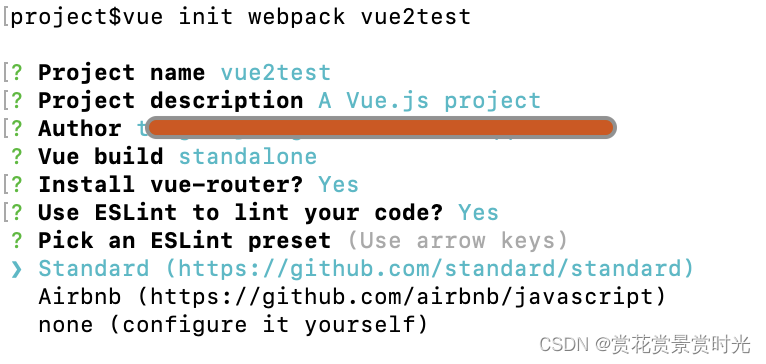
4、用vue-cli 2创建项目的命令如下,采用webpack模版
// vue init <template-name> [project-name]
vue init webpack vue2test
5、在执行上面的命令时候,首先会询问一些问题,如:项目名称、项目描述、作者、构建、是否安装路由插件、是否需要使用eslint等等,当所有问题回答后,就开始生成脚手架项目。
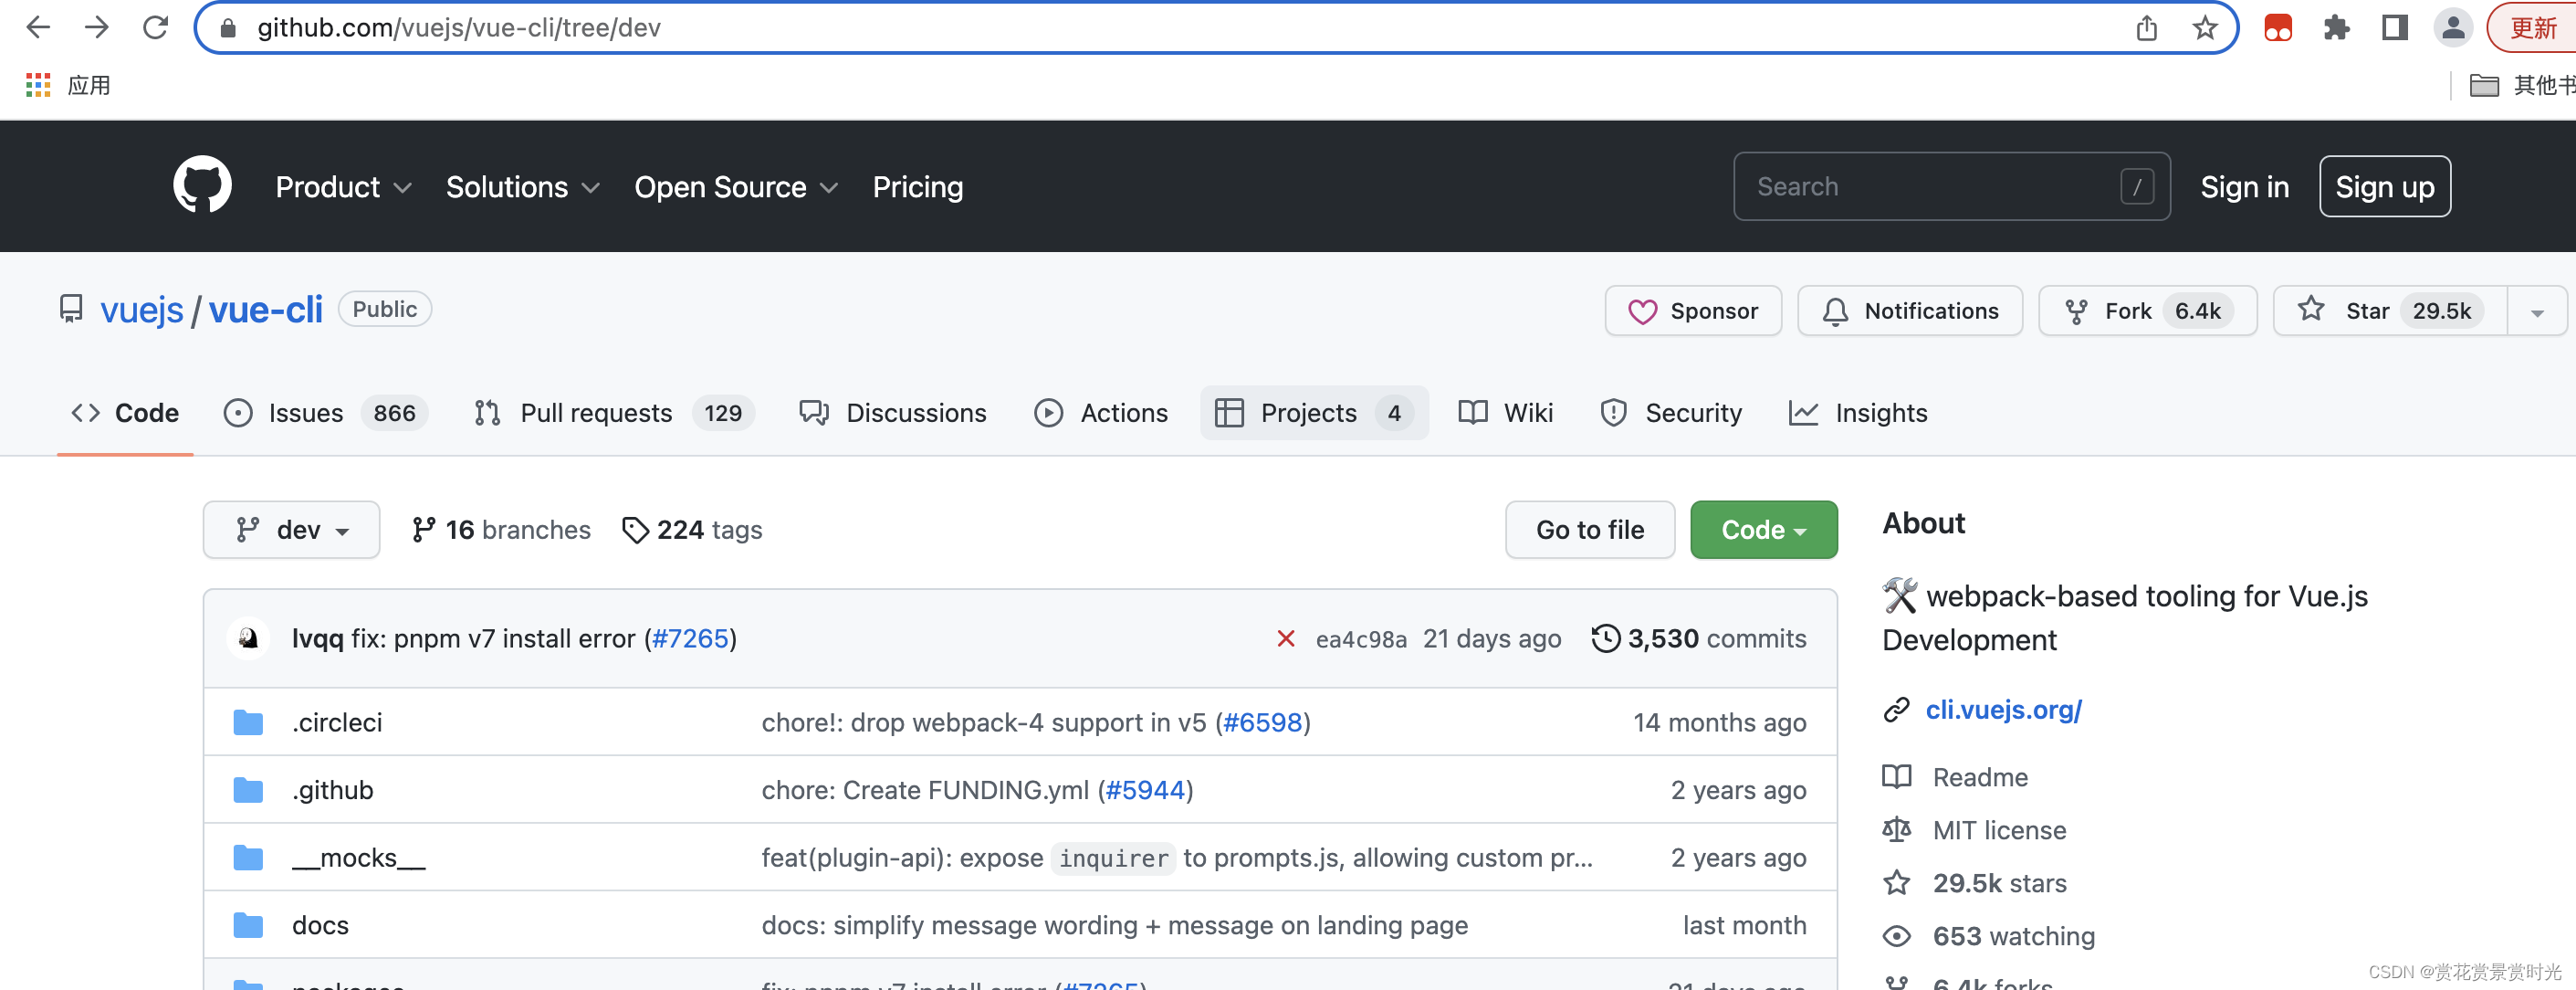
6、在看源码之前先把项目download下来
// 仓库地址,默认是dev分支,该分支是高版本的代码
https://github.com/vuejs/vue-cli
如下图所示默认是dev分支,该分支是高版本的代码,需要切到v2才是vue-cli2的源码:
7、vue-cli2的源码目录结构如下:
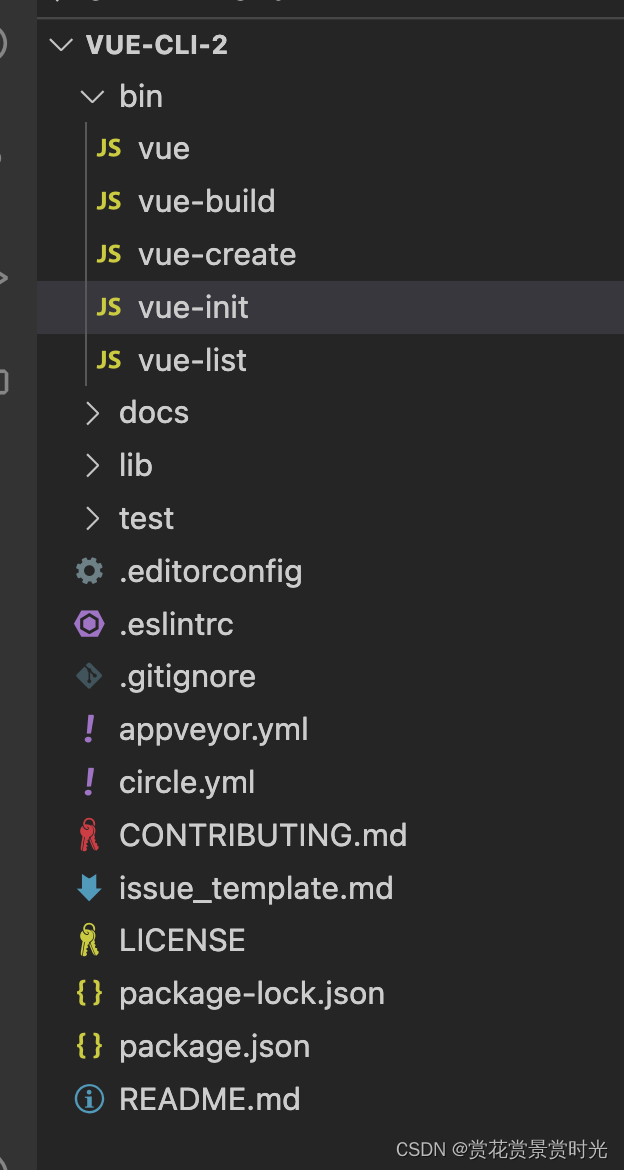
8、package.json文件属性bin代码如下:
  "bin": {
    "vue": "bin/vue",
    "vue-init": "bin/vue-init",
    "vue-list": "bin/vue-list"
  },
具有对外部提供执行命令的工具npm包的package.json文件会有bin属性设置,在全局安装该工具包时候,会根据工具包里面的package.json文件的bin属性生成相应的软链接符号,该软链接符号放在npm全局安装路径下的bin文件夹目录下(或者局部安装时候,放在项目根目录下的node_modules/.bin文件夹下),名称是bin属性名,指向可执行的脚本文件。vue init命令对应的是vue-init,即执行bin/vue-init文件
9、接下来看下bin/vue-init文件内容
1)引进一些模块和本地常用工具类方法
#!/usr/bin/env node
/**
 * 指明用node执行该脚本文件,系统去env环境找node的安装路径
 * #! -----在Linux或者Unix中,是一个符号名称,用于指明这个脚本文件的解释程序,即用什么来执行这个脚本文件。
 * /usr/bin/env:告诉系统可以在env设置里面查找该解释器的路径。如果出现No such file or directory的错误,则添加node环境变量配置就可以了
 * 注意:windows不支持Shebang,它是通过文件的扩展名来确定使用什么解释器来执行脚本注意:windows不支持Shebang,它是通过文件的扩展名来确定使用什么解释器来执行脚本
 */


// 模块
const download = require('download-git-repo') // 一个用于下载git仓库项目的模块
// commander可以让node命令更加简单,提供了命令行输入、参数解析等强大功能
// 可以将文字输出到终端当中的模块
const program = require('commander')
// fs是node的读写模块,以同步的方法检测目录是否存在,存在返回true,否则返回false
const exists = require('fs').existsSync
// path是node提供的一个模块,包含了一些工具函数,用于处理文件与目录的路径
const path = require('path')
// 在node执行脚本时候,在控制台显示loading效果、显示各种状态的图标等
const ora = require('ora')
// 获取用户主目录的路径
const home = require('user-home')
// 将绝对路径转换为波形路径 比如/Users/Documents/dev → ~/dev
const tildify = require('tildify')
// 可以修改终端输出字符样式
const chalk = require('chalk')
// 是一个命令行回答的模块,可以自己设定终端的问题,然后对这些回答给出相应的处理
const inquirer = require('inquirer')
// 是一个可以使用 UNIX 命令的模块,如:rm -rf
const rm = require('rimraf').sync

// 本地提供的一些工具类方法
const logger = require('../lib/logger')
const generate = require('../lib/generate')
const checkVersion = require('../lib/check-version')
const warnings = require('../lib/warnings')
const localPath = require('../lib/local-path')

const isLocalPath = localPath.isLocalPath
const getTemplatePath = localPath.getTemplatePath
2)下面代码声明了vue init的用法
// -------------------------------------------- 1 --------------------------------------------
/**
 * 下面的代码声明了vue init的用法,如果在终端当中 输入 vue init --help或者跟在vue init 后面的参数长
 * 度小于1,会输出下面的描述
 */


/**
 * Usage.
 * usage: 显示help的时候,自定义命令行第一行的用法描述
 * option:添加命令行
 */

program
  .usage('<template-name> [project-name]')
  .option('-c, --clone', 'use git clone')
  .option('--offline', 'use cached template')

/**
 * Help.
 * on:自定义监听事件
 */

program.on('--help', () => {
  console.log('  Examples:')
  console.log()
  console.log(chalk.gray('    # create a new project with an official template')) // chalk.gray设置文字颜色为灰色
  console.log('    $ vue init webpack my-project')
  console.log()
  console.log(chalk.gray('    # create a new project straight from a github template'))
  console.log('    $ vue init username/repo my-project')
  console.log()
})

/**
 * Help.
 */

function help () {
  program.parse(process.argv) // 解析命令行参数,参数放在属性args上
  if (program.args.length < 1) return program.help() // 显示帮助信息
}
help()

// -------------------------------------------- 1 --------------------------------------------
在控制台输入vue init或者vue init --help,输出信息如下所示:
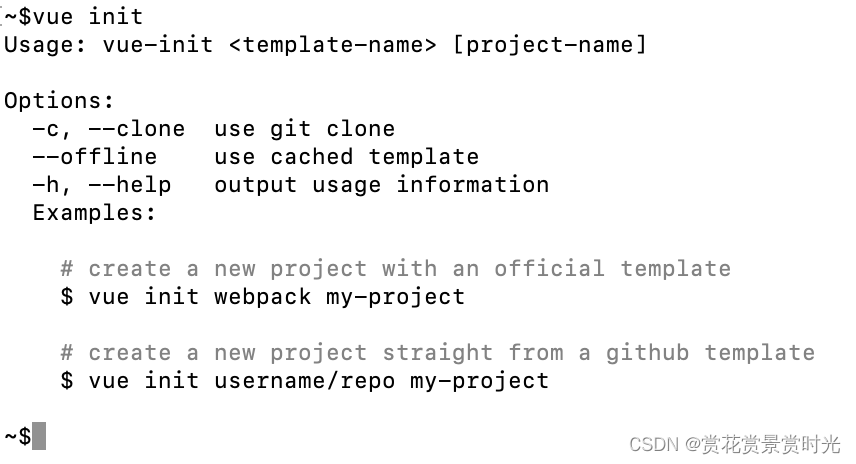
说明:process是一个全局对象,它提供当前 Node.js 进程的有关信息,以及控制当前 Node.js 进程。process.argv属性返回一个数组,具有的元素如下所述:
// process.argv返回一个数组
process.argv[0]:返回启动Node.js进程的可执行文件所在的绝对路径
process.argv[1]:返回当前执行的JavaScript文件绝对路径
剩余的元素为其他命令行参数
示例如下图所示:

3)下面代码主要是获取变量值
// -------------------------------------------- 2 --------------------------------------------
/**
* Settings.
* 下面主要是获取变量、路径
*/
// 模版路径,template:启动Node.js进程的可执行文件所在的绝对路径,如'/Users/lily/.nvm/versions/node/v18.7.0/bin/node'
let template = program.args[0]
const hasSlash = template.indexOf('/') > -1
// 项目名称,rawName:当前执行的JavaScript文件绝对路径,如'/Users/lily/Documents/project/testcommander/index.js'
const rawName = program.args[1]
// 如果不存在项目名称或项目名称输入是'.' ,则name取的是 当前文件夹的名称
const inPlace = !rawName || rawName === '.'
// process.cwd():获取Node.js进程的当前工作目录,如/Users/lily/Documents/project/testcommander
// path.relative('../', process.cwd()):获取当前工作目录的文件夹名,如:testcommander
const name = inPlace ? path.relative('../', process.cwd()) : rawName
// 输出路径,如/Users/lily/Documents/project/testcommander
const to = path.resolve(rawName || '.')
// 是否用到git clone
const clone = program.clone || false
// tmp为本地模板路径,如果是离线状态,那么模板路径取本地的
// home = require('user-home'),得到用户的主目录路径,如:/Users/lily
// tmp,如:/Users/lily/.vue-templates/-Users-lily-.nvm-versions-node-v18.7.0-bin-node
const tmp = path.join(home, '.vue-templates', template.replace(/[\/:]/g, '-'))
if (program.offline) {
// tildify(tmp)将绝对路径转换为波形路径,如:~/.vue-templates/-Users-tangxiujiang-.nvm-versions-node-v18.7.0-bin-node
// 即~相当于/Users/lily
console.log(`> Use cached template at ${chalk.yellow(tildify(tmp))}`)
template = tmp
}
/**
* Padding.
*/
// 监听exit事件
console.log()
process.on('exit', () => {
console.log()
})
// inPlace:如果不存在项目名称或项目名称输入是'.'
// 或者输出路径存在,则在终端显示设定的问题,并根据回答进行处理
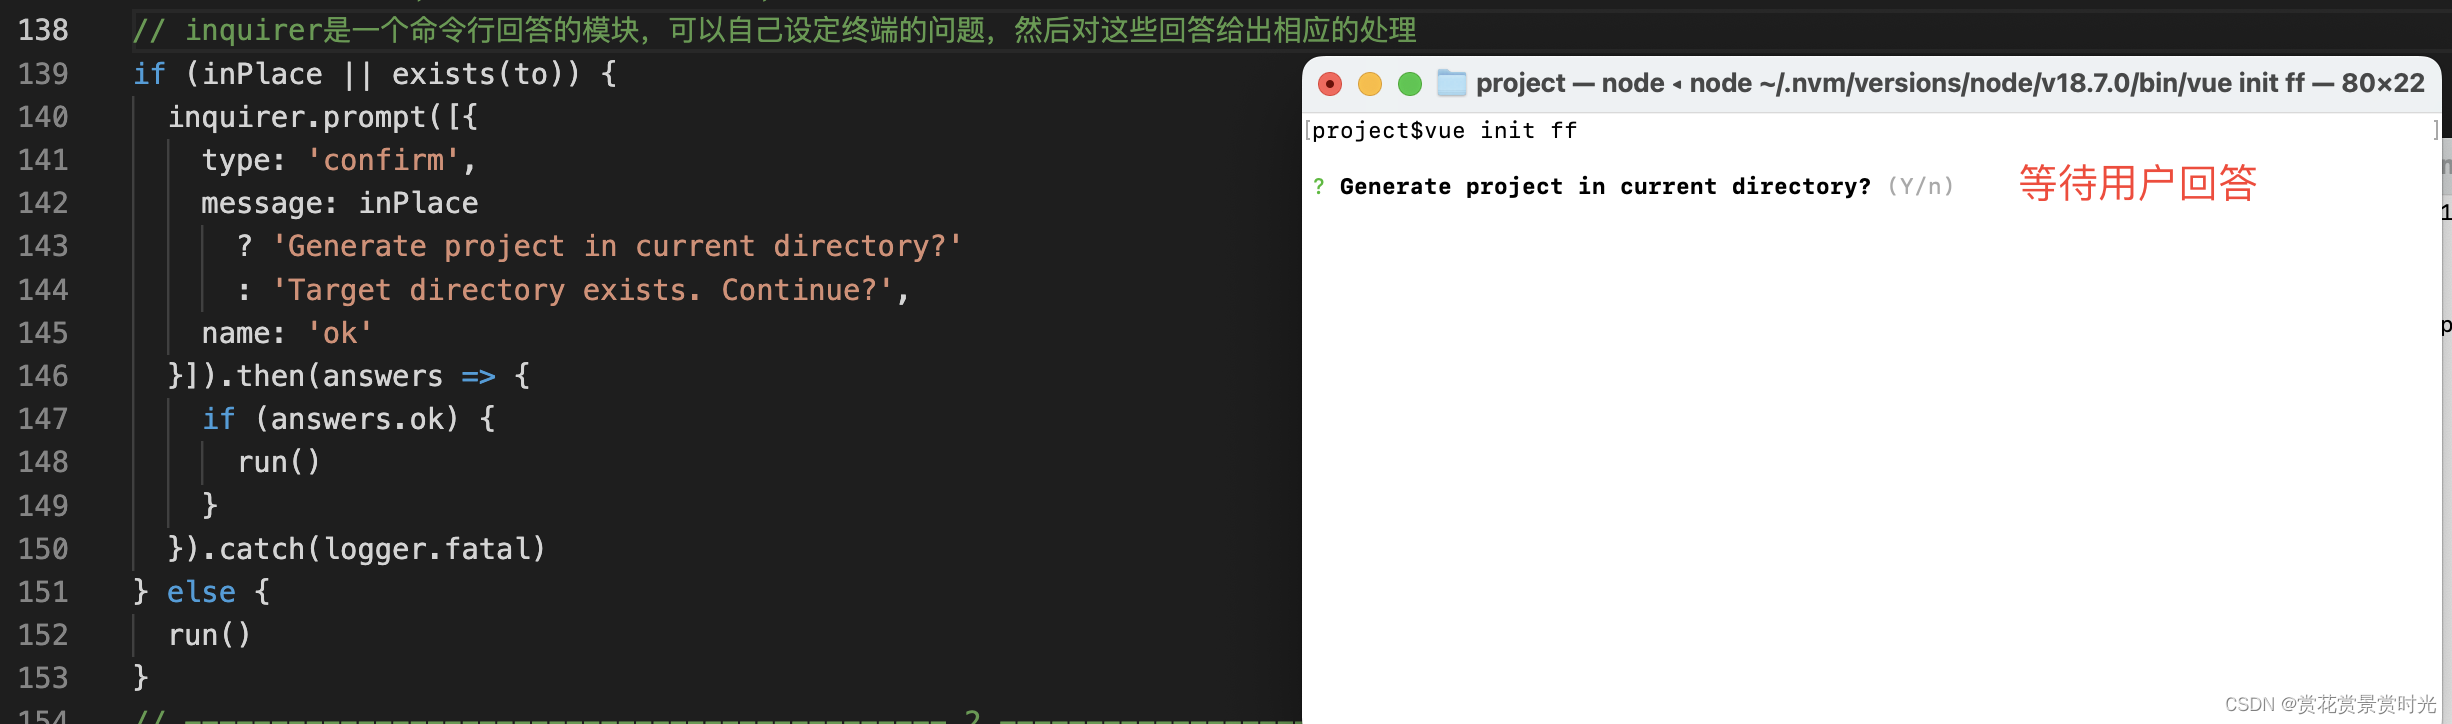
// inquirer是一个命令行回答的模块,可以自己设定终端的问题,然后对这些回答给出相应的处理
if (inPlace || exists(to)) {
inquirer.prompt([{
type: 'confirm',
message: inPlace
? 'Generate project in current directory?'
: 'Target directory exists. Continue?',
name: 'ok'
}]).then(answers => {
if (answers.ok) {
run()
}
}).catch(logger.fatal)
} else {
run()
}
// -------------------------------------------- 2 --------------------------------------------
inquirer是一个命令行回答的模块,可以自己设定终端的问题,然后对这些回答给出相应的处理,如下图所示,输入vue init ff,则终端显示等待用户输入答案,并根据答案进行相应的处理:
4)根据模版名称,下载、生成模版
// -------------------------------------------- 3 --------------------------------------------

/**
 * Check, download and generate the project.
 * 下面主要是根据模版名称,来下载并生成模版,如果是本地的模版路径,就直接生成
 */

function run () {
  // check if template is local
  // 判断是否是本地模版路径,是的话直接生成模版项目
  if (isLocalPath(template)) {
    // 获取模版地址
    const templatePath = getTemplatePath(template)
    // 如果本地模版路径存在 则开始生成模版
    if (exists(templatePath)) {
      generate(name, templatePath, to, err => {
        if (err) logger.fatal(err)
        console.log()
        logger.success('Generated "%s".', name)
      })
    } else {
      logger.fatal('Local template "%s" not found.', template)
    }
  } else {
    // 非本地模版路径,则先检查版本
    checkVersion(() => {
      // 路径是否包含‘/’
      if (!hasSlash) { // 路径不包含'/',则进入该分支,使用官方模版
        // use official templates
        const officialTemplate = 'vuejs-templates/' + template
        if (template.indexOf('#') !== -1) { // 路径有‘#’则直接下载
          downloadAndGenerate(officialTemplate)
        } else { // 路径不包含‘#’
          if (template.indexOf('-2.0') !== -1) { // 路径不包含'-2.0',则输出模版废弃的相关提示
            warnings.v2SuffixTemplatesDeprecated(template, inPlace ? '' : name)
            return
          }

          // warnings.v2BranchIsNowDefault(template, inPlace ? '' : name)
          // 下载并生成模版
          downloadAndGenerate(officialTemplate)
        }
      } else {
        // 下载并生成模版
        downloadAndGenerate(template)
      }
    })
  }
}

/**
 * Download a generate from a template repo.
 *
 * @param {String} template
 */

function downloadAndGenerate (template) {
  // 显示loading icon + 'downloading template'
  const spinner = ora('downloading template')
  spinner.start()
  // Remove if local template exists
  // 删除本地存在的模版
  if (exists(tmp)) rm(tmp)
  // 下载模版
  // template目标地址,tmp为下载地址,clone代表是否需要clone
  download(template, tmp, { clone }, err => {
    spinner.stop() // 停止动画
    // 下载出错,则输出日志并终止进程
    if (err) logger.fatal('Failed to download repo ' + template + ': ' + err.message.trim())
    // 模版下载成功之后,调生成模版的方法
    generate(name, tmp, to, err => {
      if (err) logger.fatal(err)
      console.log()
      logger.success('Generated "%s".', name)
    })
  })
}
// -------------------------------------------- 3 --------------------------------------------
至此,bin/vue-init文件源码已大致讲完,其主要功能是:根据模版名称,下载、生成模版。
10、接下来看下下载模版方法:download
download是download-git-repo模块,该方法的使用可参考文档:download-git-repo - npm,作用是从代码仓库中下载代码,如下是API的介绍:
download(repository, destination, options, callback)1)参数repository表示代码仓库地址
A)可采用简写方式:
// 如:'github:liuli/uni-app'或者'liubbc/uni-app'
1、GitHub - github:owner/name or simply owner/name
// 如:'gitlab:liuli/uni-app'
2、GitLab - gitlab:owner/name
// 如:'bitbucket:liuli/uni-app'
3、Bitbucket - bitbucket:owner/name
注意:仓库下载的默认分支是master分支,但是可以修改repository的下载分支名,如下所示:
// 即在仓库名称后加上'#分支名称',如liuli/uni-app#dev,表示下载的是dev分支代码
owner/name#my-branch
另外,可以指定自定义来源,如 gitlab:custom.com:owner/name.,自定义来源默认为 https 或 git@ , 你也可以自己定义协议
B)Direct - direct:url方式
这种方式会跳过上面简写的方式,直接传递 url。有以下注意事项:
a)如果使用 direct,并且没有 clone配置项, 必须传入完整的zip文件地址, 包括分支(如果需要的话);
b)如果使用 direct 并带有 clone配置项, 必须传入完整的 git repo url ,可以通过 direct:url#my-branch指定分支
2)destination---下载的仓库放置的路径
3)options--------选项参数
4)callback-------回调函数
11、生成模版的方法:generate
生成模版的方法generate在文件lib/generate.js文件
// 可以修改终端输出字符样式
const chalk = require('chalk')
// 一个非常简单、可插拔的静态站点生成器。用于遍历文件夹,判断是否需要进行模板渲染
const Metalsmith = require('metalsmith')
// 是一个模版编译器,通过template和json,输出一个html
const Handlebars = require('handlebars')
// 异步处理模块,类似于让方法变成一个线程
const async = require('async')
// 模版引擎整合库
const render = require('consolidate').handlebars.render

const path = require('path')
// 字符串数组匹配的库
const multimatch = require('multimatch')
// options.js自定义的配置项文件
const getOptions = require('./options')
// 本地定义的工具类
// ask设置提问的问题,并且对输入的答案进行处理
const ask = require('./ask')
// 过滤不符合条件的数据
const filter = require('./filter')
// 打印日志:区分失败,成功,普通日志
const logger = require('./logger')


// ------------------------------ 1 -----------------------------
// 注册两两个渲染器
// register handlebars helper
Handlebars.registerHelper('if_eq', function (a, b, opts) {
  return a === b
    ? opts.fn(this)
    : opts.inverse(this)
})

Handlebars.registerHelper('unless_eq', function (a, b, opts) {
  return a === b
    ? opts.inverse(this)
    : opts.fn(this)
})
// ------------------------------ 1 -----------------------------


/**
 * Generate a template given a `src` and `dest`.
 *
 * @param {String} name
 * @param {String} src
 * @param {String} dest
 * @param {Function} done
 */

module.exports = function generate (name, src, dest, done) {
  // 读取src目录下的配置文件meta.json或meta.js
  // 同时设置name ,author(当前git用户)到配置opts中
  const opts = getOptions(name, src)
  // 在该目录下生成静态文件
  const metalsmith = Metalsmith(path.join(src, 'template'))
  // data赋值
  const data = Object.assign(metalsmith.metadata(), {
    destDirName: name,
    inPlace: dest === process.cwd(),
    noEscape: true
  })
  // 遍历opts中的helpers对象,注册渲染模版数据
  opts.helpers && Object.keys(opts.helpers).map(key => {
    Handlebars.registerHelper(key, opts.helpers[key])
  })

  const helpers = { chalk, logger }
  // 数据合并
  if (opts.metalsmith && typeof opts.metalsmith.before === 'function') {
    opts.metalsmith.before(metalsmith, opts, helpers)
  }
  // askQuestions在终端里面询问一些问题
  metalsmith.use(askQuestions(opts.prompts))
    .use(filterFiles(opts.filters))
    .use(renderTemplateFiles(opts.skipInterpolation))

  if (typeof opts.metalsmith === 'function') {
    opts.metalsmith(metalsmith, opts, helpers)
  } else if (opts.metalsmith && typeof opts.metalsmith.after === 'function') {
    opts.metalsmith.after(metalsmith, opts, helpers)
  }
  // clean:设置在写入之前是否删除原先目标目录 默认为true
  //  source:设置原路径
  //  destination:设置输出的目录
  // build:执行构建
  metalsmith.clean(false)
    .source('.') // start from template root instead of `./src` which is Metalsmith's default for `source`
    .destination(dest)
    .build((err, files) => {
      done(err)
      if (typeof opts.complete === 'function') {
        // 当生成完毕之后执行 meta.js当中的 opts.complete方法
        const helpers = { chalk, logger, files }
        opts.complete(data, helpers)
      } else {
        logMessage(opts.completeMessage, data)
      }
    })

  return data
}

/**
 * Create a middleware for asking questions.
 *
 * @param {Object} prompts
 * @return {Function}
 */

function askQuestions (prompts) {
  return (files, metalsmith, done) => {
    ask(prompts, metalsmith.metadata(), done)
  }
}

/**
 * Create a middleware for filtering files.
 *
 * @param {Object} filters
 * @return {Function}
 */

function filterFiles (filters) {
  return (files, metalsmith, done) => {
    filter(files, filters, metalsmith.metadata(), done)
  }
}

/**
 * Template in place plugin.
 *
 * @param {Object} files
 * @param {Metalsmith} metalsmith
 * @param {Function} done
 */

function renderTemplateFiles (skipInterpolation) {
  skipInterpolation = typeof skipInterpolation === 'string'
    ? [skipInterpolation]
    : skipInterpolation
  return (files, metalsmith, done) => {
    const keys = Object.keys(files)
    const metalsmithMetadata = metalsmith.metadata()
    async.each(keys, (file, next) => {
      // skipping files with skipInterpolation option
      if (skipInterpolation && multimatch([file], skipInterpolation, { dot: true }).length) {
        return next()
      }
      const str = files[file].contents.toString()
      // do not attempt to render files that do not have mustaches
      if (!/{{([^{}]+)}}/g.test(str)) {
        return next()
      }
      render(str, metalsmithMetadata, (err, res) => {
        if (err) {
          err.message = `[${file}] ${err.message}`
          return next(err)
        }
        files[file].contents = new Buffer(res)
        next()
      })
    }, done)
  }
}

/**
 * Display template complete message.
 *
 * @param {String} message
 * @param {Object} data
 */

function logMessage (message, data) {
  if (!message) return
  render(message, data, (err, res) => {
    if (err) {
      console.error('\n   Error when rendering template complete message: ' + err.message.trim())
    } else {
      console.log('\n' + res.split(/\r?\n/g).map(line => '   ' + line).join('\n'))
    }
  })
}
总结:
看完vue-init命令的原理后,其实定制自定义的模版,我们只要做2件事:
- 首先,需要有一个自己模版项目
- 其次,如果需要自定义一些变量,就需要在模版的
meta.js当中定制
下载模块使用的是download-git-repo模块,支持github,gitlab,bitucket上下载,只需要将定制好的模板项目放到git远程仓库上即可。


 2691
2691


 被折叠的 条评论
为什么被折叠?
被折叠的 条评论
为什么被折叠?
 到【灌水乐园】发言


