


1. onnxruntime包下载
从https://github.com/microsoft/onnxruntime/releases/下载解压到E:/code/package/onnruntime
2. opencv_c++下载https://github.com/opencv/opencv/releases/tag/4.8.1
3.测试opencv代码:总结:添加include目录,添加lib库目录,链接器输入添加*.lib库文件,且debug/release项目与编译器设置相同。
#include <opencv2/core.hpp>
#include <opencv2/highgui.hpp>
using namespace cv;
int main(int argc, char* argv[])
{

    std::string image_path = "./ai.png";
    Mat img = imread(image_path, IMREAD_COLOR);

    imshow("Display window", img);
    int k = waitKey(0); // Wait for a keystroke in the window
    return 0;
}
在属性中添加include目录后提示LNK2019 无法解析的外部符号 “void __cdecl cv::error(int,class std::basic_string<char,struct std::char_traits,class std::allocator > const &,char const *,char const *,int)” (?error@cv@@YAXHAEBV?
b
a
s
i
c
s
t
r
i
n
g
@
D
U
?
basic_string@DU?
basicstring@DU?
…
测试,使用vs2019创建一个cpp文件include<onnxruntime_cxx_api.h>找不到头文件。
4. LNK2019 无法解析的外部符号 "void _cdecl cv::error(int,class std::basic_string<char,struct std::char_traits,RMatSize@cv@@QEBA?e@H@1@XZ) 之类的提示
解决:添加库目录D:\code\package\opencv_cxx\build\x64\vc16\lib;

如果是debug模式则在链接器输入-附加依赖项中添加open_word481d.lib,release模式则添加的是opencv_world.lib,名称根据实际文件夹中的改。再次运行可解决
注意,我的文件夹中有opencv_world481.lib;和opencv_world481d.lib;两个文件。我设置的debug模式,则只能添加481d.lib文件,Release模式添加481.lib文件,不可同时添加,否则opencv的imread依然内存报错,读取的图片为空

5.若提示opencv_word481.dll找不到,则将D:\code\package\opencv_cxx\build\x64\vc16\bin加入环境变量path,重启vs2019即可
解决:找不到头文件:右键项目名称-属性-添加执行文件目录,并且红框的内容应该一致,如都是Release 和x86,并添加include目录

6.0x00007FF87AD2CF19 处(位于 Project1.exe 中)有未经处理的异常: Microsoft C++ 异常: cv::Exception,位于内存位置 0x000000BC9A0FECD0 处。是由于c++中文件路径要用\,而不能用/。还有问题则可能是附加依赖项的问题,debug模式只添加481.lib.不能同时添加两个
7. 若运行时依然报错:程序无法正常启动(0x0007b):看看是不是32位和64的影响:
解决:onnxruntime包有32和64之分,选择win32时,include和lib的路径是onnxruntime32.运行程序输出已加载:C:\system32\cruntime.dll知道vs正用的32位工具,所以把编译器第二行改为release/x86,项目右击的属性改为release/win32。若是onnxruntime,平台改为win32试试
8. 若还是报错,都改为debug试试,把onnxruntime_providers_shared.dll和onnxruntime.dll动态链接库文件复制到debug/release文件夹,即放在项目名.exe所在文件夹内,这是必须的
9.运行程序报错提示缺少mfc组件:勾选适用于最新v142生成工具的c++MFC工具安装

10.有时无法解析符号可能是因为,若主函数为main则为控制台程序,为winmain则是窗口程序,在链接器-系统-子系统中选择对应的才行。

11.使用后cmake 编译CMakeLists.txt时,提示:
Generator NMake Makefiles does not support platform specification, but platform x64,CMake Error: CMAKE_C_COMPILER not set, after EnableLanguage
CMake Error: CMAKE_CXX_COMPILER not set, after EnableLanguage
则是由于未安装visual studio编译器,或则安装了但是没把vs文件夹中的cl.exe所在目录加入环境变量。
12.stm32cubemx生成的makefile文件,编译器cc改为g++报错undefined reference to `_getpid’未定义。
解决:更改LDFLASHGS
问题解决
解决方法:
吧LDFLAGS里的-specs=nano.specs改为-specs=nosys.specs
13. error MSB8020: 无法找到 v143 的生成工具(平台工具集 =“v143”)。若要使用 v143 生成工具进行生成,请安装 v143 生成工具
解决:平台工具集选择VisualStudio2019(v142)

14. 窗口运行结束迅速关闭
解决:在return 0前面加上system(“pause”);
15. load模型时提示不能从chat *转换为wchar_t *
解决:在模型名称前加上L

16.引发了异常: 读取访问权限冲突。Ort::GetApi(…) 返回 nullptr。
- 是由于Debug/Release文件夹中的dll文件版本和E:code/package/onnxruntime中的版本不一样,目前这个onnx文件夹存放的19.2版本,之前有些项目用的16.1,将19.2版本的dll复制过去
- 过段时间发现又报同样的错:由于C:windows/system32/中有onnxruntime.dll文件,程序检测到这个了,删除它但是没有权限,vs中查看加载列表中是否是这个路径的
- 我将env弄成全局变量但不是指针的时候也会报这个错误,可以弄成全局指针,函数中new env初始化
17.Invalid input name 或者output name
自己设置值:run函数输入inputNames是const char* const* input_names而原本代码是char*
const char* inputNames[] = { "images" };//这两个值是根据netron查看onnx格式得到的输入输出名称
const char* outputNames[] = { "output" };
std::vector<Ort::Value> outputTensors = this->session.Run(Ort::RunOptions{ nullptr },
inputNames,//原本的代码是输入的char *,但是函数应该输入char * *,
inputTensors.data(), 1, outputNames,//this->outputNames.data(),
1);
/*原本的自动获取代码
auto input_name = session.GetInputNameAllocated(0, allocator);
inputNames.push_back(input_name.get());
auto output_name = session.GetOutputNameAllocated(0, allocator);
outputNames.push_back(output_name.get());
std::vector<Ort::Value> outputTensors = this->session.Run(Ort::RunOptions{nullptr},//设置为nullptr表示使用默认的运行选项
inputNames.data(),//指定输入的名称和对应的张量
inputTensors.data(),
1,//1表示输入的数量
outputNames.data(),//指定输出的名称
1);//输出的数量*/
```
#### 18.模型路径宽字符串问题
```c
ifdef _WIN32
// Windows平台代码
std::wstring w_modelPath = utils::charToWstring(modelPath.c_str());
//在Windows平台上,由于文件路径可能涉及Unicode字符(特别是当路径包含非ASCII字符时),因此这里使用std::wstring来存储模型路径。
//utils::charToWstring函数是一个自定义函数,用于将标准C++字符串(std::string)转换为宽字符串(std::wstring)。
//然后,使用转换后的宽字符串w_modelPath来创建ONNX Runtime会话。
session = Ort::Session(env, w_modelPath.c_str(), sessionOptions);//modelpath部分可以直接L"model.onnx"
#else
// 非Windows平台代码
session = Ort::Session(env, modelPath.c_str(), sessionOptions);//直接"model.onnx"
#endif
```
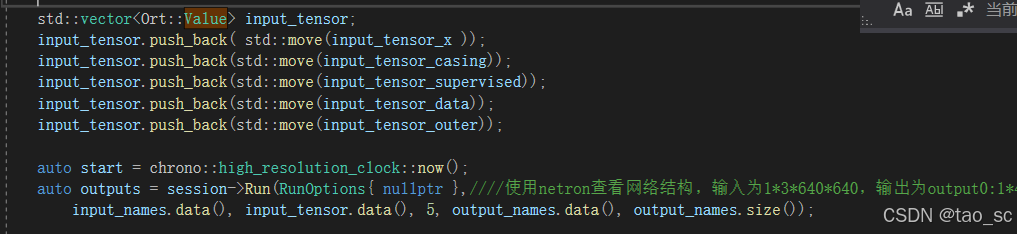
#### 19.std::construct_at未找到匹配的重载函数
报错

input_tensor加上std::move()
# c语言实现demo
```c
#include<onnxruntime_c_api.h>//主要是这个头文件
#include <stdio.h>
#include <stdlib.h>
#include <assert.h>
const OrtApi* g_ort = NULL;
#define ORT_ABORT_ON_ERROR(expr) \
do { \
OrtStatus* onnx_status = (expr); \
if (onnx_status != NULL) { \
const char* msg = g_ort->GetErrorMessage(onnx_status); \
fprintf(stderr, "%s\n", msg); \
g_ort->ReleaseStatus(onnx_status); \
abort(); \
} \
} while (0);
void verify_input_output_count(OrtSession * session) {
size_t count;
ORT_ABORT_ON_ERROR(g_ort->SessionGetInputCount(session, &count));
assert(count == 1);
ORT_ABORT_ON_ERROR(g_ort->SessionGetOutputCount(session, &count));
assert(count == 1);
}
bool heat_simu_ort(float data1,float data2 )
{
OrtSession* session;
g_ort = OrtGetApiBase()->GetApi(ORT_API_VERSION);
if (!g_ort) {
fprintf(stderr, "Failed to init ONNX Runtime engine.\n");
return -1;
}
OrtEnv* env;
ORT_ABORT_ON_ERROR(g_ort->CreateEnv(ORT_LOGGING_LEVEL_WARNING, "test", &env));
assert(env != NULL);
OrtSessionOptions* session_options;
ORT_ABORT_ON_ERROR(g_ort->CreateSessionOptions(&session_options));
wchar_t* model_path = L"./model_loss_smoothl1.onnx";
ORT_ABORT_ON_ERROR(g_ort->CreateSession(env, model_path, session_options, &session));
verify_input_output_count(session);
float input[3]={data1,data2 };//1组数据两个输入14, 3500,21, 3500,32, 4500
OrtMemoryInfo* memory_info;
ORT_ABORT_ON_ERROR(g_ort->CreateCpuMemoryInfo(OrtArenaAllocator, OrtMemTypeDefault, &memory_info));
const int64_t input_shape[] = { 1, 2 };
OrtValue* input_tensor = NULL;
ORT_ABORT_ON_ERROR(g_ort->CreateTensorWithDataAsOrtValue(memory_info, input, 2* sizeof(float), input_shape,
2, ONNX_TENSOR_ELEMENT_DATA_TYPE_FLOAT ,&input_tensor));
assert(input_tensor != NULL);
int is_tensor;
ORT_ABORT_ON_ERROR(g_ort->IsTensor(input_tensor, &is_tensor));
assert(is_tensor);
g_ort->ReleaseMemoryInfo(memory_info);
const char* input_names[] = { "input" };
const char* output_names[] = { "output" };
OrtValue* output_tensor = NULL;
ORT_ABORT_ON_ERROR(g_ort->Run(session, NULL, input_names, (const OrtValue* const*)&input_tensor, 1, output_names, 1,
&output_tensor));
assert(output_tensor != NULL);
ORT_ABORT_ON_ERROR(g_ort->IsTensor(output_tensor, &is_tensor));
assert(is_tensor);
int ret = 0;
float* output_tensor_data = NULL;
ORT_ABORT_ON_ERROR(g_ort->GetTensorMutableData(output_tensor, (void**)&output_tensor_data));
for (int i = 0; i < 1; i++)
printf("res:%f", output_tensor_data[i]);
int in;
scanf("%c", &in);//等待控制台输入一个数据再关闭窗口
g_ort->ReleaseSessionOptions(session_options);
g_ort->ReleaseSession(session);
g_ort->ReleaseEnv(env);
if (ret != 0) {
fprintf(stderr, "fail\n");
}
#ifdef _WIN32
CoUninitialize();
#endif
return ret;
}
int main()
{
heat_simu_ort(0, 3000);
return 0;
}
```


 6397
6397

 被折叠的 条评论
为什么被折叠?
被折叠的 条评论
为什么被折叠?
 到【灌水乐园】发言


