


Opencv图像处理基本操作
1基本数据类型
图像有若干个通道,灰度图像只有一个通道,而彩色具有红,绿,蓝组成,但是OpenCv以逆序的方式来存储三个分量,还可以使用第四个透明度(alpha),可以使用
img.channels()获取图像通道个数。
使用若干个位存储一副图像的每个像素,这被称为图像的深度,灰度图像为8位,即0-255个灰度级,可以用img.depth()获得图像的深度,其返回值为:
CV_8U - 8-bit unsigned integers ( 0..255 )
CV_8S - 8-bit signed integers ( -128..127 )
CV_16U - 16-bit unsigned integers ( 0..65535 )
CV_16S - 16-bit signed integers ( -32768..32767 )
CV_32S - 32-bit signed integers ( -2147483648..2147483647 )
CV_32F - 32-bit floating-point numbers ( -FLT_MAX..FLT_MAX, INF, NAN )
CV_64F - 64-bit floating-point numbers ( -DBL_MAX..DBL_MAX, INF, NAN )
对于灰度图像和彩色图像,最常见的是CV_8U.
Mat img=imread("lena.png",IMREAD_GRAYSCALE);
Mat fp;
img.convertTo(fp,CV_32F);//改变图像的深度
2 像素级访问
1. 第一种方法:模板函数at<>
uchar pixel=img.at<uchar>(0,0);  //获得灰度图像0,0点像素
Vec3b pixel=img.at<Vec3B>(0,0);  //获得3波段图像的第一个波段(0,0)像素。
第一种方法,效率不高,必须定位到他所在的位置
2. 第二种方法:函数ptr
他返回图像特定行的指针。因此可以得到每一行的数据,时间复杂度降低,
如下代码获取一副彩色图像的每个像素值。
//时间复杂度大大降低!!!
uchar R,G,B;
for (int i=0;i<img.rows;i++)    //遍历行
    Vec3b pixRow=img.ptr<Vec3b>(i);
for (int j=0;j<img.cols;j++) {   //遍历**列**
    B=pixRow[j][0];
    G=pixRow[j][1];
    R=pixRow[j][2];
}
测量程序用时可用函数:
double to=(double)getTickCount();
elapsed=((double)getTickCount()-to)/getTickFrenquency()
图像位运算
可以用掩码对一个图像进行处理,位元算有:
void bitwise_and(InputArray src1, InputArray src2, OutputArray dst, InputArray mask=noArray())
其中src1是原始的图像,src2是掩码,dst为输出
一个例子:
#include<opencv2\opencv.hpp>
#include <iostream>
using namespace cv;
using namespace std;
int main() {
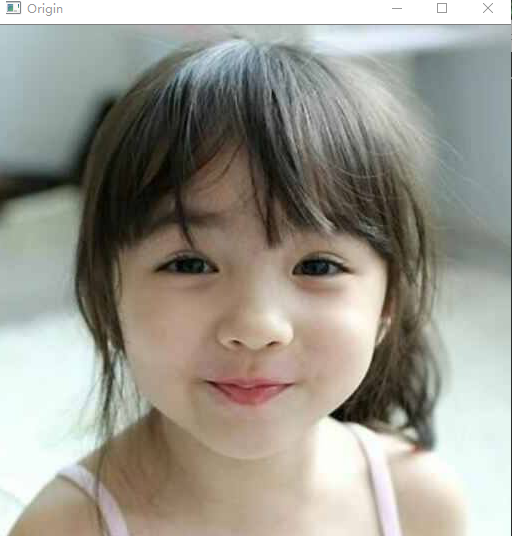
Mat img = imread("cute.jpg", 1);
if (img.empty())
cout << "cannot load image" << endl;
imshow("Origin", img);
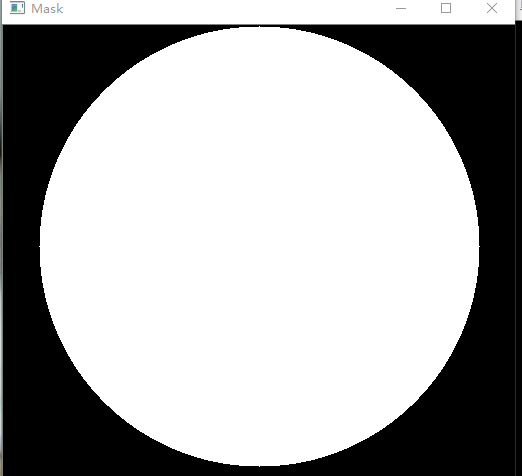
Mat mask(img.rows, img.cols,CV_8UC3, Scalar(0, 0,0 ));
circle(mask, Point(img.rows / 2, img.cols / 2-35), 220,Scalar(255,255,255),-1); //画一个圆
imshow("Mask", mask);
//执行位操作
Mat r;
bitwise_and(img, mask, r);
imshow("Bit_and", r);
waitKey(0);
return 0;
}如下所示的图像处理过程:
分别为原始图像,掩模,计算后的图像

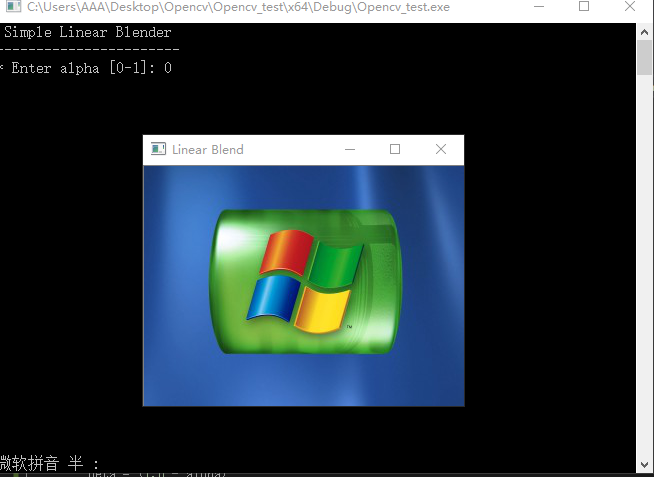
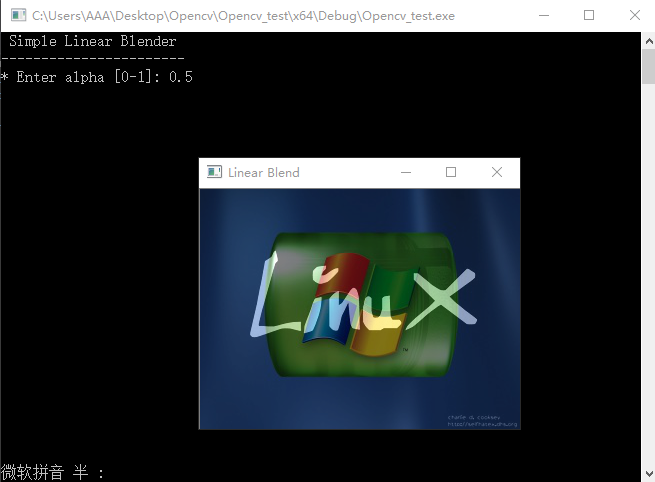
1. Adding (blending) two images using OpenCV
将两张图像以线性组合的方式合并成一张图像,注意的是,两张图像的大小应该相同。
g(x) = (1 -a)*f0(x) + a*f1(x)g(x)为生成的矩阵,f0(x),f1(x)为要合并的两个矩阵。a为尺度。
用到的函数原型:
C++:
void addWeighted(InputArray src1, double alpha, InputArray src2, double beta, double gamma, OutputArray dst, int dtype=-1)
#include <opencv2/core.hpp>
#include <opencv2/imgcodecs.hpp>
#include <opencv2/highgui.hpp>
#include <iostream>
#include <string>
using namespace cv;
using namespace std;
int main(int argc, char** argv)
{
        double alpha = 0.5; double beta; double input;
        Mat src1, src2, dst;
        /// Ask the user enter alpha
        std::cout << " Simple Linear Blender " << std::endl;
        std::cout << "-----------------------" << std::endl;
        std::cout << "* Enter alpha [0-1]: ";
        std::cin >> input;
        /// We use the alpha provided by the user if it is between 0 and 1
        if (input >= 0.0 && input <= 1.0)
            alpha = input;
        /// Read image ( same size, same type )
        src1 = imread("LinuxLogo.jpg");
        src2 = imread("WindowsLogo.jpg");
        if (!src1.data) { printf("Error loading src1 \n"); return -1; }
        if (!src2.data) { printf("Error loading src2 \n"); return -1; }
        /// Create Windows
        namedWindow("Linear Blend", 1);
        beta = (1.0 - alpha);
        addWeighted(src1, alpha, src2, beta, 0.0, dst);
        imshow("Linear Blend", dst);
        waitKey(0);
        return 0;
}
当a=0时,此时只有window的logo
a=0.5时如图所示:
2. Changing the contrast and brightness of an image
改变图像的对比度和亮度
基础的公式为:
g(i; j) = a*f(i,j) + b
where i and j indicates that the pixel is located in the i-th row and j-th column.
获得一个图片的像素我们用image.at<Vec3b>(y,x)[c] 这里的y为行,x为列,c代表R, G or B (0, 1 or 2)
int main(int argc, char** argv)
{
double alpha; /**< Simple contrast control */
int beta; /**< Simple brightness control */
/// Read image given by user
Mat image = imread("cute.jpg");
Mat new_image = Mat::zeros(image.size(), image.type()); //copy the origin picture size,and type
/// Initialize values
std::cout << " Basic Linear Transforms " << std::endl;
std::cout << "-------------------------" << std::endl;
std::cout << "* Enter the alpha value [1.0-3.0]: "; std::cin >> alpha;
std::cout << "* Enter the beta value [0-100]: "; std::cin >> beta;
/// Do the operation new_image(i,j) = alpha*image(i,j) + beta
for (int y = 0; y < image.rows; y++){
for (int x = 0; x < image.cols; x++){
for (int c = 0; c < 3; c++){
new_image.at<Vec3b>(y, x)[c] =
saturate_cast<uchar>(alpha*(image.at<Vec3b>(y, x)[c]) + beta);//saturate_cast to make sure the values are valid.
}
}
}
namedWindow("Original Image", 1);
namedWindow("New Image", 1);
imshow("Original Image", image);
imshow("New Image", new_image);
waitKey();
return 0;
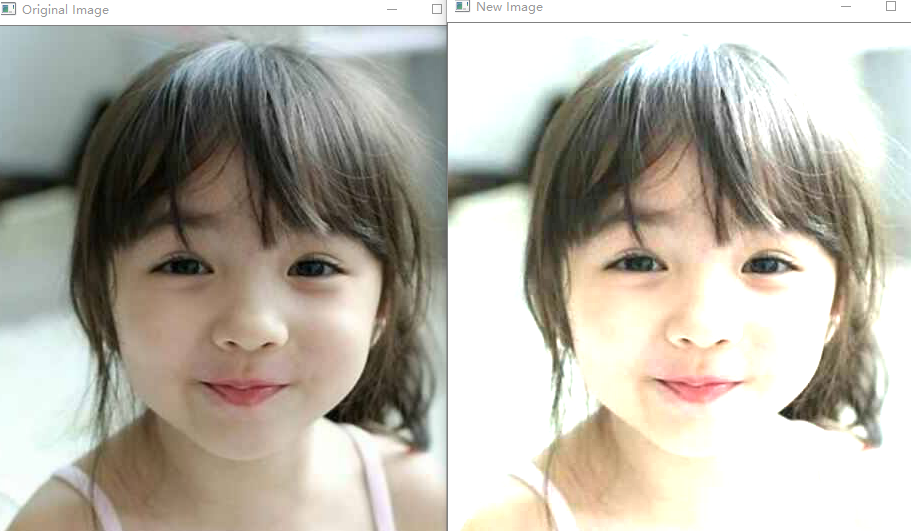
}示例如下:可以看到改变的图片的对比度和亮度。
这里可以用函数image.convertTo(new_image, -1, alpha, beta);来代替for循环,它会更有效率。
Basic Drawing
1. 定义一个点 2D
Point pt;
pt.x = 10;
pt.y = 8;
Point pt = Point(10, 8);
2. 画椭圆ellipse原型
void ellipse(InputOutputArray img, Point center, Size axes,
 double angle, double startAngle, double endAngle,
 const Scalar& color, int thickness = 1,
 int lineType = LINE_8, int shift = 0);
后面三个为默认的参数,可以不写。
//自己写的函数,指定img,和角度
void MyEllipse(Mat img, double angle)
{
    int thickness = 2;
    int lineType = 8;
    ellipse(img,
        Point(w / 2, w / 2),
        Size(w / 4, w / 16),
        angle,
        0,
        360,
        Scalar(255, 0, 0),  //为颜色
        thickness,
        lineType);
}
//**调用方法:**
MyLine(rook_image, Point(0, 15 * w / 16), Point(w, 15 * w / 16));
3. 画线段
函数原型
void line(InputOutputArray img, Point pt1, Point pt2, const Scalar& color,
 int thickness = 1, int lineType = LINE_8, int shift = 0);
Random generator and text with OpenCV
随机数产生类Random Number generator class (RNG)
RNG rng( 0xFFFFFFFF );//创建一个RNG类,并对其进行初始化
//在[a,b)中随机产生一个数
C++: int RNG::uniform(int a, int b)
C++: float RNG::uniform(float a, float b)
C++: double RNG::uniform(double a, double b)
//a – lower inclusive boundary of the returned random numbers.
//b – upper non-inclusive boundary of the returned random numbers.
RNG rng;

// always produces 0
double a = rng.uniform(0, 1);

// produces double from [0, 1)
double a1 = rng.uniform((double)0, (double)1);

// produces float from [0, 1)
double b = rng.uniform(0.f, 1.f);

// produces double from [0, 1)
double c = rng.uniform(0., 1.);

// may cause compiler error because of ambiguity:
//  RNG::uniform(0, (int)0.999999)? or RNG::uniform((double)0, 0.99999)?
double d = rng.uniform(0, 0.999999);
Random color
一副彩色图像由R,G,B组成,可用RNG产生随机的颜色。
static Scalar randomColor( RNG& rng )
{
int icolor = (unsigned) rng;
return Scalar( icolor&255, (icolor>>8)&255, (icolor>>16)&255 );
}
Put out the text
获得一个字符串的宽度和高度:
C++: Size getTextSize(const string& text, int fontFace, double fontScale, int thickness, int* baseLine)
例如:
Size textsize = getTextSize("OpenCV forever!", CV_FONT_HERSHEY_COMPLEX, 3, 5, 0);
将其输出:
C++: void putText(Mat& img, const string& text, Point org, int fontFace, double fontScale, Scalar color, int thickness=1, int lineType=8, bool bottomLeftOrigin=false )


 672
672

 被折叠的 条评论
为什么被折叠?
被折叠的 条评论
为什么被折叠?
 到【灌水乐园】发言


