


alex
alexnet version 1
参考git上的大神代码,自己学着一个cnn finetune的代码。
代码
代码结构
| name | usage |
|---|---|
| image_process.py | 将图片做索引: path label 用于datagenerator读取 |
| datagenerator.py | 读取图片,reszie,反转,banch 等基础操作 |
| alexnet.py | net 核心代码 |
| finetune | finetune 代码 |
使用
1.生成图片路径和label
image_process.py :
- arg1 是训练图片位置
- arg2 是tain.txt 和 val.txt 存放路径
- arg3 用于训练的比例 剩下的交叉验证
- Usage:
python image_process.py ../../data/dogvscat/train ../../data/dogvscat 0.8
train.txt 例子:
tensorlearn/data/dogvscat/train/dog.9528.jpg 1
tensorlearn/data/dogvscat/train/cat.9138.jpg 0
tensorlearn/data/dogvscat/train/cat.2848.jpg 0
2.finetune
finetune.py
设置:
# Path to the textfiles for the trainings and validation set
train_file = '../../data/dogvscat/train.txt'
val_file = '../../data/dogvscat/val.txt'

# Learning params
learning_rate = 0.01
num_epochs = 10
batch_size = 128

# Network params
dropout_rate = 0.5
num_classes = 2
train_layers = ['fc8', 'fc7']

# How often we want to write the tf.summary data to disk
display_step = 1

# Path for tf.summary.FileWriter and to store model checkpoints
filewriter_path = "../../data/checkpoint"
checkpoint_path = "../../data/filewriter"
3. tensorboard
运行 python finetune.py 会有提示

tensorboard --logdir ../../data/checkpoint --port 8080访问对应ip:port 就会有如下界面

TODO
- conf 设置参数
- fc训练后的前向网络
ALEX的结构

共8层,5层convolutional,3层full connected
             .conv(11, 11, 96, 4, 4, padding='VALID', name='conv1')
             .lrn(2, 2e-05, 0.75, name='norm1')
             .max_pool(3, 3, 2, 2, padding='VALID', name='pool1')
             .conv(5, 5, 256, 1, 1, group=2, name='conv2')
             .lrn(2, 2e-05, 0.75, name='norm2')
             .max_pool(3, 3, 2, 2, padding='VALID', name='pool2')
             .conv(3, 3, 384, 1, 1, name='conv3')
             .conv(3, 3, 384, 1, 1, group=2, name='conv4')
             .conv(3, 3, 256, 1, 1, group=2, name='conv5')
             .max_pool(3, 3, 2, 2, padding='VALID', name='pool5')
             .fc(4096, name='fc6')
             .fc(4096, name='fc7')
             .fc(1000, relu=False, name='fc8')
             .softmax(name='prob'))
LRN(local response normalization)
局部响应归一化
公式
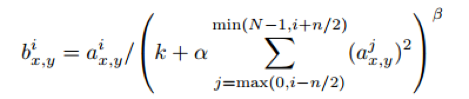
参数
$k=2,n=5,\alpha=10^{-4},\beta=0.75$
图解

比较:响应归一化将我们的top-1与top-5误差率分别减少了1.4%与1.2%。我们也验证了该方案在CIFAR-10数据集上的有效性:四层CNN不带归一化时的测试误差率是13%,带归一化时是11%
减少过拟合
data Augmentation
- 256 取5个227片 水平反转,共10个
- PCA:对于每个训练图像,我们成倍增加已有主成分,比例大小为对应特征值乘以一个从均值为0,标准差为0.1的高斯分布中提取的随机变量。

drop out
pass
训练参数
动力为0.9、权重衰减为0.0005
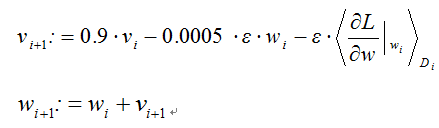
当验证误差率在当前学习率下不再提高时,就将学习率除以10。学习率初始化为0.01,在终止前降低三次。我们训练该网络时大致将这120万张图像的训练集循环了90次,在两个NVIDIA GTX 580 3GB GPU上花了五到六天。
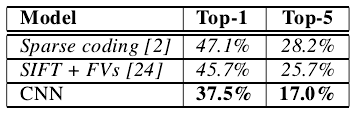
定量评价
定性评价
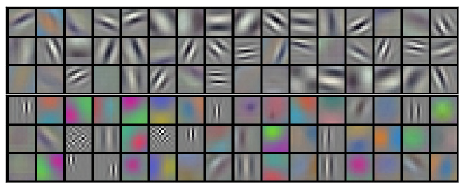
GPU1上的核大多数颜色不明确,而GPU2上的核大多数颜色明确
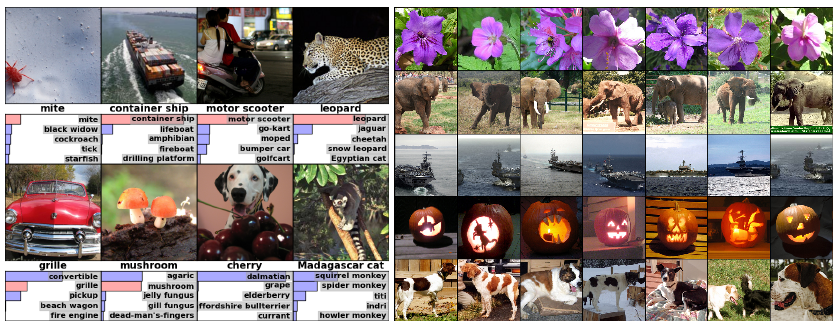
(左图)八个ILSVRC-2010测试图像,以及被我们的模型认为最有可能的五个标签。正确的标签写在每个图像下面,正确标签的概率也以红色条予以显示(若它在前5之内)。(右图)第一列是五个ILSVRC-2010测试图像。其余列显示了六个训练图像,它们在最后的隐层产生的特征向量与测试图像的特征向量有最小的欧氏距离。
reference
- https://kratzert.github.io/kratzert.github.io/2017/02/24/finetuning-alexnet-with-tensorflow.html
- http://hacker.duanshishi.com/?p=1661
- https://kratzert.github.io/kratzert.github.io/2017/02/24/finetuning-alexnet-with-tensorflow.html
代码
https://github.com/chenlongzhen/tensorlearn/tree/master/script/finetune_alexnet_with_tensorflow


 894
894

 被折叠的 条评论
为什么被折叠?
被折叠的 条评论
为什么被折叠?
 到【灌水乐园】发言


