


通过一个具体案例介绍SDK中调试uboot的方法。
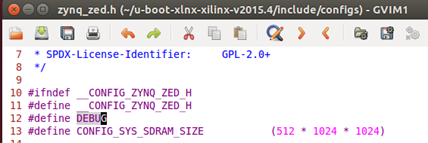
uboot2015.4中打开DEBUG,以便打印出更多的信息,便于理解uboot的执行流程,
编译会报下面的错,把CONFIG_SPL注释掉即可,
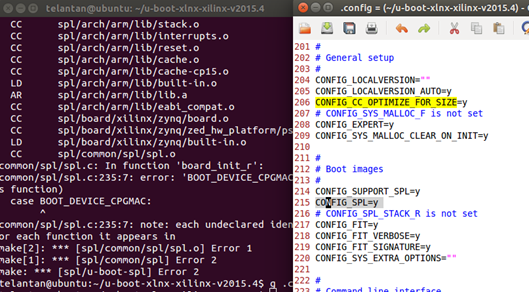
将编译生成的文件放到Zedboard上启动,发现没有任何输出,而之前没加DEBUG选项时是可以正常启动的。
具体定位过程总结如下:
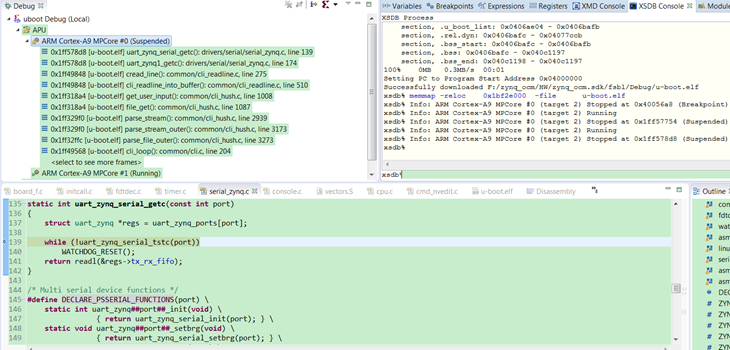
在SDK xsdb窗口中键入下面命令,
依次执行ps_init,ps_post_config初始化zynq,
xsdb% cd {F:\zynq_ocm\HW\zynq_ocm.sdk\design_1_wrapper_hw_platform_0}
xsdb% source ps7_init.tcl
xsdb% ps7_init
xsdb% ps7_post_config
下载u-boot镜像,
xsdb% dow u-boot.elf
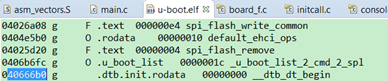
Downloading Program -- F:/zynq_ocm/HW/zynq_ocm.sdk/design_1_wrapper_hw_platform_0/u-boot.elf
section, .text: 0x04000000 - 0x0404ddbb
section, .rodata: 0x0404ddbc - 0x04066683
section, .hash: 0x04066684 - 0x040666af
section, .dtb.init.rodata: 0x040666b0 - 0x04068b2f
section, .data: 0x04068b30 - 0x0406aed7
section, .got.plt: 0x0406aed8 - 0x0406aee3
section, .u_boot_list: 0x0406aee4 - 0x0406bbdb
section, .rel.dyn: 0x0406bbdc - 0x04077de3
section, .bss_start: 0x0406bbdc - 0x0406bbdb
section, .bss: 0x0406bbdc - 0x040c1277
section, .bss_end: 0x040c1278 - 0x040c1277
100% 0MB 0.4MB/s 00:01
Setting PC to Program Start Address 0x04000000
Successfully downloaded F:/zynq_ocm/HW/zynq_ocm.sdk/design_1_wrapper_hw_platform_0/u-boot.elf
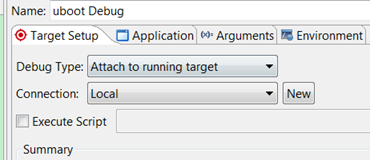
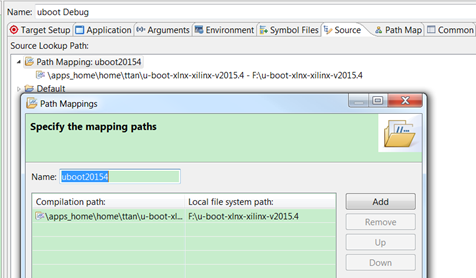
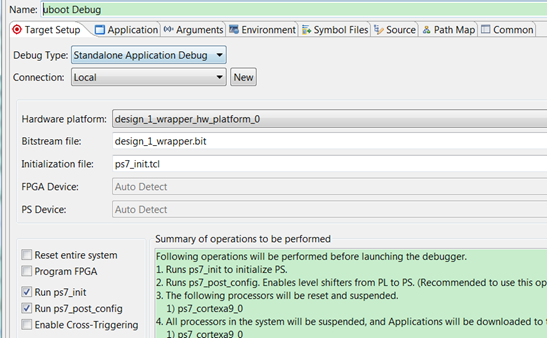
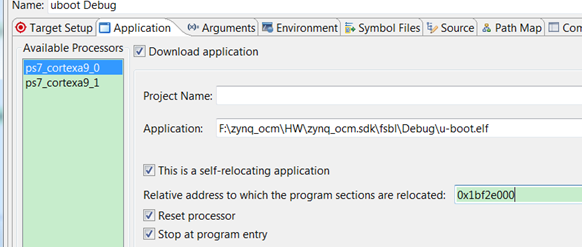
debug configuration
添加源代码的相对路径
从u-boot.elf中找到board_init_f的位置,
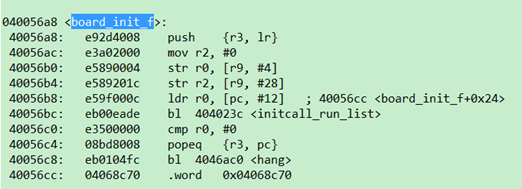
在此处加个断点,为什么断点设在此处,因为board_init_r之后会执行reloc重定位,在此函数之前还可以按通常的流程debug,
xsdb% bpadd -addr 0x040056a8
0
xsdb% Info: Breakpoint 0 status:
target 2: {Address: 0x40056a8 Type: Hardware}
xsdb% con
xsdb% Info: ARM Cortex-A9 MPCore #0 (target 2) Stopped at 0x40056a8 (Breakpoint)
xsdb% Info: ARM Cortex-A9 MPCore #0 (target 2) Stopped at 0x40056ac (Step)
con命令后会停在断点处,
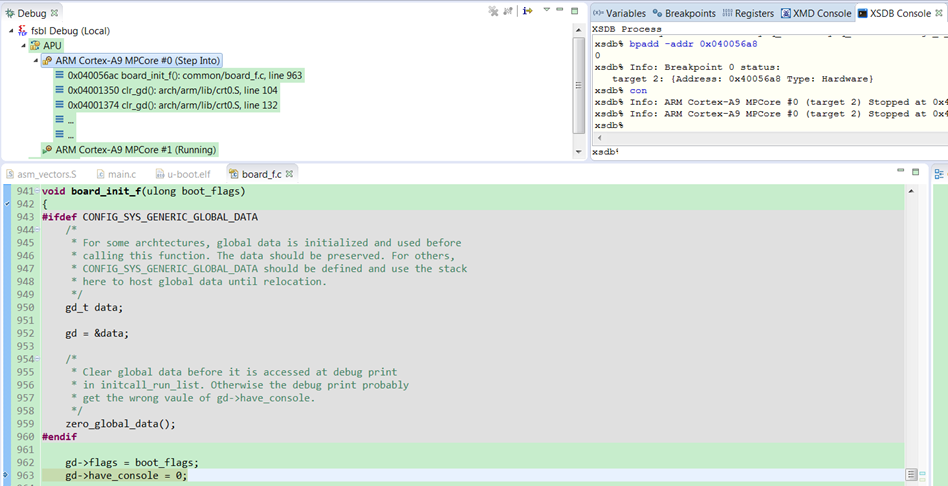
在ret=(*init_fnc_ptr)()处下断点,
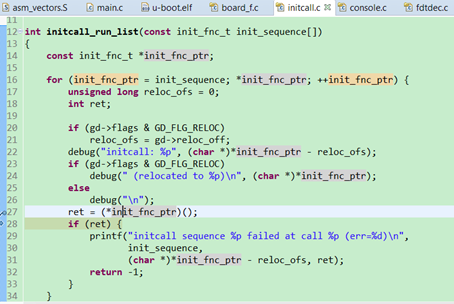
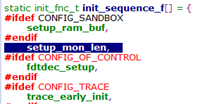
init_run_list会遍历init_sequence_f中的所有函数,
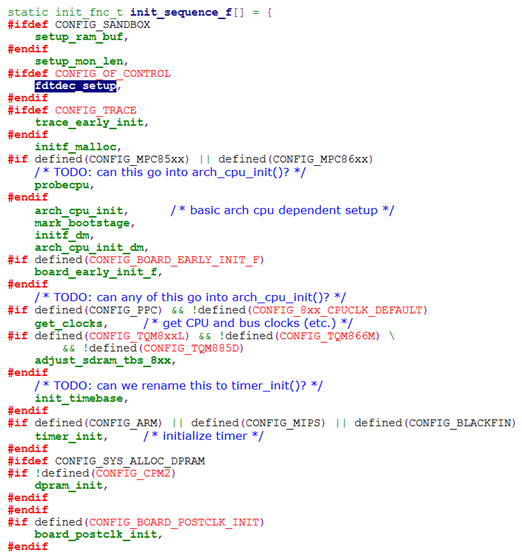
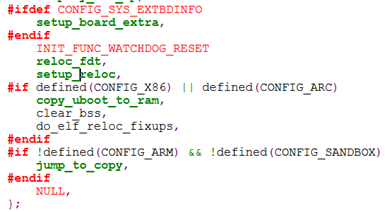
后面可以用SDK中的图形界面单步执行。下面跑题顺便看几个Board_f.c中执行的函数,对理解uboot初始化过程有帮助。
开始会调用setup_mon_len ,计算uboot执行代码占用空间大小,为后面reloc准备信息,
gd->mon_len = (ulong)&__bss_end - (ulong)_start;
0x040c1198 - 0x04000000 = 0xc1198
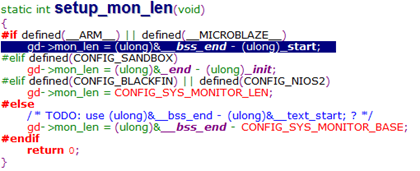
040c1198 g O .bss_end 00000000 __bss_end
04000000 g .text 00000000 _start


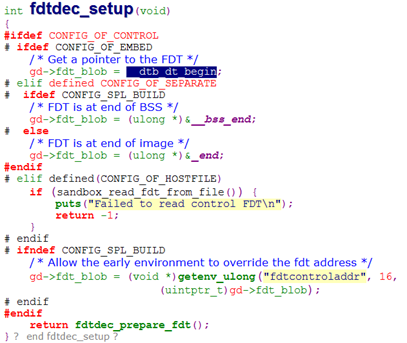
fdtdec_setup函数,把dtb位置返回给gd->fdt_blob,方便后面设备树的访问,

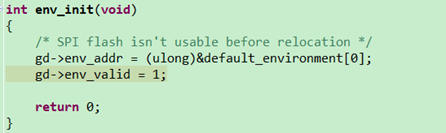
env_init得到默认环境存储地址,


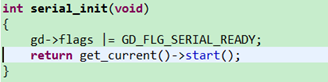
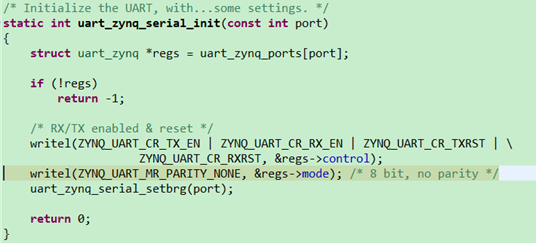
serial_init初始化串口,
driver/serial/serial.c
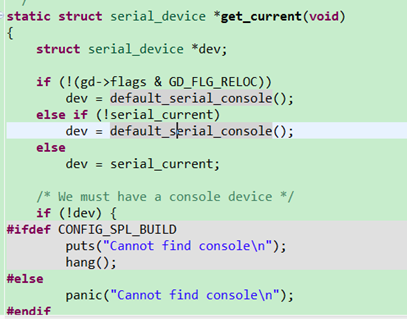
default_serial_console返回默认串口,
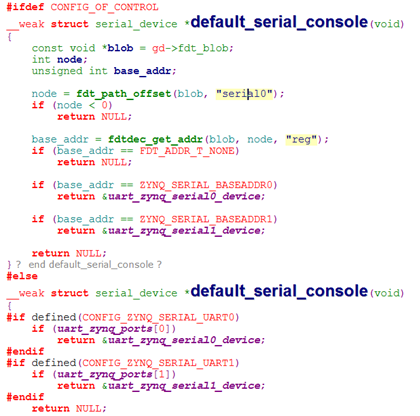
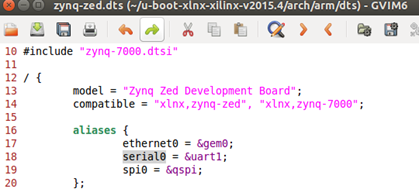
如果使用了device tree,则根据alias域中的serial0来确认使用哪个串口,
本质上都是使用uart_zynq_serial_xxx(port)函数处理串口请求,根据参数port来确定串口外设的基地址,
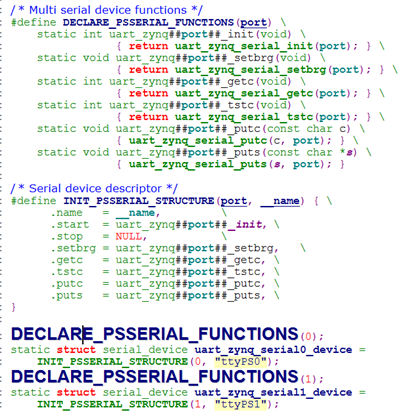
start函数对应的是uart_zynq_serial_init函数,

serial_init之后, 调用console_init_f,
gd->have_console=1,此后就可以进行串口打印了,
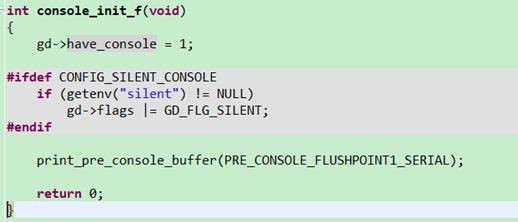
串口初始化完成后,可以调用puts打印信息,
# ifndef debug
# ifdef DEBUG
# define debug(fmt,args...) printf(fmt ,##args)
# else
# define debug(fmt,args...)
# endif
# endif
debug
printf
puts
serial_puts
get_current()->puts(s) //get_current返回串口对象,而在这个过程中又调用了debug,构成了死循环
dev = default_serial_console()
node = fdt_path_offset(blob, "serial0");
base_addr = fdtdec_get_addr(blob, node, "reg")
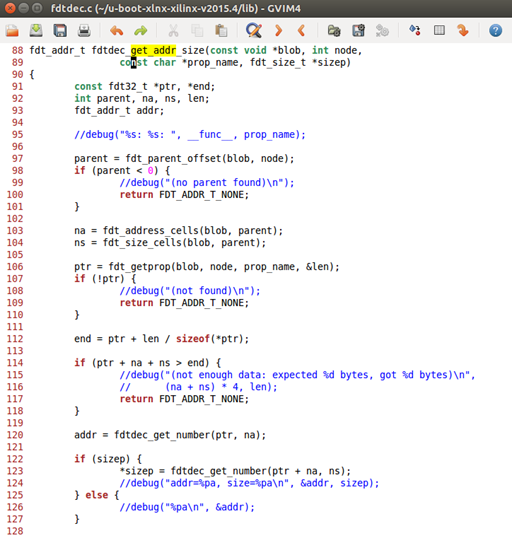
fdtdec_get_addr_size(blob, node, prop_name, NULL) //lib/fdtdec.c
debug(.....)
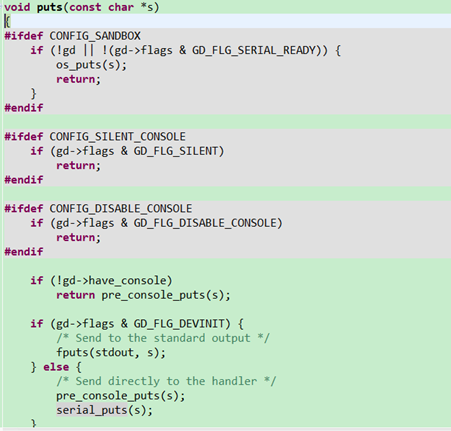
void serial_puts(const char *s)
{
get_current()->puts(s);
}
造成了puts调用的死循环
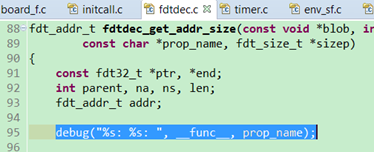
把fdtdec_get_addr_size函数中的debug注册掉,问题解决,
====================================
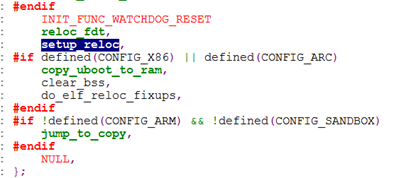
下面进一步讨论一下reloc之后如何在SDK中调试uboot代码。
先看一下reloc操作的处理过程,
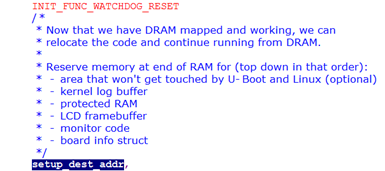
setup_dest_addr
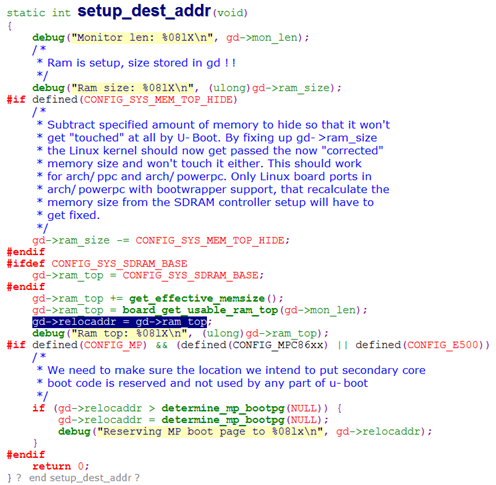

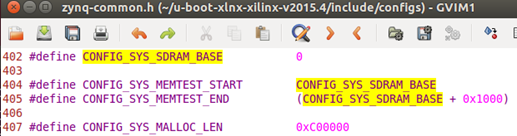
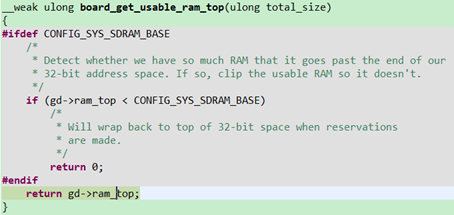
gd->ram_top = CONFIG_SYS_SDRAM_BASE;

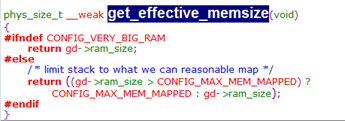
gd->ram_top += get_effective_memsize();

gd->ram_top = board_get_usable_ram_top(gd->mon_len)
gd->relocaddr = gd->ram_top;

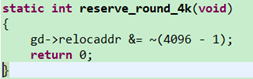
reserve_round_4k
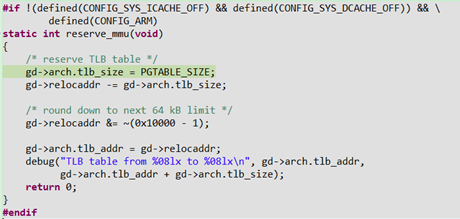
reserve_mmu
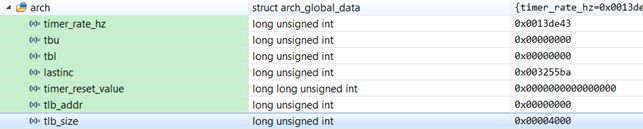
gd->arch.tlb_size = PGTABLE_SIZE;
gd->relocaddr -= gd->arch.tlb_size;
/* round down to next 64 kB limit */
gd->relocaddr &= ~(0x10000 - 1);

reserve_uboot
gd->relocaddr -= gd->mon_len;
gd->relocaddr &= ~(4096 - 1);
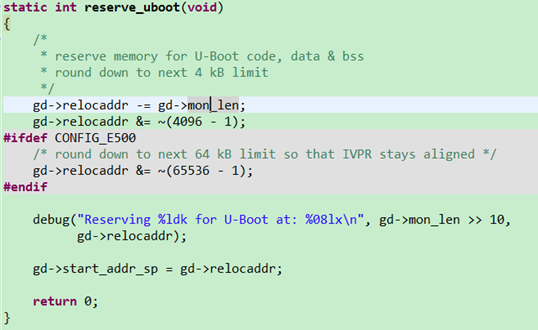

reserve_malloc
setup_reloc
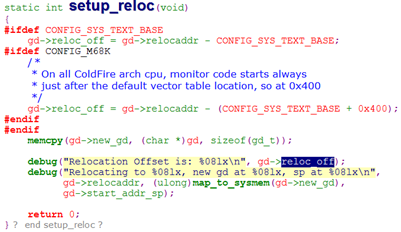
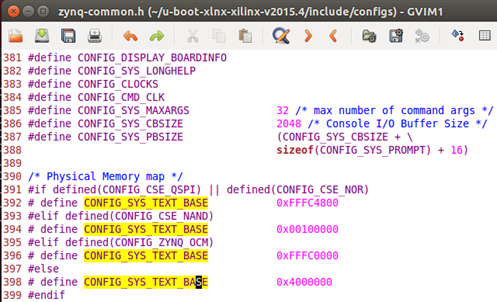
# define CONFIG_SYS_TEXT_BASE 0x4000000
可以得到下面两个关键地址,
relocaddr 0x1ff2e000
reloc_off 0x1bf2e000


uboot重定位后用memmap命令映射,
Use the memmap command via XSDB to provide the address to which the program sections are allocated. The memmap command in XSDB can be used to add symbol files to the debugger.
memmap -reloc reloc_off -file <path-to-u-boot/u-boot.elf
此处理对应的具体命令为
memmap -reloc 0x1bf2e000 -file u-boot.elf
======================================
如果从一开始就全部使用IDE环境调试,则debug configuration配置如下,


 5246
5246

 被折叠的 条评论
为什么被折叠?
被折叠的 条评论
为什么被折叠?
 到【灌水乐园】发言


