


HarmonyOS布局简介
简介
因为笔者是从事Android开发的,所以这里大多都带入Android的布局概念,对Android不熟悉的还望谅解一下。
目前鸿蒙的布局也主要分为线性布局和相对布局两种布局,今天就主要介绍一下这两种布局的属性以及在ability文件中用java ui框架编写布局。
线性布局
DirectionalLayout译为定向布局,和Android里面的LinearLayout一样,往一个方向添加元素;同样可以通过orientation设置布局的方向,可以设置为水平和垂直。
//垂直方向
ohos:orientation="vertical"
//水平方向
ohos:orientation="horizontal"
布局元素称之为组件(Component),一个元素代表一个组件。
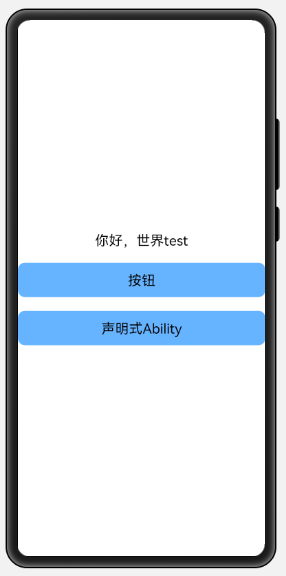
线性布局还是很简单的,通过几个元素就可以看出来效果:
<?xml version="1.0" encoding="utf-8"?>
<DirectionalLayout
    xmlns:ohos="http://schemas.huawei.com/res/ohos"
    ohos:height="match_parent"
    ohos:width="match_parent"
    ohos:alignment="center"
    ohos:orientation="vertical">

    <Text
        ohos:id="$+id:text_helloworld"
        ohos:height="match_content"
        ohos:width="match_content"
        ohos:background_element="$graphic:background_ability_main"
        ohos:layout_alignment="horizontal_center"
        ohos:text="$string:mainability_HelloWorld"
        ohos:text_size="20fp"
        />

    <Button
        ohos:id="$+id:btnIntent"
        ohos:height="50vp"
        ohos:text="按钮"
        ohos:text_size="20fp"
        ohos:top_margin="20vp"
        ohos:background_element="$graphic:btn_intent"
        ohos:width="match_parent"/>

    <Button
        ohos:id="$+id:btnJavaUI"
        ohos:height="50vp"
        ohos:width="match_parent"
        ohos:text="声明式Ability"
        ohos:background_element="$graphic:btn_intent"
        ohos:top_margin="20vp"
        ohos:text_size="20fp"/>

</DirectionalLayout>
三个元素垂直排列就可以得到以下效果:
元素的属性就不多做介绍了,做过Android的基本都知道,什么内边距啊,外边距啊,鸿蒙也是一样的有。
相对布局
DependentLayout 译为依赖布局,同样可以理解为Android里面的RelativeLayout相对布局,这样一带入就很好理解了;主要还是来看一下布局内组件支持的属性:
组件之间的属性:
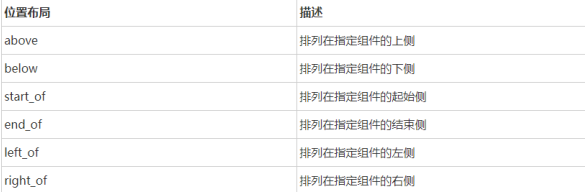
组件与父控件之间的属性:

要相较于父控件某个位置对齐就可以使用组件与父控件之间的属性进行依赖;组件与组件之间就可以使用组件之间的属性。
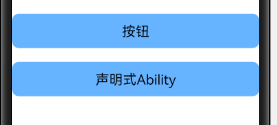
还是一段简单的代码,同样可以得到两个按钮垂直排列的效果:
<DependentLayout
    ohos:height="200vp"
    ohos:width="match_parent"
    ohos:below="$id:layout1">

    <Text
        ohos:id="$+id:tv1"
        ohos:height="40vp"
        ohos:width="match_parent"
        ohos:text_size="20fp"
        ohos:background_element="$graphic:shape_round"
        ohos:text="第二个页面"/>

    <Text
        ohos:height="40vp"
        ohos:width="match_parent"
        ohos:below="$id:tv1"
        ohos:text_size="20fp"
        ohos:background_element="$graphic:shape_round"
        ohos:top_margin="20vp"
        ohos:text="我在第一个tv下面"/>

</DependentLayout>
Java ui声明式布局
之前在介绍布局的时候都是在xml里面进行编写的,这里harmonyOS多了一个方式是在ability中用java代码的方式进行编写UI,这也是Android在推出compose之前没有的操作;下面就来介绍一下这种编写UI的方式。
在编写之前先来看一下Ability引用xml布局的方式

可以看到要引入布局是直接在setUIContent里面通过ResourceTable的方式来进行引入,在AbilitySlice.class文件里面也可以看到这样一个方法,传入的是一个int类型的值:
public final void setUIContent(int layoutRes) {
    throw new RuntimeException("Stub!");
}
但是在这个方法下面还有一个方法,传入的是ComponentContainer类型的值,通过这个值我们就可以使用java代码来编写UI:
public final void setUIContent(int layoutRes) {
    throw new RuntimeException("Stub!");
}

public void setUIContent(ComponentContainer componentContainer) {
    throw new RuntimeException("Stub!");
}
下面通过代码来实现一个很简单的布局,最外层线性布局,里面包含一个线性布局和一个相对布局,草图如下:

1.编写最外层布局(红色框框部分)
最外层可以对照成xml布局文件里面最外层的那个布局。
//定义一个最外层的线性布局
private DirectionalLayout mainLayout;
//实例化该布局
mainLayout = new DirectionalLayout(this);
//设置布局宽度
mainLayout.setWidth(MATCH_PARENT);
//设置布局高度
mainLayout.setHeight(MATCH_PARENT);
//设置布局排列方式(默认垂直)
mainLayout.setOrientation(Component.VERTICAL);
/**
* 设置布局背景颜色
* setBackground 里面需要传入一个element,所以这里需要实例化一个element来设置背景颜色
*/
ShapeElement mainShapeElement = new ShapeElement();
mainShapeElement.setRgbColor(new RgbColor(255,255,255));
mainLayout.setBackground(mainShapeElement);

//调用setUIContent方法注入布局
super.setUIContent(mainLayout);
这样就可以得到最外层红色框框部分的内容了。
2.绘制第一个子元素布局
同样绘制为线性布局
DirectionalLayout topLayout = new DirectionalLayout(this);
topLayout.setWidth(MATCH_PARENT);
topLayout.setHeight(200);
topLayout.setOrientation(Component.HORIZONTAL);

ShapeElement elementTop = new ShapeElement();
elementTop.setRgbColor(new RgbColor(255,0,0));
topLayout.setBackground(elementTop);

//将组件添加到父布局里面去
mainLayout.addComponent(topLayout);
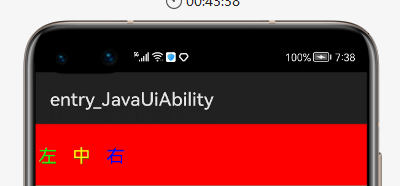
3.绘制第一个布局内的组件
Text tvLeft = new Text(this);//实例化一个text组件
tvLeft.setWidth(100);//组件宽度
tvLeft.setHeight(MATCH_PARENT);//组件高度
tvLeft.setText("左");//文字内容
tvLeft.setTextSize(20, Text.TextSizeType.FP);//文字大小 单位FP
tvLeft.setTextColor(Color.GREEN);//文字颜色
tvLeft.setMarginLeft(10);//左边距

Text tvCenter = new Text(this);
tvCenter.setWidth(100);
tvCenter.setHeight(MATCH_PARENT);
tvCenter.setText("中");
tvCenter.setTextSize(20, Text.TextSizeType.FP);
tvCenter.setTextColor(Color.YELLOW);
tvCenter.setMarginLeft(10);

Text tvRight = new Text(this);
tvRight.setWidth(100);
tvRight.setHeight(MATCH_PARENT);
tvRight.setText("右");
tvRight.setTextSize(20, Text.TextSizeType.FP);
tvRight.setTextColor(Color.BLUE);
tvRight.setMarginLeft(10);

topLayout.addComponent(tvLeft);
topLayout.addComponent(tvCenter);
topLayout.addComponent(tvRight);
效果1:
4.绘制第二个组件
绘制为相对布局
DependentLayout centerLayout = new DependentLayout(this);
centerLayout.setWidth(MATCH_PARENT);
centerLayout.setHeight(200);

ShapeElement elementCenter = new ShapeElement();
elementCenter.setRgbColor(new RgbColor(156,109,109));
centerLayout.setBackground(elementCenter);
//将组件添加到父控件里面去
mainLayout.addComponent(centerLayout);
5.绘制第二个组件的内容
Text tvLeft = new Text(this);//实例化一个text组件
tvLeft.setWidth(100);//设置宽度
tvLeft.setHeight(MATCH_PARENT);//设置高度
tvLeft.setText("左");//设置内容
tvLeft.setTextSize(20, Text.TextSizeType.FP);//设置文字大小 单位fp
tvLeft.setTextColor(Color.GREEN);//文字颜色

/**
* 通过LayoutConfig来设置组件相对于父控件的位置
*/
DependentLayout.LayoutConfig leftConfig = new DependentLayout.LayoutConfig(80,80);
//位于父控件左边对齐
leftConfig.addRule(DependentLayout.LayoutConfig.ALIGN_PARENT_LEFT);
//位于父控件垂直居中对齐
//一个rule不能同时设置这两个属性
leftConfig.addRule(DependentLayout.LayoutConfig.VERTICAL_CENTER);
tvLeft.setLayoutConfig(leftConfig);


Text tvCenter = new Text(this);
tvCenter.setWidth(80);
tvCenter.setHeight(MATCH_PARENT);
tvCenter.setText("中");
tvCenter.setTextSize(20, Text.TextSizeType.FP);
tvCenter.setTextColor(Color.YELLOW);
DependentLayout.LayoutConfig centerConfig = new DependentLayout.LayoutConfig(80,80);
centerConfig.addRule(DependentLayout.LayoutConfig.CENTER_IN_PARENT);
tvCenter.setLayoutConfig(centerConfig);


Text tvRight = new Text(this);
tvRight.setWidth(80);
tvRight.setHeight(MATCH_PARENT);
tvRight.setText("右");
tvRight.setTextSize(20, Text.TextSizeType.FP);
tvRight.setTextColor(Color.BLUE);
DependentLayout.LayoutConfig rightConfig = new DependentLayout.LayoutConfig(80,80);
rightConfig.addRule(DependentLayout.LayoutConfig.ALIGN_PARENT_RIGHT);
rightConfig.addRule(DependentLayout.LayoutConfig.VERTICAL_CENTER);
tvRight.setLayoutConfig(rightConfig);

centerLayout.addComponent(tvLeft);
centerLayout.addComponent(tvCenter);
centerLayout.addComponent(tvRight);
6.JavaUIAbility所有代码
package com.example.demo1.slice;

import ohos.aafwk.ability.AbilitySlice;
import ohos.aafwk.content.Intent;
import ohos.agp.colors.RgbColor;
import ohos.agp.components.*;
import ohos.agp.components.element.ShapeElement;
import ohos.agp.utils.Color;

import static ohos.agp.components.ComponentContainer.LayoutConfig.MATCH_PARENT;

/**
 * 使用java UI 框架
 * 声明式布局
 * */
public class JavaUiAbilitySlice extends AbilitySlice {

    private int topId = 100;

    //最外层布局
    private DirectionalLayout mainLayout;
    //

    @Override
    public void onStart(Intent intent) {
        super.onStart(intent);
        //java ui 声明式布局
        //声明一个布局
        mainLayout = new DirectionalLayout(this);
        mainLayout.setWidth(MATCH_PARENT);
        mainLayout.setHeight(MATCH_PARENT);
        mainLayout.setOrientation(Component.VERTICAL);
        ShapeElement mainShapeElement = new ShapeElement();
        mainShapeElement.setRgbColor(new RgbColor(255,255,255));
        mainLayout.setBackground(mainShapeElement);

        initTopLayout();
        initCenterLayout();
        super.setUIContent(mainLayout);
    }

    @Override
    public void onActive() {
        super.onActive();
    }

    @Override
    public void onForeground(Intent intent) {
        super.onForeground(intent);
    }

    private void initTopLayout(){
        DirectionalLayout topLayout = new DirectionalLayout(this);
        topLayout.setWidth(MATCH_PARENT);
        topLayout.setHeight(200);
        topLayout.setOrientation(Component.HORIZONTAL);

        ShapeElement elementTop = new ShapeElement();
        elementTop.setRgbColor(new RgbColor(255,0,0));
        topLayout.setBackground(elementTop);

        initTopContent(topLayout);

        mainLayout.addComponent(topLayout);
    }

    private void initTopContent(DirectionalLayout topLayout){

        Text tvLeft = new Text(this);
        tvLeft.setWidth(100);
        tvLeft.setHeight(MATCH_PARENT);
        tvLeft.setText("左");
        tvLeft.setTextSize(20, Text.TextSizeType.FP);
        tvLeft.setTextColor(Color.GREEN);
        tvLeft.setMarginLeft(10);

        Text tvCenter = new Text(this);
        tvCenter.setWidth(100);
        tvCenter.setHeight(MATCH_PARENT);
        tvCenter.setText("中");
        tvCenter.setTextSize(20, Text.TextSizeType.FP);
        tvCenter.setTextColor(Color.YELLOW);
        tvCenter.setMarginLeft(10);

        Text tvRight = new Text(this);
        tvRight.setWidth(100);
        tvRight.setHeight(MATCH_PARENT);
        tvRight.setText("右");
        tvRight.setTextSize(20, Text.TextSizeType.FP);
        tvRight.setTextColor(Color.BLUE);
        tvRight.setMarginLeft(10);

        topLayout.addComponent(tvLeft);
        topLayout.addComponent(tvCenter);
        topLayout.addComponent(tvRight);

    }


    private void initCenterLayout(){
        DependentLayout centerLayout = new DependentLayout(this);
        centerLayout.setWidth(MATCH_PARENT);
        centerLayout.setHeight(200);

        ShapeElement elementCenter = new ShapeElement();
        elementCenter.setRgbColor(new RgbColor(156,109,109));
        centerLayout.setBackground(elementCenter);

        initCenterContent(centerLayout);
        mainLayout.addComponent(centerLayout);
    }

    private void initCenterContent(DependentLayout centerLayout){
        Text tvLeft = new Text(this);
        tvLeft.setWidth(100);
        tvLeft.setHeight(MATCH_PARENT);
        tvLeft.setText("左");
        tvLeft.setTextSize(20, Text.TextSizeType.FP);
        tvLeft.setTextColor(Color.GREEN);
        DependentLayout.LayoutConfig leftConfig = new DependentLayout.LayoutConfig(80,80);
        leftConfig.addRule(DependentLayout.LayoutConfig.ALIGN_PARENT_LEFT);
        leftConfig.addRule(DependentLayout.LayoutConfig.VERTICAL_CENTER);
        tvLeft.setLayoutConfig(leftConfig);


        Text tvCenter = new Text(this);
        tvCenter.setWidth(80);
        tvCenter.setHeight(MATCH_PARENT);
        tvCenter.setText("中");
        tvCenter.setTextSize(20, Text.TextSizeType.FP);
        tvCenter.setTextColor(Color.YELLOW);
        DependentLayout.LayoutConfig centerConfig = new DependentLayout.LayoutConfig(80,80);
        centerConfig.addRule(DependentLayout.LayoutConfig.CENTER_IN_PARENT);
        tvCenter.setLayoutConfig(centerConfig);


        Text tvRight = new Text(this);
        tvRight.setWidth(80);
        tvRight.setHeight(MATCH_PARENT);
        tvRight.setText("右");
        tvRight.setTextSize(20, Text.TextSizeType.FP);
        tvRight.setTextColor(Color.BLUE);
        DependentLayout.LayoutConfig rightConfig = new DependentLayout.LayoutConfig(80,80);
        rightConfig.addRule(DependentLayout.LayoutConfig.ALIGN_PARENT_RIGHT);
        rightConfig.addRule(DependentLayout.LayoutConfig.VERTICAL_CENTER);
        tvRight.setLayoutConfig(rightConfig);

        centerLayout.addComponent(tvLeft);
        centerLayout.addComponent(tvCenter);
        centerLayout.addComponent(tvRight);
    }
}
效果图2:

总结
相对于属性Android开发的人来说还是很友好的,很多属性都是相同的,当然熟悉之后也是能很快写出符合自己UI的布局的。
今天的内容就到这里了,以后继续研究其他内容~


 2819
2819


 被折叠的 条评论
为什么被折叠?
被折叠的 条评论
为什么被折叠?
 到【灌水乐园】发言


