


activity界面显示流程
相关文件路径:
\frameworks\base\core\java\android\app\Activity.java
\frameworks\base\services\core\java\com\android\server\policy\PhoneWindowManager.java
\frameworks\base\core\java\android\view\WindowManager.java
\frameworks\base\core\java\com\android\internal\policy\PhoneWindow.java
\frameworks\base\core\java\android\view\WindowManagerImpl.java
\frameworks\base\core\java\android\view\WindowManagerGlobal.java
\frameworks\base\core\java\android\view\ViewRootImpl.java
\frameworks\base\core\java\com\android\internal\policy\DecorView.java
\frameworks\base\core\java\android\app\ActivityThread.java
\frameworks\base\core\java\android\view\LayoutInflater.java
时序图如下:
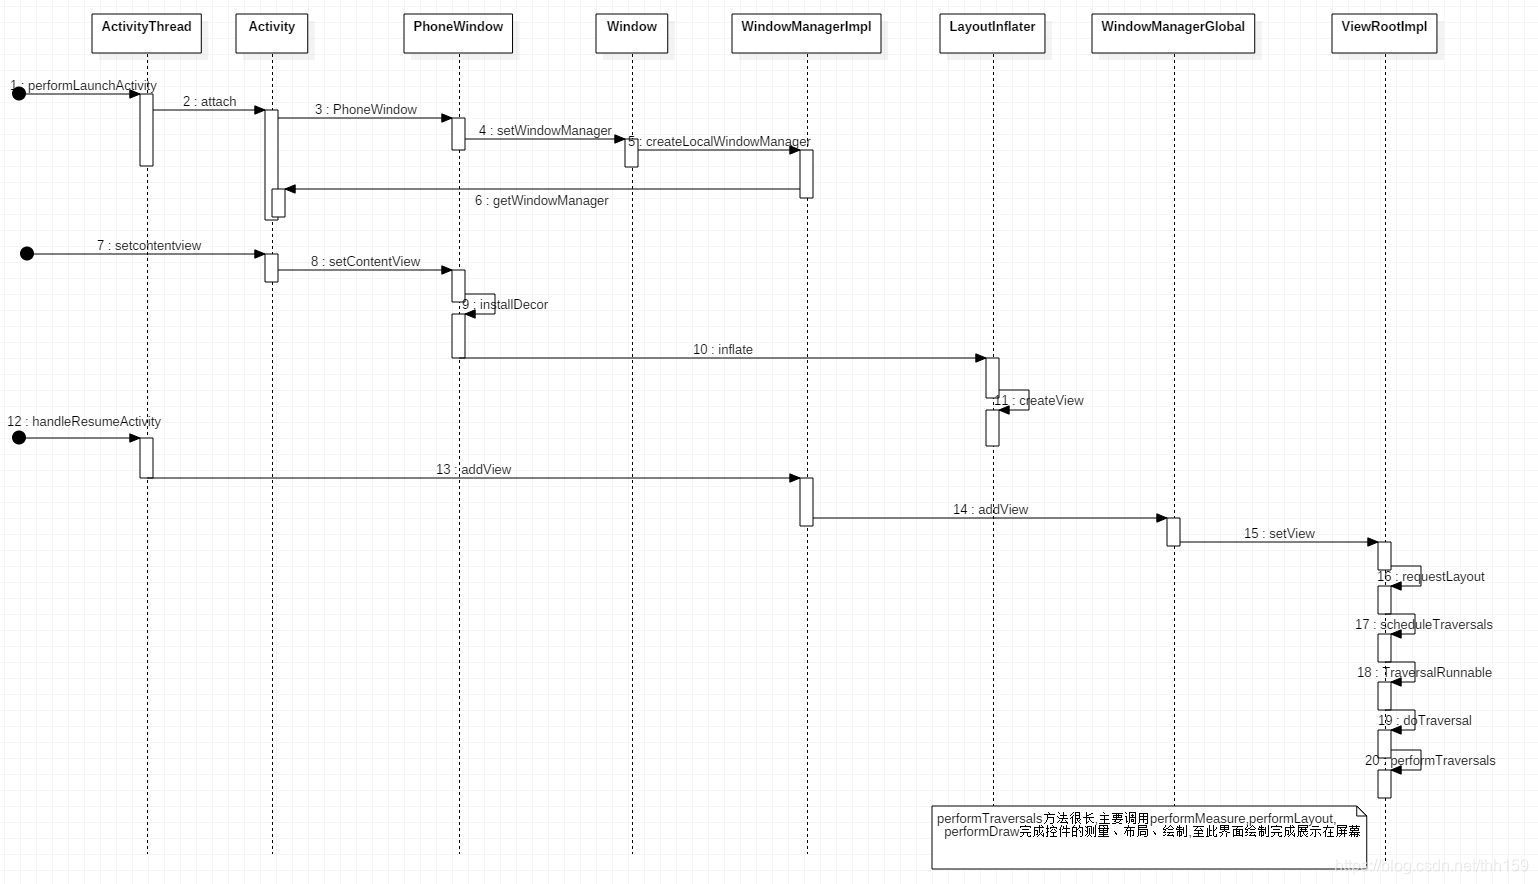
activity界面的显示过程可以概括为以下三个过程
- 1.窗口的准备过程,该过程主要包括窗口服务的初始化
- 2.布局文件的解析过程,该过程会将布局文件中的元素和其layoutparam都解析出来
- 3.解析出来的view元素的绘制过程,该过程会自顶向下的调用每个元素的measure、layout、draw,自此界面就展示在我们面前了。
窗口准备过程
在activity启动阶段,oncreate的回调是发生在ActivityThread的performLaunchActivity方法中,其在回调之前完成窗口准备相关工作:
    private Activity performLaunchActivity(ActivityClientRecord r, Intent customIntent) {

        try {
        //初始化application、context、Configuration
            Application app = r.packageInfo.makeApplication(false, mInstrumentation);

            if (activity != null) {
                Context appContext = createBaseContextForActivity(r, activity);
                CharSequence title = r.activityInfo.loadLabel(appContext.getPackageManager());
                Configuration config = new Configuration(mCompatConfiguration);
                if (r.overrideConfig != null) {
                    config.updateFrom(r.overrideConfig);
                }

                Window window = null;
                if (r.mPendingRemoveWindow != null && r.mPreserveWindow) {
                    window = r.mPendingRemoveWindow;
                    r.mPendingRemoveWindow = null;
                    r.mPendingRemoveWindowManager = null;
                }
                //初始化各种相关窗口管理类
                activity.attach(appContext, this, getInstrumentation(), r.token,
                        r.ident, app, r.intent, r.activityInfo, title, r.parent,
                        r.embeddedID, r.lastNonConfigurationInstances, config,
                        r.referrer, r.voiceInteractor, window);

                ......回调oncreate等方法
    }
attach方法中将WindowManagerImpl设置为activity的窗口管理类
    final void attach(Context context, ActivityThread aThread,
            Instrumentation instr, IBinder token, int ident,
            Application application, Intent intent, ActivityInfo info,
            CharSequence title, Activity parent, String id,
            NonConfigurationInstances lastNonConfigurationInstances,
            Configuration config, String referrer, IVoiceInteractor voiceInteractor,
            Window window) {
        attachBaseContext(context);

        mFragments.attachHost(null /*parent*/);
        //初始化PhoneWindow
        mWindow = new PhoneWindow(this, window);
        mWindow.setWindowControllerCallback(this);
        mWindow.setCallback(this);
        mWindow.setOnWindowDismissedCallback(this);
        mWindow.getLayoutInflater().setPrivateFactory(this);
        if (info.softInputMode != WindowManager.LayoutParams.SOFT_INPUT_STATE_UNSPECIFIED) {
            mWindow.setSoftInputMode(info.softInputMode);
        }
        if (info.uiOptions != 0) {
            mWindow.setUiOptions(info.uiOptions);
        }
        mUiThread = Thread.currentThread();
        //将activityrhead设置为该activity的主线程
        mMainThread = aThread;
        mInstrumentation = instr;
        mToken = token;
        mIdent = ident;
        mApplication = application;
        mIntent = intent;
        mReferrer = referrer;
        mComponent = intent.getComponent();
        mActivityInfo = info;
        mTitle = title;
        mParent = parent;
        mEmbeddedID = id;
        mLastNonConfigurationInstances = lastNonConfigurationInstances;
        if (voiceInteractor != null) {
            if (lastNonConfigurationInstances != null) {
                mVoiceInteractor = lastNonConfigurationInstances.voiceInteractor;
            } else {
                mVoiceInteractor = new VoiceInteractor(voiceInteractor, this, this,
                        Looper.myLooper());
            }
        }
        //设置PhoneWindow的管理类为WindowManagerImpl
        mWindow.setWindowManager(
                (WindowManager)context.getSystemService(Context.WINDOW_SERVICE),
                mToken, mComponent.flattenToString(),
                (info.flags & ActivityInfo.FLAG_HARDWARE_ACCELERATED) != 0);
        if (mParent != null) {
            mWindow.setContainer(mParent.getWindow());
        }
        //设置activiti的mWindowManager为WindowManagerImpl类
        mWindowManager = mWindow.getWindowManager();
        mCurrentConfig = config;
    }
PhoneWindow父类Window中:
    public void setWindowManager(WindowManager wm, IBinder appToken, String appName,
            boolean hardwareAccelerated) {
        mAppToken = appToken;
        mAppName = appName;
        mHardwareAccelerated = hardwareAccelerated
                || SystemProperties.getBoolean(PROPERTY_HARDWARE_UI, false);
        if (wm == null) {
            wm = (WindowManager)mContext.getSystemService(Context.WINDOW_SERVICE);
        }
        mWindowManager = ((WindowManagerImpl)wm).createLocalWindowManager(this);
    }
WindowManagerImpl:
    public WindowManagerImpl createLocalWindowManager(Window parentWindow) {
        return new WindowManagerImpl(mContext, parentWindow);
    }
attach方法完成了activity窗口管理的初始化和设置,接下来会回调到activity的oncreate中,在oncreate中会设置布局文件SetContentView,之后进入布局文件的解析过程。
布局文件的解析过程
该过程会将窗口显示需要的DecorView,布局文件中间中的元素全部准备好
    public void setContentView(@LayoutRes int layoutResID) {
        getWindow().setContentView(layoutResID);
        //初始化actionbar
        initWindowDecorActionBar();
    }
PhoneWindow
    @Override
    public void setContentView(int layoutResID) {

        if (mContentParent == null) {
        //初始化decorview
            installDecor();
        } else if (!hasFeature(FEATURE_CONTENT_TRANSITIONS)) {
            mContentParent.removeAllViews();
        }

        if (hasFeature(FEATURE_CONTENT_TRANSITIONS)) {
            final Scene newScene = Scene.getSceneForLayout(mContentParent, layoutResID,
                    getContext());
            transitionTo(newScene);
        } else {
        //解析布局文件
            mLayoutInflater.inflate(layoutResID, mContentParent);
        }
        //处理fitsystemwindow设置
        mContentParent.requestApplyInsets();
        final Callback cb = getCallback();
        if (cb != null && !isDestroyed()) {
            cb.onContentChanged();
        }
        mContentParentExplicitlySet = true;
 最低0.47元/天 解锁文章


 437
437


 被折叠的 条评论
为什么被折叠?
被折叠的 条评论
为什么被折叠?
 到【灌水乐园】发言


