


 本文详细探讨了Android 6.0.1_r50中InputChannel的注册过程,从ViewRootImpl创建InputChannel,到Server端和Client端的注册。InputChannel作为InputManager与Activity间通信的桥梁,其创建涉及ViewRootImpl、WindowManagerService、InputManagerService和InputDispatcher。注册过程中,InputChannel的Server端与InputManagerService交互,Client端则通过WindowInputEventReceiver与主线程绑定,确保输入事件的正确处理。
Android系统源码阅读(12):InputChannel的注册过程
请对照AOSP版本:6.0.1_r50。
InputManager可以获得输入事件并分发,Activity需要处理这些输入事件。那么,这两者之间如何建立的连接呢?这就需要InputChannel作为桥梁建立两者之间的通道。
1. ViewRootImpl创建InputChannel
这里ViewRoot类已经消失了,由ViewRootImpl替代。Activity在创建时会将自己的DecorView设置给对应的ViewRootImpl。
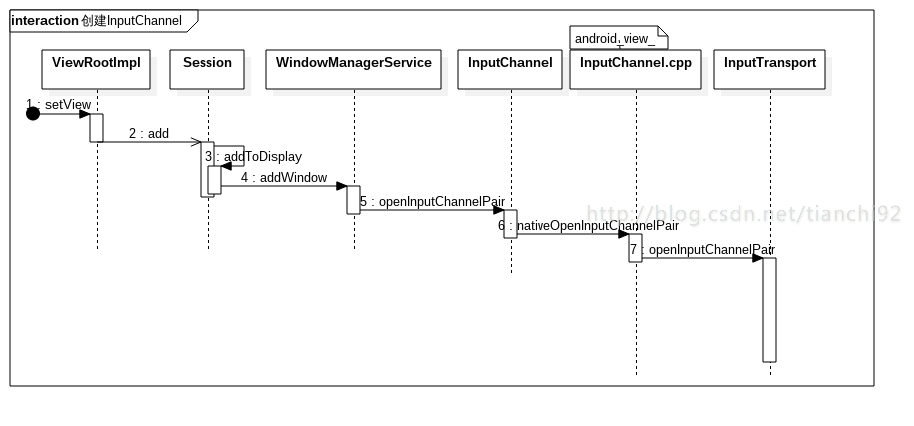
1.1
这一步会创建client的InputChannel,并且将当前启动的Activity的窗口传递给WindowManagerService。
frameworks/base/core/java/android/view/ViewRootImpl.java
    /**
     * We have one child
     */
    public void setView(View view, WindowManager.LayoutParams attrs, View panelParentView) {
        synchronized (this) {
            if (mView == null) {
                //将view设置为传入的DecorView
                mView = view;
                //..

                mAdded = true;
                int res; /* = WindowManagerImpl.ADD_OKAY; */

                //新建InputChannel
                if ((mWindowAttributes.inputFeatures
                        & WindowManager.LayoutParams.INPUT_FEATURE_NO_INPUT_CHANNEL) == 0) {
                    mInputChannel = new InputChannel();
                }
                try {
                    mOrigWindowType = mWindowAttributes.type;
                    mAttachInfo.mRecomputeGlobalAttributes = true;
                    collectViewAttributes();
                    //mWindowSession是一个Binder代理对象
                    //它引用了运行在WindowManagerService中的一个类型为Session的Binder本地对象
                    //向WindowManagerService添加正在启动的Activity的窗口
                    //这里还会将InputChannel传递过去
                    res = mWindowSession.addToDisplay(mWindow, mSeq, mWindowAttributes,
                            getHostVisibility(), mDisplay.getDisplayId(),
                            mAttachInfo.mContentInsets, mAttachInfo.mStableInsets,
                            mAttachInfo.mOutsets, mInputChannel);
                } catch (RemoteException e) {
                    //..
                } finally {
                    //..
                }
                //..

                if (view instanceof RootViewSurfaceTaker) {
                    mInputQueueCallback =
                        ((RootViewSurfaceTaker)view).willYouTakeTheInputQueue();
                }
                if (mInputChannel != null) {
                    if (mInputQueueCallback != null) {
                        mInputQueue = new InputQueue();
                        mInputQueueCallback.onInputQueueCreated(mInputQueue);
                    }
                    //将InputChannel和主线程关联起来,在下面会详细讲解
                    mInputEventReceiver = new WindowInputEventReceiver(mInputChannel,
                            Looper.myLooper());
                }
                view.assignParent(this);
            }
        }
    }
1.2
这一步是进程间的请求,从应用进程转到WindowManagerService进程,对应于1.1中的函数addToDisplay。这里会补足一些参数,开始调用下一步函数。
1.3
这一步也是调整一些参数,然后交给WindowManagerService来处理。
1.4
这里会将传入的Window存入Map来进行统一管理,同时创建了一对server/client端的InputChannel。
frameworks/base/services/core/java/com/android/server/wm/WindowManagerService.java :
   public int addWindow(Session session, IWindow client, int seq,
            WindowManager.LayoutParams attrs, int viewVisibility, int displayId,
            Rect outContentInsets, Rect outStableInsets, Rect outOutsets,
            InputChannel outInputChannel) {

            //先对添加的window做一些检查,省略..

            //创建了一个WindowSatete对象
            WindowState win = new WindowState(this, session, client, token,
                    attachedWindow, appOp[0], seq, attrs, viewVisibility, displayContent);

            //..

            if (outInputChannel != null && (attrs.inputFeatures
                    & WindowManager.LayoutParams.INPUT_FEATURE_NO_INPUT_CHANNEL) == 0) {
                String name = win.makeInputChannelName();
                //创建了一个InputChannel对,在1.5中详细讲解
                InputChannel[] inputChannels = InputChannel.openInputChannelPair(name);
                //一个放在WindowState里作为server端的InputChannel
                win.setInputChannel(inputChannels[0]);
                //一个转化为client传递过来的outInputChannel
                inputChannels[1].transferTo(outInputChannel);
                //从上一篇文章中的1.1可知,InputManager作为参数传入
                //WindowManagerService的构造函数,并且存放在mInputManager中
                //下面章节会详细讲述如何注册server端的InputChannel
                mInputManager.registerInputChannel(win.mInputChannel, win.mInputWindowHandle);
            }

            // From now on, no exceptions or errors allowed!
            //将win放入mWindowMap,以client的binder为关键字
            mWindowMap.put(client.asBinder(), win);

            //将win加入相应的list,省略..

            mInputMonitor.setUpdateInputWindowsNeededLw();

            boolean focusChanged = false;
            if (win.canReceiveKeys()) {
                focusChanged = updateFocusedWindowLocked(UPDATE_FOCUS_WILL_ASSIGN_LAYERS,
 最低0.47元/天 解锁文章


 187
187


 被折叠的 条评论
为什么被折叠?
被折叠的 条评论
为什么被折叠?
 到【灌水乐园】发言


