


哎呀,妈呀,花了整整一个周末的双休时间,ssh框架的整合,对于我这样的菜鸟,我确实是无语啦,不过也是的,我搭建的是最struts2 和hibernate以及spring都是最新版的,跟视频和网上都有一些小小变动,这简直要了我的命,对刚入门和我一样的菜鸟们,贴上源码及步骤,希望少走弯路。保持学习的积极性和健康性。
废话胡多说了,参考视频中的ssh的建立步骤:(文字性的描述,结合图片)
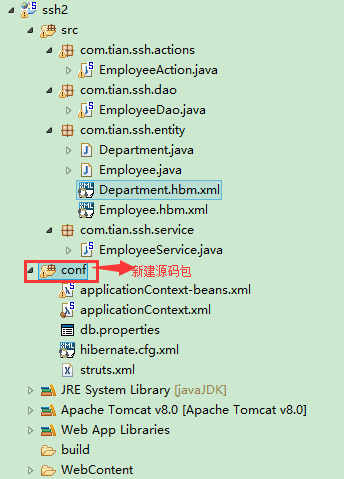
忘了一件事:首先来看看我的目录结构:

一、 加入 Spring
1、 加入 jar 包(这个就不废话了)
2、配置 web.xml 文件
主要是配置ContextLoaderListener(快捷键art+/有提示,以免菜鸟手工出错)
<!-- needed for ContextLoaderListener -->
<context-param>
<param-name>contextConfigLocation</param-name>
<param-value>classpath:applicationContext*.xml</param-value>
</context-param>
<!-- Bootstraps the root web application context before servlet initialization -->
<listener>
<listener-class>org.springframework.web.context.ContextLoaderListener</listener-class>
</listener>
3、 加入 Spring 的配置文件.
applicationContext.xml(暂时空着)
二、加入 Hibernate
1、 同时建立持久化类, 和其对应的 .hbm.xml 文件, 生成对应的数据表
Department.java
package com.tian.ssh.entity;

public class Department {

	private Integer id;
	private String departmentName;
	public Integer getId() {
		return id;
	}
	public void setId(Integer id) {
		this.id = id;
	}
	public String getDepartmentName() {
		return departmentName;
	}
	public void setDepartmentName(String departmentName) {
		this.departmentName = departmentName;
	}


}
Employee.java
package com.tian.ssh.entity;

import java.util.Date;

public class Employee {

	private Integer id;
	private String lastName;
	private String email;
	private Date birth;
	private Date createTime;
	private Department department;
	public Integer getId() {
		return id;
	}
	public void setId(Integer id) {
		this.id = id;
	}
	public String getLastName() {
		return lastName;
	}
	public void setLastName(String lastName) {
		this.lastName = lastName;
	}
	public String getEmail() {
		return email;
	}
	public void setEmail(String email) {
		this.email = email;
	}
	public Date getBirth() {
		return birth;
	}
	public void setBirth(Date birth) {
		this.birth = birth;
	}
	public Date getCreateTime() {
		return createTime;
	}
	public void setCreateTime(Date createTime) {
		this.createTime = createTime;
	}
	public Department getDepartment() {
		return department;
	}
	public void setDepartment(Department department) {
		this.department = department;
	}


}
<?xml version="1.0"?>
<!DOCTYPE hibernate-mapping PUBLIC "-//Hibernate/Hibernate Mapping DTD 3.0//EN"
"http://hibernate.sourceforge.net/hibernate-mapping-3.0.dtd">
<!-- Generated 2015-8-15 11:45:30 by Hibernate Tools 3.4.0.CR1 -->
<hibernate-mapping>
    <class name="com.tian.ssh.entity.Department" table="SSH_DEPARTMENT">
        <id name="id" type="java.lang.Integer">
            <column name="ID" />
            <generator class="native" />
        </id>
        <property name="departmentName" type="java.lang.String">
            <column name="DEPARTMENT_NAME" />
        </property>
    </class>
</hibernate-mapping>
Employee.hbm.xml
<?xml version="1.0"?>
<!DOCTYPE hibernate-mapping PUBLIC "-//Hibernate/Hibernate Mapping DTD 3.0//EN"
"http://hibernate.sourceforge.net/hibernate-mapping-3.0.dtd">
<!-- Generated 2015-8-15 11:45:30 by Hibernate Tools 3.4.0.CR1 -->
<hibernate-mapping>
    <class name="com.tian.ssh.entity.Employee" table="SSH_EMPLOYEE">
        <id name="id" type="java.lang.Integer">
            <column name="ID" />
            <generator class="native" />
        </id>
        <property name="lastName" type="java.lang.String">
            <column name="LAST_NAME" />
        </property>
        <property name="email" type="java.lang.String">
            <column name="EMAIL" />
        </property>
        <property name="birth" type="java.util.Date">
            <column name="BIRTH" />
        </property>
        <property name="createTime" type="java.util.Date">
            <column name="CREATE_TIME" />
        </property>
        <many-to-one name="department" class="com.tian.ssh.entity.Department" >
            <column name="DEPARTMENT_ID" />
        </many-to-one>
    </class>
</hibernate-mapping>
2、 Spring 整合 Hibernate
3、步骤:
①. 加入 jar 包(把解压后的lib/requied加入,lib/optional/c3p0中的c3p0-0.9.2.1.jar,mchange-commons-java-0.2.3.4.jar加入)
②. 在类路径下加入 hibernate.cfg.xml 文件, 在其中配置 hibernate 的基本属性
<?xml version="1.0" encoding="UTF-8"?>
<!DOCTYPE hibernate-configuration PUBLIC
		"-//Hibernate/Hibernate Configuration DTD 3.0//EN"
		"http://hibernate.sourceforge.net/hibernate-configuration-3.0.dtd">
<hibernate-configuration>
	<session-factory>
    	<!-- 配置hibernate的基本属性 -->

		<!-- 方言 -->
		<property name="hibernate.dialect">org.hibernate.dialect.MySQL57InnoDBDialect</property>

		<!-- 是否显示及格式化sql语句 -->
		<property name="hibernate.show_sql">true</property>
		<property name="hibernate.format_sql">true</property>

		<!-- 生成数据表的策略 -->
		<property name="hibernate.hbm2ddl.auto">update</property>

		<!-- 二级缓存 -->

		<!-- ======================================================= -->
		<property name="hibernate.current_session_context_class">thread</property>

	</session-factory>
</hibernate-configuration>
<property name="hibernate.dialect">org.hibernate.dialect.MySQL57InnoDBDialect</property>
③. 建立持久化类, 和其对应的 .hbm.xml 文件
如上面所示,已建好。
④. 和 Spring 进行整合
i. 加入 c3p0 和 MySQL 的驱动
ii. 在 Spring 的配置文件中配置: 数据源, SessionFactory, 声明式事务
我就把整合好后的applicationContext.xml贴出来:
<?xml version="1.0" encoding="UTF-8"?>
<beans xmlns="http://www.springframework.org/schema/beans"
	xmlns:xsi="http://www.w3.org/2001/XMLSchema-instance"
	xmlns:aop="http://www.springframework.org/schema/aop"
	xmlns:context="http://www.springframework.org/schema/context"
	xmlns:tx="http://www.springframework.org/schema/tx"
	xsi:schemaLocation="http://www.springframework.org/schema/beans http://www.springframework.org/schema/beans/spring-beans.xsd
		http://www.springframework.org/schema/aop http://www.springframework.org/schema/aop/spring-aop-4.1.xsd
		http://www.springframework.org/schema/context http://www.springframework.org/schema/context/spring-context-4.1.xsd
		http://www.springframework.org/schema/tx http://www.springframework.org/schema/tx/spring-tx-4.1.xsd">

	<!-- 导入资源文件 -->
	<context:property-placeholder location="classpath:db.properties"/>

	<!-- 配置C3P0数据源  -->
	<bean id="dataSource" class="com.mchange.v2.c3p0.ComboPooledDataSource">
		<property name="user" value="${jdbc.user}"></property>
		<property name="password" value="${jdbc.password}"></property>
		<property name="driverClass" value="${jdbc.driverClass}"></property>
		<property name="jdbcUrl" value="${jdbc.jdbcUrl}"></property>
		<property name="initialPoolSize" value="${jdbc.initPoolSize}"></property>
		<property name="maxPoolSize" value="${jdbc.maxPoolSize}"></property>
	</bean>

	<!-- 配置sessionFactory -->
	<bean id="sessionFactory" class="org.springframework.orm.hibernate4.LocalSessionFactoryBean">
		<property name="dataSource" ref="dataSource"></property>
		<property name="configLocation" value="classpath:hibernate.cfg.xml"></property>
		<property name="mappingLocations" value="classpath:com/tian/ssh/entity/*.hbm.xml"></property>
	</bean>

	<!-- ========================================================================================== -->


</beans>
jdbc.user=root
jdbc.password=123
jdbc.driverClass=com.mysql.jdbc.Driver
jdbc.jdbcUrl=jdbc:mysql:///ssh2
jdbc.initPoolSize=5
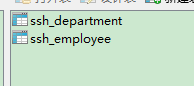
jdbc.maxPoolSize=10⑤. 启动项目, 会看到生成对应的数据表(在数据库hibernate会自动帮我们生成)
三、加入 Struts2
1、 加入 jar 包: 若有重复的 jar 包, 则需要删除版本较低的. javassist-3.11.0.GA.jar(这个选择app里面的blank,不需要lib下的)
2、在 web.xml 文件中配置 Struts2 的 Filter
<?xml version="1.0" encoding="UTF-8"?>
<web-app xmlns:xsi="http://www.w3.org/2001/XMLSchema-instance"
	xmlns="http://xmlns.jcp.org/xml/ns/javaee"
	xsi:schemaLocation="http://xmlns.jcp.org/xml/ns/javaee http://xmlns.jcp.org/xml/ns/javaee/web-app_3_1.xsd"
	id="WebApp_ID" version="3.1">

	<!-- needed for ContextLoaderListener -->
	<context-param>
		<param-name>contextConfigLocation</param-name>
		<param-value>classpath:applicationContext*.xml</param-value>
	</context-param>

	<!-- Bootstraps the root web application context before servlet initialization -->
	<listener>
		<listener-class>org.springframework.web.context.ContextLoaderListener</listener-class>
	</listener>

	<!-- struts2 filter的配置 -->
	<filter>
		<filter-name>struts2</filter-name>
		<filter-class>org.apache.struts2.dispatcher.ng.filter.StrutsPrepareAndExecuteFilter</filter-class>
	</filter>

	<filter-mapping>
		<filter-name>struts2</filter-name>
		<url-pattern>/*</url-pattern>
	</filter-mapping>


	<filter>
		<filter-name>SpringOpenSessionInViewFilter</filter-name>
		<filter-class>org.springframework.orm.hibernate4.support.OpenSessionInViewFilter</filter-class>
	</filter>
	<filter-mapping>
		<filter-name>SpringOpenSessionInViewFilter</filter-name>
		<url-pattern>/*</url-pattern>
	</filter-mapping>

</web-app><?xml version="1.0" encoding="UTF-8" ?>
<!DOCTYPE struts PUBLIC
"-//Apache Software Foundation//DTD Struts Configuration 2.3//EN"
"http://struts.apache.org/dtds/struts-2.3.dtd">
<struts>
<constant name="struts.enable.DynamicMethodInvocation" value="false" />
<constant name="struts.devMode" value="true" />
<package name="default" namespace="/" extends="struts-default">
<action name="emp-*" class="employeeAction"
method="{1}">
<result name="list">/WEB-INF/views/emp-list.jsp</result>
</action>
</package>
</struts>
4、 整合 Spring
①. 加入 Struts2 的 Spring 插件的 jar 包(在lib下)

②. 在 Spring 的配置文件中正常配置 Action, 注意 Action 的 scope 为 prototype
③. 在 Struts2 的配置文件中配置 Action 时, class 属性指向该 Action 在 IOC 中的 id
struts的bean文件:applicationContext-beans.xml
<?xml version="1.0" encoding="UTF-8"?>
<beans xmlns="http://www.springframework.org/schema/beans"
	xmlns:xsi="http://www.w3.org/2001/XMLSchema-instance"
	xsi:schemaLocation="http://www.springframework.org/schema/beans http://www.springframework.org/schema/beans/spring-beans.xsd">

	<bean id="employeeDao" class="com.tian.ssh.dao.EmployeeDao">
		<property name="sessionFactory" ref="sessionFactory"></property>
	</bean>

	<bean id="employeeService" class="com.tian.ssh.service.EmployeeService">
		<property name="employeeDao" ref="employeeDao"></property>
	</bean>

	<bean id="employeeAction" class="com.tian.ssh.actions.EmployeeAction"
		scope="prototype">
		<property name="employeeService" ref="employeeService"></property>
	</bean>

</beans>
如走来结构图所示的,其他几个类和页面的显示:
EmployeeAction.java
package com.tian.ssh.actions;

import java.util.Map;

import org.apache.struts2.interceptor.RequestAware;

import com.opensymphony.xwork2.ActionSupport;
import com.tian.ssh.service.EmployeeService;

public class EmployeeAction extends ActionSupport implements RequestAware {

	private EmployeeService employeeService;

	public void setEmployeeService(EmployeeService employeeService) {
		this.employeeService = employeeService;
	}


	public String list(){
		request.put("employees", employeeService.getAll());
		return "list";
	}


	private Map<String, Object> request;
	@Override
	public void setRequest(Map<String, Object> arg0) {
		// TODO Auto-generated method stub
		this.request = arg0;
	}
}
package com.tian.ssh.dao;

import java.util.List;

import org.hibernate.Session;
import org.hibernate.SessionFactory;
import org.hibernate.Transaction;

import com.tian.ssh.entity.Employee;

public class EmployeeDao {

	private SessionFactory sessionFactory;

	public void setSessionFactory(SessionFactory sessionFactory) {
		this.sessionFactory = sessionFactory;
	}

	public Session getSession() {
		return this.sessionFactory.getCurrentSession();
	}

	public List<Employee> getAll() {

		 String hql = "FROM Employee e LEFT OUTER JOIN FETCH e.department";

		List<Employee> list1 = null;

		try {
			Transaction transaction = null;
			transaction = getSession().beginTransaction();
			list1 = getSession().createQuery(hql).list();

		} catch (Exception e) {
			// TODO: handle exception
			e.printStackTrace();
		}

		return list1;
	}

}
EmployeeService.java
package com.tian.ssh.service;

import java.util.List;

import com.tian.ssh.dao.EmployeeDao;
import com.tian.ssh.entity.Employee;

public class EmployeeService {

	private EmployeeDao employeeDao;

	public void setEmployeeDao(EmployeeDao employeeDao) {
		this.employeeDao = employeeDao;
	}

	public List<Employee> getAll(){
		return employeeDao.getAll();
	}

}
emp-list.jsp
<%@ page language="java" contentType="text/html; charset=UTF-8"
    pageEncoding="UTF-8"%>
<%@ taglib uri="/struts-tags" prefix="s"%>
<!DOCTYPE html PUBLIC "-//W3C//DTD HTML 4.01 Transitional//EN" "http://www.w3.org/TR/html4/loose.dtd">
<html>
<head>
<meta http-equiv="Content-Type" content="text/html; charset=UTF-8">
<title>Insert title here</title>
</head>
<body>

	<h4>Employee list page</h4>

	<s:if test="#request.employees == null || #request.employees.size() == 0">
		没有任何员工信息!
	</s:if>
	<s:else>
		<table border="1" cellpadding="10" cellspacing="0">
			<tr>
				<td>ID</td>
				<td>LASTNAME</td>
				<td>EMAIL</td>
				<td>BIRTH</td>
				<td>CREATETIME</td>
				<td>DEPARTMENT</td>
			</tr>
			<s:iterator value="#request.employees">
				<tr>
					<td>${id }</td>
					<td>${lastName }</td>
					<td>${email }</td>
					<td>${birth }</td>
					<td>${createTime }</td>
					<td>${department.departmentName }</td>
				</tr>
			</s:iterator>
		</table>
	</s:else>
</body>
</html>
index.jsp
<%@ page language="java" contentType="text/html; charset=UTF-8"
    pageEncoding="UTF-8"%>
<!DOCTYPE html PUBLIC "-//W3C//DTD HTML 4.01 Transitional//EN" "http://www.w3.org/TR/html4/loose.dtd">
<html>
<head>
<meta http-equiv="Content-Type" content="text/html; charset=UTF-8">
<title>Insert title here</title>
</head>
<body>

	<a href="emp-list"></a>
</body>
</html>最最后,要补充的是,这个东西折磨我很久了,会一直提示“Could not obtain transaction-synchronized Session for current thread“在hibernate.cfg.xml中添加
<property name="hibernate.current_session_context_class">thread</property>,这样你以为好了吗结果又提示你:
“createQuery is not valid without active transaction”,好这是你一改知道了,是没有激活事务,在你的基础数据操作功能中加上这:
Transaction transaction = null;
transaction = getSession().beginTransaction();
本例子中就是在EmployeeDao.java的getAll()方法中添加即可。
最后我们来看下我耗时很长调处来的结果:


 被折叠的 条评论
为什么被折叠?
被折叠的 条评论
为什么被折叠?
 到【灌水乐园】发言


