


source:http://www.hardwaresecrets.com/article/Memory-Overclocking/152/1
Introduction
A lot has been said about CPU and VGA overclocking, but it is also possible to overclock your RAM memory in order to boost your PC performance without spending a penny. Memory overclocking is done through the motherboard's setup (you can enter the setup program by hitting the Del key during the memory counting that appears everytime you turn your PC on), almost always on the same menu as where the CPU clock appears (usually called "Frequency/Voltage Control" or similar).
The process is a little bit boring, like all overclocking procedures. You will have to change the memory clock, save the new configuration, reboot your PC, and check to ensure that your computer is still working correctly. We recommend that you run your favorite 3D game for a while in order to check if everything is running alright. We also recommend that you run a benchmarking software in order to check the performance gain from the overclocking. As we will explain later, sometimes memory overclocking decreases the PC performance, depending on the configurated timings. (We will cover this topic in this tutorial as well.) We recommend that you run two programs: Sandra, on its Memory Bandwidth Benchmark module to check the increase in memory performance (download it at http://www.hardwaresecrets.com/page/download_id); and SuperPI, to check the increase in the overall PC performance (download it at http://www.hardwaresecrets.com/page/download_bench).
After rebooting the PC and testing if the overclocking was successful, you have two options. If the overclocking went right, you can go back to the motherboard's setup and try increasing the memory clock even more and repeating the whole process, until you find the maximum overclocking capability of your memory module. If the overclocking went wrong, you should go back to the setup and lower the memory clock, since the clock you configured isn't making the memory work right.
All overclocking procedures can work or not. It is not possible for us to tell you if it will work in your system and the maximum clock memory you will achieve on it. Overclocking is a trial-and-error process.
That's the basic idea. There are two tricks in order to achieve a higher overclocking level: raising the memory voltage and playing with the memory timings. We will now explain in detail how the memory overclocking is done, including those two tricks.
Overclocking your Memory
There are two modes of configuring the memory clock: synchronous, were the memory clock is tied to the CPU external clock, and asynchronous, where the memory clock can be configured independently from the CPU clock. The mode your computer has depends on its motherboard.
The synchronous mode is usually found in entry-level motherboards while asynchronous mode is usually found in high-end motherboards. Also, notice that many low-end motherboards don't have any overclocking configuration at all.
So, how do you know what mode your motherboard uses? Enter setup, go to the "Frequency/Voltage Control" menu, and look at the available options. If you find any option to change the memory clock ("Memory Clock" or "Memory Frequency," sometimes under a sub-menu called "DRAM Configuration" or "Memory Configuration"), your memory is running at asynchronous mode. Otherwise, it is running at synchronous. Also note that in order to change clock configurations, you may need to change the option that allows you to do so. This option can have several different names, such as "Clock Control," "System Performance," or "DDR Timing Setting by." Sometimes memory configuration options are under "Advanced Chipset Setup" rather than "Voltage/Frequency Control," so you need to also take a look at this menu and look for memory configuration options there.

Figure 1: This motherboard doesn't have a specific clock configuration for memory. Thus, the memory works on synchronous mode.
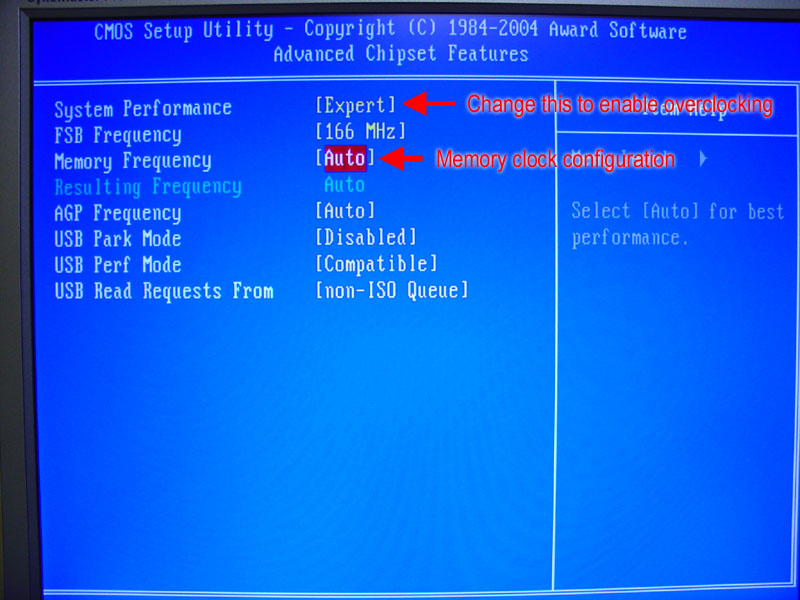
Figure 2: This motherboard has a specific option for changing the memory clock; thus, the memory works in asynchronous mode. You need to change "System Performance" to "Expert" in order to have access to the memory clock control.

Figure 3: Memory clock options of the motherboard shown in Figure 2
Let's explain in detail how to overclock your memory.
Synchronous Mode
The main disadvantage of the synchronous mode is that in order to overclock your memory, you will need to overclock your CPU. Usually that's ok since perhaps you are trying to overclock both memory and the CPU. But in many cases, the maximum external clock your CPU is reaching is limited by the memory or vice-versa.
For example, through trial-and-error you discovered that the maximum external CPU clock you can configure on your system is 180 MHz. Your memory is also working at 180 MHz ("360 MHz" since DDR memories are rated with twice their real clock) or more, depending on the host/memory ratio settings that some synchronous motherboards have. For example, on the motherboard of Figure 4 the memory can be set to run with the external CPU clock multiplied by 2 or by 2.5. This motherboard was targeted at the Pentium 4 CPU, so when the external clock was set to 133 MHz ("533 MHz"), the memory clock could be configured at 266 MHz or 333 MHz. Of course, setting it to 333 MHz would make more sense if you use DDR333 or DDR400 memories. But when we overclocked the CPU external clock to 180 MHz at the 2.5 ratio shown, the memory would run at 450 MHz.
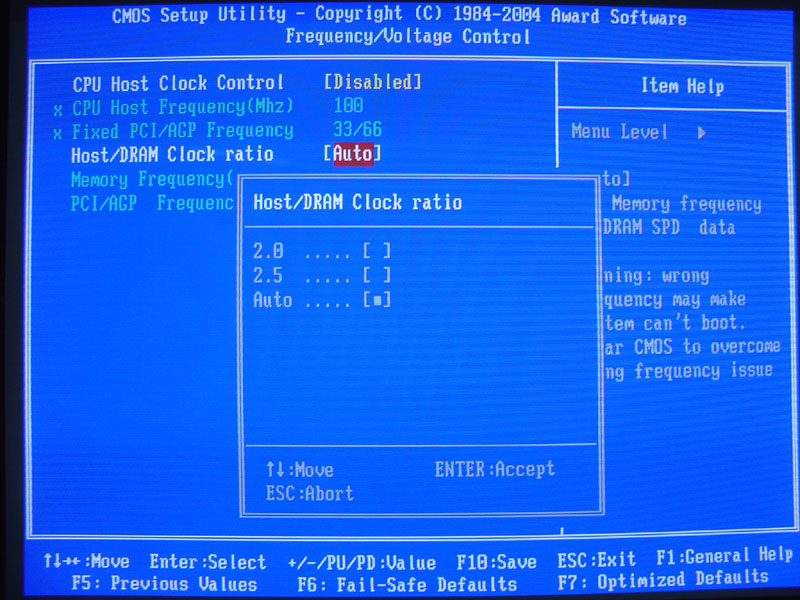
Figure 4: Host/memory ratio setting
On motherboards with synchronous mode, when you find out the maximum CPU external clock, you cannot know for sure what is limiting you to increase it. This can be a CPU limitation or a memory limitation. On motherboards with the host/memory ratio configuration shown in Figure 4, you can change the ratio to check which component is limiting the overclock. For example, we would lower the ratio from 2.5 to 2 in order to make the memory run at 360 MHz instead of 450 MHz and then try again to increase the CPU external clock. If you really cannot increase it over the 180 MHz limit (in our example), it means that the CPU is the component limiting the clock increase. On the other hand, if after lowering the ratio you now can increase the CPU external clock a little more, it was the memory that was limiting the overclock. Then you can see the new maximum external CPU clock you can achieve with this new configuration.
When the CPU is limiting the clock increase, you have to face a terrible truth: your memory could achieve a higher clock rate, but you cannot configure it to use this higher clock rate because your motherboard doesn’t have a configuration to do so. That's one disadvantage of using cheap motherboards, and that's why overclockers prefer high-end motherboards.
This problem doesn't affect motherboards with asynchronous memory configuration. Since you have two different configuration sets for the CPU and for memory, the maximum clock the CPU can reach is not limited by the memory, and also the maximum clock the memory can reach is not limited by the CPU, which is far better for overclocking.
Asynchronous Mode
As we explained, some motherboards allow you to increase the memory clock separately from the CPU external clock, which is the best option for achieving a high overclocking.
There are two ways of configuring the memory clock on asynchronous motherboards: using predetermined fixed value or typing in the clock you want. This option will depend on the motherboard model.
The motherboard we saw in Figure 3, the memory clock options are fixed. As you can see, you can only choose the memory clock from a predetermined list of settings. This is not the best case, but it is better than not having any memory overclocking option at all.
The best scenario is to have a motherboard where you can type in the memory clock you want, like you can see in Figure 5. Usually, you need to change a configuration called "DDR Timing Setting," "Clock Control," "System Performance," or similar from "Auto" to "Manual" in order to change the memory clock.
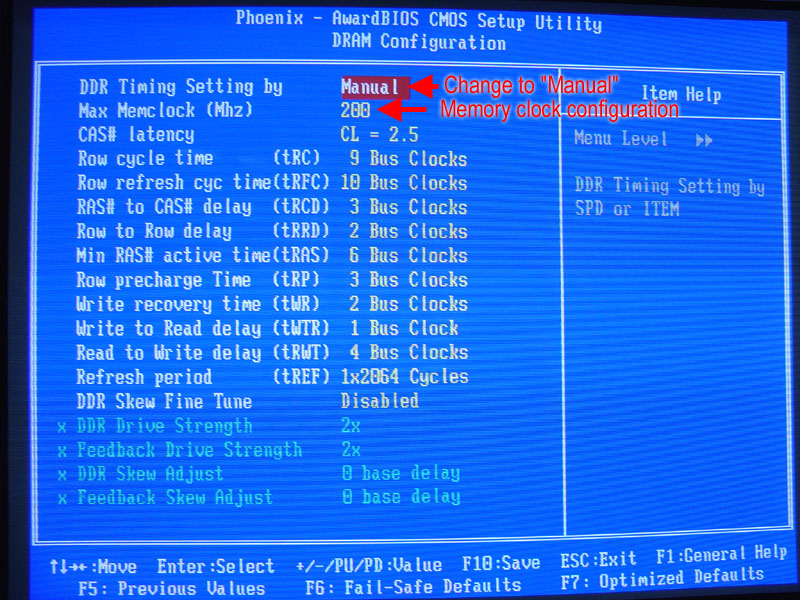
Figure 5: Memory clock configuration
As we mentioned before, you will need to increase the memory clock, save the configuration, reboot your PC, and test if the memory overclocking worked or not. If it worked, you need to repeat the process again trying a higher clock. If not, you need to repeat the process again trying a lower clock. You will need to repeat the whole process several times until you find out the maximum clock rate your memory accepts.
Raising the Memory Voltage
The most common trick in overclocking is increasing the voltage of the component (CPU, video card or memory). Increasing the voltage usually allows the component to reach a higher clock.
After you find out the maximum clock your memory can reach, you can try increasing its voltage to see if you can achieve a higher clock. But you need to pay attention that you don't burn your memory! DDR memories use a standard voltage of 2.5 V, and we do not recommend that you go over 2.8 V (There are memories from OCZ where the manufacturer states that you can run them up to 3.2 V without burning them.)
The memory voltage settings can also be found under the "Frequency/Voltage Control" menu on setup under names such as "DIMM OverVoltage Control," "DRAM Voltage Regulator," and "DIMM Voltage Regulator." Low-end motherboards don't have this kind of configuration.
The options you will find depend on the motherboard model. Some motherboards have more voltage options than others, and the way the voltage increase is expressed also depends on the motherboard model.
The motherboard featured in Figure 6 has only three options for memory voltage: Normal (which is 2.5 V), + 0.1 V (i.e., 2.6 V) and + 0.2 V (i.e., 2.7 V).
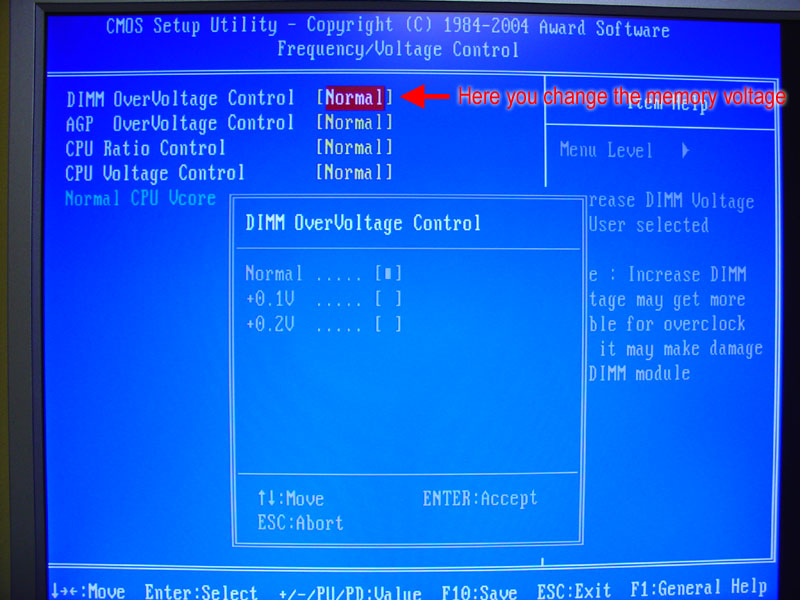
Figure 6: Example of memory voltage configuration
On the motherboard shown in Figures 7 and 8, first you will need to change the "Voltage Fine Tuning" option in order to change the memory voltage. On this motherboard, you have four options for memory voltage: Normal (which is 2.5 V), + 0.1 V (i.e., 2.6 V), + 0.2 V (i.e., 2.7 V) and + 0.3 V (i.e., 2.8 V).
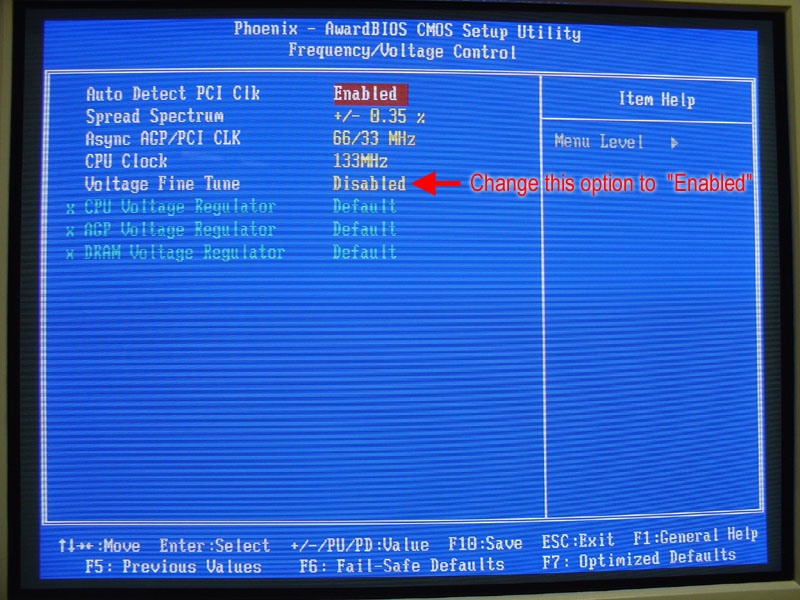
Figure 7: Enabling memory voltage increase
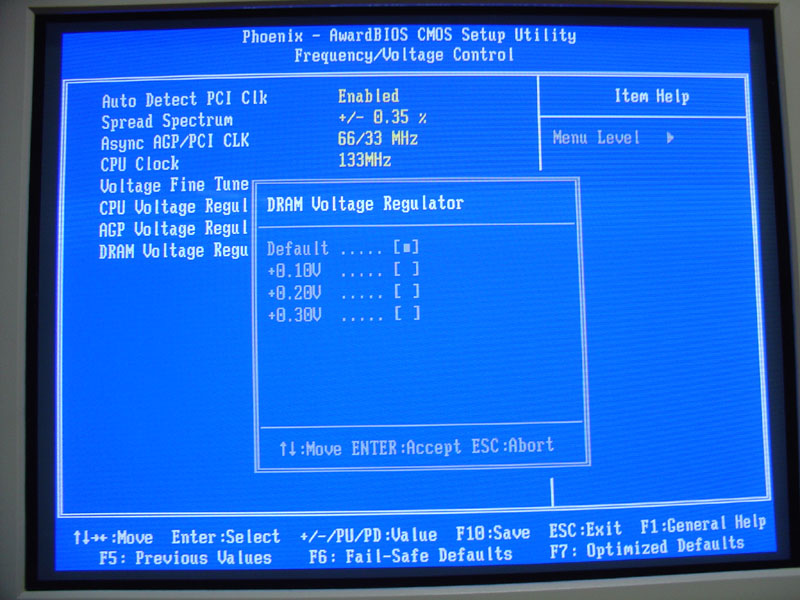
Figure 8: Another example of memory voltage configuration
One more example is Figure 9, where you can change the memory voltage to 2.7 V, 2.8 V and 2.9 V.

Figure 9: One more memory voltage configuration example
Changing the Memory Timings
Another trick for memory overclocking is to change the memory timings (a.k.a. "latency"). By raising the memory timings, you will be able to achieve a higher clock rate with your memory. But there is a catch: the memory can run slower.
The memory delays a certain amount of time to deliver the data requested by the CPU. This time is called CAS Latency or simply CL and is expressed in the number of clock cycles the memory will delay return back the requested data. For example, a memory configured with a CL of 2 will delay two clock ticks to deliver the data, while a memory configured with a CL of 3 will delay three clock ticks to deliver the same data. So, a memory with a CL of 2 will be faster than a memory with a CL of 3.
If you raise the memory's CL, you will be able to increase its clock, but sometimes the memory can run slower, even though it is running at a higher clock rate. There are times when it is better to run your memory with a lower CL and a lower clock rate than it is to run it with a higher clock and a higher CL. If you decide to raise the memory timings to achieve a higher clock rate, you should measure the memory performance before and after, then compare the numbers to see which option gives you better performance.
We are talking about CL, but there are, in fact, five timing types: CL, tRCD, tRP, tRAS and CMD. These timings are expressed in numbers such as 2-2-2-5 and 3-4-4-8 (The CMD parameter is optional.) We've written a tutorial explaining what each one of these numbers mean. Please refer to it to learn more about this subject. The idea is simple: by lowering those numbers, you will achieve higher performance. B raising them, you will achieve a higher overclocking, but it can lead to lower performance (As we said, you will need to measure the performance before and after changing timings, and clock to see what is the best option.)
On some motherboards, you can change each parameter individually, while others, you have some fixed predetermined options from a list configuring all timings on a single option (e.g., "2-2-2-5," "3-4-4-8," etc.) Some very high end motherboards will have many more timing options. (See Figure 11.)

Figure 10: Memory timing options
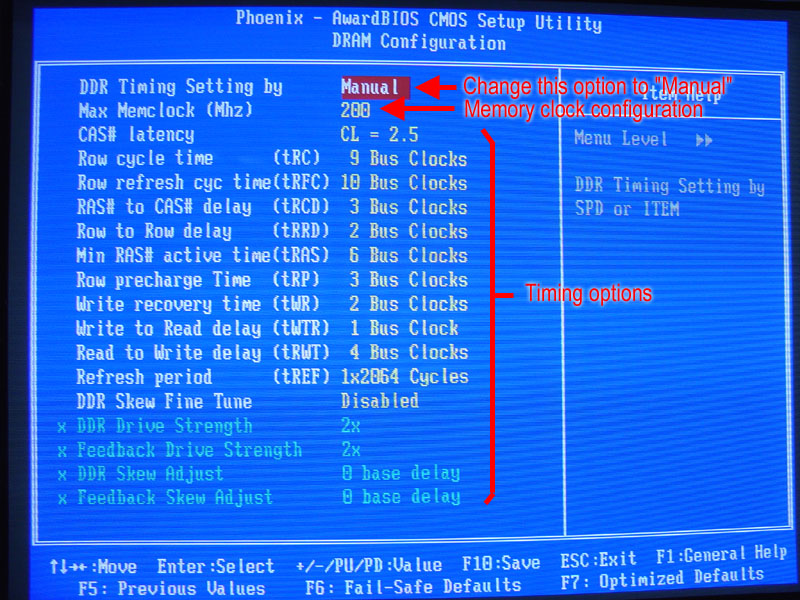
Figure 11: Exemple of a motherboard with far more timing options
We suggest you change only one option at a time. If you change more than that, you won't know which option is preventing your overclocking from working in case your overclocking fails.
If your motherboard has the CMD timing option (which is optional), configure it as "T1," since at "T2" the memory performance is lower.


 4164
4164


 被折叠的 条评论
为什么被折叠?
被折叠的 条评论
为什么被折叠?
 到【灌水乐园】发言


