


前置通知( Advice):
在方法调用前自定义操作。比如方法调用时的log记录、计时、登陆验证等。下面以log记录为例说明。
步骤:
1. 定义接口
2. 编写对象(被代理对象=目标对象)
3. 编写通知(前置通知目标方法调用前调用)
4. 在beans.xml文件配置
4.1 配置 被代理对象=目标对象
4.2 配置通知
4.3 配置代理对象 是 ProxyFactoryBean的对象实例
4.3.1 <!-- 代理接口集 -->
4.3.2 织入通知
4.3.3 配置被代理对象
本实例:
1、基本信息:
包名:com.aop
两个接口类:TestServiceInter.java;TestServiceInter2.java
测试类:Test1Service.java实现了上述两个接口
前置通知类:MyMethodBeforeAdvice.java
配置文件:beans.xml
应用操作类:App.java
2、接口类TestServiceInter.java中代码:
<span style="font-size:18px;">package com.aop;
public interface TestServiceInter {
	public void sayHello();
}</span>
<span style="font-size:18px;">package com.aop;
public interface TestServiceInter2 {
	public void sayBye();
}</span>
<span style="font-size:18px;">package com.aop;

public class Test1Service implements TestServiceInter,TestServiceInter2 {

	private String name;
	public String getName() {
		return name;
	}
	public void setName(String name) {
		this.name = name;
	}
	public void sayHello() {

		System.out.println("Hello!"+name);

	}
	public void sayBye() {
		// TODO Auto-generated method stub
		System.out.println("Bye!"+name);
	}

}</span>
<span style="font-size:18px;">package com.aop;
import java.lang.reflect.Method;
import org.springframework.aop.MethodBeforeAdvice;

public class MyMethodBeforeAdvice implements MethodBeforeAdvice {

	@Override//method:表示被调用的方法,args:给这个方法传递的参数;target:目标对象

	public void before(Method method, Object[] args, Object target)
			throws Throwable {
		// TODO Auto-generated method stub
		System.out.println("记录日志..."+method.getName());
	}
}</span>
<span style="font-size:18px;"><!-- 1、配置被代理的对象,该对象实现了接口 -->
<bean id="test1Service" class="com.aop.Test1Service">
	<property name="name" value="小明"/>
</bean>
<!-- 2、配置前置通知
	proxyFactoryBean implements TestServiceInter,TestServiceInter2{
		public void sayHello();
	}
-->
<bean id ="myMethodBeforeAdvice" class="com.aop.MyMethodBeforeAdvice" />
<!-- 3、配置代理对象,spring提供 -->
<bean id="proxyFactoryBean1" class="org.springframework.aop.framework.ProxyFactoryBean">
<!-- 3.1、配置代理接口集-->
	<property name="proxyInterfaces">
	<list>
		<value>com.aop.TestServiceInter</value>
		<value>com.aop.TestServiceInter2</value>
	</list>
	</property>
<!-- 3.2、把通知织入到代理对象 -->
<property name="interceptorNames">
	<!-- 相当于把前置通知和代理对象关联起来,可以把通知看成拦截器 -->
	<value>myMethodBeforeAdvice</value>
</property>
<!-- 3.3、配置被代理对象 ,可以指定-->
<property name="target" ref="test1Service"/>
</bean></span>
<span style="font-size:18px;">package com.aop;
import org.springframework.context.ApplicationContext;
import org.springframework.context.support.ClassPathXmlApplicationContext;
public class App {
public static void main(String[] args) {
ApplicationContext ac=new ClassPathXmlApplicationContext("com/aop/beans.xml");
TestServiceInter ts=(TestServiceInter)ac.getBean("proxyFactoryBean1");
TestServiceInter2 ts2=(TestServiceInter2)ts;//转接口
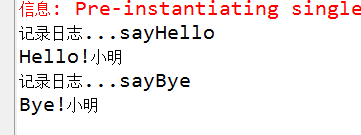
ts.sayHello();
ts2.sayBye();
}
}</span>


 667
667

 被折叠的 条评论
为什么被折叠?
被折叠的 条评论
为什么被折叠?
 到【灌水乐园】发言


