


一、背景与思考
在ArcGIS API的widgets中,有一个basemapGallery的底图切换功能,但是该功能占据的空间过大,且不够美观,所以尝试利用vue自行封装一个底图切换功能。
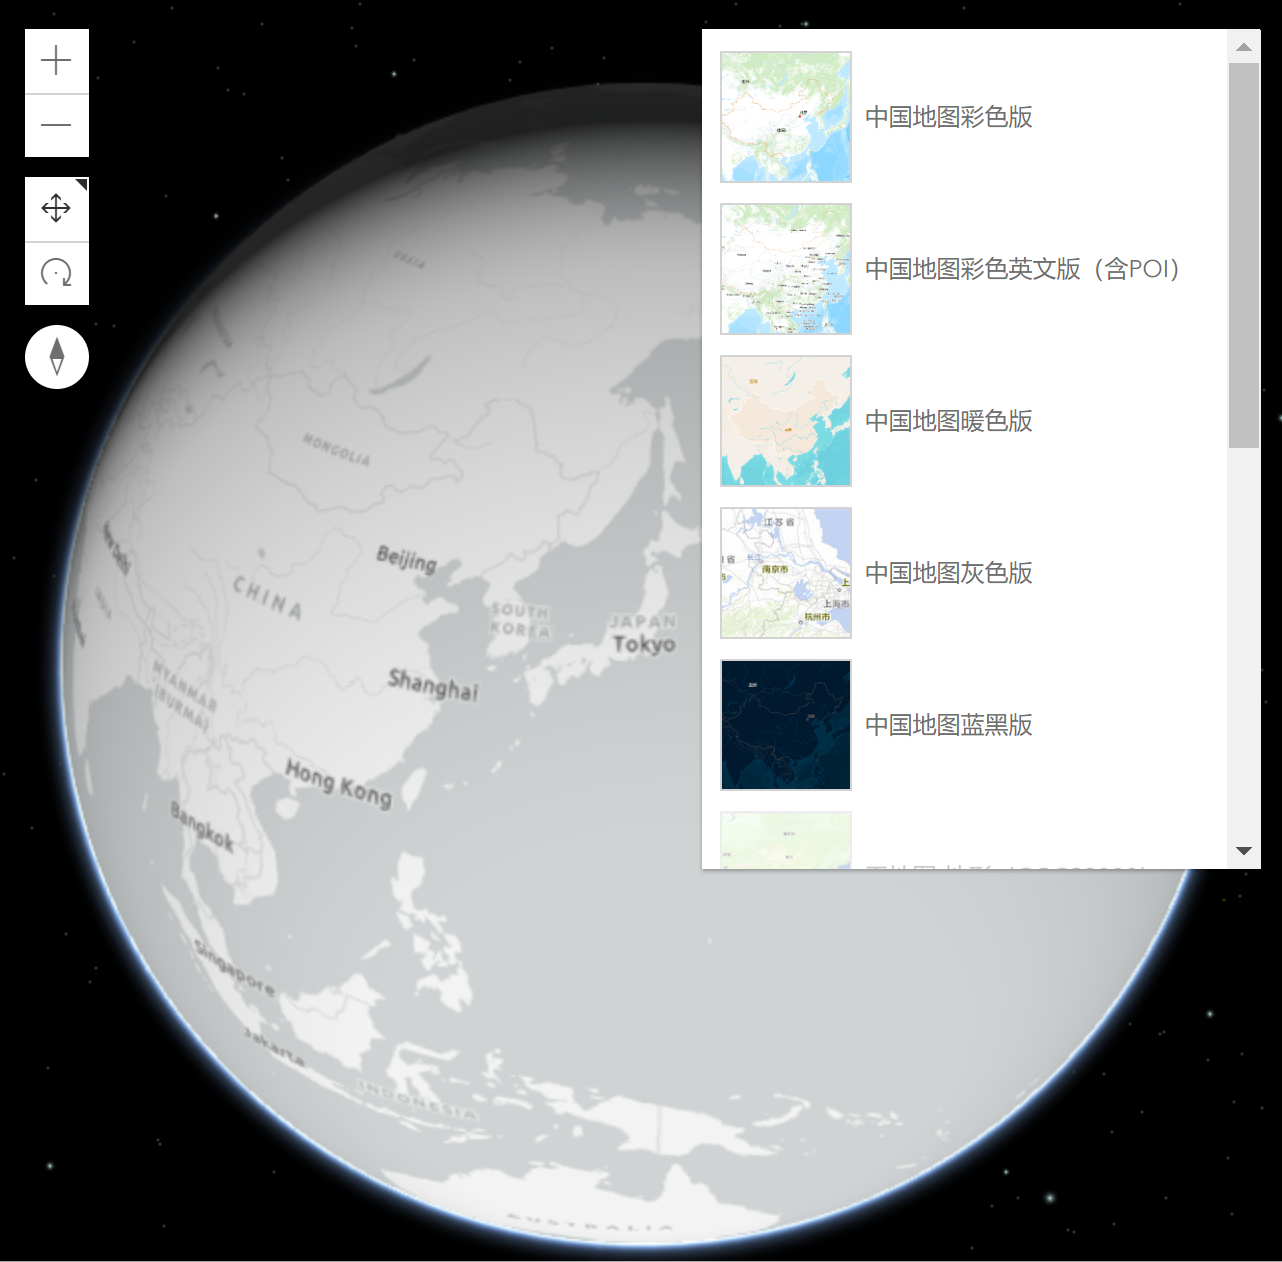

在封装该功能之前,我们需要需要分析一下该功能的组成部分。首先在地图页面的右下角有一个浅白色的大盒子,在这个大盒子里面存放了几个小盒子,每个小盒子可以点击,点击后会切换底图。且一开始只有第一个小盒子是显示的,鼠标移动到第一个小盒子上时,其他的小盒子才显示。每一个小盒子都有其独特的标题,图片等内容。
随后,我们还应该知道,封装的组件应该可以在不同的项目中使用,所以基本的要素不应该写死,而是在具体使用过程中,从调用的父组件中传入过来,所以需要设计从父组件中传入数据的数据结构。
首先,传入的数据应该是一个数组,数组中一个数据对应一个可以切换的底图要素。所以一个底图要素是一个对象。在这个对象内,存放一个底图要素所必须的属性。需要一个标题,所以给一个属性title。需要一个用于展示的图片,使用img。然后需要给一个属性id,这个的目的主要是为了区分数组的第一个要素,因为第一个要素一开始就展示在页面中,不同于其他要素,所以使用id来区分。随后需要一个url来确定需要切换底图的url信息,当然,如果传入一个url,那也一定要传入一个该图层的类型,所以再给一个type。
最后,我们确定了该数据的数据结构,该数据是一个数组,其中具有多个对象,一个对象中有[id,title,img,url,type]五个属性,且传入的这五个属性都不能为空,可以在后台数据库中对该数据进行约束。数据结构设计完毕后,就可以开始组件的封装了。
二、封装MapSwitch文件
新建一个vue文件,命名为“MapSwitch.vue“,在template中首先定义一个大盒子div。其class为"map-switch",然后给外层盒子设置css代码。
  /* 外层盒子的css设置 */
  .map-switch{
    position: absolute;
    bottom: 10px;
    right: 10px;
    height: 70px;
    display: flex;
    justify-content: space-between;
    flex-direction: row-reverse;
    align-items: center;
    padding: 0px 5px;
  }
该盒子应该浮于地图上方,所以给定位为absolute,处于右下角,bottom和right都为10px。高度给了一个70px,没有给宽度,因为宽度会根据数组的长度动态赋予。布局方式为flex布局,justify-content设置为space-between,flex-direction设置为row-reverse,从右向左依次排放。align-items为center,设置居中对齐。最后设置上下padding为0,左右为5px。
但是map-switch一开始并不显示,所以给该盒子一个动态的class并命名为“switch-activated”,该class应该动态绑定给该盒子。如果想要展示大盒子,只需要将isShow的值改为true即可。css代码中给该盒子一个颜色。
<div :class="{'switch-activated': isShow}"></div>

import {ref} from 'vue'
  const isShow = ref(false)

  .switch-activated{
    background-color: #fff;
  }
大盒子的长度需要根据数组的数量来动态的设置,设置每个小盒子的长度为85px,小盒子与小盒子之间的间距为5px。根据数组长度计算大盒子的长度,并赋值给style。
    //根据数组的长度动态展示地图切换的长度
    <div :style="dynamicwidth"></div>

    const switchwidth = 90*props.BasemapData.length+'px'
    const dynamicwidth = {
      width: switchwidth
    }
小盒子的默认为隐藏状态,此处没有给小盒子背景图片,而是用背景颜色替代了。可根据自己的需求自行修改
/* 小盒子的基本框架 */
  .map-switch div{
    display: inline;
    width: 85px;
    height: 60px;
    background-color: skyblue;
    position: relative;
    visibility:hidden;
    z-index: 8;
  }
三、封装MapSwitchItem文件
新建一个“MapSwitchItem.vue”文件,MapSwitch中遍历BasemapData数组,该数据是存放切换地图数据的数组。随后将item对象传给MapSwitchItem文件。在MapSwitchItem文件中,最外层的div有一个动态class,来区别首个底图并显示。并在div盒子中存放标题和图片。
    //判断是否是第一个数组,第一个数组是需要展示的
    <div :class="{'base-switch': isFirst}">
      <span>{{item.title}}</span>
      <img :src="item.img" alt="">
    </div>

    import { computed} from 'vue'
    const isFirst = computed(() =>{
      return props.item.id === 0
    })
随后还需要添加上两个事件,一个是点击事件,点击小盒子后切换相应的底图,该事件需要传入一个参数,点击的是哪一个事件。另一个是mouseover事件,当鼠标移动到第一个盒子上时会执行该事件。
  <div @mouseover="showBasemap" @click="switchClick(item.id)"></div>
    //鼠标浮于地图切换上方时,展示所有可切换的地图
    const showBasemap = () => {
      context.emit('showBasemap')
    }
    //点击可切换底图
    const switchClick = (index) => {
      context.emit('switchClick',index)
    }
在MapSwitch文件中处理这些事件。showBasemap事件中,只需要将isShow.value改为true即可。而switchClick事件中,需要根据传入的id值来进行底图的获取。
    const showBasemap = () =>{
      isShow.value = true
    }
    const map = inject('map')
    //根据底图不同切换地图
    const switchClick = (index) =>{
      const switchitem = props.BasemapData[index]
      switch(props.BasemapData[index].type){
        //矢量图层
        case 'feature':
          map.basemap.baseLayers = [
              new FeatureLayer({
                url: switchitem.url
              })
          ]
          break;
        //影像图层
        case 'imagery':
          map.basemap.baseLayers = [
              new ImageryLayer({
                url: switchitem.url
              })
          ]
          break;
        //切片图层
        case 'tile':
          map.basemap.baseLayers = [
            new TileLayer({
              url: switchitem.url
            })
          ]
          break;
        //三维图层
        case 'scene':
          map.basemap.baseLayers = [
            new SceneLayer({
              url: switchitem.url
            })
          ]
          break
      }
    }
四、代码展示
MapSwitch.vue的代码如下:
<template>
  <div class="map-switch" :class="{'switch-activated': isShow}" @mouseleave="unShowBasemap" :style="dynamicwidth">
    <switch-map-item v-for="(item,index) in BasemapData"
                      :key="index"
                      :item="item"
                      @showBasemap="showBasemap"
                      @switchClick="switchClick">
    </switch-map-item>
  </div>
</template>

<script>
import {ref, inject} from 'vue'
import SwitchMapItem from './SwitchMapItem.vue'
import TileLayer from '@arcgis/core/layers/TileLayer'
import FeatureLayer from '@arcgis/core/layers/FeatureLayer'
import ImageryLayer from '@arcgis/core/layers/ImageryLayer'
import SceneLayer from '@arcgis/core/layers/SceneLayer'
export default {
  components: { SwitchMapItem },
  props:{
    BasemapData: {
      type: Array,
      require: true
    }
  },
  setup (props) {
    const showBasemap = () =>{
      isShow.value = true
    }
    const unShowBasemap = () =>{
      isShow.value = false
    }
    const map = inject('map')
    //根据底图不同切换地图
    const switchClick = (index) =>{
      const switchitem = props.BasemapData[index]
      switch(props.BasemapData[index].type){
        //矢量图层
        case 'feature':
          map.basemap.baseLayers = [
              new FeatureLayer({
                url: switchitem.url
              })
          ]
          break;
        //影像图层
        case 'imagery':
          map.basemap.baseLayers = [
              new ImageryLayer({
                url: switchitem.url
              })
          ]
          break;
        //切片图层
        case 'tile':
          map.basemap.baseLayers = [
            new TileLayer({
              url: switchitem.url
            })
          ]
          break;
        //三维图层
        case 'scene':
          map.basemap.baseLayers = [
            new SceneLayer({
              url: switchitem.url
            })
          ]
          break
      }
    }
    //根据数组的长度动态展示地图切换的长度
    const switchwidth = 90*props.BasemapData.length+'px'
    const dynamicwidth = {
      width: switchwidth
    }
    const isShow = ref(false)

    return {
      showBasemap,
      unShowBasemap,
      switchClick,
      isShow,
      dynamicwidth,
    }
  }
}
</script>

<style>
  /* 外层盒子的css设置 */
  .map-switch{
    position: absolute;
    bottom: 10px;
    right: 10px;
    /* width: 800px; */
    height: 70px;
    display: flex;
    justify-content: space-between;
    flex-direction: row-reverse;
    align-items: center;
    padding: 0px 5px;
  }
  /* 小盒子的基本框架 */
  .map-switch div{
    display: inline;
    width: 85px;
    height: 60px;
    background-color: skyblue;
    position: relative;
    visibility:hidden;
    z-index: 8;
  }
  /* 第一个小盒子可见 */
  .map-switch .base-switch{
    visibility: inherit;
  }
  /* 鼠标移动到第一个盒子上所有盒子可见 */
  .switch-activated div{
    visibility: inherit;
  }
  /* 选择小盒子时添加外边框 */
  .switch-activated div:hover{
    border: .6px solid blue;
  }
  .switch-activated{
    background-color: rgb(255, 255, 255,.6);
  }
  .map-switch span{
    font-size: 12px;
    color: #fff;
    position: absolute;
    bottom: 3px;
    right: 2px;
  }
</style>
MapSwitchItem.vue的代码如下:
<template>
  <div @mouseover="showBasemap" :class="{'base-switch': isFirst}" @click="switchClick(item.id)">
    <span>{{item.title}}</span>
    <img :src="item.img" alt="">
  </div>
</template>

<script>
import { computed} from 'vue'
export default {
  props: {
    item: {
      type: Object
    }
  },
  setup (props,context) {
    //鼠标浮于地图切换上方时,展示所有可切换的地图
    const showBasemap = () => {
      context.emit('showBasemap')
    }
    //点击可切换底图
    const switchClick = (index) => {
      context.emit('switchClick',index)
    }
    //判断是否是第一个数组,第一个数组是需要展示的
    const isFirst = computed(() =>{
      return props.item.id == 0
    })
    return {
      isFirst,
      showBasemap,
      switchClick
    }
  }
}
</script>
可以展示的效果如下图所示

五、不足
该代码的不足之处在于没有添加背景图片进行测试,同时缺少动画效果,这些缺陷会在后期补足。


 1350
1350


 被折叠的 条评论
为什么被折叠?
被折叠的 条评论
为什么被折叠?
 到【灌水乐园】发言


