


一:注解
Java 注解用于为 Java 代码提供元数据。作为元数据,注解不直接影响你的代码执行,但也有一些类型的注解实际上可以用于这一目的。Java 注解是从 Java5 开始添加到 Java 的。Java 语言中的类、方法、变量、参数和包等都可以被标注。和 Javadoc 不同,Java 标注可以通过反射获取标注内容。在编译器生成类文件时,标注可以被嵌入到字节码中。Java 虚拟机可以保留标注内容,在运行时可以获取到标注内容。
使用注解开发的好处:
- 使代码更加干净易读,易于维护修改。比如,以前使用spring的开发,都是基于xml文件实现了统一的配置管理,但是缺点也是显而易见的,就是随着项目的越来越大,xml文件会变得越来越复杂,维护成本也会越来越高。使用注解就可以提供更大的便捷性,易于维护修改。
- 可以实现代码的类型检查,特别是在编译器的角度实现一些类型检查,比如预检查(@Override)和抑制警告(@SuppressWarnings)等。
- 自定义注解,作为额外信息的载体,存储有关程序的额外信息
注解一般可以分为三类:元注解,标准注解,自定义注解
1.1:元注解
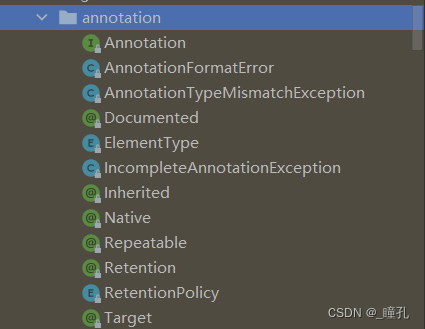
元注解是负责对其它注解进行说明的注解,自定义注解时可以使用元注解。Java 5 定义了 4 个注解,分别是 @Documented、@Target、@Retention 和 @Inherited。Java 8 又增加了 @Repeatable 和 @Native 两个注解。这些注解都可以在 java.lang.annotation 包中找到。下面主要介绍每个元注解的作用及使用。
1.1.1:@Document
package java.lang.annotation;

@Documented
@Retention(RetentionPolicy.RUNTIME)
@Target(ElementType.ANNOTATION_TYPE)
public @interface Documented {
}
@Documented 是一个标记注解,没有成员变量。用 @Documented 注解修饰的注解类会被 JavaDoc 工具提取成文档。默认情况下,JavaDoc 是不包括注解的,但如果声明注解时指定了@Documented,就会被 JavaDoc 之类的工具处理,所以注解类型信息就会被包括在生成的帮助文档中。
下面通过示例来了解它的用法,代码如下所示:
自定义注解:
@Documented
@Target({ ElementType.TYPE, ElementType.METHOD })
public @interface MyDocumented {
    public String value() default "这是@Documented注解";
}
测试类:
@MyDocumented
public class DocumentedTest {
    @MyDocumented
    public String Test() {
        return "@Documented Test";
    }
}
打开 Java 文件所在的目录,分别输入如下两条命令行:
javac MyDocumented.java DocumentedTest.java
javadoc -d doc MyDocumented.java DocumentedTest.java
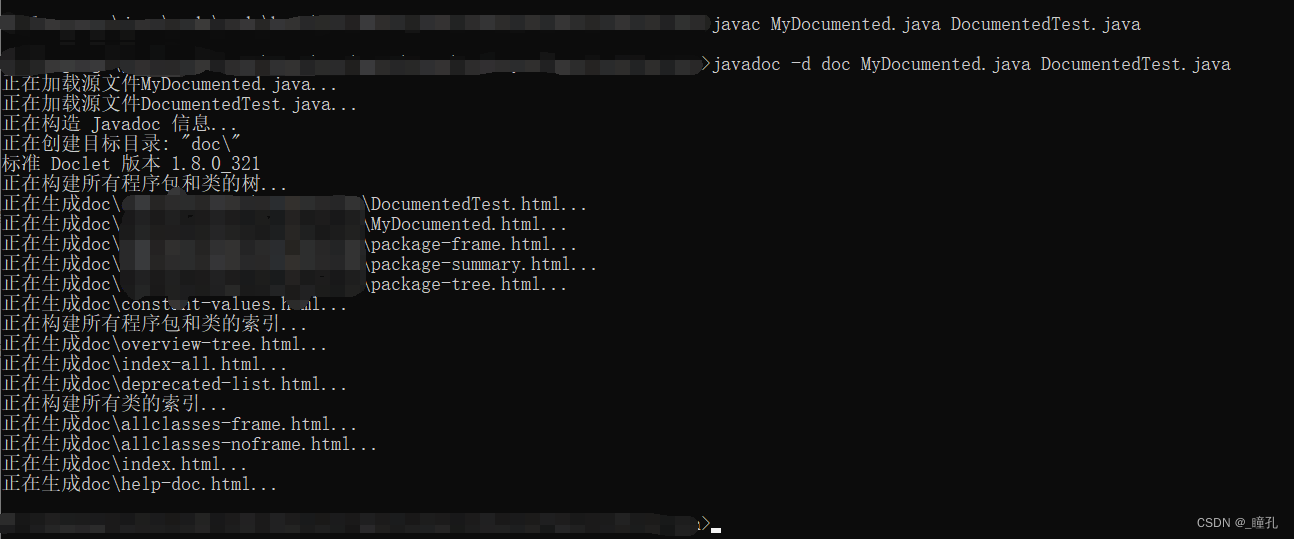
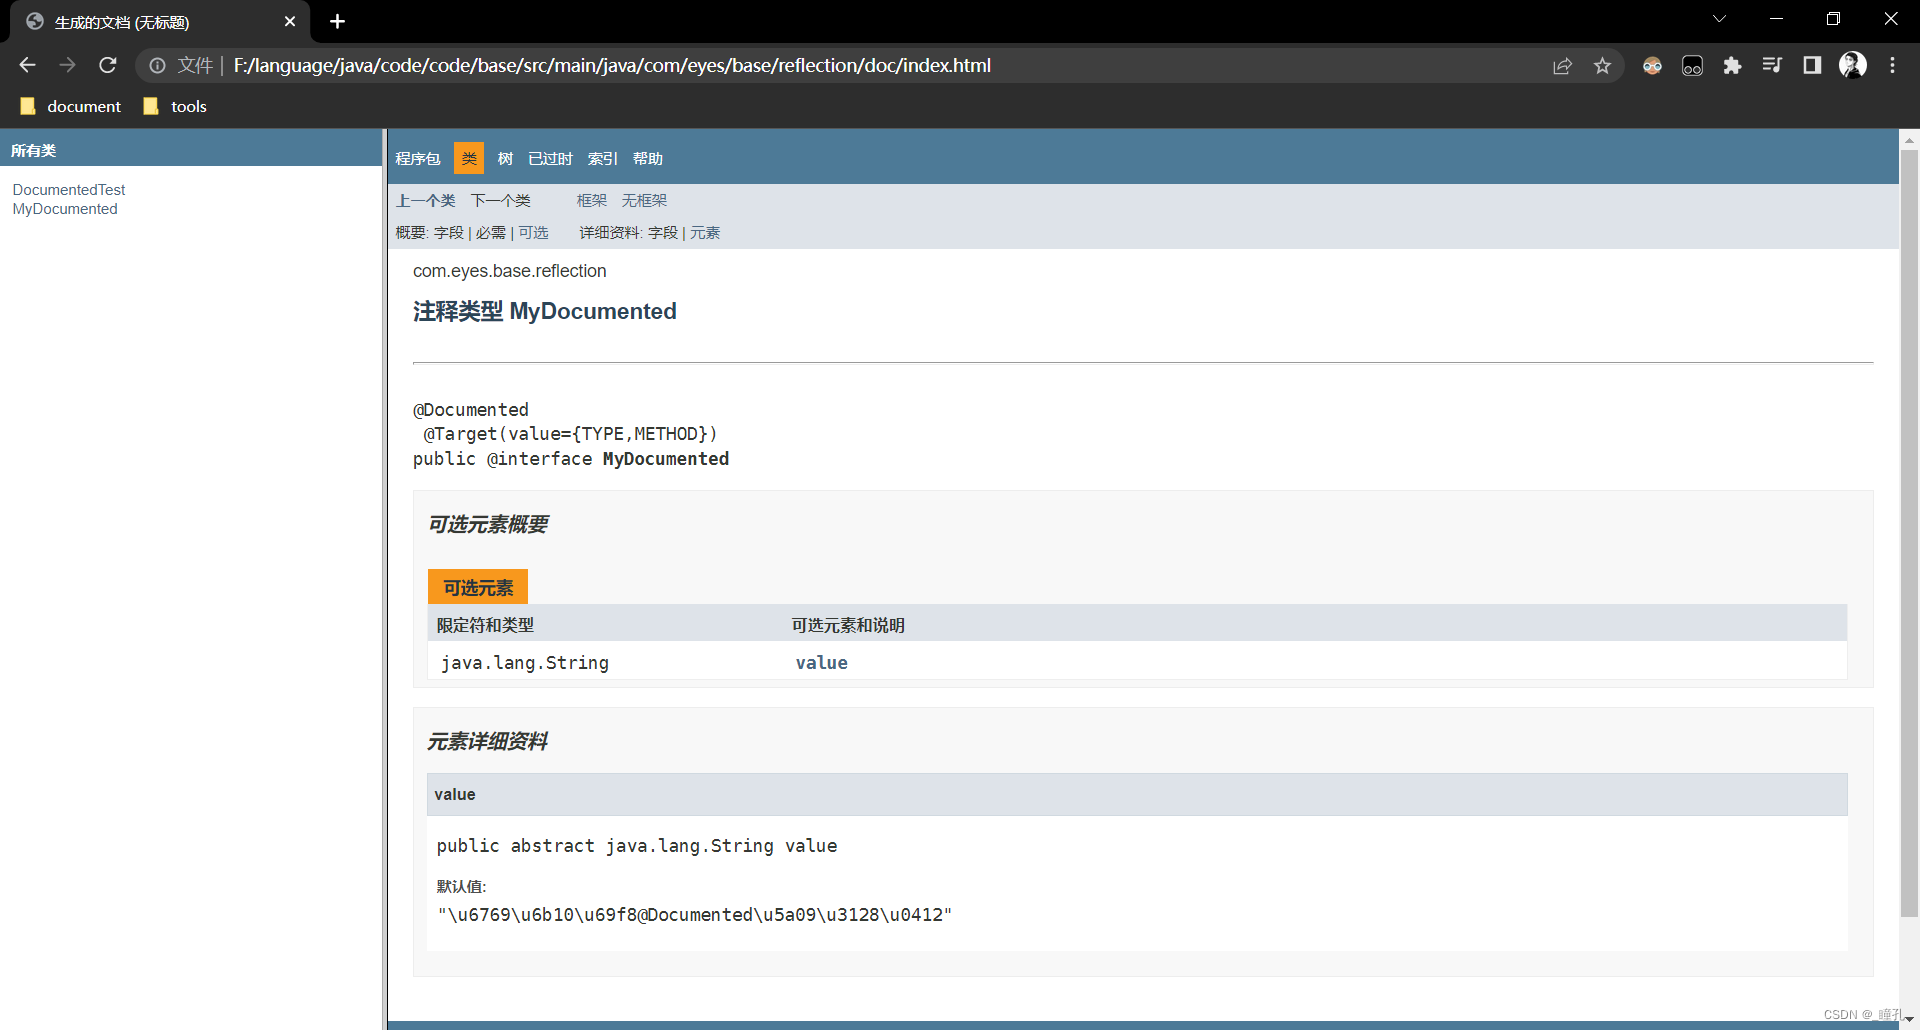
运行成功后,打开生成的帮助文档,可以看到在类和方法上都保留了 MyDocument 的注解信息。如下图所示:
1.1.2:@Target
package java.lang.annotation;

@Documented
@Retention(RetentionPolicy.RUNTIME)
@Target(ElementType.ANNOTATION_TYPE)
public @interface Target {
    /**
     * Returns an array of the kinds of elements an annotation type
     * can be applied to.
     * @return an array of the kinds of elements an annotation type
     * can be applied to
     */
    ElementType[] value();
}
@Target 注解用来指定一个注解的使用范围,即被 @Target 修饰的注解可以用在什么地方。@Target 注解有一个成员变量(value)用来设置适用目标,value 是 java.lang.annotation.ElementType 枚举类型的数组,下面为 ElementType 所有的枚举常量。
public enum ElementType {
    /** Class, interface (including annotation type), or enum declaration */
    /* 用于类、接口(包括注解类型)或 enum 声明 */
    TYPE,

    /** Field declaration (includes enum constants) */
    /* 用于成员变量(包括枚举常量) */
    FIELD,

    /** Method declaration */
    /* 用于方法 */
    METHOD,

    /** Formal parameter declaration */
    /* 用于类型参数 */
    PARAMETER,

    /** Constructor declaration */
    /* 用于构造方法 */
    CONSTRUCTOR,

    /** Local variable declaration */
    /* 用于局部变量 */
    LOCAL_VARIABLE,

    /** Annotation type declaration */
    /* 用于注解 */
    ANNOTATION_TYPE,

    /** Package declaration */
    /* 用于包 */
    PACKAGE,

    /**
     * Type parameter declaration
     *
     * @since 1.8
     */
     /* 用来标注类型参数 */
    TYPE_PARAMETER,

    /**
     * Use of a type
     *
     * @since 1.8
     */
     /* 能标注任何类型名称 */
    TYPE_USE
}
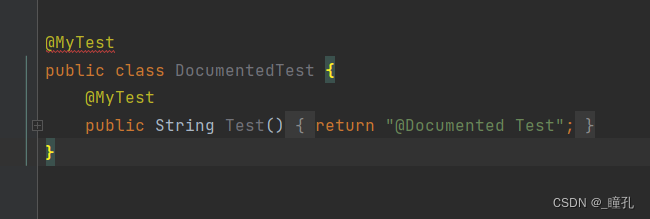
例如自定义一个 MyTarget 注解,使用范围为方法,代码如下所示:
@Target({ ElementType.METHOD })
public @interface MyTest {
}
那么它就只能使用在方法上,而在其他地方使用都会报错:
1.1.3:@Retention
package java.lang.annotation;

@Documented
@Retention(RetentionPolicy.RUNTIME)
@Target(ElementType.ANNOTATION_TYPE)
public @interface Retention {
    /**
     * Returns the retention policy.
     * @return the retention policy
     */
    RetentionPolicy value();
}
@Retention 用于描述注解的生命周期,也就是该注解被保留的时间长短。@Retention 注解中的成员变量(value)用来设置保留策略,value 是 java.lang.annotation.RetentionPolicy 枚举类型,RetentionPolicy 有 3 个枚举常量,如下所示:
public enum RetentionPolicy {
    /**
     * Annotations are to be discarded by the compiler.
     */
    /* 在源文件中有效(即源文件保留) */
    SOURCE,

    /**
     * Annotations are to be recorded in the class file by the compiler
     * but need not be retained by the VM at run time.  This is the default
     * behavior.
     */
    /* 在 class 文件中有效(即 class 保留) */
    CLASS,

    /**
     * Annotations are to be recorded in the class file by the compiler and
     * retained by the VM at run time, so they may be read reflectively.
     *
     * @see java.lang.reflect.AnnotatedElement
     */
    /* 在运行时有效(即运行时保留) */
    RUNTIME
}
生命周期大小排序为 SOURCE < CLASS < RUNTIME,前者能使用的地方后者一定也能使用。如果需要在运行时去动态获取注解信息,那只能用 RUNTIME 注解;如果要在编译时进行一些预处理操作,比如生成一些辅助代码(如 ButterKnife),就用 CLASS 注解;如果只是做一些检查性的操作,比如 @Override 和 @SuppressWarnings,则可选用 SOURCE 注解。
1.1.4:@Inherited
package java.lang.annotation;

@Documented
@Retention(RetentionPolicy.RUNTIME)
@Target(ElementType.ANNOTATION_TYPE)
public @interface Inherited {
}
@Inherited 是一个标记注解,用来指定该注解可以被继承。使用 @Inherited 注解的 Class 类,表示这个注解可以被用于该 Class 类的子类。就是说如果某个类使用了被 @Inherited 修饰的注解,则其子类将自动具有该注解。
自定义注解:
@Target({ ElementType.TYPE })
@Inherited
@Retention(RetentionPolicy.RUNTIME)
public @interface MyTest {
}
测试代码:
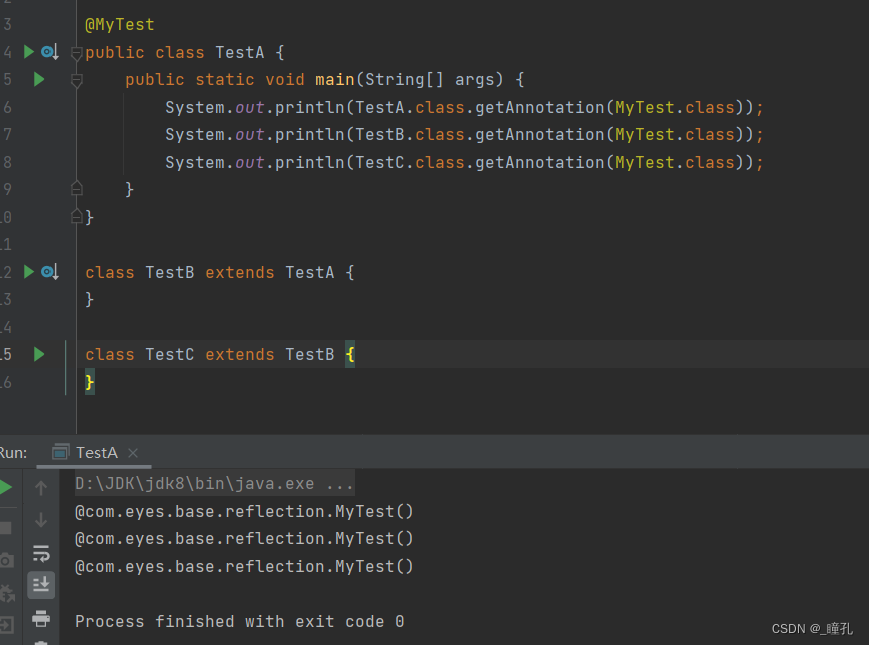
@MyTest
public class TestA {
    public static void main(String[] args) {
        System.out.println(TestA.class.getAnnotation(MyTest.class));
        System.out.println(TestB.class.getAnnotation(MyTest.class));
        System.out.println(TestC.class.getAnnotation(MyTest.class));
    }
}

class TestB extends TestA {
}

class TestC extends TestB {
}
1.1.5:@Repeatable
package java.lang.annotation;

/**
 * The annotation type {@code java.lang.annotation.Repeatable} is
 * used to indicate that the annotation type whose declaration it
 * (meta-)annotates is <em>repeatable</em>. The value of
 * {@code @Repeatable} indicates the <em>containing annotation
 * type</em> for the repeatable annotation type.
 *
 * @since 1.8
 * @jls 9.6 Annotation Types
 * @jls 9.7 Annotations
 */
@Documented
@Retention(RetentionPolicy.RUNTIME)
@Target(ElementType.ANNOTATION_TYPE)
public @interface Repeatable {
    /**
     * Indicates the <em>containing annotation type</em> for the
     * repeatable annotation type.
     * @return the containing annotation type
     */
    Class<? extends Annotation> value();
}
@Repeatable 注解是 Java 8 新增加的,它允许在相同的程序元素中重复注解,在需要对同一种注解多次使用时,往往需要借助 @Repeatable 注解。Java 8 版本以前,同一个程序元素前最多只能有一个相同类型的注解,如果需要在同一个元素前使用多个相同类型的注解,则必须使用注解“容器”。
Java 8 之前的做法:
public @interface Roles {
    Role[] roles();
}

public @interface Roles {
    Role[] value();
}

public class RoleTest {
    @Roles(roles = {@Role(roleName = "role1"), @Role(roleName = "role2")})
    public String doString(){
        return "@Repeatable";
    }
}
Java 8 之后增加了重复注解,使用方式如下:
public @interface Roles {
    Role[] value();
}

@Repeatable(Roles.class)
public @interface Role {
    String roleName();
}

public class RoleTest {
    @Role(roleName = "role1")
    @Role(roleName = "role2")
    public String doString(){
        return "这是C语言中文网Java教程";
    }
}
不同的地方是,创建重复注解 Role 时加上了 @Repeatable 注解,指向存储注解 Roles,这样在使用时就可以直接重复使用 Role 注解。从上面例子看出,使用 @Repeatable 注解更符合常规思维,可读性强一点。
两种方法获得的效果相同。重复注解只是一种简化写法,这种简化写法是一种假象,多个重复注解其实会被作为“容器”注解的 value 成员的数组元素处理。
1.1.6:@Native
package java.lang.annotation;


/**
 * Indicates that a field defining a constant value may be referenced
 * from native code.
 *
 * The annotation may be used as a hint by tools that generate native
 * header files to determine whether a header file is required, and
 * if so, what declarations it should contain.
 *
 * @since 1.8
 */
@Documented
@Target(ElementType.FIELD)
@Retention(RetentionPolicy.SOURCE)
public @interface Native {
}
使用 @Native 注解修饰成员变量,则表示这个变量可以被本地代码引用,常常被代码生成工具使用。对于 @Native 注解不常使用,了解即可。
1.2:标准注解
Java主要提供了5个标准注解,分别是:
- Override
- Deprecated
- SuppressWarnings
- SafeVarargs
- FunctionalInterface
Override:该标准注解的功能就是标注重写父类方法。我们如果在某个方法上加上这个注解,就表示该方法继承并重写父类的同名方法,当编译器编译代码时如果发现Override标记的方法名和重写的父类方法名不一致就会告警。
Deprecated:Deprecated注解的功能就是标记一个元素(类、方法或类成员属性)为已过期。所以,我们如果在识别为过期的类、方法或类成员属性上加上这个标记,就表示该类、方法或属性已经废弃。当编译器编译时遇到了使用@Deprecated修饰的类、方法或属性时就会提示元素过期的警告信息。
SuppressWarnings:该注解的功能是抑制编译器编译时产生警告信息,指示应该在注释元素(以及包含在该注释元素中的所有程序元素)中取消显示指定的编译器警告。注意,在给定元素中取消显示的警告集是所有包含元素中取消显示的警告的超集。例如,如果注释一个类来取消显示某个警告,同时注释一个方法来取消显示另一个警告,那么将在此方法中同时取消显示这两个警告。在java编译过程中会出现很多警告,有很多是安全的,但是每次编译有很多警告影响我们对error的过滤和修改,我们可以在代码中加上 @SuppressWarnings(“XXXX”) 来解决
SafeVarargs:SafeVarargs是从JDK1.7以后才引入的标准注解,从字面上理解,它的功能就是对方法内非类型安全的变量操作进行告警。当编译器编译发现一个方法上标记了SafeVarargs注解,就会忽略该方法内非类型安全的变量操作的告警。
FunctionalInterface:FunctionalInterface是JDK1.8之后新增的标准注解,它的功能就是检查被标记的接口是否是一个函数接口。当编译器编译发现一个接口类上标记了FunctionalInterface注解,就会检查该接口类的接口方法实现是否为函数式编程,如果不是,编译器就会产生警告信息。
当然还有一些少见的:
| 注 解 接 口 | 应 用 场 景 | 目 的 |
| PostConstruct | 方法 | 被标记的方法应该在构造之后立即被调用 |
| PreDestroy | 被标记的方法应该在移除之前立即被调用 | |
| Resource | 类、接口、方法、域 | 在类或者接口上:标记为在其他地方要用到的资源 在方法或者域上 :为 “注入” 而标记 |
| Resources | 类、接口 | 一个资源组 |
| Grenerated | 全部 | 标注源代码中的某些东西是由某些工具生成的,而不是人写的。 |
二:反射
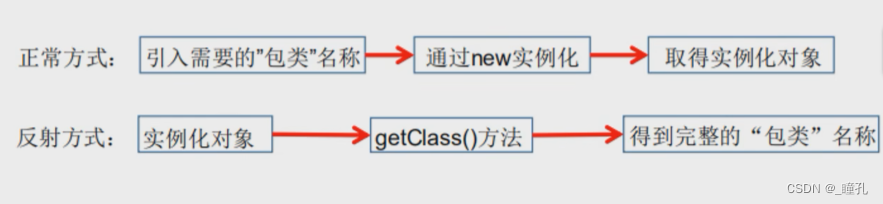
反射(Reflection) 是 Java 程序开发语言的特征之一,它允许运行中的 Java 程序对自身进行检查,或者说“自审”,并能直接操作程序的内部属性和方法。
反射的概念是由 Smith 在 1982 年首次提出的,主要是指程序可以访问、检测和修改它本身状态或行为的一种能力。通俗地讲,一提到反射,我们就可以想到镜子。镜子可以明明白白地照出我是谁,还可以照出别人是谁。反映到程序中,反射就是用来让开发者知道这个类中有什么成员,以及别的类中有什么成员。在加载完类后,在堆内存的方法区中就产生了一个Class类型的对象(一个类只有一个Class对象),这个对象就包含了完整的类的结构信息。我们就可以通过这个对象看到类的结构。
反射机制提供的功能:
- 在运行时判断任意一个对象所属的类
- 在运行时构造任意一个类的对象
- 在运行时判断任意一个类所具有的成员变量和方法
- 在运行时获取泛型信息
- 在运行时调用任意一个对象的成员变量和方法
- 在运行时处理注解
- 生成动态代理
- …
反射的优点:
- 可以实现动态创建对象和编译,体现出很大的灵活性
- 与 Java 动态编译相结合,可以实现无比强大的功能。
- 对于 Java 这种先编译再运行的语言,能够让我们很方便的创建灵活的代码,这些代码可以在运行时装配,无需在组件之间进行源代码的链接,更加容易实现面向对象。
反射的缺点:
- 对性能有影响。使用反射基本上是一种解释操作,我们可以告诉JVM,我们希望做什么并且它满足我们的要求。这类操作总是慢于直接执行相同的操作。
- 反射调用方法时可以忽略权限检查,获取这个类的私有方法和属性,因此可能会破坏类的封装性而导致安全问题。
2.0:Hashcode
很明显hashcode跟反射没什么关系…但是我在学习反射的过程中,一些测试代码让我意识到我对hashcode的认识还很浅,于是就又去学习了一下hashcode,顺便在这里记录一下。
Hash:一般翻译做散列、杂凑,或音译为哈希,是把任意长度的输入(又叫做预映射pre-image)通过散列算法变换成固定长度的输出,该输出就是散列值。这种转换是一种压缩映射,也就是,散列值的空间通常远小于输入的空间,不同的输入可能会散列成相同的输出,所以不可能从散列值来确定唯一的输入值。简单的说就是一种将任意长度的消息压缩到某一固定长度的消息摘要的函数。
hashcode就是通过hash函数得来的,通俗的说,就是通过某一种算法得到的,hashcode就是在hash表中有对应的位置。每个对象都有hashcode,对象的hashcode怎么得来的呢?首先一个对象肯定有物理地址,hashcode代表对象的地址说的是对象在hash表中的位置,物理地址说的对象存放在内存中的地址
那么对象如何得到hashcode呢?通过对象的内部地址(也就是物理地址)转换成一个整数,然后该整数通过hash函数的算法就得到了hashcode,所以,hashcode是什么呢?就是在hash表中对应的位置。这里如果还不是很清楚的话,举个例子,hash表中有 hashcode为1、2、3、4、5、6、7、8这样八个位置,有一个对象A,A的物理地址转换为一个整数17(这是假如),就通过直接取余算法,17%8=1,那么A的hashcode就为1,且A就在hash表中1的位置。
2.1:Class对象
在java世界里,一切皆对象。从某种意义上来说,java有两种对象:实例对象和Class对象。每个类的运行时的类型信息就是用Class对象表示的。它包含了与类有关的信息。其实我们的实例对象就通过Class对象来创建的。Java使用Class对象执行其RTTI(运行时类型识别,Run-Time Type Identification),多态是基于RTTI实现的。
java.lang.Class类是实现反射的核心类,每一个类都有一个Class对象,每当编译一个新类就产生一个Class对象,基本类型 (boolean, byte, char, short, int, long, float, and double)有Class对象,数组有Class对象,就连关键字void也有Class对象(void.class)。Class对象对应着java.lang.Class类,如果说类是对象抽象和集合的话,那么Class类就是对类的抽象和集合。
Class类没有公共的构造方法,Class对象是在类加载的时候由Java虚拟机以及通过调用类加载器中的 defineClass 方法自动构造的,因此不能显式地声明一个Class对象。一个类被加载到内存并供我们使用需要经历如下三个阶段:
- 加载:这是由类加载器(ClassLoader)执行的。通过一个类的全限定名来获取其定义的二进制字节流(Class字节码),将这个字节流所代表的静态存储结构转化为方法去的运行时数据接口,根据字节码在java堆中生成一个代表这个类的java.lang.Class对象。
- 链接:将Java类的二进制代码合并到JVM的运行状态之中的过程
- 验证:确保加载的类信息符合JVM规范,没有安全方面的问题
- 准备:正式为类变量(static)分配内存并设置类变量默认初始值的阶段,这些内存都将在方法去中进行分配
- 解析:虚拟机常量池内的符号引用(常量名)替换为直接引用(地址)的过程
- 初始化:到了此阶段,才真正开始执行类中定义的java程序代码。该阶段是执行类构造器<client>()方法的过程。类构造器<client>()方法是由编译期自动收集类中所有类变量的赋值动作和静态代码块中的语句合并产生的。(类构造器是构造类信息的,不是构造该类对象的构造器)。当初始化一个类的时候,如果发现其父类还没有进行初始化,则需要先触发其父类的初始化。虚拟机会保证一个类的在多线程环境中被正确加锁和同步。
所有的类都是在对其第一次使用时,动态加载到JVM中的(懒加载)。当程序创建第一个对类的静态成员的引用时,就会加载这个类。使用new创建类对象的时候也会被当作对类的静态成员的引用。因此java程序程序在它开始运行之前并非被完全加载,其各个类都是在必需时才加载的。这一点与许多传统语言都不同。动态加载使能的行为,在诸如C++这样的静态加载语言中是很难或者根本不可能复制的。
在类加载阶段,类加载器首先检查这个类的Class对象是否已经被加载。如果尚未加载,默认的类加载器就会根据类的全限定名查找.class文件。在这个类的字节码被加载时,它们会接受验证,以确保其没有被破坏,并且不包含不良java代码。一旦某个类的Class对象被载入内存,我们就可以它来创建这个类的所有对象。
2.1.1:获取Class对象的三种方式
有三种获得Class对象的方式:
- Class.forName(“类的全限定名”)
- 实例对象.getClass()
- 类名.class (类字面常量)
    @Test
    public void test() throws ClassNotFoundException {
        Person person = new Student();
        Class<? extends Person> aClass = person.getClass();
        System.out.println(aClass);

        Class<?> aClass1 = Class.forName("com.eyes.base.reflection.Student");
        System.out.println(aClass1);

        Class<Student> studentClass = Student.class;
        System.out.println(studentClass);
    }

2.1.2:所有类型的Class对象
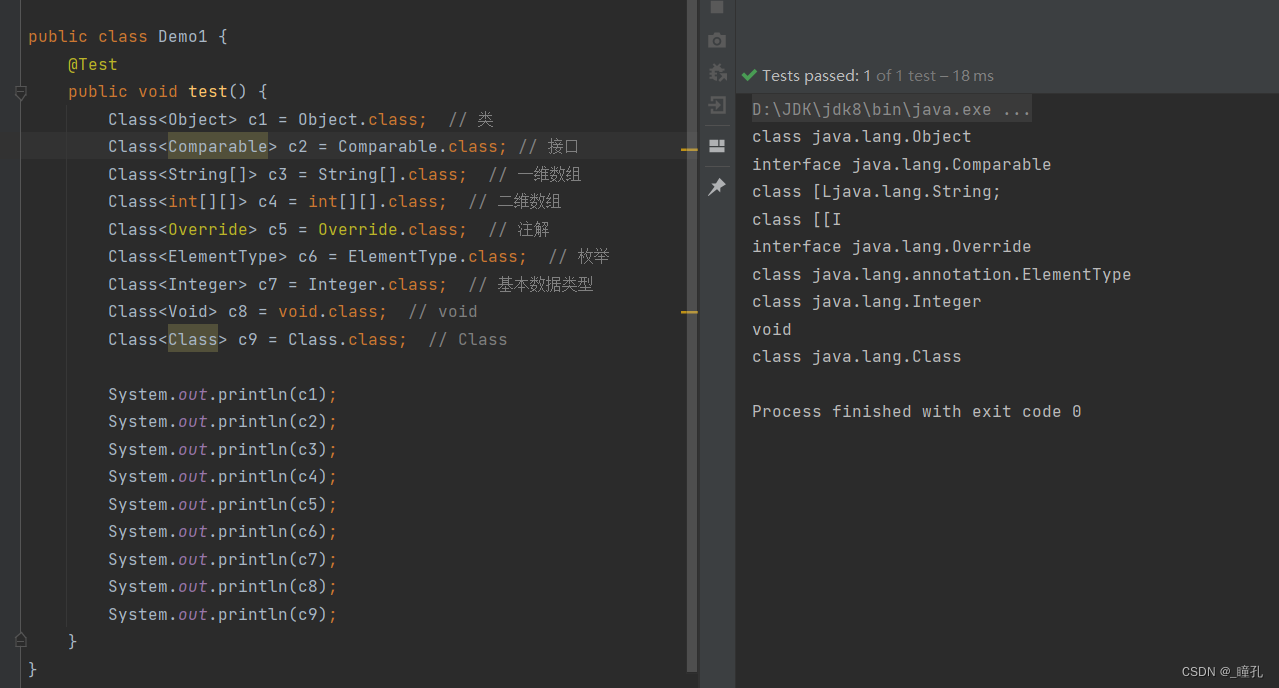
    @Test
    public void test() {
        Class<Object> c1 = Object.class;  // 类
        Class<Comparable> c2 = Comparable.class; // 接口
        Class<String[]> c3 = String[].class;  // 一维数组
        Class<int[][]> c4 = int[][].class;  // 二维数组
        Class<Override> c5 = Override.class;  // 注解
        Class<ElementType> c6 = ElementType.class;  // 枚举
        Class<Integer> c7 = Integer.class;  // 基本数据类型
        Class<Void> c8 = void.class;  // void
        Class<Class> c9 = Class.class;  // Class

        System.out.println(c1);
        System.out.println(c2);
        System.out.println(c3);
        System.out.println(c4);
        System.out.println(c5);
        System.out.println(c6);
        System.out.println(c7);
        System.out.println(c8);
        System.out.println(c9);
    }
2.1.3:一个类的反射对象是唯一的
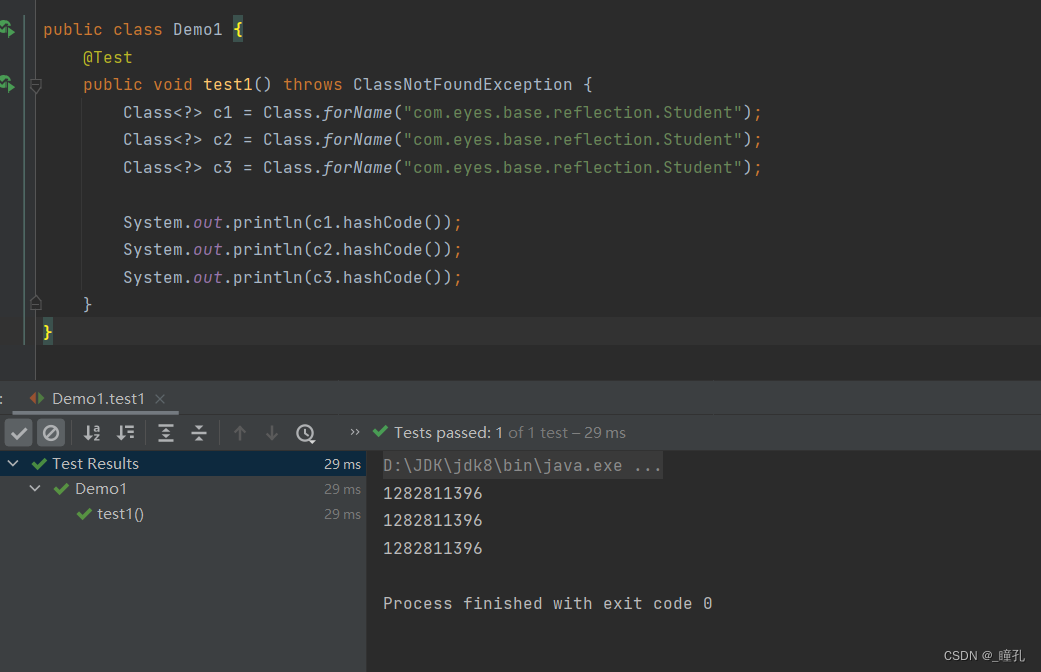
    @Test
    public void test1() throws ClassNotFoundException {
        Class<?> c1 = Class.forName("com.eyes.base.reflection.Student");
        Class<?> c2 = Class.forName("com.eyes.base.reflection.Student");
        Class<?> c3 = Class.forName("com.eyes.base.reflection.Student");

        System.out.println(c1.hashCode());
        System.out.println(c2.hashCode());
        System.out.println(c3.hashCode());
    }
2.2:获取类的运行时结构
| 类型 | 访问方法 | 返回值类型 | 说明 |
|---|---|---|---|
| 包路径 | getPackage() | Package 对象 | 获取该类的存放路径 |
| 类名称 | getName() | String 对象 | 获取该类的名称 |
| 继承类 | getSuperclass() | Class 对象 | 获取该类继承的类 |
| 实现接口 | getlnterfaces() | Class 型数组 | 获取该类实现的所有接口 |
| 构造方法 | getConstructors() | Constructor 型数组 | 获取所有权限为 public 的构造方法 |
| getDeclaredContruectors() | Constructor 对象 | 获取当前对象的所有构造方法 | |
| 方法 | getMethods() | Methods 型数组 | 获取所有权限为 public 的方法 |
| getDeclaredMethods() | Methods 对象 | 获取当前对象的所有方法 | |
| 成员变量 | getFields() | Field 型数组 | 获取所有权限为 public 的成员变量 |
| getDeclareFileds() | Field 对象 | 获取当前对象的所有成员变量 | |
| 内部类 | getClasses() | Class 型数组 | 获取所有权限为 public 的内部类 |
| getDeclaredClasses() | Class 型数组 | 获取所有内部类 | |
| 内部类的声明类 | getDeclaringClass() | Class 对象 | 如果该类为内部类,则返回它的成员类,否则返回 null |
public class Demo1 {
    @Test
    public void test() throws ClassNotFoundException, NoSuchMethodException {
        Class<?> aClass = Class.forName("com.eyes.base.reflection.D");

        System.out.println(aClass.getPackage());  // 包名
        System.out.println(aClass.getName());  // 类名
        System.out.println(aClass.getSuperclass());  // 父类Class
        System.out.println(Arrays.toString(aClass.getInterfaces()));  // 实现接口
        System.out.println(aClass.getDeclaredConstructor());  // 构造方法
        System.out.println(Arrays.toString(aClass.getMethods()));  // 方法
        System.out.println(Arrays.toString(aClass.getFields()));  // 成员变量
        System.out.println(Arrays.toString(aClass.getClasses()));  // 内部类
    }
}

class A{ }

interface B { }
interface C { }

class D extends A implements B, C{
    public int a;

    public void da() {}

    public int db(int a) {
        return 0;
    }

    public class E{}
}
运行结果:
package com.eyes.base.reflection
com.eyes.base.reflection.D
class com.eyes.base.reflection.A
[interface com.eyes.base.reflection.B, interface com.eyes.base.reflection.C]
com.eyes.base.reflection.D()
[public int com.eyes.base.reflection.D.db(int), public void com.eyes.base.reflection.D.da(), public final void java.lang.Object.wait() throws java.lang.InterruptedException, public final void java.lang.Object.wait(long,int) throws java.lang.InterruptedException, public final native void java.lang.Object.wait(long) throws java.lang.InterruptedException, public boolean java.lang.Object.equals(java.lang.Object), public java.lang.String java.lang.Object.toString(), public native int java.lang.Object.hashCode(), public final native java.lang.Class java.lang.Object.getClass(), public final native void java.lang.Object.notify(), public final native void java.lang.Object.notifyAll()]
[public int com.eyes.base.reflection.D.a]
[class com.eyes.base.reflection.D$E]
2.3:动态创建对象执行方法
创建类的对象:调用Class对象的newInstance()方法,使用该方法有两个要求:
- 类必须有一个无参的构造器
- 类的构造器的访问权限需要足够
看下面代码:
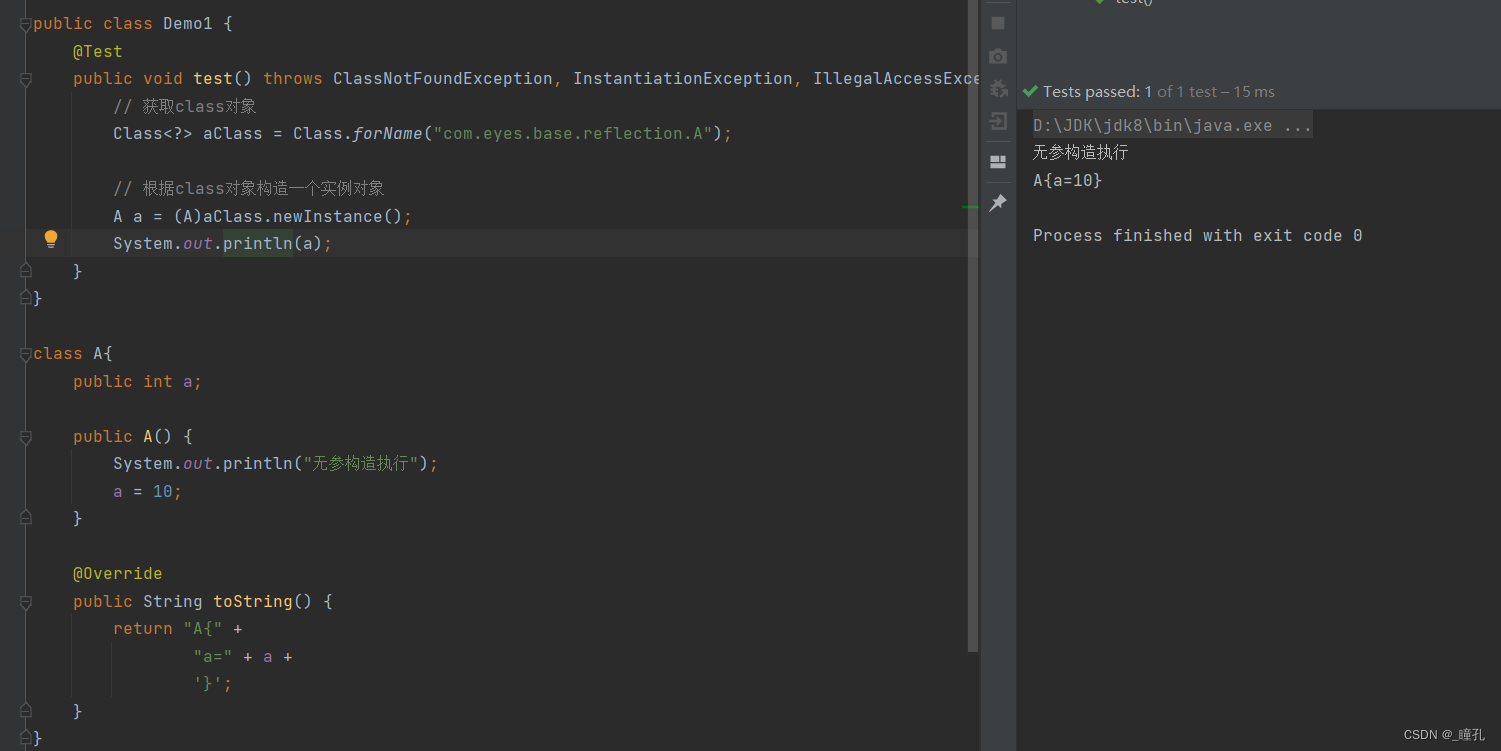
public class Demo1 {
    @Test
    public void test() throws ClassNotFoundException, InstantiationException, IllegalAccessException {
        // 获取class对象
        Class<?> aClass = Class.forName("com.eyes.base.reflection.A");

        // 根据class对象构造一个实例对象
        A a = (A)aClass.newInstance();
        System.out.println(a);
    }
}

class A{
    public int a;

    public A() {
        System.out.println("无参构造执行");
        a = 10;
    }

    @Override
    public String toString() {
        return "A{" +
                "a=" + a +
                '}';
    }
}
结果如下,可见是通过无参构造创建了实例对象
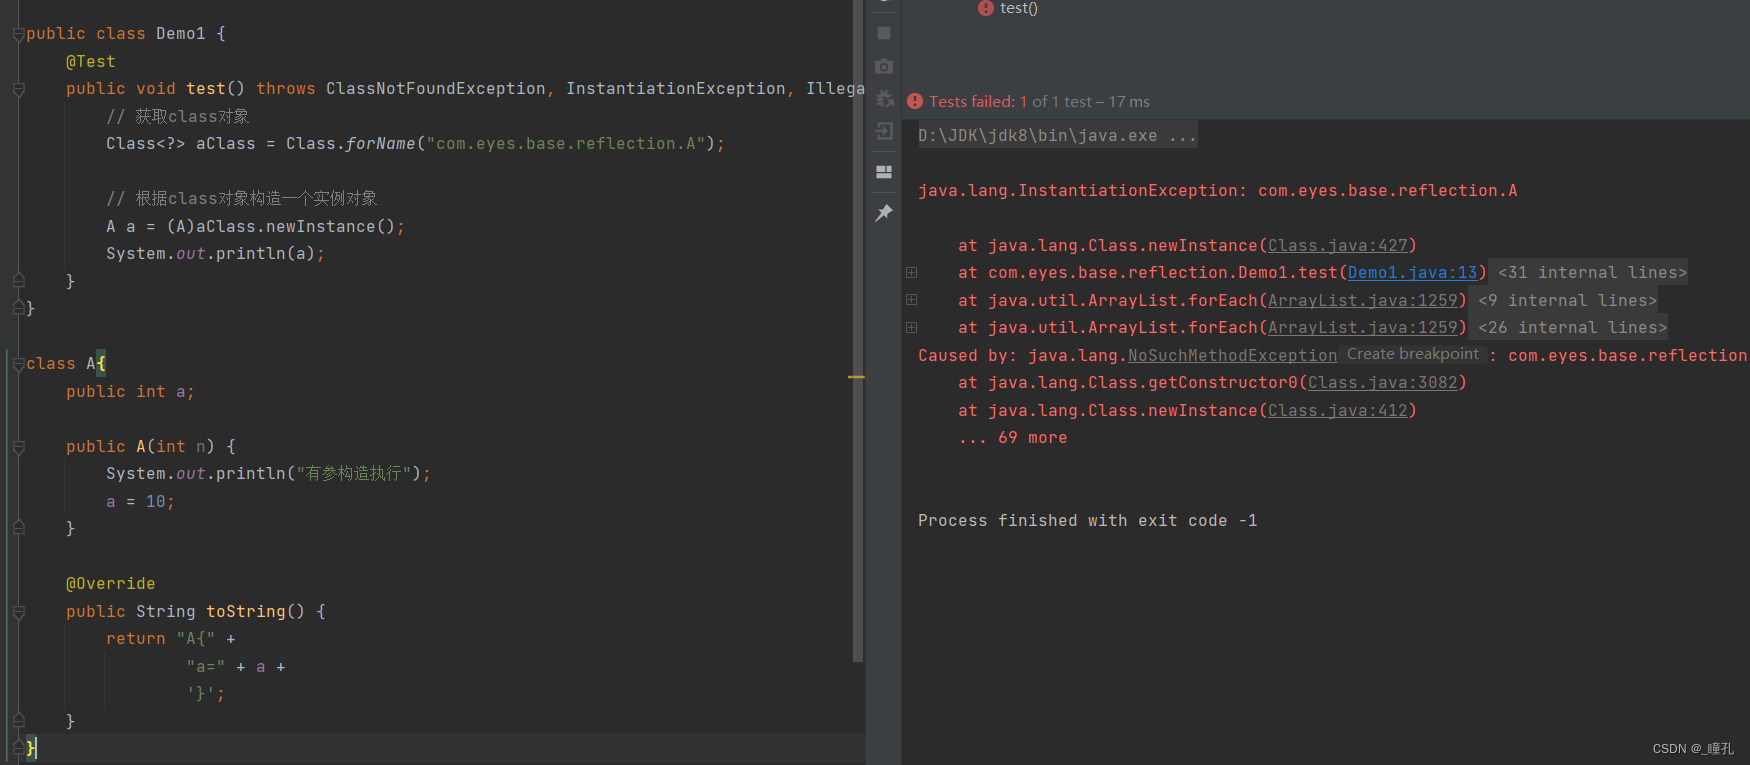
然后我们给A加一个有参构造函数,这样A就没有无参构造了,注意,如果没有给类添加构造函数时,会默认创建无参构造,当添加了有参构造时,不会默认创建无参构造,因此此时A没有无参构造:
public class Demo1 {
    @Test
    public void test() throws ClassNotFoundException, InstantiationException, IllegalAccessException {
        // 获取class对象
        Class<?> aClass = Class.forName("com.eyes.base.reflection.A");

        // 根据class对象构造一个实例对象
        A a = (A)aClass.newInstance();
        System.out.println(a);
    }
}

class A{
    public int a;

    public A(int n) {
        System.out.println("有参构造执行");
        a = 10;
    }

    @Override
    public String toString() {
        return "A{" +
                "a=" + a +
                '}';
    }
}
很明显,当没有无参构造时调用newInstance()方法创建实例对象会报错
当类没有无参构造时,可以通过其他方式创建类实例对象,比如使用getDeclaredConstructor()指定构造器来创建:
public class Demo1 {
    @Test
    public void test() throws ClassNotFoundException, NoSuchMethodException, InvocationTargetException, InstantiationException, IllegalAccessException {
        // 获取class对象
        Class<?> aClass = Class.forName("com.eyes.base.reflection.A");

        // 根据class对象构造一个实例对象
        Constructor<?> constructor = aClass.getDeclaredConstructor(int.class);
        A a = (A)constructor.newInstance(5);
        System.out.println(a);
    }
}

class A{
    public int a;

    public A(int n) {
        System.out.println("有参构造执行");
        a = n;
    }

    @Override
    public String toString() {
        return "A{" +
                "a=" + a +
                '}';
    }
}

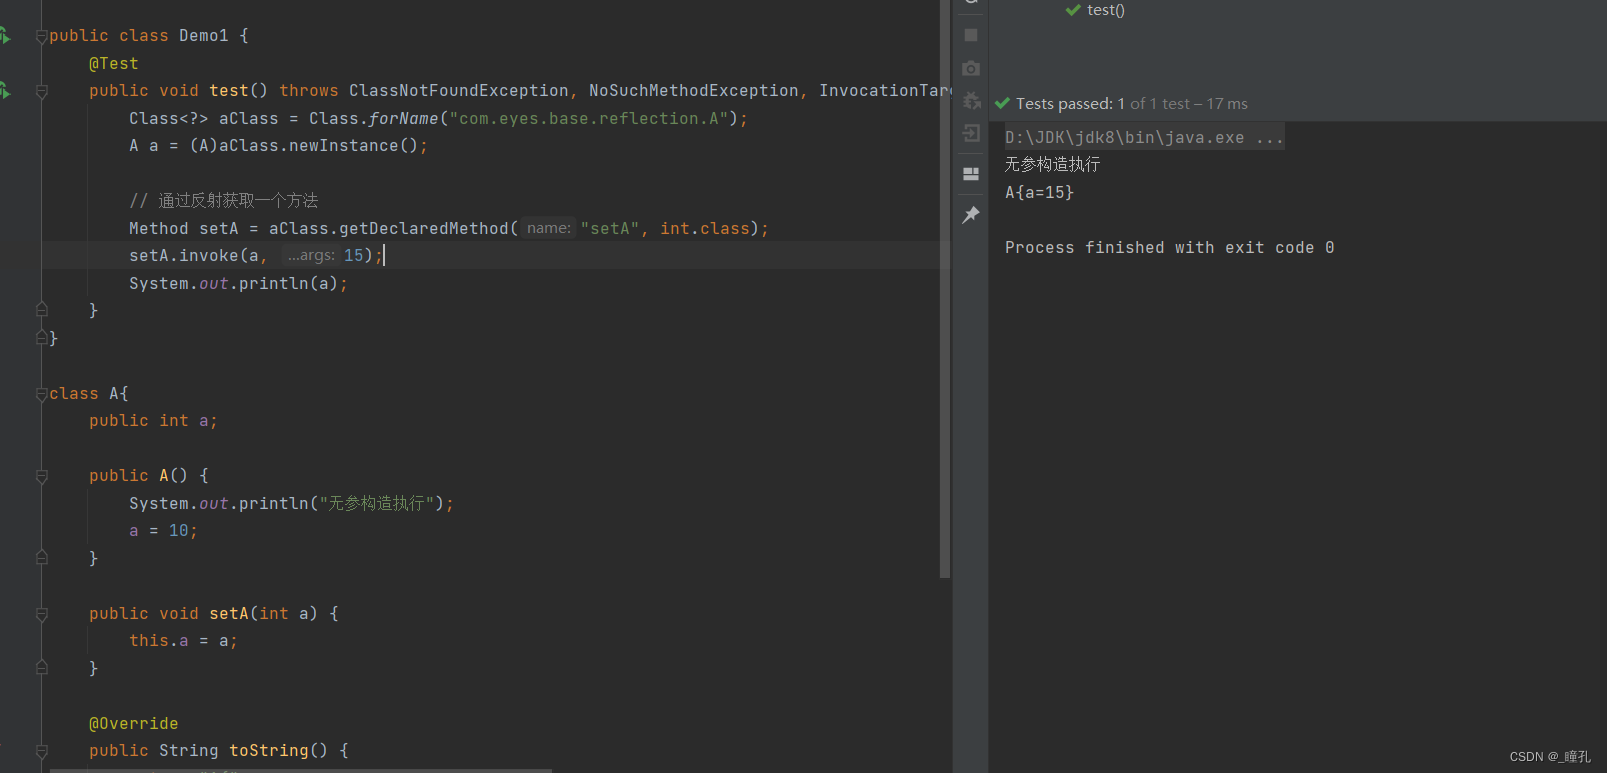
创建对象后,就可以继续通过反射调用它的方法:
public class Demo1 {
    @Test
    public void test() throws ClassNotFoundException, NoSuchMethodException, InvocationTargetException, InstantiationException, IllegalAccessException {
        Class<?> aClass = Class.forName("com.eyes.base.reflection.A");
        A a = (A)aClass.newInstance();

        // 通过反射获取一个方法
        Method setA = aClass.getDeclaredMethod("setA", int.class);
        setA.invoke(a, 15);
        System.out.println(a);
    }
}

class A{
    public int a;

    public A() {
        System.out.println("无参构造执行");
        a = 10;
    }

    public void setA(int a) {
        this.a = a;
    }

    @Override
    public String toString() {
        return "A{" +
                "a=" + a +
                '}';
    }
}
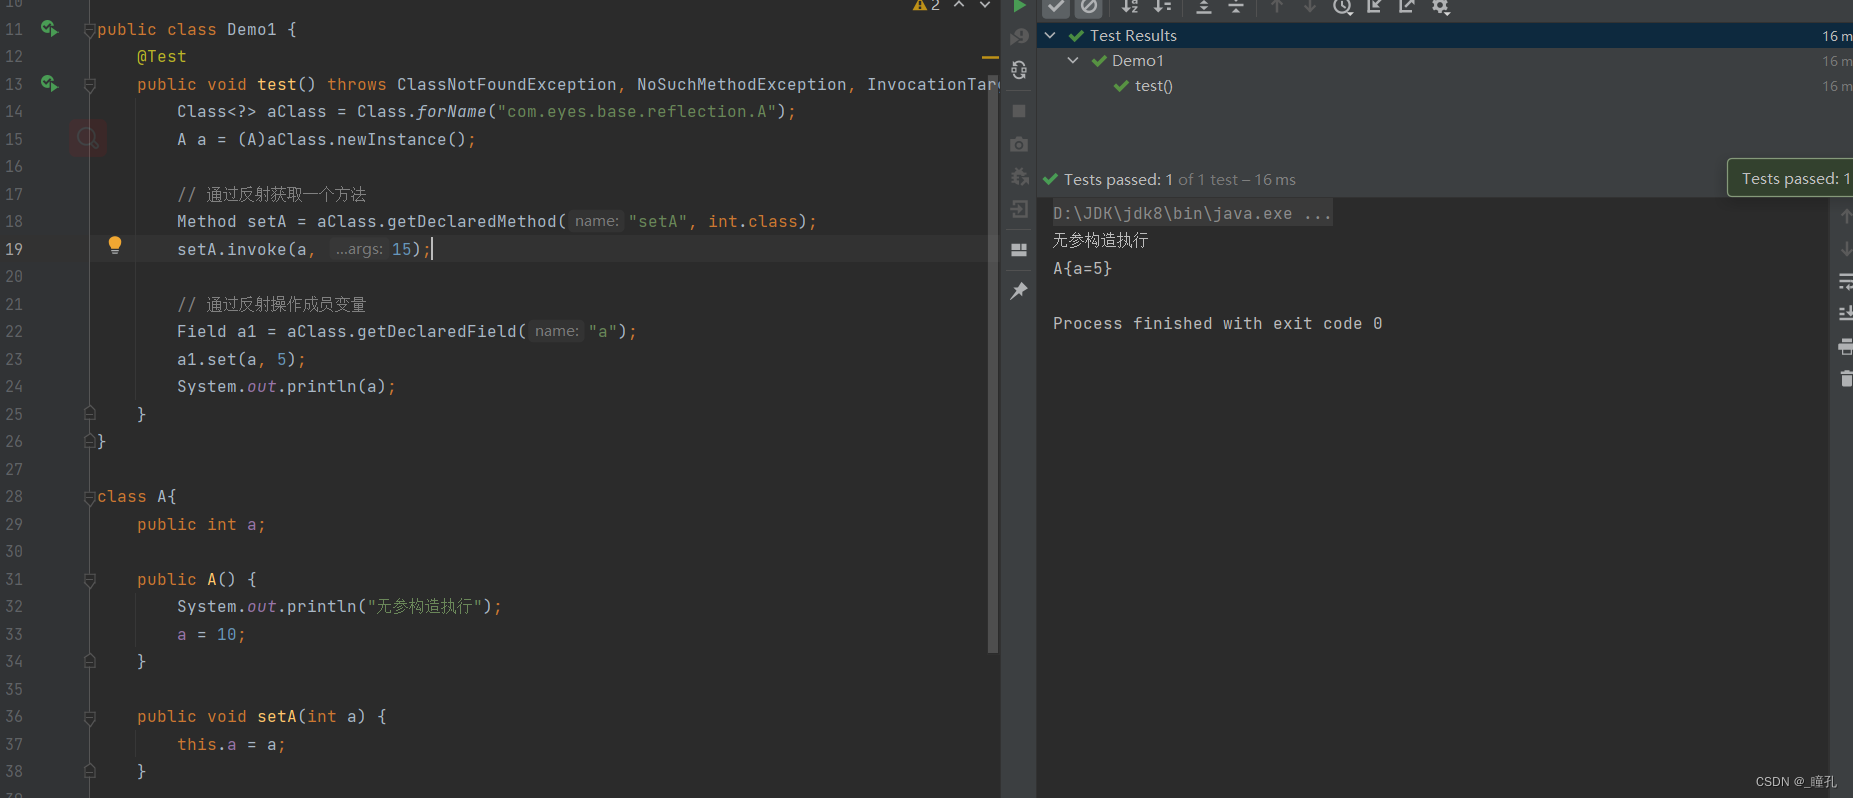
然后就是通过反射操作属性:
public class Demo1 {
    @Test
    public void test() throws ClassNotFoundException, NoSuchMethodException, InvocationTargetException, InstantiationException, IllegalAccessException, NoSuchFieldException {
        Class<?> aClass = Class.forName("com.eyes.base.reflection.A");
        A a = (A)aClass.newInstance();

        // 通过反射获取一个方法
        Method setA = aClass.getDeclaredMethod("setA", int.class);
        setA.invoke(a, 15);

        // 通过反射操作成员变量
        // getDeclaredField()只能获取public的成员变量,但是反射是可以关闭访问权限检测
        // 可以在set前加一个a1.setAccessible(true)关掉权限检测直接获取private成员
        Field a1 = aClass.getDeclaredField("a");
        a1.set(a, 5);
        System.out.println(a);
    }
}

class A{
    public int a;

    public A() {
        System.out.println("无参构造执行");
        a = 10;
    }

    public void setA(int a) {
        this.a = a;
    }

    @Override
    public String toString() {
        return "A{" +
                "a=" + a +
                '}';
    }
}
2.4:性能对比分析
public class Demo1 {
    public static void main(String[] args) throws NoSuchMethodException, InstantiationException, IllegalAccessException, InvocationTargetException {
        Demo1.test1();
        Demo1.test2();
        Demo1.test3();
    }

    // 普通方式调用
    public static void test1() {
        A a = new A();
        long startTime = System.currentTimeMillis();
        for (int i = 0; i < 10000000; i++) {
            a.getA();
        }
        long endTime = System.currentTimeMillis();
        System.out.println("普通方式用时:" + (endTime - startTime) + "ms");
    }

    // 反射方式
    public static void test2() throws NoSuchMethodException, InstantiationException, IllegalAccessException, InvocationTargetException {
        Class<A> aClass = A.class;
        A a = aClass.newInstance();
        Method getA = aClass.getDeclaredMethod("getA");

        long startTime = System.currentTimeMillis();
        for (int i = 0; i < 10000000; i++) {
            getA.invoke(a);
        }
        long endTime = System.currentTimeMillis();
        System.out.println("反射方式用时:" + (endTime - startTime) + "ms");
    }

    // 反射方式,关闭权限检查
    public static void test3() throws InstantiationException, IllegalAccessException, NoSuchMethodException, InvocationTargetException {
        Class<A> aClass = A.class;
        A a = aClass.newInstance();
        Method getA = aClass.getDeclaredMethod("getA");
        getA.setAccessible(true);

        long startTime = System.currentTimeMillis();
        for (int i = 0; i < 10000000; i++) {
            getA.invoke(a);
        }
        long endTime = System.currentTimeMillis();
        System.out.println("反射方式(关闭权限检查)用时:" + (endTime - startTime) + "ms");
    }
}

class A{
    public int a;

    public A() {
        a = 10;
    }

    public int getA() {
        return a;
    }
}
从下面结果可以看出,反射性能相对来说很慢,如果反射十分频繁,可以考虑关闭权限检测
2.5:获取泛型信息
Java采用泛型擦除的机制来引入泛型,Java中的泛型仅仅是给编译器javac使用的,确保数据的安全性和免去强制类型转换问题,但是,一旦编译完成 ,所有和泛型有关的类型全部擦除
为了通过反射操作这些类型,Java新增了ParameterizedType ,GenericArrayType,TypeVariable和WildcardType几种类型来代表不能被归一到Class类中的类型但是又和原始类型齐名的类型。
- ParameterizedType:表示一种参数化类型,比如Collection<String>
- GenericArrayType:表示一种元素类型是参数化类型或者类型变量的数组类型
- TypeVariable:是各种类型变量的公共父接口
- WildcardType:代表一种通配符类型表达式
public class Demo1 {
    public void test1(Map<String, A> map, List<A> list) {
        System.out.println("test1");
    }

    public Map<String, A> test2(){
        System.out.println("test2");
        return null;
    }

    public static void main(String[] args) throws NoSuchMethodException {
        Method test1 = Demo1.class.getMethod("test1", Map.class, List.class);
        Type[] genericParameterTypes = test1.getGenericParameterTypes();
        Type genericReturnType = test1.getGenericReturnType();
        System.out.println(Arrays.toString(genericParameterTypes));
        System.out.println(genericReturnType);

        System.out.println("---------------------------------");

        Method test2 = Demo1.class.getMethod("test2");
        Type[] genericParameterTypes2 = test2.getGenericParameterTypes();
        Type genericReturnType2 = test2.getGenericReturnType();
        System.out.println(Arrays.toString(genericParameterTypes2));
        System.out.println(genericReturnType2);

        System.out.println("---------------------------------");

        for (Type genericParameterType: genericParameterTypes) {  // 遍历所有参数类型
            System.out.println("#" + genericParameterType);
            if(genericParameterType instanceof ParameterizedType) {  // 判断是否为参数化类型
                Type[] actualTypeArguments = ((ParameterizedType) genericParameterType).getActualTypeArguments();
                for (Type actualTypeArgument: actualTypeArguments) {  // 取出真实类型
                    System.out.println(actualTypeArgument);
                }
            }
        }
    }
}

class A{}
2.6:获取注解信息
| 方法名 | 作用 |
|---|---|
| <A extends Annotation> A getAnnotation(Class<A> annotationClass) | 如果该元素存在 annotationClass 类型的注解,则返回注解,否则返回 null |
| <A extends Annotation> A getDeclaredAnnotation(Class<A> annotationClass) | 这是 Java 8 新增的方法,该方法尝试获取直接修饰该程序元素、指定类型的注解。如果该类型的注解不存在,则返回 null |
| Annotation[] getAnnotations() | 返回该元素上存在的所有注解 |
| Annotation[] getDeclaredAnnotations() | 返回直接存在于该元素的所有注解(和 getAnnotations() 的区别在于该方法将不返回继承的注释) |
| boolean isAnnotationPresent(Class<? extends Annotation> annotationClass) | 判断该元素上是否存在 annotationClass 类型的注解,如果存在则返回 true,否则返回 false。 |
| <A extends Annotation> A[] getAnnotationsByType(Class<A> annotationClass) | 该方法与前面介绍的 getAnnotation() 方法基本相似。但由于 Java 8 增加了重复注解功能,因此需要使用该方法获取该元素存在 annotationClass 类型的多个注解。 |
| <A extends Annotation> A[] getDeclaredAnnotationsByType(Class<A> annotationClass) | 该方法与前面介绍的 getDeclaredAnnotations() 方法基本相似。但由于 Java 8 增加了重复注解功能,因此需要使用该方法获取该元素存在 annotationClass 类型的多个注解。 |
public class Demo1 {
    public static void main(String[] args) throws NoSuchFieldException {
        Class<A> aClass = A.class;

        // 获取A的全部注解
        Annotation[] declaredAnnotations = aClass.getDeclaredAnnotations();
        for (Annotation annotation: declaredAnnotations) {
            System.out.println("annotation: " + annotation);
        }

        // 获取注解的value
        MyTypeAnnotation annotation = aClass.getAnnotation(MyTypeAnnotation.class);
        String value = annotation.value();
        System.out.println("value: " + value);

        // 获得类指定的注解
        Field a = aClass.getDeclaredField("a");
        MyFieldAnnotation annotation1 = a.getAnnotation(MyFieldAnnotation.class);
        System.out.println("annotation1.para1() " + annotation1.para1());
        System.out.println("annotation1.para2() " + annotation1.para2());
    }
}

@MyTypeAnnotation("hhh")
class A {
    @MyFieldAnnotation(para1 = 1, para2 = 2)
    public int a;

    @MyTypeAnnotation
    public void b(){};
}

@Target({ElementType.TYPE, ElementType.METHOD})
@Retention(RetentionPolicy.RUNTIME)
@interface MyTypeAnnotation {
    String value() default "";
}

@Target(ElementType.FIELD)
@Retention(RetentionPolicy.RUNTIME)
@interface MyFieldAnnotation {
    int para1();
    int para2();
}
如果有兴趣了解更多相关内容,欢迎来我的个人网站看看:瞳孔的个人空间


 788
788


 被折叠的 条评论
为什么被折叠?
被折叠的 条评论
为什么被折叠?
 到【灌水乐园】发言


