


题目
- 写出 LNMP 用途、工作原理,同时实战 LNMP,PHP 版本 7.2 以上,写出来详细代码;
- 使用 LNMP 发布 Discuz 论坛,实现 LNP 连接 2 台 MYSQL(8.x) 主从架构数据库。
解答
LNMP 用途
提供稳定高效的 WEB 服务,支持负载均衡、读写分离、高并发、低消耗、冗余互备、单点容错等功能。
LNMP 工作原理
- Nginx 不能直接处理 PHP 动态页面,需借助 Nginx 与 PHP-FPM 的整合。
- 当用户访问 PHP 页面时,Nginx 将请求通过 FastCGI 协议转发给 PHP-FPM 解释器。
- PHP-FPM 解释器将动态页面转换为静态页面,通过 FastCGI 协议将静态页面返回给 Nginx。
实战 LNMP
实验环境:
- Nginx 服务器:192.168.0.110; CentOS 7;
- MySQL Master: 192.168.0.111; CentOS 7;
- MySQL Slave: 192.168.0.112; CentOS 7;
1. yum 部署 nginx
环境:
- 服务器:192.168.0.110
- 版本:nginx/1.20.1
步骤:
# 安装 第三方库
$ yum -y install epel-release

# 查看当前源
$ yum repolist

# 清理缓存
$ yum clean all

# 重建缓存
$ yum makecache

# 安装 nginx
$ yum install nginx -y

# 查看版本
$ nginx -version

# 启动
$ systemctl start nginx.service

# 测试:物理机浏览器访问 192.168.0.110
# 查看页面文件
$ cat /usr/share/nginx/html/index.html
# 内容相符则暴部署成功
2. 部署 PHP
环境:
- 服务器:192.168.0.110
- 版本:
- PHP 7.2.34 (cli) (built: Oct 1 2020 13:37:37) ( NTS )
- PHP 7.2.34 (fpm-fcgi) (built: Oct 1 2020 13:40:44)
步骤:
# 下载 php rpm 包
$ rpm -ivh https://dl.fedoraproject.org/pub/epel/epel-release-latest-7.noarch.rpm

# 生成源
$ rpm -Uvh https://mirror.webtatic.com/yum/el7/webtatic-release.rpm

# 安装所需包
$ yum install php72w php72w-cli php72w-common php72w-devel php72w-embedded php72w-fpm php72w-gd php72w-mbstring php72w-mysqlnd php72w-opcache php72w-pdo php72w-xml -y

# 查看版本
$ php --version

# 启动 php-fpm
$ systemctl start php-fpm

# 查看端口
$ netstat -tnlp

# 配置整合
$ vim /etc/nginx/nginx.conf
# 在 server {} 内末尾插入内容
location ~ \.php$ {
    root           html;
    fastcgi_pass   127.0.0.1:9000;
    fastcgi_index  index.php;
    fastcgi_param  SCRIPT_FILENAME  $document_root$fastcgi_script_name;
    include        fastcgi_params;
}

# 重启 nginx
$ systemctl restart nginx.service

# 添加测试文件
vim /usr/share/nginx/html/index.php
# 插入测试内容
<?php
phpinfo();
?>

# 测试:浏览器访问 192.168.0.110/index.php
# 看到 php 信息说明成功
3. 部署 mysql
环境:
- 主库:192.168.0.111
- 从库:192.168.0.112
- 版本:mysqld Ver 8.0.31 for Linux on x86_64 (MySQL Community Server - GPL)
步骤:
-
部署 MYSQL:192.168.0.111;192.168.0.112
# 下载 rpm 包 $ wget https://dev.mysql.com/get/mysql80-community-release-el7-7.noarch.rpm # 生成源 $ rpm -ivh mysql80-community-release-el7-7.noarch.rpm # 查看源 $ ls /etc/yum.repos.d/ # 更新 GPG-KEY $ rpm --import https://repo.mysql.com/RPM-GPG-KEY-mysql-2022 # 安装 $ yum -y install mysql-community-server # 启动 $ systemctl start mysqld && systemctl status mysqld # 查看初始密码 $ grep 'password' /var/log/mysqld.log # 登录 $ mysql -p # 设置密码 > alter user 'root'@'localhost' identified by 'WahahaAyaya123!'; -
配置主从架构:
-
Master:192.168.0.111
# 编辑配置文件 $ vim /etc/my.cnf # 插入内容 [mysqld] server-id=111 log-bin=binlog-111 # 重启数据库 $ systemctl restart mysqld # 登录 $ mysql -p'WahahaAyaya123!' # 查看 master 信息 > show master status; # 创建从库连接账号 > create user 'slave'@'%' identified by 'WahahaAyaya123!'; # 给账号授权 > grant replication slave on *.* to 'slave'@'%'; -
Slave:192.168.0.112
# 编辑配置文件
$ vim /etc/my.cnf
# 插入内容
[mysqld]
server-id=112

# 重启数据库
$ systemctl restart mysqld

# 登录
$ mysql -p'WahahaAyaya123!'

# 设置同步信息
> change master to
master_host='192.168.0.111',
master_user='slave',
master_password='WahahaAyaya123!',
master_log_file='binlog-111.000001',
master_log_pos=692;

# 启动同步
> start slave;

# 查看同步状态
> show slave status\G
-
4. 部署 Discuz
环境:
- 服务器:192.168.0.110;102.168.0.111
- 版本:Discuz_X3.4_SC_UTF8
-
安装 discuz:192.168.0.110
# 上传 $ rz # 解压 $ unzip Discuz_X3.4_SC_UTF8_20220811.zip -d /usr/share/nginx/html/ # 移动文件到主目录 # \mv:遇到同名文件直接覆盖 $ cd /usr/share/nginx/html/ $ \mv upload/* ./ # 配置 $ vim /etc/nginx/nginx.conf # 添加内容 # 没有 index 字段则默认优先读取 index.html index index.php index.html; # 查看文件权限 # d:之查看目录 $ ls -ld data/ config/ # 查看 PHP-FPM 解释器 属主 # -e:查看所有进程 # -f:显示完整格式列表 $ ps -ef | grep php # 更改文件属主 $ chown -R apache.apache data/ config/ uc_client/ uc_server/ # 编辑 discuz 服务器 110 的 hosts 文件 $ vim /etc/hosts # 插入数据库域名 $ 192.168.0.111 mysql.tp404.com -
配置数据库:192.168.0.111
-- 创建用户 > create user 'bbs'@'%' identified with mysql_native_password by 'WahahaAyaya123!'; -- 授权 > grant all on discuz.* to 'bbs'@'%'; -
浏览器登录:192.168.0.110
-
根据提示进行安装:

-
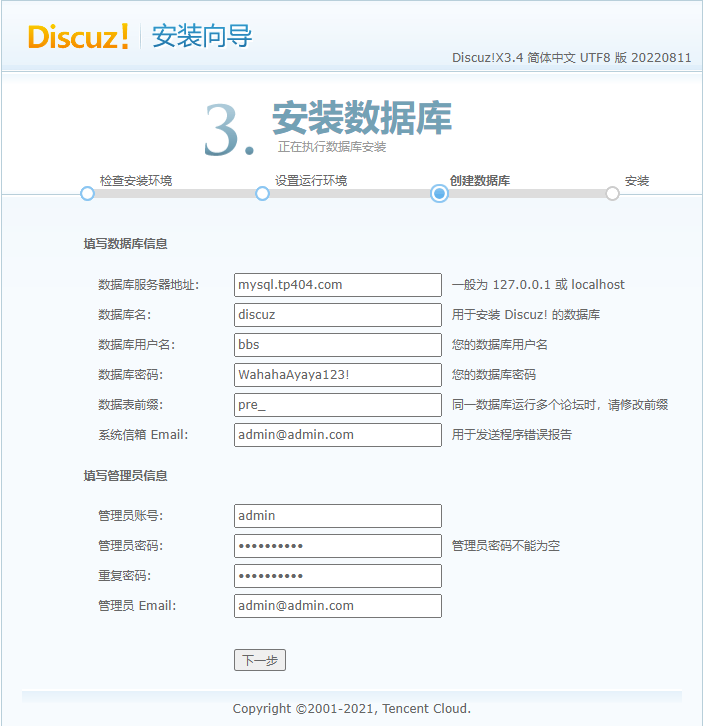
填写数据库地址,用户名等信息:
-
完成安装:
-
5. 测试
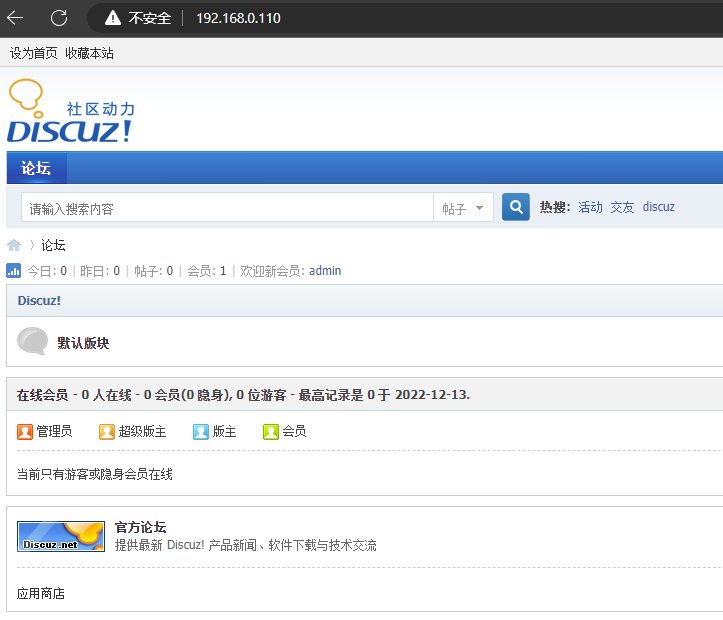
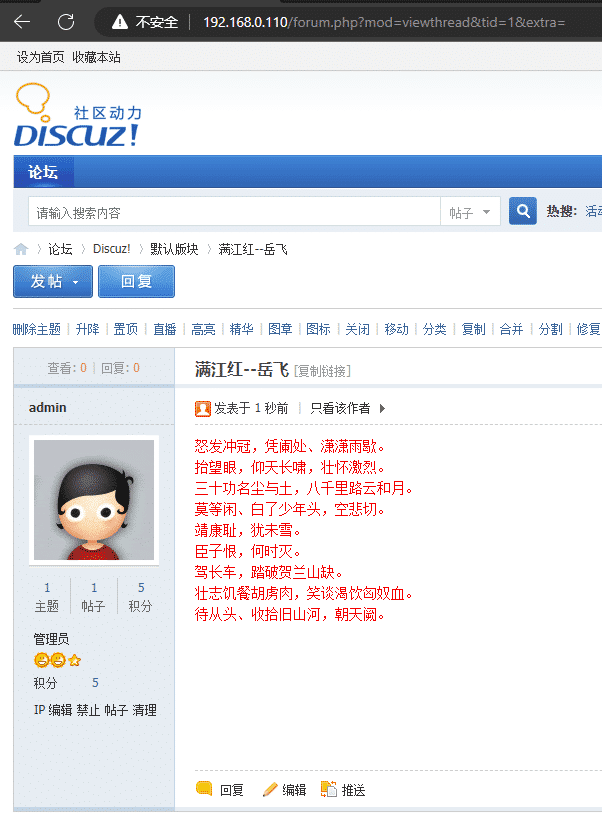
登录论坛发帖:192.168.0.110


 359
359


 被折叠的 条评论
为什么被折叠?
被折叠的 条评论
为什么被折叠?
 到【灌水乐园】发言


