


MinGW 提供了一套简单方便的Windows下的基于GCC 程序开发环境。MinGW 收集了一系列免费的Windows 使用的头文件和库文件;同时整合了GNU( http://www.gnu.org/ )的工具集,特别是GNU 程序开发工具,如经典gcc, g++, make等。MinGW是完全免费的自由软件,它在Windows平台上模拟了Linux下GCC的开发环境,为C++的跨平台开发提供了良好基础支持,为了在Windows下工作的程序员熟悉Linux下的C++工程组织提供了条件。
2. 为什么使用MinGW?
因为我和很多IT人士一样,不愿意吊死在$M这棵树上。且不说开源这个理念的伟大,仅仅就Windows的安全性也已经让人们很不安心了。如果再深入一点从编写程序来看,在C++标准尚不成熟时期产生的MFC今天看来基本上就是盖子大叔凭着个人(或许是$M公司^^)理解所使用的C++方言。在我们期盼C++0x时代到来之前,没有任何实际行动能比严格遵循C++的ISO标准更能表达我们对于C++这个伟大的哲学体系的尊重。从这个角度来说,遵循ISO标准的实现就是好的实现。所以,MinGW不会比VC差,况且,他既是开源软件家族中的一员,也是*nix平台下事实标准GCC的翻版。如果有一天我们开始使用Linux平台了,会因为今天透过MinGW所了解的GCC知识而受益。
3. MinGW 和 Cgwin的区别
4. 安装MinGW
MinGW may have problems with paths containing spaces, and if not, usually other programs used with MinGW will experience problems with such paths. Thus, we strongly recommend that you do not install MinGW in any location with spaces in the path name reference. You should avoid installing into any directory or subdirectory having names like "Program Files" or "My Documents", etc.
No version numbering convention exists for MinGW as a whole. Each package has its own version number, and the installer version number does not correlate, in any way, with the version number of any individual package which it installs.
The preferred installation target directory is C:\MinGW
The preferred installation method is using the automated installer tool. While a manual installation is possible, we do not reccommend it. Instructions are provided below if you really want to risk it.
After installation you will need to perform some additional tasks yourself to ensure your MinGW applications will run. Most importantly, you will need to make changes to your PATH environment variable. Be careful: there are two PATH variables which can be changed, and changing the wrong one can have significant consequences. Instructions for changing the correct PATH variable are provided below.
You will also need to ensure you specify the correct installation target directory to the MinGW environment. While it is possible to install MinGW to a location other than C:\MinGW (ie on a different drive), you must ensure that the MinGW environment knows where it is located. Instructions for doing this are also provided below.
Graphical User Interface Installer
An automated GUI first time installer tool called mingw-get-inst is currently the preferred method of installation.
The mingw-get-inst tool will only facilitate the initial set up of the CLI (Command Line Interface) mingw-get installer. Note that the mingw-get-inst tool is not an official GUI installer; it is intended for first time use only, to set up the CLI installer which should be used for all subsequent updates or modifications.
An official GUI installer is currently under development, but remains temporarily unpublished. For those willing to assist with the evaluation and testing of the GUI installer development snapshots, these will be made available from the developer's personal SourceForge project pages, (see below).
To use the mingw-get-inst automated first time installer tool, do the following:
- Click on this mingw-get-inst link to take you to the installation tool server directory.
- Click on the directory that has the most recent date string (yyyymmdd) in its name.
- Locate the file named "mingw-get-inst" ending in ".exe", and having the most recent date string (yyyymmdd) in its name.
- Click on that link and save the file to your local hard drive.
- Locate the file you have downloaded, and double click on it to start the installer.
- Locate the directory into which you want to install MinGW (ie C:\MinGW). Use the advice given above: that the absolute path to this directory should not contain any spaces.
- Select the option to update package catalogues to latest available. NOTE: If you attempt to use the bundled catalogues, you may install a hopelessly out-of-date system.
- Select the optional components to be installed, including the C++, Fortran, Objective-C, and Ada compilers and MSYS.
- The set up tool will download and run the mingw-get CLI installer, to install the selected component packages. NOTE: The make and GDB packages are installed automatically by the set up tool.
NOTE: The preferred installation is to always include the MSYS addon, regardless of other packages you also choose.
NOTE: In many cases, you will probably need to add the C++ compiler as well
(The MinGW release notes contain more detailed information about the configuration and use of the mingw-get-inst set up tool).
After Installing You Should
If you used the automated installation tool and installed MSYS as an addon to MinGW, you do not need to change your PATH environment variable.
If you used either of the GUI installers (the mingw-get-inst tool or the unofficial installer snapshot), and you installed the MSYS add on, they will create a start menu "MinGW Shell" shortcut in your "Start \ Programs \ MinGW" folder. Double clicking the shortcut will open a command window with the correct environment setup for you, including the correct path references, allowing you to run any of the MinGW or MSYS applications within that command window.
Regardless of how you installed MinGW or MSYS, you should check your MSYS configuration (if you have installed MSYS). You need to ensure that MSYS knows where it is located:
- Open a Windows Explorer window and locate your installation directory (ie C:\MinGW)
- Below your installation directory, you should find a directory named "msys" in lower case letters.
- Find (and open) the additional subdirectories "1.0" and "etc".
- Within the "etc" directory, there is a file named "fstab". Open it with a text editor. You should be able to do this by right clicking on it, and in the popup menu select "Open" or "Open With"
- Edit the file and ensure that it reads as follows:
<installation-directory> /mingwNOTE: Substitute <installation-directory> with the FULL and absolute path to where you installed MinGW (ie C:\MinGW). Make sure you follow the <installation-directory> entry with at least one space before typing the "/mingw" entry.
NOTE: Before you save the file, make sure there is at least one blank line at the bottom below all of the entries that may exist, then save and close the file.
Your MinGW and MSYS installations should now be ready for use.
Caveats: (exceptions)
If you ever intend to run MinGW or its applications using a cmd.exe window, you will need to make changes to your PATH environment variable. Instructions for doing so are listed in the Environment Settings section below.
5. 下载一个文本编辑器(vim)来写代码
这又是一个有着传统的“悠久”历史,很好很强大的,免费开源的,牛x文本编辑器。官方主页是:
http://www.vim.org/
不用怀疑,你可以很容易的下载Vim的安装程序,并且很容易的安装,不需要任何的“破解”-_-!!
因为Vim很好很强大,所以,太多的内容就留给包括我自己在内的大家自己去学了(我的逻辑Orz)。我们这里简单的只需要了解如下几点:
1) 建立一个名为 abc.def 的文本文件,在console窗口下输入:
vim abc.def
你就进入了vim的编辑界面。
2) 按"i"键,就可以输入文本了。退回到编辑方式,按Esc,再进入插入方式,再按i,就这样...
3) vim在编辑方式下本来的光标移动是h, j, k, l,不过,上下左右箭头也是可以使用的。
4) 编辑完成后,(编辑方式下)按Shift+Z两次,或者:wq就可以保存退出。使用:q!可以不保存强制退出。
6. MinGW的简单使用.
继续刚才的话题,我们建立一个叫 hello.cpp 的文件(据说Hello World是程序员的咒语...)
int main( )
{
std::cout << " Hello World. " << std::endl;
return 0 ;
}
我们可以简单的使用命令:g++ hello.cpp,与最传统的Unix系统下的C编译器一样,MinGW为我们生成了一个名为a的可执行文件,当然,在win32下,名字叫做a.exe。
可以使用参数 -o 来指定编译的可执行文件的名字:g++ -o hello.exe hello.cpp (或者也可以不写名exe,直接g++ -o hello hello.cpp 结果一样).这样,得到的文件就是hello.exe。
可以使用参数 -c 来生成与源文件名相同的目标文件:g++ -c hello.cpp ,得到的文件是hello.o .
目标文件可以继续连接成可执行文件:g++ hello.o ,得到文件a.exe .
多个源文件,目标文件和库文件都可以同时编译和连接.
7. 注意1
用MinGW编译出来的可执行文件在执行的时候出现

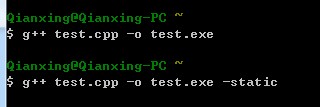
在正常编译的后面加入-static参数,exe文件的大小也从几十K变成了1M多。但是这样的话,既然拷贝你的程序到别人的机子上也是能够运行的。


 6118
6118


 被折叠的 条评论
为什么被折叠?
被折叠的 条评论
为什么被折叠?
 到【灌水乐园】发言


