


简介
Shader着色器分为BitmapShader(位图渲染);LinearGradient(线性渲染);SweepGradient(梯度渲染);RadialGradient(环形渲染);ComposeShader(组合渲染);
BitmapShader 图片渲染
BitmapShader 需要传入三个参数:
- Bitmap:构造shader使用的bitmap
- tileX:X轴方向的TileMode
- tileY:Y轴方向的TileMode
  BitmapShader bitMapShader = new BitmapShader(mBitMap, Shader.TileMode.REPEAT, Shader.TileMode.REPEAT);
  mPaint.setShader(bitMapShader);
  mPaint.setAntiAlias(true);
上面参数中的TileMode三种模式
- CLAMP,//是拉伸最后一个像素铺满
- MIRROR;//是横向纵向不足处不断翻转镜像平铺
- REPEAT,//类似电脑壁纸,横向纵向不足的重复放置


LinearGradient 线型渲染
LinearGradient参数
- x0,起始点x坐标
- y0, 起始点y坐标
- x1, 结束点x坐标
- y1, 结束点y坐标
- int[] mColors, 中间依次要出现的几个颜色
- float[] positions 位置数组,position的取值范围[0,1],作用是指定几个颜色分别放置在那个位置上,如果传null,渐变就线性变化。
- TileMode用于指定控件区域大于指定的渐变区域时,空白区域的颜色填充方式(可以见)
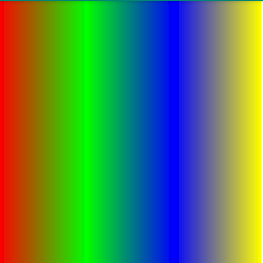
int[] mColors = {Color.RED, Color.GREEN, Color.BLUE, Color.YELLOW};
LinearGradient linearGradient = new LinearGradient(0, 0, 1000, 0, mColors, null, Shader.TileMode.MIRROR);
//float[] position = {0.1f,0.2f,0.3f,1};
//LinearGradient linearGradient = new LinearGradient(0, 0, 1000, 0, mColors, position, Shader.TileMode.MIRROR);
mPaint.setShader(linearGradient);
canvas.drawRect(0, 0, 1000, 1000, mPaint);
这里需要注意一下position的值范围是在0到1之间,需要和颜色值的个数想对应,用来控制每个颜色的位置,下面两张图,分别是没有设置position和设置了position的不同

具体功能实现可以参考:LinearGradient实现歌词滚动
RadialGradient 环形渲染
RadialGradient 参数:
- centerX ,centerY:shader的中心坐标,开始渐变的坐标
- radius:渐变的半径
- centerColor,edgeColor:中心点渐变颜色,边界的渐变颜色
- colors:渐变颜色数组
- stops:渐变位置数组,类似扫描渐变的positions数组,取值[0,1],中心点为0,半径到达位置为1.0f
- tileMode:shader未覆盖以外的填充模式
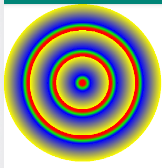
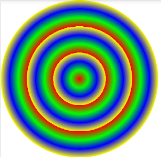
int[] mColors = {Color.RED, Color.GREEN, Color.BLUE, Color.YELLOW};
RadialGradient mRadialGradient = new RadialGradient(300, 300, 100, mColors, null, Shader.TileMode.REPEAT);
//float[] stops = {0.1f,0.2f,0.3f,1};
//RadialGradient mRadialGradient = new RadialGradient(300, 300, 300, mColors, stops, Shader.TileMode.REPEAT);
mPaint.setShader(mRadialGradient);
canvas.drawCircle(300, 300, 300, mPaint);
这里需要注意一下stops的值范围是在0到1之间,需要和颜色值的个数想对应,用来控制每个颜色的位置,下面两张图,分别是没有设置stops和设置了stops的不同
具体功能使用:SweepGradient实现雷达扫描
SweepGradient 梯度渲染
SweepGradient 参数:
- cx,cy 渐变中心坐标
- color0,color1:渐变开始结束颜色
- colors,positions:类似LinearGradient,用于多颜色渐变,positions为null时,根据颜色线性渐变
int[] mColors = {Color.RED, Color.GREEN, Color.BLUE, Color.YELLOW};
SweepGradient mSweepGradient = new SweepGradient(300, 300, mColors, null);
mPaint.setShader(mSweepGradient);
canvas.drawCircle(300, 300, 300, mPaint);
具
ComposeShader 组合渲染
ComposeShader 参数
- shaderA 第一个渲染
- shaderB 第二个渲染
- Mode AB组合渲染模式
        //创建BitmapShader,用以绘制心
        Bitmap mBitmap = ((BitmapDrawable)getResources().getDrawable(R.drawable.heart)).getBitmap();
         BitmapShader bitmapShader = new BitmapShader(mBitmap, Shader.TileMode.CLAMP, Shader.TileMode.CLAMP);
         //创建LinearGradient,用以产生从左上角到右下角的颜色渐变效果
         LinearGradient linearGradient = new LinearGradient(0, 0, mWidth, mHeight, Color.GREEN, Color.BLUE, Shader.TileMode.CLAMP);
         //bitmapShader对应目标像素,linearGradient对应源像素,像素颜色混合采用MULTIPLY模式
         ComposeShader composeShader = new ComposeShader(linearGradient, bitmapShader, PorterDuff.Mode.MULTIPLY);
//         ComposeShader composeShader2 = new ComposeShader(composeShader, linearGradient, PorterDuff.Mode.MULTIPLY);
         //将组合的composeShader作为画笔paint绘图所使用的shader
         mPaint.setShader(composeShader);
         //用composeShader绘制矩形区域
         canvas.drawRect(0, 0, mBitmap.getWidth(), mBitmap.getHeight(), mPaint);


 457
457


 被折叠的 条评论
为什么被折叠?
被折叠的 条评论
为什么被折叠?
 到【灌水乐园】发言


