


webpack 安装
bilibili:尚硅谷2022版Webpack5入门到原理(面试开发一条龙)
npm i webpack webpack-cli -D
以下
webpack:5.70.0
webpack-cli:4.9.2
npm :8.5.3
1webpack配置文件
 webpack.config.js,
1.下面是这是多入口和多出口的配置情况
const {resolve} = require('path')
module.exports = {
	/* 这是一个入口一个出口的打包情况*/
	entry:'./src/index.js',//入口文件,如果只有一个入口格式
		output:{
		filename:'build.js',//输出文件名称
		path:resolve(__dirname,'build'), //输出文件路径
		clean:true,//自动清空上次打包结果
	}, //输出文件

/*这是两个入口一个出口的情况 */
	// entry:[
	// "./src/main.js",
	// "./src/index.js"

	// ],//入口文件,如果有两个入口,这是array写法
	// 	output:{
	// 	filename:'build.js',//输出文件名称
	// 	path:resolve(__dirname,'build') //输出文件路径
	// }, //输出文件

	/*这是两个入口两个个出口的情况 */
	// entry:{
	// 	one:'./src/index.js',
	// 	two:'./src/main.js'
	// },//入口文件,有几个入口,便有几个出口
	// output:{
	// 	filename:'[name].js',//输出文件名称
	// 	path:resolve(__dirname,'build') //输出文件路径
	// }, //输出文件

 // /* 混合式用法 */
 // entry:{
 // 	onea:['./src/main.js','./src/index.js'],
 // 	twob:'./src/index.js',
 // },
	// output:{
	// 	filename:'[name].js',//输出文件名称
	// 	path:resolve(__dirname,'build') //输出文件路径
	// }, //输出文件

	 module:{
		rules:[

		]
	},//loader配置
    plugins:[
    ],//插件
	mode:'production', //development .生产模式,production,生产模式
}
2 打包html资源
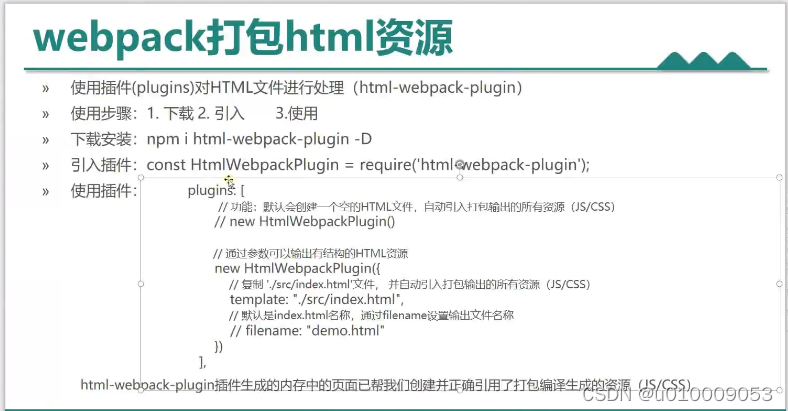 webpack.config.js
const {resolve} = require('path')
const htmlWebpackPlugin = require('html-webpack-plugin') // 引用插件
module.exports = {
	/* 这是一个入口一个出口的打包情况*/
	entry:'./src/index.js',//入口文件,如果只有一个入口格式
	output:{
		filename:'[name].js',//输出文件名称
		path:resolve(__dirname,'build') //输出文件路径
	}, //输出文件

	 module:{
		rules:[

		]
	},//loader配置
    plugins:[
    //new htmlWebpackPlugin(), //使用插件,默认创建一个空发的,目的自动引入包的资源(js/css)
    new htmlWebpackPlugin( {
    	template:'./src/index.html', //使用src中的index.html作为模板
    	filename:'demo.html', //更改文件名称
    	minify:{
    		collapseWhitespace:true ,//移除空格
    		removeComments:true, //移除注释

    	}

    }
    ),
    ],//插件
	mode:'production', //development .生产模式,production,生产模式
}
2.1 打包多个html
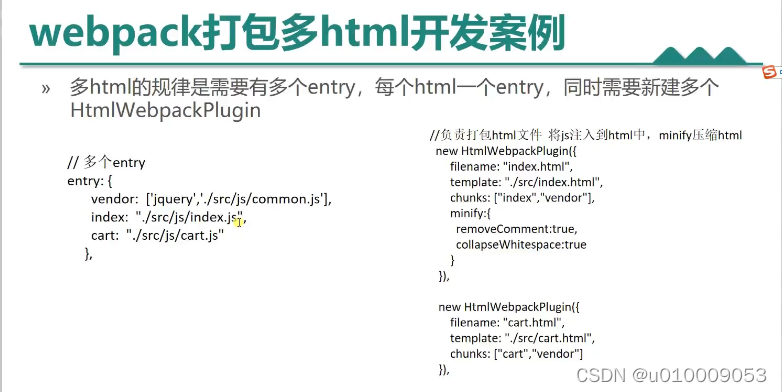 index.html文件包含index.js文件和通用js,cart.html文件包含cart.js和通用js
webpack.config.js
const {resolve} = require('path')
const htmlWebpackPlugin = require('html-webpack-plugin') // 引用插件
module.exports = {

	entry:{
		vendor:['./src/js/jquery.js','./src/js/common.js'],//两个html文件通用的js
		index:'./src/js/index.js', //index.html用到的js文件
		cart:'./src/js/cart.js' //cart.html 用到的文件
	},
	output:{
		filename:'[name].js',//输出文件名称
		path:resolve(__dirname,'build') //输出文件路径
	}, //输出文件

	 module:{
		rules:[

		]
	},//loader配置
    plugins:[
    //new htmlWebpackPlugin(), //使用插件,默认创建一个空发的,目的自动引入包的资源(js/css)
    new htmlWebpackPlugin( {
    	template:'./src/index.html', //使用src中的index.html作为模板
    	filename:'index.html', //更改文件名称
    	chunks:['index','vendor'], //
    	minify:{
    		collapseWhitespace:true ,//移除空格
    		removeComments:true, //移除注释

    	}

    }
    ),
        new htmlWebpackPlugin( {
    	template:'./src/cart.html', //使用src中的index.html作为模板
    	filename:'cart.html', //更改文件名称
    	chunks:['cart','vendor']

    }
    ),
    ],//插件
	mode:'production', //development .生产模式,production,生产模式
}
3 webpack 打包CSS资源
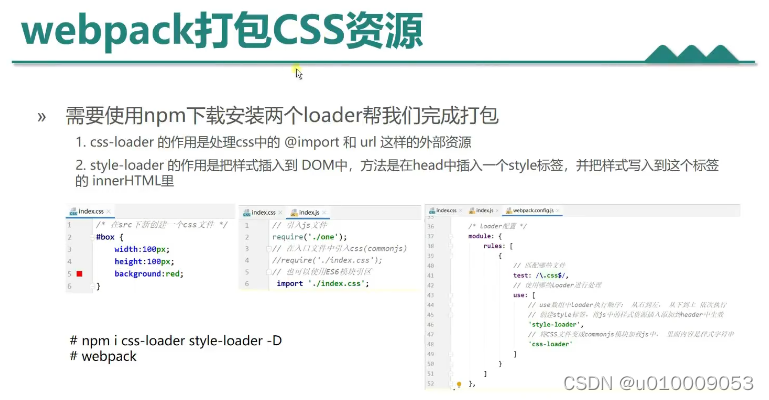 需要将css写入js文件中,
在js文件中加入require(‘./style.css’)
const {resolve} = require('path')
const htmlWebpackPlugin = require('html-webpack-plugin') // 引用插件
module.exports = {

	entry:'./src/index.js',
	output:{
		filename:'[name].js',//输出文件名称
		path:resolve(__dirname,'build') //输出文件路径
	}, //输出文件

	 module:{
		rules:[
		{
			test:/\.css$/ ,//规则,正则表达式
			use:['style-loader','css-loader'] //引入loader,注意顺序,从右到左,从上到下,两个loader用use,一个loader用loader loader:{'style-loader'}
		}
		]
	},//loader配置
    plugins:[
    //new htmlWebpackPlugin(), //使用插件,默认创建一个空发的,目的自动引入包的资源(js/css)
    new htmlWebpackPlugin( {
    	template:'./src/index.html', //使用src中的index.html作为模板
    	filename:'index.html', //更改文件名称
    }
    )
    ],//插件
	mode:'production', //development 开发模式,production,生产模式
}
4 提取CSS为外联文件
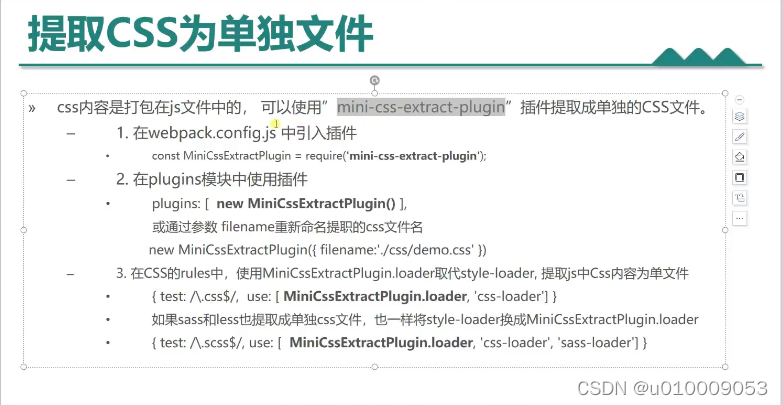 将style-loader 替换为MiniCssExtractPlugin.loader,
webpack.config.js
const {resolve} = require('path')
const htmlWebpackPlugin = require('html-webpack-plugin') // 引用插件
const MiniCssExtractPlugin = require('mini-css-extract-plugin') //引入插件,该插件用于提取CSS文件
module.exports = {

	entry:'./src/index.js',
	output:{
		filename:'[name].js',//输出文件名称
		path:resolve(__dirname,'build') //输出文件路径
	}, //输出文件

	 module:{
		rules:[
		{
			test:/\.css$/ ,//规则,正则表达式
			use:[MiniCssExtractPlugin.loader,'css-loader'] //引入loader,注意顺序,从右到左,从上到下,两个loader用use,一个loader用loader loader:{'style-loader'}
		},
		{
			test:/\.less$/ ,//规则,正则表达式
			use:[MiniCssExtractPlugin.loader,'css-loader','less-loader'] //引入loader,注意顺序,从右到左,从上到下,两个loader用use,一个loader用loader loader:{'style-loader'}
		}
		]
	},//loader配置
    plugins:[
    //new htmlWebpackPlugin(), //使用插件,默认创建一个空发的,目的自动引入包的资源(js/css)
    new htmlWebpackPlugin( {
    	template:'./src/index.html', //使用src中的index.html作为模板
    	filename:'index.html', //更改文件名称
    }
    ),
    new MiniCssExtractPlugin(),
    ],//插件
	mode:'production', //development 开发模式,production,生产模式
5 处理CSS的兼容性
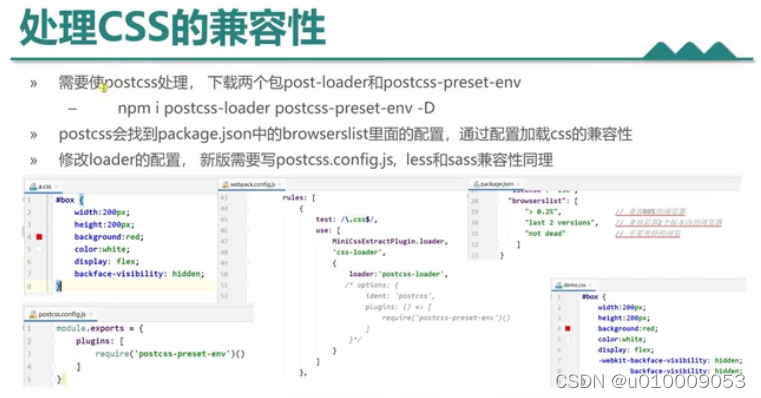 1. 新建一个浏览器兼容性的配置文件 postcss.config.js
module.exports = {
	plugins:[
	require('postcss-preset-env')()
	]
}
- 需要在package.json 文件中添加兼容的浏览器版本
 "browserslist":[
    ">0.2%",
    "last 2 versions",
    "not dead"
  ]
- webpack.config.js 添加postcss-loader
 module:{
		rules:[
		{
			test:/\.css$/ ,//规则,正则表达式
			use:[MiniCssExtractPlugin.loader,'css-loader','postcss-loader'] //引入loader,注意顺序,从右到左,从上到下,两个loader用use,一个loader用loader loader:{'style-loader'}
		},
		{
			test:/\.less$/ ,//规则,正则表达式
			use:[MiniCssExtractPlugin.loader,'css-loader','less-loader','postcss-loader'] //引入loader,注意顺序,从右到左,从上到下,两个loader用use,一个loader用loader loader:{'style-loader'}
		}
		]
	},//loader配置
6. 压缩CSS文件资源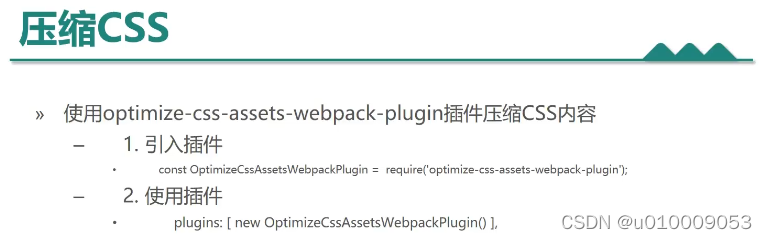
7. 打包图片资源
webpack 自带打包图片的loader,仅需要激活就可以,不需要额外的loader,type:‘asset’
webpack.config.js代码如下:
module:{
        rules:[
            {
                test:/\.css$/,
                use:[MiniCssExtractPlugin.loader,'css-loader','postcss-loader']
            },
            /*打包CSS中的图片 */
            {
                test:/\.(jpg|png)$/,
                type:"asset/resource",
                 parser:{
                    dataUrlCondition:{
                        //小于10KB的图片转成base64,优点:减少请求数量,缺点:体积会更大
                        maxSize:20*1024
                    }
                },
                generator:{
                    filename:'img/[hash:10].[ext]'
                }
            },
            /*打包html中的图片 */
            {
                test:/\.html$/,
                loader:'html-withimg-loader'
            }

        ]

    },
8.对js进行语法检查
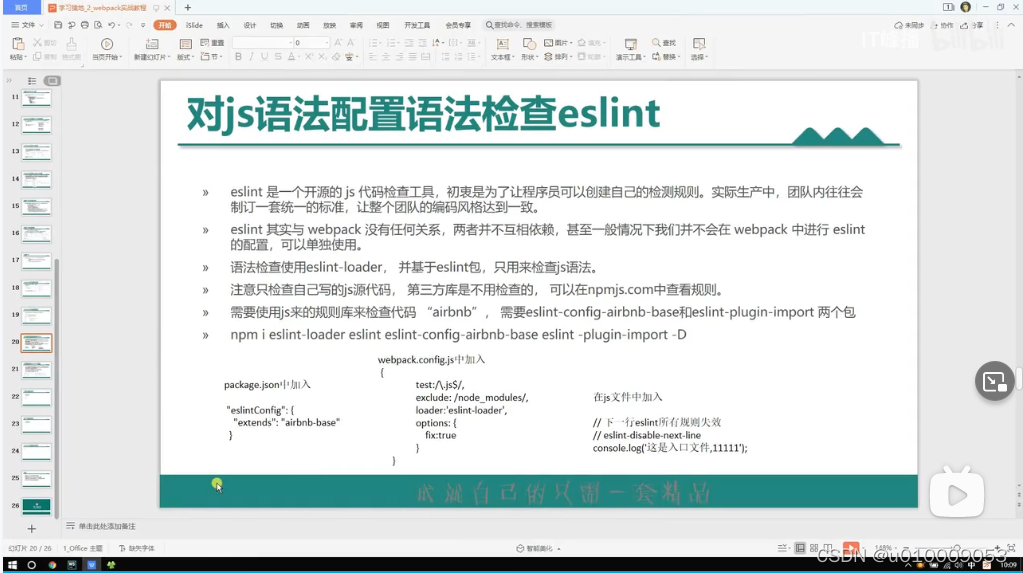
1.webpack.config.js
          /* 对js文件语法检查eslint*/
            {
                test: /\.js$/,
                //只检查自己写的代码,不检查第三方库的代码
                exclude: /node_modules/,
                loader: 'eslint-loader',
                options: {
                    fix: true
                }
            }
2.package.json
  "eslintConfig": {
    "extends": "airbnb-base"
  },
8. 开发服务器devserver配置
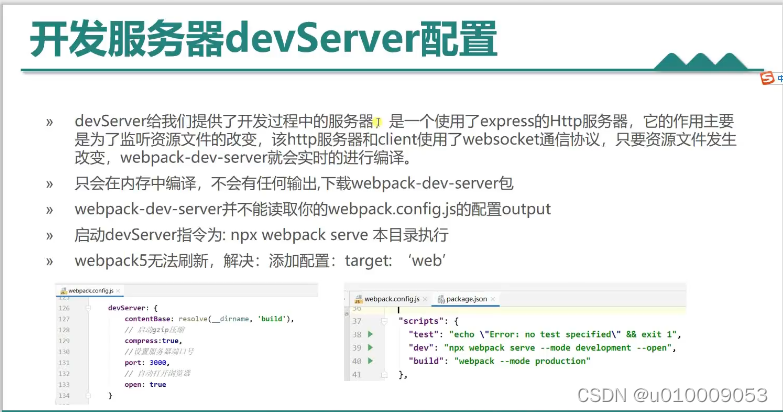 1. npm i webpack-dev-server -D
2. 启动方式
命令行式:webpack serve
在webpack.config.js 中添加target:“web”,浏览器将自动刷新与保存,
自动启动:
package.json 中添加"dev" : "webpack serve --mode development ",
webpack.config.js 中添加 devServer:{
port:3001,
compress:true,//编译
open:true,//自动打开浏览器
hot:true.//HMR开启,提高打包编译速度
}
命令行中运行:npm run dev
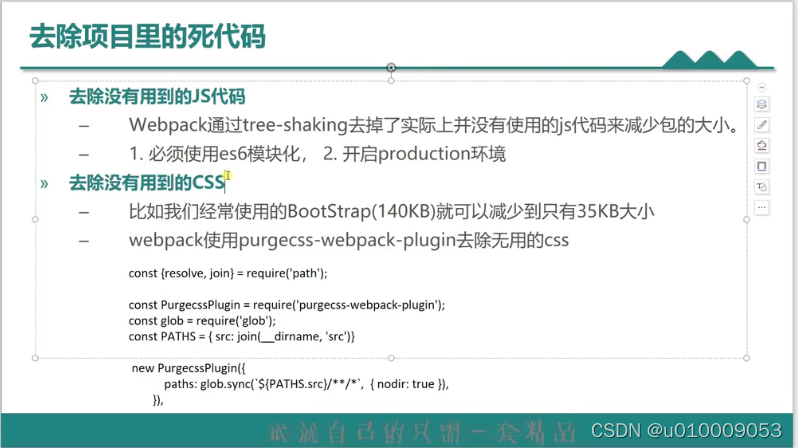
9. 去除死代码
10 . 多入口提取公共模块
webpack.config.js
module.export={
...
optimization: {
        splitChunks: {
          chunks: 'all',
        //   minSize: 20000,
        //   minRemainingSize: 0,
        //   minChunks: 1,
        //   maxAsyncRequests: 30,
        //   maxInitialRequests: 30,
        //   enforceSizeThreshold: 50000,
          cacheGroups: {
            // defaultVendors: {
            //   test: /[\\/]node_modules[\\/]/,
            //   priority: -10,
            //   reuseExistingChunk: true,
            // },
            default: {
                minSize: 0,
              minChunks: 2,
              priority: -20,
              reuseExistingChunk: true,
            },
          },
        },
    }

}


 1040
1040


 被折叠的 条评论
为什么被折叠?
被折叠的 条评论
为什么被折叠?
 到【灌水乐园】发言


