


由于网上的一些帖子比较老了,好多人评论不能用黑屏之类的。这边重新整理个最新的,亲测可用。
先大体概括下,一共就几处设置,一个脚本。
一、设置
普通渲染的项目摄像机的Clear Flags选择Solid Color,颜色为黑色(0,0,0,0)。
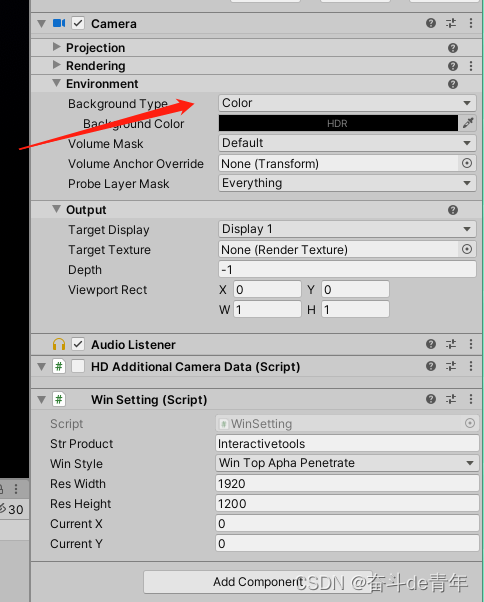
使用HDRP的项目,关闭掉摄像机上的脚本:HDAdditionalCameraData,摄像机默认的backgroundType,Sky改为Color,颜色为黑色(0,0,0,0)见下图。
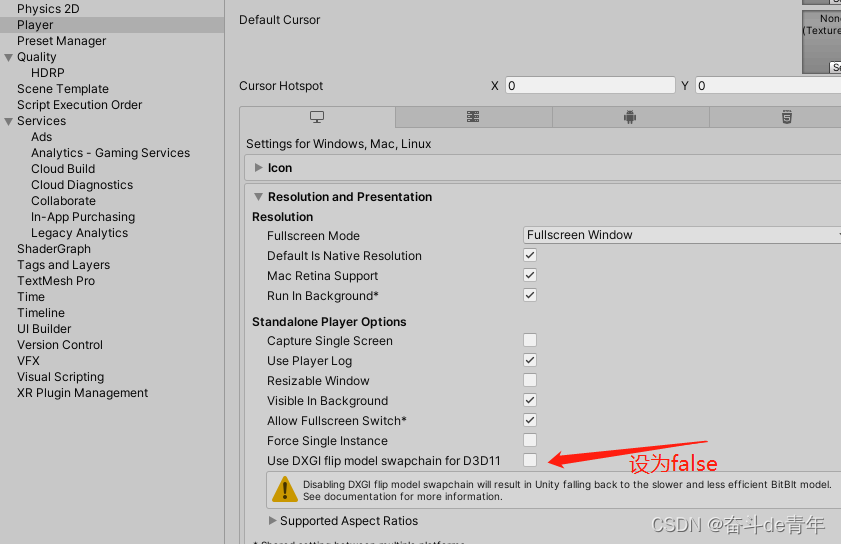
↓↓↓特别注意下图,所使用的unity版本如果没有下面的选项则不用管。
下面放上脚本:
using UnityEngine;
using System.Collections;
using System;
using System.Runtime.InteropServices;
using System.IO;

/// <summary>
/// 一共可选择三种样式
/// </summary>
public enum enumWinStyle
{
    /// <summary>
    /// 置顶
    /// </summary>
    WinTop,
    /// <summary>
    /// 置顶并且透明
    /// </summary>
    WinTopApha,
    /// <summary>
    /// 置顶透明并且可以穿透
    /// </summary>
    WinTopAphaPenetrate
}
public class WinSetting : MonoBehaviour
{

    #region Win函数常量
    private struct MARGINS
    {
        public int cxLeftWidth;
        public int cxRightWidth;
        public int cyTopHeight;
        public int cyBottomHeight;
    }

    [DllImport("user32.dll")]
    static extern IntPtr FindWindow(string lpClassName, string lpWindowName);
    [DllImport("user32.dll")]
    static extern int SetWindowLong(IntPtr hWnd, int nIndex, int dwNewLong);

    [DllImport("user32.dll")]
    static extern int GetWindowLong(IntPtr hWnd, int nIndex);

    [DllImport("user32.dll")]
    static extern int SetWindowPos(IntPtr hWnd, int hWndInsertAfter, int X, int Y, int cx, int cy, int uFlags);

    [DllImport("user32.dll")]
    static extern int SetLayeredWindowAttributes(IntPtr hwnd, int crKey, int bAlpha, int dwFlags);

    [DllImport("Dwmapi.dll")]
    static extern uint DwmExtendFrameIntoClientArea(IntPtr hWnd, ref MARGINS margins);
    [DllImport("user32.dll")]
    private static extern int SetWindowLong(IntPtr hWnd, int nIndex, uint dwNewLong);
    private const int WS_POPUP = 0x800000;
	//设定一个新的扩展风格
    private const int GWL_EXSTYLE = -20;
	// 定义窗体样式,-16表示设定一个新的窗口风格
    private const int GWL_STYLE = -16;
    private const int WS_EX_LAYERED = 0x00080000;
    private const int WS_BORDER = 0x00800000;
    private const int WS_CAPTION = 0x00C00000;
    private const int SWP_SHOWWINDOW = 0x0040;
    private const int LWA_COLORKEY = 0x00000001;
    private const int LWA_ALPHA = 0x00000002;
    private const int WS_EX_TRANSPARENT = 0x20;
    //
    private const int ULW_COLORKEY = 0x00000001;
    private const int ULW_ALPHA = 0x00000002;
    private const int ULW_OPAQUE = 0x00000004;
    private const int ULW_EX_NORESIZE = 0x00000008;
    #endregion
    //
    public string strProduct;//项目名称
    public enumWinStyle WinStyle = enumWinStyle.WinTop;//窗体样式
    //
    public int ResWidth;//窗口宽度
    public int ResHeight;//窗口高度
    //
    public int currentX;//窗口左上角坐标x
    public int currentY;//窗口左上角坐标y
    //
    private bool isApha;//是否透明
    private bool isAphaPenetrate;//是否要穿透窗体
    // Use this for initialization
    void Awake()
    {
        Screen.fullScreen = false;
#if UNITY_EDITOR
        print("编辑模式不更改窗体");
#else
        switch (WinStyle)
        {
            case enumWinStyle.WinTop:
                isApha = false;
                isAphaPenetrate = false;
                break;
            case enumWinStyle.WinTopApha:
                isApha = true;
                isAphaPenetrate = false;
                break;
            case enumWinStyle.WinTopAphaPenetrate:
                isApha = true;
                isAphaPenetrate = true;
                break;
        }
        //获得窗口句柄
        IntPtr hwnd = FindWindow(null, strProduct);
        //
        if (isApha)
        {
            //去边框并且透明
            SetWindowLong(hwnd, GWL_EXSTYLE, WS_EX_LAYERED);
			// 获得当前样式
            int intExTemp = GetWindowLong(hwnd, GWL_EXSTYLE);
            if (isAphaPenetrate)//是否透明穿透窗体
            {
                SetWindowLong(hwnd, GWL_EXSTYLE, intExTemp | WS_EX_TRANSPARENT | WS_EX_LAYERED);
            }
            //
            SetWindowLong(hwnd, GWL_STYLE, GetWindowLong(hwnd, GWL_STYLE) & ~WS_BORDER & ~WS_CAPTION); //无边框、无标题栏
            SetWindowPos(hwnd, -1, currentX, currentY, ResWidth, ResHeight, SWP_SHOWWINDOW);
            var margins = new MARGINS() { cxLeftWidth = -1 };// 边距内嵌值确定在窗口四侧扩展框架的距离 -1为没有窗口边框
            //
            DwmExtendFrameIntoClientArea(hwnd, ref margins);

			SetLayeredWindowAttributes(hwnd, 0, 255, 1);
        }
        else
        {
            //单纯去边框
            SetWindowLong(hwnd, GWL_STYLE, WS_POPUP);
            SetWindowPos(hwnd, -1, currentX, currentY, ResWidth, ResHeight, SWP_SHOWWINDOW);
        }
#endif
    }
}
随便扔到哪,我是扔到摄像机上了,说下参数填写,见下图1图2
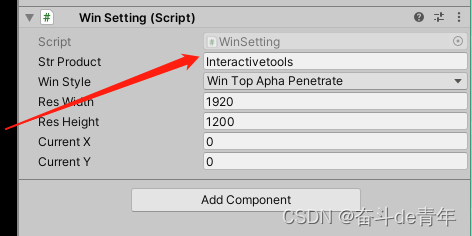
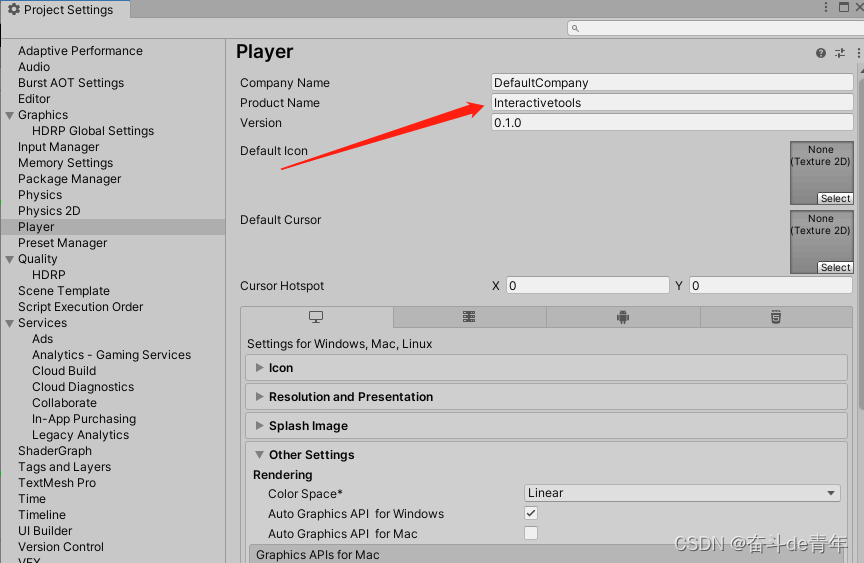
挂上脚本后,strproduct要和图2处的ProductName填写的一样,老版本的unity导出的exe名字也要一样,,新版的unity只要选择存放的文件夹,名字不用管。
下面是效果
普通的
unity 发布exe透明穿透(普通)
HDRP的
unity 发布exe透明穿透(HDRP)


 1382
1382

 被折叠的 条评论
为什么被折叠?
被折叠的 条评论
为什么被折叠?
 到【灌水乐园】发言


