


编译linux内核
新的内核修订了旧内核的bug,并增加了许多新的特性;如果用户想要使用这些新特性,或想根据自己的系统度身定制一个更高效,更稳定的内核,就需要重新编译Linux内核。通常,更新的内核会支持更多的硬件,具备更好的进程管理能力,运行速度更快、 更稳定,并且一般会修复老版本中发现的许多漏洞等,经常性地选择升级更新的系统内核是Linux使用者的必要操作内容。
1. 准备工作
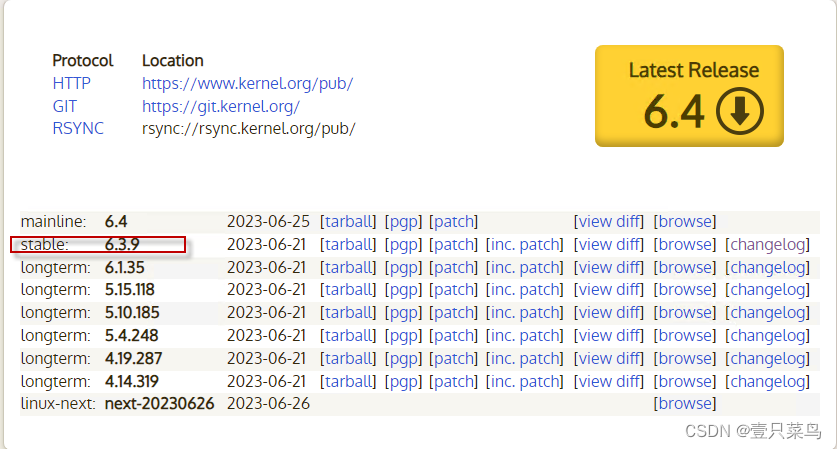
1.1 下载内核文件
进入官网,我这里选择 stable: 6.3.9
下载后,上传到linux服务器
也可以通过wget下载
wget https://mirrors.edge.kernel.org/pub/linux/kernel/v5.x/linux-5.10.7.tar.xz
解压到/usr/src/kernels目录中
[root@node-252 yurq]# tar -Jxvf linux-6.3.9.tar.xz -C /usr/src/kernels/
[root@node-252 yurq]# ll /usr/src/kernels/
total 4
drwxrwxr-x 26 root root 4096 Jun 21 22:02 linux-6.3.9
1.2 环境准备
安装好依赖库
yum install -y elfutils-libelf.x86_64 elfutils-libelf-devel.x86_64 kernel-devel kernel-header openssl-devel
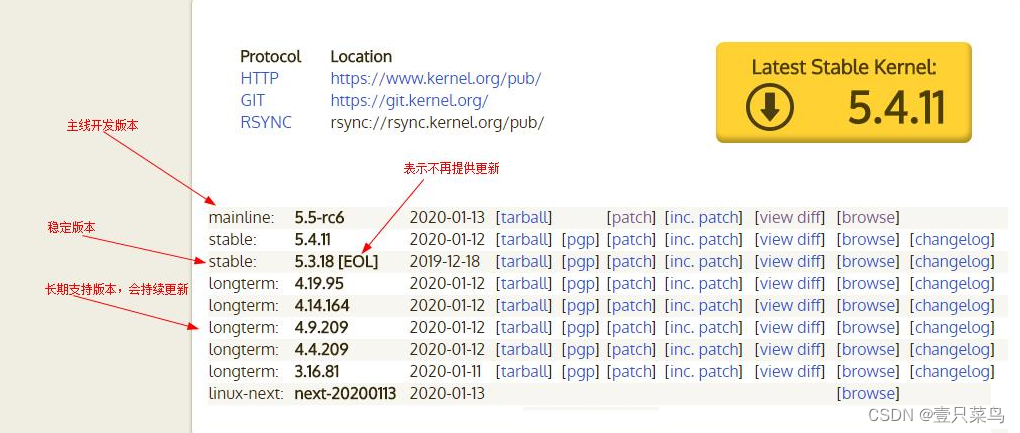
1.3 内核命名规则
[root@node-253 linux-6.3.9]# uname -a
Linux node-253 3.10.0-1160.88.1.el7.x86_64 #1 SMP Tue Mar 7 15:41:52 UTC 2023 x86_64 x86_64 x86_64 GNU/Linux
Linux内核命名格式为"R.X.Y-Z",以上为例(3.10.0-1160.88.1):
- 1)数字R表示内核版本号:3
- 2)数字X表示内核主版本号:10
- 3)数字Y表示内核次版本号:0
- 4)数字Z表示内核小版本号:1160.88.1
1.4 内核镜像
| 镜像类型 | 镜像说明 |
|---|---|
| vmlinux | 编译后形成镜像文件 |
| zImage(vmlinuz) | 在vmlinux的基础上使用gzip进行压缩所形成的小内核(不超过512KB) |
| bzImage(vmlinuz) | 全称为bigzImage,同zImage一样原理,只是比zImage镜像大 |
| uImage(vmlinuz) | 为uBoot专用镜像,在zImage基础上再加上一个头形成uImage 作者:补给站Linux内核 |
vmlinuz是对vmlinux进行了相应压缩的内核镜像,而zImage,bzImage和uImage统称为vmlinuz。
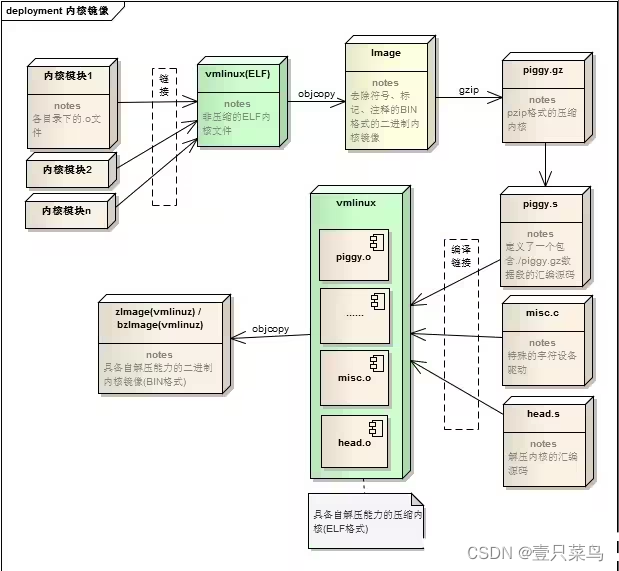
- zImage实际上就是将vmlinux使用gzip进行压缩,并在压缩之后的镜像前加个头,头里包括一段gzip解压缩代码,用于启动时自解压。
- bzImage和zImage相同,不同的就是zImage会将内核解压到一个低端地址(内存中第一个640KB),而bzImage将内核解压到一个高端地址(大于1M)。
- uImage是uBoot专用的镜像文件,它是在zImage的基础上使用mkimage工具生成,其结果是在zImage上加个0x40 bytes的头,其包括:内核版本,创建时间,类型等
1.4 ELF
Linux ELF是计算机程序。ELF = Executable and Linkable Format,
可执行连接格式,是UNIX系统实验室(USL)作为应用程序二进制接口(Application Binary Interface,ABI)而开发和发布的。扩展名为elf。
三种类型的ELF文件:
- i.可重定位文件:用户和其他目标文件一起创建可执行文件或者共享目标文件,例如lib*.a文件。
- ii.可执行文件:用于生成进程映像,载入内存执行,例如编译好的可执行文件a.out。
- iii.共享目标文件:用于和其他共享目标文件或者可重定位文件一起生成elf目标文件或者和执行文件一起创建进程映像,例如lib*.so文件。
ELF文件作用
ELF文件参与程序的连接(建立一个程序)和程序的执行(运行一个程序),所以可以从不同的角度来看待ELF格式的文件:
- i. 如果用于编译和链接(可重定位文件),则编译器和链接器将把ELF文件看作是节头表描述的节的集合,程序头表可选。
- ii. 如果用于加载执行(可执行文件),则加载器则将把ELF文件看作是程序头表描述的段的集合,一个段可能包含多个节,节头表可选。
- iii. 如果是共享文件,则两者都含有。
2. 编译内核
用make menuconfig命令来选择要编译的模块
[root@node-252 linux-6.3.9]# make menuconfig
  HOSTCC  scripts/basic/fixdep
  HOSTCC  scripts/kconfig/mconf.o
  HOSTCC  scripts/kconfig/lxdialog/checklist.o
  HOSTCC  scripts/kconfig/lxdialog/inputbox.o
  HOSTCC  scripts/kconfig/lxdialog/menubox.o
  HOSTCC  scripts/kconfig/lxdialog/textbox.o
  HOSTCC  scripts/kconfig/lxdialog/util.o
  HOSTCC  scripts/kconfig/lxdialog/yesno.o
  HOSTCC  scripts/kconfig/confdata.o
  HOSTCC  scripts/kconfig/expr.o
  LEX     scripts/kconfig/lexer.lex.c
  YACC    scripts/kconfig/parser.tab.[ch]
  HOSTCC  scripts/kconfig/lexer.lex.o
  HOSTCC  scripts/kconfig/menu.o
  HOSTCC  scripts/kconfig/parser.tab.o
  HOSTCC  scripts/kconfig/preprocess.o
  HOSTCC  scripts/kconfig/symbol.o
  HOSTCC  scripts/kconfig/util.o
  HOSTLD  scripts/kconfig/mconf
***
*** C compiler is too old.
***   Your GCC version:    4.8.5
***   Minimum GCC version: 5.1.0
***
scripts/Kconfig.include:44: Sorry, this C compiler is not supported.
make[2]: *** [menuconfig] Error 1
make[1]: *** [menuconfig] Error 2
make: *** [__sub-make] Error 2
这里提示我们的gcc版本过低了,所以我们需要升级下gcc
2.1 升级gcc
去官网下一个新版的gcc ,由于要求5.1.0以上版本即可,笔者选择5.5.0版本下载
- 下载完成后上传到服务器,解压到/usr/local/
tar -zvxf gcc-5.5.0.tar.gz --directory=/usr/local/
解压之后可以在/usr/local目录下面看到解压后的gcc-5.5.0目录
- 查看gcc需要的依赖
进入到gcc-5.5.0目录下面,查看需要的依赖:
vim contrib/download_prerequisites
...
# Necessary to build GCC.
MPFR=mpfr-2.4.2
GMP=gmp-4.3.2
MPC=mpc-0.8.1
...
解压依赖文件到/usr/local/gcc-5.5.0/
tar -zxvf mpc-0.8.1.tar.gz --directory=/usr/local/gcc-5.5.0/
tar -jxvf mpfr-2.4.2.tar.bz2 --directory=/usr/local/gcc-5.5.0/
tar -jxvf gmp-4.3.2.tar.bz2 --directory=/usr/local/gcc-5.5.0/
- 建立软链接
cd /usr/local/gcc-5.5.0/
ln -sf gmp-4.3.2 gmp
ln -sf mpc-0.8.1 mpc
ln -sf mpfr-2.4.2 mpfr
- 编译准备
在目录gcc-5.5.0下面依次执行下面两个命令:
mkdir build && cd build
../configure -enable-checking=release -enable-languages=c,c++ -disable-multilib
- 编译并安装gcc
在build目录下面执行的命令,编译安装gcc:
make && make install
这一步需要时间非常久,有条件的可以使用
make -j4让make最多运行四个编译命令同时运行,加快编译速度(建议不要超过CPU核心数量的2倍)
- 升级过程中报错
make[3]: *** [s-attrtab] Killed
make[3]: Leaving directory `/usr/local/gcc-5.5.0/build/gcc'
make[2]: *** [all-stage1-gcc] Error 2
make[2]: Leaving directory `/usr/local/gcc-5.5.0/build'
make[1]: *** [stage1-bubble] Error 2
make[1]: Leaving directory `/usr/local/gcc-5.5.0/build'
make: *** [all] Error 2
网友说是因为内存不足导致的,增加交换内存可以解决,笔者这里之前部署别的软件,把交换内存关了,这里将交换内存打开
[test@node-252 gcc-5.5.0]$ cat /etc/fstab
...
/dev/mapper/centos-swap swap                    swap    defaults        0 0
[test@node-252 gcc-5.5.0]$ swapon /dev/mapper/centos-swap
[test@node-252 gcc-5.5.0]$ free
              total        used        free      shared  buff/cache   available
Mem:         995464      208668      528192         564      258604      647104
Swap:       2097148      163840     1933308
重新编译和安装,这是一个漫长的过程
-=================================
由于笔者是在虚拟机进行升级gcc,等待了大概1个小时左右
-=================================
- 更新gcc
上面的过程执行完,如果你在linux命令行中输入:gcc -version,你会发现显示的还是原来的版本,这是因为gcc还没有更新,执行的还是原来的gcc命令。
原来的gcc命令位于目录/usr/bin/gcc等目录下面,为了不覆盖原来的命令。将原来的相关内容进行备份处理,执行如下命令
mv /usr/bin/gcc /usr/bin/gcc485
mv /usr/bin/g++ /usr/bin/g++485
mv /usr/bin/c++ /usr/bin/c++485
mv /usr/bin/cc /usr/bin/cc485
mv /usr/lib64/libstdc++.so.6 /usr/lib64/libstdc++.so.6.bak
安装的gcc新版本位于/usr/local/bin目录下面,需要为新版本gcc创建软链接
ln -s /usr/local/bin/gcc /usr/bin/gcc
ln -s /usr/local/bin/g++ /usr/bin/g++
ln -s /usr/local/bin/c++ /usr/bin/c++
ln -s /usr/local/bin/gcc /usr/bin/cc
ln -s /usr/local/lib64/libstdc++.so.6.0.28 /usr/lib64/libstdc++.so.6
- 查看版本
[root@node-252 build]# gcc -v
Using built-in specs.
COLLECT_GCC=gcc
COLLECT_LTO_WRAPPER=/usr/local/libexec/gcc/x86_64-unknown-linux-gnu/5.5.0/lto-wrapper
Target: x86_64-unknown-linux-gnu
Configured with: ../configure -enable-checking=release -enable-languages=c,c++ -disable-multilib
Thread model: posix
gcc version 5.5.0 (GCC)
2.2 make menuconfig其他报错
重新编译内核需要选择模块
cd /usr/src/kernels/linux-6.3.9/
make menuconfig
除了gcc版本过低之外,还可能会出现以下报错
报错1:
* Unable to find the ncurses package.
* Install ncurses (ncurses-devel or libncurses-dev
* depending on your distribution).
*
* You may also need to install pkg-config to find the
* ncurses installed in a non-default location.
*
make[2]: *** [scripts/kconfig/mconf-libs] Error 1
make[1]: *** [menuconfig] Error 2
make: *** [__sub-make] Error 2
解决:
yum install ncurses-devel.i686
报错2:
[root@node-253 linux-6.3.9]# make menuconfig
  HOSTCC  scripts/kconfig/mconf.o
  HOSTCC  scripts/kconfig/lxdialog/checklist.o
  HOSTCC  scripts/kconfig/lxdialog/inputbox.o
  HOSTCC  scripts/kconfig/lxdialog/menubox.o
  HOSTCC  scripts/kconfig/lxdialog/textbox.o
  HOSTCC  scripts/kconfig/lxdialog/util.o
  HOSTCC  scripts/kconfig/lxdialog/yesno.o
  HOSTCC  scripts/kconfig/confdata.o
  HOSTCC  scripts/kconfig/expr.o
  LEX     scripts/kconfig/lexer.lex.c
/bin/sh: flex: command not found
make[2]: *** [scripts/kconfig/lexer.lex.c] Error 127
make[1]: *** [menuconfig] Error 2
make: *** [__sub-make] Error 2
解决:
yum install -y flex bison
报错3:
[root@node-253 linux-6.3.9]# make menuconfig
  HOSTLD  scripts/kconfig/mconf
/usr/bin/ld: skipping incompatible //lib/libtinfo.so when searching for -ltinfo
/usr/bin/ld: skipping incompatible //usr/lib/libtinfo.so when searching for -ltinfo
/usr/bin/ld: cannot find -ltinfo
collect2: error: ld returned 1 exit status
make[2]: *** [scripts/kconfig/mconf] Error 1
make[1]: *** [menuconfig] Error 2
make: *** [__sub-make] Error 2
解决:
一般出现这种情况有两个原因:
一. 找不到libtinfo.so文件
1. 先看看有没有这个文件

在根目录中,注意,在根目录中,使用如下命令查找是否有这个文件:

find -name *libcurl.so*
如果有,cp命令把它复制到/usr/lib里面去。

cp /usr/lib64/libcurl.so.4 /usr/lib
最后建立一个软链接:

ln -s libcurl.so.4 libcurl.so
好了,现在就没问题了。

2. 如果find命令找不到这个.so文件,说明这个文件可能真的不存在,重装,或者去网上下一个,放进/usr/lib里面,再建立软链接。
二. 有这个库文件,但是库文件的版本不对(这里指的是库文件的系统位数和系统不匹配)
查看系统位数
[root@node-253 linux-6.3.9]# getconf LONG_BIT
64
查看库文件
[root@node-253 lib]# readelf -h libtinfo.so.5.9
ELF Header:
  Magic:   7f 45 4c 46 01 01 01 00 00 00 00 00 00 00 00 00
  Class:                             ELF32
  Data:                              2's complement, little endian
  Version:                           1 (current)
  OS/ABI:                            UNIX - System V
  ABI Version:                       0
  Type:                              DYN (Shared object file)
  Machine:                           Intel 80386
  Version:                           0x1
  Entry point address:               0x5eb0
  Start of program headers:          52 (bytes into file)
  Start of section headers:          135192 (bytes into file)
  Flags:                             0x0
  Size of this header:               52 (bytes)
  Size of program headers:           32 (bytes)
  Number of program headers:         7
  Size of section headers:           40 (bytes)
  Number of section headers:         28
  Section header string table index: 27
找到系统位数匹配的库文件
[root@node-253 lib]# cd /lib64
[root@node-253 lib64]# readelf -h libtinfo.so.5.9
ELF Header:
  Magic:   7f 45 4c 46 02 01 01 00 00 00 00 00 00 00 00 00
  Class:                             ELF64
  Data:                              2's complement, little endian
  Version:                           1 (current)
  OS/ABI:                            UNIX - System V
  ABI Version:                       0
  Type:                              DYN (Shared object file)
  Machine:                           Advanced Micro Devices X86-64
  Version:                           0x1
  Entry point address:               0xce40
  Start of program headers:          64 (bytes into file)
  Start of section headers:          172784 (bytes into file)
  Flags:                             0x0
  Size of this header:               64 (bytes)
  Size of program headers:           56 (bytes)
  Number of program headers:         7
  Size of section headers:           64 (bytes)
  Number of section headers:         28
  Section header string table index: 27
剩下的就是把库文件替换了
[root@node-253 lib64]# cp libtinfo.so.5.9 /usr/lib/
如果找不到则需要重新编译该库文件或者下载
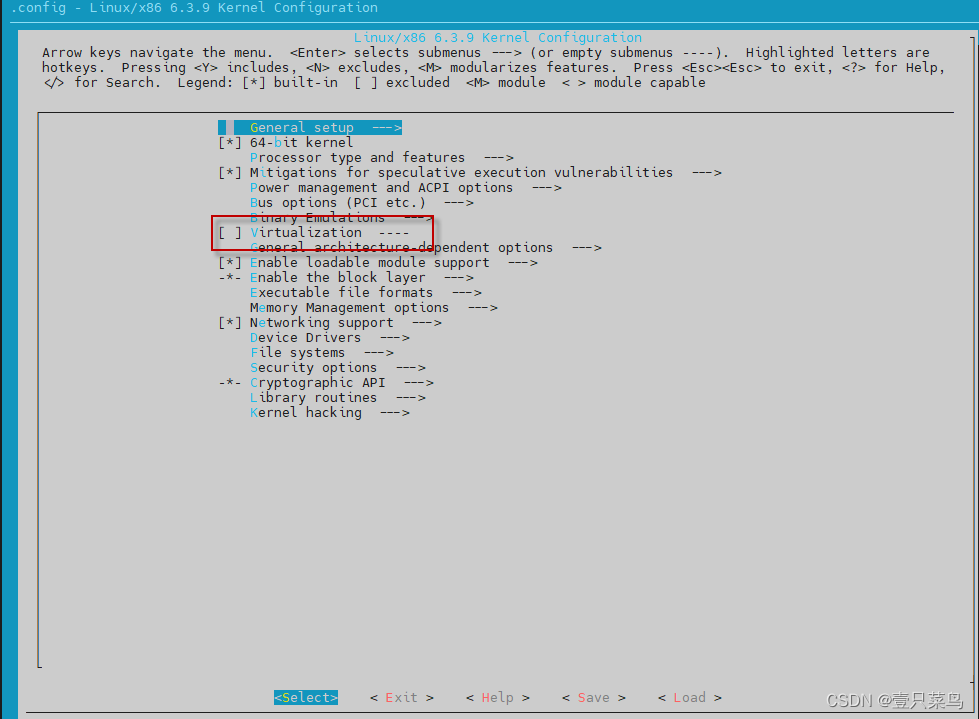
2.3 配置选项
进入内核图形化配置界面,在这里我们可以选择和配置模块

菜单选项中的行首括号代表的含义如下:
| 符号 | 说明 |
|---|---|
| [ ] | 表示可以内置或者移除 |
| <> | 表示可以内置,模块化或者移除 |
| { } | 表示内置或模块化(根据其他功能选择) |
- - | 根据其他功能选择 |
但括号中为*,M或者空白时表示内置,以模块编译或者单独的执行该功能。如要改变这些功能选项,则可以将光标移动到对应选项上进行高亮选中,然后按
<Y>来内置,<M>模块化功能,或<N>来移除。也可以通过按空格键来循环可选项(ie. Y->N->M->Y)
配置选项列表
| 可选 | 选项 | 说明 |
|---|---|---|
| General setup —> | 常规设置 | |
| [*] | Enable loadable module support —> | 允许模块加载支持 |
| [*] | Enable the block layer —> | 允许块设备支持 |
| Processor type and features —> | 处理器类型和功能 | |
| Power management and ACPI options —> | 电源管理和ACPI选项 | |
| Bus options (PCI etc.) —> | 总线选项(PCI等) | |
| Executable file formats / Emulations —> | 可执行文件格式/仿真 | |
| -*- | Networking support —> | 网络支持 |
| Device Drivers —> | 设备驱动 | |
| Firmware Drivers —> | 固件驱动 | |
| File systems —> | 文件系统 | |
| Kernel hacking —> | 内核监视 | |
| Security options —> | 安全选项 | |
| -*- | Cryptographic API —> | 密码API |
| [*] | Virtualization —> | 虚拟化 |
| Library routines —> | 程序库程序 | |
| Load an Alternate Configuration File | 加载备用配置文件 | |
| Save an Alternate Configuration File | 保存备用配置文件 |
配置选项说明
-
General setup:
与Linux 最相关的程序互动、核心版本说明、是否使用程序代码等信息都在这里设定。 这里的项目主要都是针对核心不同程序之间的相关性来设计。 -
Enable loadable module support:
模块是一小段代码,编译后可在系统内核运行时动态的加入内核,从而为内核增加一些特性或是对某种硬件进行支持。一般一些不常用到的驱动或特性可以编译为模块以减少内核的体积。在运行时可以使用modprobe命令来加载它到内核中去(在不需要时还可以移除它)。一些特性是否编译为模块的原则是,不常使用的,特别是在系统启动时不需要的驱动可以将其编译为模块,如果是一些在系统启动时就要用到的驱动比如说文件系统,系统总线的支持就不要编为模块,否则无法启动系统。在启动时不用到的功能,编成模块是最有效的方式。
-
Enable the block layer:
使用硬盘/USB/SCSI设备者必选这选项使得块设备可以从内核移除。如果不选,那么 block dev 文件将不可用,一些文件系统比如 ext3 将不可用。这个选项会禁止 SCSI 字符设备和 USB 储存设备,如果它们使用不同的块设备。 -
Processor type and features:
根据自己CPU的类型进行适合的设置。 -
Power management and ACPI options:
对电源进行管理。ACPI表示高级配置和电源管理接口(Advanced Configuration and Power Management Interface)。 -
Bus options (PCI etc.) :
这个项目和总线有关。分为最常见的 PCI和 PCI-express 的支持,还有笔记本电脑常见的 PCMCIA 插卡等等。 -
Executable file formats / Emulations:
是给 Linux 核心运作执行文件之用的数据。通常与不编译行为有关。 -
Networking support:
是相当重要的选项,因为他还包括了防火墙相关的项目。由于防火墙是在启动网络之后再设定即可,所以绝大部分的内容都可以被编译成为模块,而且也建议编成模块。有用到再载入到核心即可。 -
Device Drivers:
设备驱动设定。 -
Firmware Drivers:
固件驱动设定。 -
File systems:
文件系统的支持也是很重要的一项核心功能。因为如果不支持某个文件系统,那我们的 Linux kernel 就无法识别,当然也就无法使用。 -
Kernel hacking:
这里和核心开发者比较有关的部分,这部分建议保留默认值即可, 应该不需要去修改,除非你想要进行核心方面的研究。 -
Security options:
这里是属于信息安全方面的设定,包括 SELinux 这个细部权限强化模块也是在这里编入核心的,这部分可以作一些额外的设定。 -
Cryptographic API:
是微软在 Windows 操作系统中添加的密码编译机能,作为资料加密与解密功能的重要基础,CryptoAPI 支持同步,异步的金钥加密处理,以及操作系统中的数位凭证的管理工作。 -
Virtualization:
虚拟化是近年来非常热门的一个议题,因为计算机的能力太强,所以时常闲置在那边, 此时,我们可以透过虚拟化技术在一部主机上面同时启劢多个操作系统来运作,这就是所谓的虚拟化。 Linux 核心已经主动的纳入虚拟化功能。而 Linux 认可的虚拟化使用的机制为 KVM(Kernel base Virtual Machine)。 -
Library routines:
常用的核心函式库也可以全部编为模块 -
Load an Alternate Configuration File:
加载备用配置文件 -
Save an Alternate Configuration File:
保存备用配置文件
本文仅解释了主要的配置模块,后续会推出一篇详细介绍各个配置选项的文章
2.4 编译内核
此步骤会对.config文件中的每一个选项再次确认,全部确认即可。执行编译
make
关于vmlinux ,modules和bzImage
make vmlinux  <==未经压缩的核心
make modules  <==仅核心模块
make bzImage  <==经压缩过的核心(预设)
make all      <==进行上述的三个动作
我们常见的在 /boot/ 底下的核心文件,都是经过压缩过的核心文件,因此,上述的动作中比较常用 的是 modules 与 bzImage 这两个,其中 bzImage 第三个字母是英文大写的 I 喔!bzImage 可以制 作出压缩过后的核心, 也就是一般我们拿来进行系统开机的信息啰!所以,基本上我们会进行的动作是
make -j 4 clean    <==先清除暂存档
make -j 4 bzImage  <==先编译核心
make -j 4 modules  <==再编译模块
make -j 4 clean bzImage modules  <==连续动作
- 如果你是第一次重新编译内核,先用
make mrproper命令处理一下内核代码目录中残留的文件,由于我们不知道源代码文件中是否包含像.o之类的文件。- 如果不是第一次的话,使用
make clean命令来清楚.o等编译内核产生的中间文件,但不会删除配置文件。- 使用
make bzImage命令来编译内核,这个内核是经过压缩的。或者使用make -j 4 bzImage命令,表示用4个线程来编译。- 使用"make modules"来编译模块,这个会花费比较长的时间。
此过程产生一大堆警告,最终报错程序终止
报错:
In file included from arch/x86/xen/multicalls.c:27:0:
arch/x86/xen/multicalls.c: In function ‘xen_mc_flush’:
./arch/x86/include/asm/xen/hypercall.h:212:2: error: invalid 'asm': invalid operand code 'V'
  asm volatile(CALL_NOSPEC
  ^
make[4]: *** [arch/x86/xen/multicalls.o] Error 1
make[3]: *** [arch/x86/xen] Error 2
make[2]: *** [arch/x86] Error 2
make[1]: *** [.] Error 2
make: *** [__sub-make] Error 2
由于是在虚拟机上编译的内核,尝试先把虚拟化相关内容在menuconfig中关闭试试,重新编译
但是并没有解决哦
有位老哥说是不是gcc的问题,换个版本试试。
重复执行 "2.1 升级gcc"章节,本次把gcc升级到10.4.0
tar -Jvxf gcc-10.4.0.tar.xz --directory=/usr/local/
gmp='gmp-6.1.0.tar.bz2'
mpfr='mpfr-3.1.6.tar.bz2'
mpc='mpc-1.0.3.tar.gz'
isl='isl-0.18.tar.bz2'
tar -jxvf mpfr-3.1.6.tar.bz2 --directory=/usr/local/gcc-10.4.0/
tar -jxvf isl-0.18.tar.bz2 --directory=/usr/local/gcc-10.4.0/
tar -jxvf gmp-6.1.0.tar.bz2 --directory=/usr/local/gcc-10.4.0/
tar -zxvf mpc-1.0.3.tar.gz --directory=/usr/local/gcc-10.4.0/
…
由于笔者的虚拟机配置太低了,又开始漫长的等待…
…
这次情况好很多,不但没有警告了,而且正在缓慢的编译中,继续等待…
…
大概等待了2个小时,编译完成
2.5 安装模块
make modules_install
安装完成后在/lib/modules/目录下会生成一个同内核版本号的目录,目录下便是新内核的模块。
[root@node-253 linux-6.3.9]# ll /lib/modules/
total 8
drwxr-xr-x. 7 root root 4096 Apr 19 19:59 3.10.0-1160.88.1.el7.x86_64
drwxr-xr-x. 7 root root 4096 Apr 19 19:49 3.10.0-1160.el7.x86_64
drwxr-xr-x  3 root root  333 Jun 28 16:29 6.3.9
2.6 安装内核
安装完后会在/boot目录下生成新的内核文件
[root@node-253 linux-6.3.9]# make install
  INSTALL /boot
[root@node-253 linux-6.3.9]# ll /boot/
total 171004
-rw-r--r--. 1 root root   153619 Mar  7 23:46 config-3.10.0-1160.88.1.el7.x86_64
-rw-r--r--. 1 root root   153591 Oct 20  2020 config-3.10.0-1160.el7.x86_64
drwxr-xr-x. 3 root root       17 Apr 19 19:45 efi
drwxr-xr-x  2 root root     4096 Jun  6 17:29 extlinux
drwxr-xr-x. 2 root root       27 Apr 19 19:46 grub
drwx------. 5 root root       97 Jun 28 16:37 grub2
-rw-------. 1 root root 62118236 Apr 19 19:49 initramfs-0-rescue-be305b12851d4ad9aac8ef5e12863eee.img
-rw-------. 1 root root 21374634 Apr 19 20:00 initramfs-3.10.0-1160.88.1.el7.x86_64.img
-rw-------. 1 root root 21327226 Apr 19 20:00 initramfs-3.10.0-1160.el7.x86_64.img
-rw-------  1 root root 22971157 Jun 28 16:37 initramfs-6.3.9.img
-rw-r--r--. 1 root root   320760 Mar  7 23:46 symvers-3.10.0-1160.88.1.el7.x86_64.gz
-rw-r--r--. 1 root root   320648 Oct 20  2020 symvers-3.10.0-1160.el7.x86_64.gz
lrwxrwxrwx  1 root root       22 Jun 28 16:36 System.map -> /boot/System.map-6.3.9
-rw-------. 1 root root  3623956 Mar  7 23:46 System.map-3.10.0-1160.88.1.el7.x86_64
-rw-------. 1 root root  3616707 Oct 20  2020 System.map-3.10.0-1160.el7.x86_64
-rw-r--r--  1 root root  6730685 Jun 28 16:36 System.map-6.3.9
lrwxrwxrwx  1 root root       19 Jun 28 16:36 vmlinuz -> /boot/vmlinuz-6.3.9
-rwxr-xr-x. 1 root root  6769256 Apr 19 19:49 vmlinuz-0-rescue-be305b12851d4ad9aac8ef5e12863eee
-rwxr-xr-x. 1 root root  7051880 Mar  7 23:46 vmlinuz-3.10.0-1160.88.1.el7.x86_64
-rwxr-xr-x. 1 root root  6769256 Oct 20  2020 vmlinuz-3.10.0-1160.el7.x86_64
-rw-r--r--  1 root root 11772768 Jun 28 16:36 vmlinuz-6.3.9
新内核会自动写入到引导文件中,直接重启系统,在选择内核的界面选中新的内核即可
[root@node-253 linux-6.3.9]# cat /boot/grub2/grub.cfg
...
2.7 验证内核
[root@node-253 ~]# uname -a
Linux node-253 6.3.9 #1 SMP PREEMPT_DYNAMIC Wed Jun 28 16:09:55 CST 2023 x86_64 x86_64 x86_64 GNU/Linux
3. 制作内核文件
3.1 创建磁盘文件
使用dd命令,创建一个128M大小的文件
[root@node-253 6.3.9]# cd /mnt/
[root@node-253 mnt]# dd if=/dev/zero of=disk.img bs=1M count=128
128+0 records in
128+0 records out
134217728 bytes (134 MB) copied, 0.0529212 s, 2.5 GB/s
[root@node-253 mnt]# ll -h
total 128M
-rw-r--r-- 1 root root 128M Jun 29 08:56 disk.img
3.2 磁盘分区
对磁盘分区,整个磁盘只建一个分区
使用fdisk命令对disk.img磁盘进行分区,使用n命令创建新的、主分区,该分区为整个磁盘大小,命令如下:
[root@node-253 mnt]# fdisk disk.img
Welcome to fdisk (util-linux 2.23.2).

Changes will remain in memory only, until you decide to write them.
Be careful before using the write command.

Device does not contain a recognized partition table
Building a new DOS disklabel with disk identifier 0x524dcece.

Command (m for help): n
Partition type:
   p   primary (0 primary, 0 extended, 4 free)
   e   extended
Select (default p):
Using default response p
Partition number (1-4, default 1):
First sector (2048-262143, default 2048):
Using default value 2048
Last sector, +sectors or +size{K,M,G} (2048-262143, default 262143):
Using default value 262143
Partition 1 of type Linux and of size 127 MiB is set

Command (m for help): w
The partition table has been altered!

Syncing disks.
分区后可以使用, 查看分区情况
[root@node-253 mnt]# fdisk -l disk.img

Disk disk.img: 134 MB, 134217728 bytes, 262144 sectors
Units = sectors of 1 * 512 = 512 bytes
Sector size (logical/physical): 512 bytes / 512 bytes
I/O size (minimum/optimal): 512 bytes / 512 bytes
Disk label type: dos
Disk identifier: 0x524dcece

   Device Boot      Start         End      Blocks   Id  System
disk.img1            2048      262143      130048   83  Linux
磁盘最开始扇区是MBR,里面有分区表,记录磁盘上有多少分区,每个分区从哪个扇区开始,以及分区占用多少扇区,往往第一个分区的开始扇区并不是从第2个扇区开始。可以看到该磁盘只有一个主分区,是从第2048个扇区开始
3.3 将磁盘分区关联到/dev/loop7设备
使用losetup命令将该分区与一个/dev/loop7设备进行关联,-o表示该分区在disk.img的偏移量(字节为单,即2048 x 512 = 1048576 )
[root@node-253 mnt]# losetup -o 1048576 /dev/loop7 disk.img
[root@node-253 mnt]# ll /dev/loop7
brw-rw---- 1 root disk 7, 7 Jun 29 09:34 /dev/loop7
3.4 格式化分区和挂载分区
接下来将分区格式化为ext3
mkfs.ext3 /dev/loop7
格式化后,将该分区挂载到mnt目录
mkdir mnt
mount -t ext3 /dev/loop7 ./mnt/
3.5 安装grub
磁盘和分区已经做完了,下一步是安将Grub
运行grub2-install命令之后,会将disk.img磁盘第一个扇区修改成MBR,同时将grub代码安装到第一个分区之前的扇区里(通常是0号到64号扇区之间),最后将grub代码运行所需要其它模块和配置文件保存到 ./mnt/boot/grub目录下。
[root@node-253 mnt]# grub2-install --boot-directory=./mnt/boot/ --target=i386-pc --modules=part_msdos disk.img
Installing for i386-pc platform.
Installation finished. No error reported.
3.6 下载、编译内核
bzImage是最终生成的内核映像文件
vmlinuz就是bzImage,内核安装过程拷贝过去的
使用 x86_64 创建.config配置文件,我们使用前文中的内核环境
[root@node-253 mnt]# cd /usr/src/kernels/linux-6.3.9/
[root@node-253 linux-6.3.9]# make x86_64_defconfig
#
# configuration written to .config
#
仅编译并打包
make bzImage -j2
又需要漫长的等待…
将编译好的文件复制到boot目录中
[root@node-253 linux-6.3.9]# cp arch/x86/boot/bzImage /mnt/mnt/boot/
[root@node-253 linux-6.3.9]# ll /mnt/mnt/boot/
total 12201
-rw-r--r-- 1 root root 12441952 Jun 29 10:31 bzImage
drwxr-xr-x 5 root root     1024 Jun 29 09:45 grub2
3.7 制作initrd
使用mkinitramfs命令可以制作简化版本的文件系统, 使用mkinitramfs命令生成极简的initrd,放到boot目录下
在CentOS之类下面一般是用mkinitrd命令,而在Ubuntu/Debian下用的是mkinitramfs命令.它们的用法稍微有些不一样,如下所示:
#centos
mkinitrd   /boot/initrd.img    5.4.61
#ubuntu
mkinitramfs  5.4.61   -o /boot/initrd.img
这个命令的作用是把/lib/modules/5.4.61中对应的.ko驱动打包到initrd.img文件中。其中5.4.61为/lib/modules下的目录名称(内核的版本号)
mkinitrd ./mnt/boot/initrd 6.3.9
- 编写grub.cfg,让Grub引导kernel运行
写grub.cfg配置文件,告诉Grub从哪个目录可以找到bzImage和initrd文件
cat ./mnt/boot/grub/grub.cfg

menuentry “FreshLinux” {
linux (hd0,msdos1)/boot/bzImage  root=/dev/sda1 console=tty0
initrd (hd0,msdos1)/boot/initrd
}
- hd0表示第一个硬盘,而msdos1表示该硬盘的第一个分区(注:Grub对硬盘和分区的标识略有不同,硬盘从编号0开始,而分区却从编号1开始)。
- linux (hd0,msdos1)/boot/bzImage console=tty0 表示:系统第一个硬盘,第一个分区的boot/bzImage文件是内核压缩镜像,而后面的console=tty0是内核启动参数,告诉内核输出到控制台上,而非图形化界面, root=/dev/sda1 让其拥有root权限。
- initrd (hd0,msdos1)/boot/initrd 表示:系统第一个硬盘,第一个分区的boot/initrd是根文件系统。
- 保存做好的磁盘
只需将解挂载/dev/loop7即可将 刚刚建立的文件内容刷新到disk.img磁盘文件上
umount /dev/loop7
losetup -d /dev/loop7
- 从磁盘运行Linux
使用qemu将它运行起来
qemu-system-x86_64 -hda disk.img -m 1024
可能是因为笔者的虚拟机没有桌面,只有命令行,无法启动。报错如下
[root@node-253 mnt]# qemu-system-x86_64 -hda disk.img -m 1024
WARNING: Image format was not specified for 'disk.img' and probing guessed raw.
         Automatically detecting the format is dangerous for raw images, write operations on block 0 will be restricted.
         Specify the 'raw' format explicitly to remove the restrictions.
VNC server running on 127.0.0.1:5900
但看起来应该可以启动
- 在VM中运行
上面已经制作好最小的linux镜象了,如何将他做为硬盘在VM中启动
将其转为化vm所支持的硬盘格式
# qemu-img 转换命令可以执行多种格式,包括之间的转换qcow2,qed, raw,vdi,vhd,和vmdk

# 查看文档格式
[root@node-253 mnt]# qemu-img info disk.img
image: disk.img
file format: raw
virtual size: 128M (134217728 bytes)
disk size: 51M


# 转换为vmdk格式

[root@node-253 mnt]# qemu-img convert -f raw -O vmdk  disk.img image.6.3.9.vmdk
[root@node-253 mnt]# ll
total 103088
-rw-r--r-- 1 root root 134217728 Jun 29 11:54 disk.img
-rw-r--r-- 1 root root  51904512 Jun 29 15:29 image.6.3.9.vmdk
drwxr-xr-x 2 root root         6 Jun 29 09:36 mnt
创建一个空白的虚拟机
添加硬盘 - 选择使用现有虚拟磁盘,将image.vmdk导入
设置BIOS - 中将刚才导入的硬盘,优先级调最高
最后重启,进入自己刚才制作的系统
VMware虚拟机如何设置从U盘启动


 1505
1505

 被折叠的 条评论
为什么被折叠?
被折叠的 条评论
为什么被折叠?
 到【灌水乐园】发言


