


最近深度学习,用到COCO数据集,需要对图片进行一些标注例如:添加矩形框并标注类型、添加字幕、添加人体关键点、添加关键物体的掩膜(mask)、添加关键物体的外轮廓等。经过在网上的搜索整理,做出了自认为比较实用的的小工具,特进行记录并共享给网友。
import os, time
from pycocotools.coco import COCO
from random import random
import matplotlib.pyplot as plt
import numpy as np
from PIL import Image, ImageDraw, ImageFont
import cv2
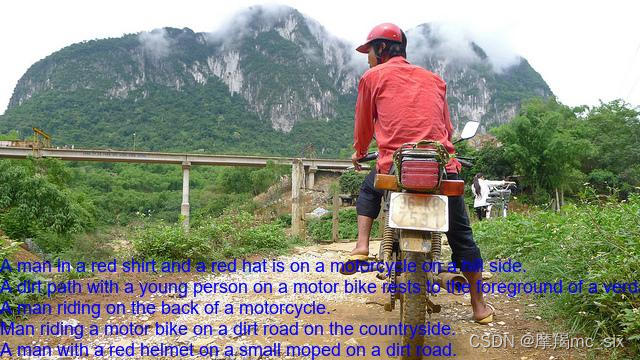
def pic_caption(coco, pic_id, i_path, s_path, position,color_n, t_size, delay_t):
print("make captions.......................................................")
ann_ids = coco.getAnnIds(imgIds=pic_id)
# 根据annotations idx信息获取所有标注信息
targets = coco.loadAnns(ann_ids)
# get image file name
path = coco.loadImgs(pic_id)[0]['file_name']
# read image
img = Image.open(os.path.join(i_path, path)).convert('RGB')
width, height = img.size
draw = ImageDraw.Draw(img)
x = 0
n = 0
for ann in targets:
font = ImageFont.truetype('arial.ttf', size=t_size)
if "up" in position:
draw.text((x, 0 + n * (t_size + 3)), ann['caption'], fill=color_n, font=font) # 定义文字内容,fill 为字体颜色(r,g,b)
elif "down" in position:
draw.text((x, height - (n+1) * (t_size + 3)), ann['caption'], fill=color_n, font=font) # 定义文字内容,fill 为字体颜色(r,g,b)
n += 1
plt.figure(path)
plt.imshow(img)
plt.show(block=False)
plt.ion()
plt.pause(delay_t)
plt.close()
img.save(s_path + path[:-4] + '_caption'+ '.jpg') # 另存加上了框框的图片
def pic_rect(coco, pic_id, i_path, s_path, color_n, t_size, delay_t):
print("make rectangle.......................................................")
coco_classes = dict([(v["id"], v["name"]) for k, v in coco.cats.items()])
# 获取对应图像id的所有annotations idx信息
ann_ids = coco.getAnnIds(imgIds=pic_id)
# 根据annotations idx信息获取所有标注信息
targets = coco.loadAnns(ann_ids)
# get image file name
path = coco.loadImgs(pic_id)[0]['file_name']
# read image
img = Image.open(os.path.join(i_path, path)).convert('RGB')
draw = ImageDraw.Draw(img)
# draw box to image
color_list = ['red', 'blue', 'green', 'yellow', 'orange', 'pink', 'brown', 'navy', 'gold', 'tomato', 'maroon',
'red', 'blue', 'green', 'yellow', 'orange', 'pink', 'brown', 'navy', 'gold', 'tomato', 'maroon',
'red', 'blue', 'green', 'yellow', 'orange', 'pink', 'brown', 'navy', 'gold', 'tomato', 'maroon',
'red', 'blue', 'green', 'yellow', 'orange', 'pink', 'brown', 'navy', 'gold', 'tomato', 'maroon',
'red', 'blue', 'green', 'yellow', 'orange', 'pink', 'brown', 'navy', 'gold', 'tomato', 'maroon',
'red', 'blue', 'green', 'yellow', 'orange', 'pink', 'brown', 'navy', 'gold', 'tomato', 'maroon', ]
n = 0
for target in targets:
x, y, w, h = target["bbox"]
x1, y1, x2, y2 = x, y, int(x + w), int(y + h)
draw.rectangle((x1, y1, x2, y2), outline=color_list[n],
width=3) # outline 是外框颜色,可自己定义,这里是循环调用了一个数组,whdth为框线的粗细。
font = ImageFont.truetype('arial.ttf', size=t_size) # 定义字体,文字大小
draw.text((x1, y1), coco_classes[target["category_id"]], fill=color_n, font=font) # 定义文字内容,fill 为字体颜色(r,g,b)
n += 1
plt.figure(path)
plt.imshow(img)
plt.show(block=False)
plt.ion()
plt.pause(delay_t)
plt.close()
img.save(s_path + path[:-4] + '_rect'+ '.jpg') # 另存加上了框框的图片
def pic_mask(coco, pic_id, i_path, s_path, str=' ', delay_t=1):
print("make mask.......................................................")
# 需要画图的是第num副图片, 对应的json路径和图片路径,
# str = ' '为类别字符串,输入必须为字符串形式 'str',若为空,则返回所有类别id
catIds = coco.getCatIds(catNms=['str']) # 获取指定类别 id
path = coco.loadImgs(pic_id)[0]['file_name'] # 加载图片,loadImgs() 返回的是只有一个内嵌字典元素的list, 使用[0]来访问这个元素
image = cv2.imread(os.path.join(i_path, path))
annIds = coco.getAnnIds(imgIds=pic_id, catIds=catIds, iscrowd=None)
anns = coco.loadAnns(annIds)
zeros = np.zeros((image.shape), dtype=np.uint8)
alpha = 1
beta = 0.6
gamma = 0
for ann in anns:
segs = ann['segmentation']
if 'list' in type(segs).__name__:
for seg in segs:
poly = []
c_out = (250, 0, 0)
c_in = (int(random() * 255), int(random() * 255), int(random() * 255))
for i in range(int(len(seg) / 2)):
poly.append([seg[i * 2], seg[i * 2 + 1]])
poly_ = np.reshape(np.array(poly), [-1, 1, 2]).astype(np.int32)
image = cv2.polylines(np.array(image), [poly_], True, c_out, 2, )
mask = cv2.fillPoly(zeros, [poly_], color=c_in, )
mask_img = cv2.addWeighted(image, alpha, mask, beta, gamma)
else:
pass
cv2.imshow(path, mask_img)
cv2.waitKey(delay_t * 1000)
cv2.destroyAllWindows()
cv2.imwrite(s_path + path[:-4] + '_mask' + '.png', mask_img)
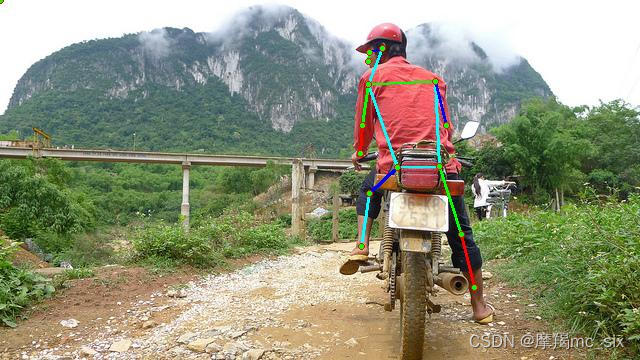
def pic_person_key_point(coco, img_id, i_path, s_path, delay_t):
print("make person_keypoint.......................................................")
catIds = coco.getCatIds(catNms=['person'])
aColor = [(0, 255, 0, 0), (255, 0, 0, 0), (0, 0, 255, 0), (0, 255, 255, 0)]
path = coco.loadImgs(img_id)[0]['file_name']
matImg = Image.open('%s/%s' % (i_path, path)).convert('RGB')
draw = ImageDraw.Draw(matImg)
# # 通过输入图片的id、类别的id、实例的面积、是否是人群来得到图片的注释id
annIds = coco.getAnnIds(imgIds=img_id, catIds=catIds, iscrowd=None)
# # 通过注释的id,得到注释的信息
anns = coco.loadAnns(annIds)
if len(anns) != 0:
for ann in anns:
sks = np.array(coco.loadCats(ann['category_id'])[0]['skeleton']) - 1
kp = np.array(ann['keypoints'])
x = kp[0::3]
y = kp[1::3]
v = kp[2::3]
for sk in sks:
c = aColor[np.random.randint(0, 4)]
if np.all(v[sk] > 0):
# 画点之间的连接线
draw.line([(x[sk][0], y[sk][0]), (x[sk][1], y[sk][1])], c, 3)
for i in range(x.shape[0]):
draw.ellipse((x[i] - 3, y[i] - 3, x[i] + 3, y[i] + 3), fill=(0, 255, 0), outline=(255, 0, 0))
plt.figure(path)
plt.imshow(matImg)
plt.show(block=False)
plt.ion()
plt.pause(delay_t)
plt.close()
matImg.save(s_path + path[:-4] + '_pkp'+ '.jpg') # 另存加上了框框的图片
def pic_polygon(coco, pic_id, i_path, s_path, str=' ', delay_t=1):
print("make polygon.......................................................")
# str = ' '为类别字符串,输入必须为字符串形式 'str',若为空,则返回所有类别id
catIds = coco.getCatIds(catNms=['str']) # 获取指定类别 id
path = coco.loadImgs(pic_id)[0]['file_name'] # 加载图片,loadImgs() 返回的是只有一个内嵌字典元素的list, 使用[0]来访问这个元素
image = cv2.imread(os.path.join(i_path, path))
annIds = coco.getAnnIds(imgIds=pic_id, catIds=catIds, iscrowd=None)
anns = coco.loadAnns(annIds)
for ann in anns:
segs = ann['segmentation']
if 'list' in type(segs).__name__:
for seg in segs:
poly = []
c_out = (int(random() * 100), int(random() * 100), int(random() * 100))
for i in range(int(len(seg) / 2)):
poly.append([seg[i * 2], seg[i * 2 + 1]])
poly_ = np.reshape(np.array(poly), [-1, 1, 2]).astype(np.int32)
image = cv2.polylines(np.array(image), [poly_], True, c_out, 3, )
else:
pass
cv2.imshow(path, image)
cv2.waitKey(delay_t * 1000)
cv2.destroyAllWindows()
cv2.imwrite(s_path + path[:-4] + '_poly' + '.jpg', image)
if __name__ == "__main__":
year = 2014
pic_path = 'val'
cap_file = 'C:/coco_data/annotations/captions_' + pic_path + str(year) + '.json'
json_file = 'C:/coco_data/annotations/instances_' + pic_path + str(year) + '.json'
pkp_file = 'C:/coco_data/annotations/person_keypoints_' + pic_path + str(year) + '.json'
img_path = 'C:/coco_data/' + pic_path + str(year)
save_path = 'C:/coco_data/result_test/'
ids = [559665,391895,60623,483108,384213,386164,223648,403385,294832,462565,436141,192440,1146,394240, ]
delay = 1
coco_j = COCO(json_file)
coco_c = COCO(cap_file)
coco_p = COCO(pkp_file)
for id in ids:
print(id, ' ', coco_j.loadImgs(id)[0]['file_name'])
pic_person_key_point(coco_p, id, img_path, save_path, delay_t=delay)
pic_caption(coco_c, id, img_path, save_path, position="down",color_n=(0, 0, 255), t_size=18, delay_t=delay)
pic_mask(coco_j, id, img_path, save_path, str='', delay_t=delay)
pic_rect(coco_j, id, img_path, save_path, color_n=(0, 0, 255), t_size=18, delay_t=delay)
pic_polygon(coco_j, id, img_path, save_path, str='', delay_t=delay)
运行结果图片如下:


 8405
8405

 被折叠的 条评论
为什么被折叠?
被折叠的 条评论
为什么被折叠?
 到【灌水乐园】发言


