


 本文详细描述了如何在服务器上部署PXE环境,安装Ubuntu系统,配置NFS服务,以及在无硬盘客户端(client2)上克隆文件系统、制作引导文件的过程,确保client2可以从PXE启动并进入Ubuntu系统。
准备
| 机器 | 说明 |
|---|---|
| server | 安装pxe相关软件,nfs-kernel-server,ip=192.168.1.2 |
| client1 | 带有硬盘,使用iso安装ubuntu系统,并安装日常工作需要用到的软件,做好相应配置,安装nfs客户端:nfs-common |
| client2 | 没有系统盘,其他硬件配置跟client1一致,测试用 ,ip=192.168.1.4 |
1、参考如下链接在server端部署pxe环境
https://blog.csdn.net/u010438035/article/details/128396790
2、参考如下链接在server端和client1端分别部署nfs服务端和客户端
https://blog.csdn.net/u010438035/article/details/128422999
在server端配置OS根目录
Create a directory to hold the OS files for the client
sudo mkdir /nfsroot
vi /etc/exports
/nfsroot             *(rw,no_root_squash,async,insecure)

# sync your exports

sudo exportfs -rv
在client1端克隆文件系统
mount.nfs4  -onolock 192.168.1.2:/nfsroot /mnt
cp -ax /. /mnt/.
cp -ax /dev/. /mnt/dev/.
在client1端制作vmlinuz和initrd.img
# Copy current kernel version to your home directory.
# uname -r will print your kernel version, and ~ is shorthand for your home directory.

sudo cp /boot/vmlinuz-`uname -r` ~
Create an initrd.img file
Change the BOOT flag to nfs in /etc/initramfs-tools/initramfs.conf
#
# BOOT: [ local | nfs ]
#
# local - Boot off of local media (harddrive, USB stick).
#
# nfs - Boot using an NFS drive as the root of the drive.
#

BOOT=nfs
Change the MODULES flag to netboot in /etc/initramfs-tools/initramfs.conf
#
# MODULES: [ most | netboot | dep | list ]
#
# most - Add all framebuffer, acpi, filesystem, and harddrive drivers.
#
# dep - Try and guess which modules to load.
#
# netboot - Add the base modules, network modules, but skip block devices.
#
# list - Only include modules from the 'additional modules' list
#

MODULES=netboot
NOTE: if you have anything in /etc/initramfs-tools/conf.d/driver-policy, this line will be ignored.
Check which modules you will need for your network adapters and put their names into /etc/initramfs-tools/modules (for example forcedeth , r8169 or tulip)
Run mkinitramfs
mkinitramfs -o ~/initrd.img-`uname -r`
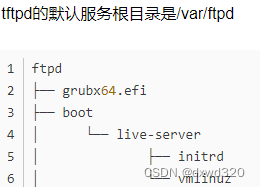
把在client1端生成的复制到server端的如下图所示的目录中:
scp ~/vmlinuz-`uname -r` 192.168.1.2:/var/ftpd/boot/live-server/vmlinuz
scp ~/initrd.img-`uname -r` 192.168.1.2:/var/ftpd/boot/live-server/initrd
检查一下vmlinuz和initrd权限是否如下所示,否则修改一下:

在server端修改grub.cfg
内容如下:
menuentry "Try or Install Ubuntu Server" {

    set gfxpayload=keep

    linux  /boot/live-server/vmlinuz root=/dev/nfs ip=dhcp nfsroot=192.168.1.2:/nfsroot rw

    initrd /boot/live-server/initrd

}
在server端修改网卡配置
编辑/nfsroot/etc/netplan/00-installer-config.yaml
可设置为dhcp=true
在server端修改fstab
/nfsroot/etc/fstab contains the information the client will use to mount file systems on boot, edit it to ensure it looks something like this ('note no swap')

# /etc/fstab: static file system information.
#
# <file system> <mount point>   <type>  <options>       <dump>  <pass>
proc            /proc           proc    defaults        0       0
/dev/nfs       /               nfs    defaults          1       1
none            /tmp            tmpfs   defaults        0       0
none            /var/run        tmpfs   defaults        0       0
none            /var/lock       tmpfs   defaults        0       0
none            /var/tmp        tmpfs   defaults        0       0

NOTE: if you have entries for other tmpfs that's fine to leave them in there
在server端修改/nfsroot/etc/kernel/postinst.d/zz-update-grub,禁用grub更新
#exec update-grub 注释这一行如下面所示:
cat /nfsroot/etc/kernel/postinst.d/zz-update-grub
#! /bin/sh
set -e

which update-grub >/dev/null 2>&1 || exit 0

if type systemd-detect-virt >/dev/null 2>&1 &&
   systemd-detect-virt --quiet --container; then
        exit 0
fi

set -- $DEB_MAINT_PARAMS
mode="${1#\'}"
mode="${mode%\'}"
case $0:$mode in
    # Only run on postinst configure and postrm remove, to avoid wasting
    # time by calling update-grub multiple times on upgrade and removal.
    # Also run if we have no DEB_MAINT_PARAMS, in order to work with old
    # kernel packages.
    */postinst.d/*:|*/postinst.d/*:configure|*/postrm.d/*:|*/postrm.d/*:remove)
        if [ -e /boot/grub/grub.cfg ]; then
        #       exec update-grub
        fi
        ;;
esac

exit 0
验证
设置client2从pxe启动,client2开机后会自动进入Ubuntu系统,系统和client1的一样。
参考
https://help.ubuntu.com/community/DisklessUbuntuHowto


 837
837

 被折叠的 条评论
为什么被折叠?
被折叠的 条评论
为什么被折叠?
 到【灌水乐园】发言


