


设置向导redis cluster集群
节点1:192.168.248.131:6379
节点2:192.168.248.132:6379
节点3:192.168.248.133:6379
节点4:192.168.248.134:6379
节点5:192.168.248.135:6379
节点6:192.168.248.136:6379
各节点编译安装redis
以下示例基于centos7系统,redis版本为5.0.9
# yum -y install gcc jemalloc-devel
# wget http://download.redis.io/releases/redis-5.0.9.tar.gz
# tar xvf redis-5.0.9.tar.gz
# cd redis-5.0.9/
# make -j 4 PREFIX=/usr/local/redis install #指定redis安装目录
# tree /usr/local/redis/
/usr/local/redis/
└── bin
    ├── redis-benchmark
    ├── redis-check-aof
    ├── redis-check-rdb
    ├── redis-cli
    ├── redis-sentinel -> redis-server
    └── redis-server

1 directory, 6 files
# mkdir /usr/local/redis/{etc,logs,data,run}
# cp redis.conf /usr/local/redis/etc/
# /usr/local/redis/bin/redis-server /usr/local/redis/etc/redis.conf


# useradd -r -s /sbin/nologin redis
# chown -R redis.redis /usr/local/redis

# vim /etc/sysctl.conf
net.core.somaxconn = 1024
vm.overcommit_memory = 1

# sysctl -p
net.core.somaxconn = 1024
vm.overcommit_memory = 1

# vim /etc/rc.local
echo never > /sys/kernel/mm/transparent_hugepage/enabled
# source /etc/rc.local


# vim /usr/lib/systemd/system/redis.service
[Unit]
Description=Redis persistent key-value database
After=network.target

[Service]
ExecStart=/usr/local/redis/bin/redis-server /usr/local/redis/etc/redis.conf --supervised systemd
ExecStop=/bin/kill -s QUIT $MAINPID
Type=notify
User=redis
Group=redis
RuntimeDirectory=redis
RuntimeDirectoryMode=0755
LimitNOFILE=65536

[Install]
WantedBy=multi-user.target

# systemctl daemon-reload
# systemctl start redis
# systemctl status redis
# /usr/local/redis/bin/redis-cli
127.0.0.1:6379> ping
PONG
127.0.0.1:6379> info
# Server
redis_version:5.0.9
redis_git_sha1:00000000
redis_git_dirty:0
redis_build_id:d2ec60bbe93e6203
redis_mode:standalone
os:Linux 3.10.0-1127.el7.x86_64 x86_64
基于redis5的Redis Cluster部署
[root@red1 ~]# redis-cli --cluster help
Cluster Manager Commands:
  create         host1:port1 ... hostN:portN  #创建集群
                 --cluster-replicas <arg>     #指定master的副本数量
  check          host:port                    #检查集群信息
                 --cluster-search-multiple-owners
  info           host:port    #查看集群主机信息
  fix            host:port    #修复集群,如果创建集群之前进群中的任一节点有数据就算将原来的数据删除之后也要执行此命令
                 --cluster-search-multiple-owners
  reshard        host:port   #在线热迁移集群指定主机的slots数据
                 --cluster-from <arg>
                 --cluster-to <arg>
                 --cluster-slots <arg>
                 --cluster-yes
                 --cluster-timeout <arg>
                 --cluster-pipeline <arg>
                 --cluster-replace
  rebalance      host:port    #平衡集群中各主机的slot数量
                 --cluster-weight <node1=w1...nodeN=wN>
                 --cluster-use-empty-masters
                 --cluster-timeout <arg>
                 --cluster-simulate
                 --cluster-pipeline <arg>
                 --cluster-threshold <arg>
                 --cluster-replace
  add-node       new_host:new_port existing_host:existing_port   #添加主机到集群
                 --cluster-slave
                 --cluster-master-id <arg>
  del-node       host:port node_id     #删除主机
  call           host:port command arg arg .. arg  #在集群上的所有节点执行命令
  set-timeout    host:port milliseconds  #设置节点的超时时间
  import         host:port          #导入外部redis服务器的数据到当前集群
                 --cluster-from <arg>
                 --cluster-copy
                 --cluster-replace
  help
创建redis cluster集群的环境准备
- 每个redis节点采用相同的配置、相同的密码、相同的redis版本
- 所有redis服务器必须没有任何数据
- 先启动为单机redis且没有任何key value
启用redis cluster配置
每个节点修改redis配置,必须开启cluster功能的参数
# 修改配置文件
# vim /usr/local/redis/etc/redis.conf
  #建议配置,否则后期的master和slave无法成功,还需再配置
  masterauth 123456
  requirepass 123456

  #必须开启集群状态,开启后redis 进程会有cluster显示
  cluster-enabled yes

  #此文件由redis cluster集群自动创建和维护
  cluster-config-file nodes-6379.conf
  appendonly yes

  #集群中node节点连接超时时间,超过此时间会踢出集群
  cluster-node-timeout 3000


# vim /usr/local/redis/etc/redis.conf
bind 0.0.0.0
masterauth 123456
requirepass 123456
cluster-enabled yes
cluster-config-file nodes-6379.conf
appendonly yes

# systemctl restart redis

#开启了16379的cluster的端口
# ss -tnl
State      Recv-Q Send-Q         Local Address:Port       Peer Address:Port
LISTEN     0      511                       *:6379               *:*
LISTEN     0      128                      *:11211               *:*
LISTEN     0      128                        *:22                *:*
LISTEN     0      511                      *:16379               *:*
LISTEN     0      128                   [::]:11211            [::]:*
LISTEN     0      128                   [::]:22               [::]:*

#查看进程状态
# ps -ef | grep redis
root      17993   1270  0 16:51 pts/0    00:00:00 /usr/local/redis/bin/redis-cli -h 192.168.248.131
root      18076  17499  0 17:08 pts/2    00:00:00 /usr/local/redis/bin/redis-cli -h 192.168.248.131
redis     18103      1  0 17:17 ?        00:00:08 /usr/local/redis/bin/redis-server 0.0.0.0:6379 [cluster]
root      18291  17544  0 18:27 pts/3    00:00:00 grep --color=auto redis
创建集群
--cluster-replicas 1 表示每个master对应一个slave节点

[root@red1 redis-5.0.9]# /usr/local/redis/bin/redis-cli -a 123456 --cluster create 192.168.248.131:6379 192.168.248.132:6379 192.168.248.133:6379 192.168.248.134:6379 192.168.248.135:6379 192.168.248.136:6379 --cluster-replicas 1
Warning: Using a password with '-a' or '-u' option on the command line interface may not be safe.
>>> Performing hash slots allocation on 6 nodes...
Master[0] -> Slots 0 - 5460
Master[1] -> Slots 5461 - 10922
Master[2] -> Slots 10923 - 16383
Adding replica 192.168.248.135:6379 to 192.168.248.131:6379
Adding replica 192.168.248.136:6379 to 192.168.248.132:6379
Adding replica 192.168.248.134:6379 to 192.168.248.133:6379
M: 4f4ee9bb8e7e28ee11f649d440a5e86ddc980f98 192.168.248.131:6379 #带M的为master
   slots:[0-5460] (5461 slots) master             #当前master的槽位起始和结束位
M: bc884c724920a5e91830a31c4c33eb15ec95b64c 192.168.248.132:6379
   slots:[5461-10922] (5462 slots) master
M: b71555b81c99482d8a928690f9875511dc7f7443 192.168.248.133:6379
   slots:[10923-16383] (5461 slots) master
S: 4a0756f094b31864b3a4d42a93a52ef03af01a5e 192.168.248.134:6379 #带S的slave
   replicates b71555b81c99482d8a928690f9875511dc7f7443
S: 8dbb957d1d318bde7abcbf55b2619e0145e92327 192.168.248.135:6379
   replicates 4f4ee9bb8e7e28ee11f649d440a5e86ddc980f98
S: b36a1551c4970b62ce6b38beb038fd8c36eaae79 192.168.248.136:6379
   replicates bc884c724920a5e91830a31c4c33eb15ec95b64c
Can I set the above configuration? (type 'yes' to accept): yes #输入yes自动创建集群
>>> Nodes configuration updated
>>> Assign a different config epoch to each node
>>> Sending CLUSTER MEET messages to join the cluster
Waiting for the cluster to join
.....
>>> Performing Cluster Check (using node 192.168.248.131:6379)
M: 4f4ee9bb8e7e28ee11f649d440a5e86ddc980f98 192.168.248.131:6379
   slots:[0-5460] (5461 slots) master   #已经分配的槽位
   1 additional replica(s)              #分配了一个slave
M: b71555b81c99482d8a928690f9875511dc7f7443 192.168.248.133:6379
   slots:[10923-16383] (5461 slots) master
   1 additional replica(s)
S: 4a0756f094b31864b3a4d42a93a52ef03af01a5e 192.168.248.134:6379
   slots: (0 slots) slave               #slave没有分配槽位
   replicates b71555b81c99482d8a928690f9875511dc7f7443
S: b36a1551c4970b62ce6b38beb038fd8c36eaae79 192.168.248.136:6379
   slots: (0 slots) slave
   replicates bc884c724920a5e91830a31c4c33eb15ec95b64c
S: 8dbb957d1d318bde7abcbf55b2619e0145e92327 192.168.248.135:6379
   slots: (0 slots) slave
   replicates 4f4ee9bb8e7e28ee11f649d440a5e86ddc980f98
M: bc884c724920a5e91830a31c4c33eb15ec95b64c 192.168.248.132:6379
   slots:[5461-10922] (5462 slots) master
   1 additional replica(s)
[OK] All nodes agree about slots configuration.   #所有节点槽位分配完成
>>> Check for open slots...   #检查打开的槽位
>>> Check slots coverage...   #检查插槽覆盖范围
[OK] All 16384 slots covered  #所有槽位(16384个)分配完成

3组master/slave
master:192.168.248.131---slave:192.168.248.135
master:192.168.248.132---slave:192.168.248.136
master:192.168.248.133---slave:192.168.248.134
验证集群状态
[root@red1 ~]# /usr/local/redis/bin/redis-cli -a 123456 cluster info
Warning: Using a password with '-a' or '-u' option on the command line interface may not be safe.
cluster_state:ok
cluster_slots_assigned:16384
cluster_slots_ok:16384
cluster_slots_pfail:0
cluster_slots_fail:0
cluster_known_nodes:6    #节点数
cluster_size:3           #三个集群
cluster_current_epoch:6
cluster_my_epoch:1
cluster_stats_messages_ping_sent:5158
cluster_stats_messages_pong_sent:5236
cluster_stats_messages_sent:10394
cluster_stats_messages_ping_received:5231
cluster_stats_messages_pong_received:5158
cluster_stats_messages_meet_received:5
cluster_stats_messages_received:10394


#查看任意节点的集群状态
[root@red1 ~]# /usr/local/redis/bin/redis-cli -a 123456 --cluster info 192.168.248.136:6379
Warning: Using a password with '-a' or '-u' option on the command line interface may not be safe.
192.168.248.131:6379 (4f4ee9bb...) -> 0 keys | 5461 slots | 1 slaves.
192.168.248.133:6379 (b71555b8...) -> 0 keys | 5461 slots | 1 slaves.
192.168.248.132:6379 (bc884c72...) -> 1 keys | 5462 slots | 1 slaves.
[OK] 1 keys in 3 masters.
0.00 keys per slot on average.
查看集群node对应关系
[root@red1 ~]# /usr/local/redis/bin/redis-cli -a 123456 cluster nodes
Warning: Using a password with '-a' or '-u' option on the command line interface may not be safe.
b71555b81c99482d8a928690f9875511dc7f7443 192.168.248.133:6379@16379 master - 0 1615459705644 3 connected 10923-16383
4a0756f094b31864b3a4d42a93a52ef03af01a5e 192.168.248.134:6379@16379 slave b71555b81c99482d8a928690f9875511dc7f7443 0 1615459703000 4 connected
b36a1551c4970b62ce6b38beb038fd8c36eaae79 192.168.248.136:6379@16379 slave bc884c724920a5e91830a31c4c33eb15ec95b64c 0 1615459704635 6 connected
4f4ee9bb8e7e28ee11f649d440a5e86ddc980f98 192.168.248.131:6379@16379 myself,master - 0 1615459701000 1 connected 0-5460
8dbb957d1d318bde7abcbf55b2619e0145e92327 192.168.248.135:6379@16379 slave 4f4ee9bb8e7e28ee11f649d440a5e86ddc980f98 0 1615459703000 5 connected
bc884c724920a5e91830a31c4c33eb15ec95b64c 192.168.248.132:6379@16379 master - 0 1615459703627 2 connected 5461-10922


[root@red1 ~]# /usr/local/redis/bin/redis-cli -a 123456 --cluster check 192.168.248.136:6379
Warning: Using a password with '-a' or '-u' option on the command line interface may not be safe.
192.168.248.131:6379 (4f4ee9bb...) -> 0 keys | 5461 slots | 1 slaves.
192.168.248.133:6379 (b71555b8...) -> 0 keys | 5461 slots | 1 slaves.
192.168.248.132:6379 (bc884c72...) -> 1 keys | 5462 slots | 1 slaves.
[OK] 1 keys in 3 masters.
0.00 keys per slot on average.
>>> Performing Cluster Check (using node 192.168.248.136:6379)
S: b36a1551c4970b62ce6b38beb038fd8c36eaae79 192.168.248.136:6379
   slots: (0 slots) slave
   replicates bc884c724920a5e91830a31c4c33eb15ec95b64c
M: 4f4ee9bb8e7e28ee11f649d440a5e86ddc980f98 192.168.248.131:6379
   slots:[0-5460] (5461 slots) master
   1 additional replica(s)
M: b71555b81c99482d8a928690f9875511dc7f7443 192.168.248.133:6379
   slots:[10923-16383] (5461 slots) master
   1 additional replica(s)
M: bc884c724920a5e91830a31c4c33eb15ec95b64c 192.168.248.132:6379
   slots:[5461-10922] (5462 slots) master
   1 additional replica(s)
S: 4a0756f094b31864b3a4d42a93a52ef03af01a5e 192.168.248.134:6379
   slots: (0 slots) slave
   replicates b71555b81c99482d8a928690f9875511dc7f7443
S: 8dbb957d1d318bde7abcbf55b2619e0145e92327 192.168.248.135:6379
   slots: (0 slots) slave
   replicates 4f4ee9bb8e7e28ee11f649d440a5e86ddc980f98
[OK] All nodes agree about slots configuration.
>>> Check for open slots...
>>> Check slots coverage...
[OK] All 16384 slots covered.
Nexus
nexus是一个强大的maven仓库管理器,它极大地简化了自己内部仓库的维护和外部仓库的访问
Download #官方下载页面
部署nexus
# wget https://download.sonatype.com/nexus/3/nexus-3.30.1-01-unix.tar.gz
# tar xf nexus-3.30.1-01-unix.tar.gz -C /usr/local/src
# ln -s /usr/local/src/nexus-3.30.1-01 /usr/local/nexus
# cat /lib/systemd/system/nexus.service
[Unit]
Description=nexus service
After=network.target

[Service]
Type=forking
LimitNOFILE=65536
ExecStart=/usr/local/nexus/bin/nexus start
ExecStop=/usr/local/nexus/bin/nexus stop
User=root
Restart=on-abort
TimeoutSec=600

[Install]
WantedBy=multi-user.target

# systemctl daemon-reload
# systemctl start nexus

###监听8081端口
# ss -tnlp | grep 8081
登录web界面
用户名admin,密码查看对应的文件/usr/local/src/sonatype-work/nexus3/admin.password
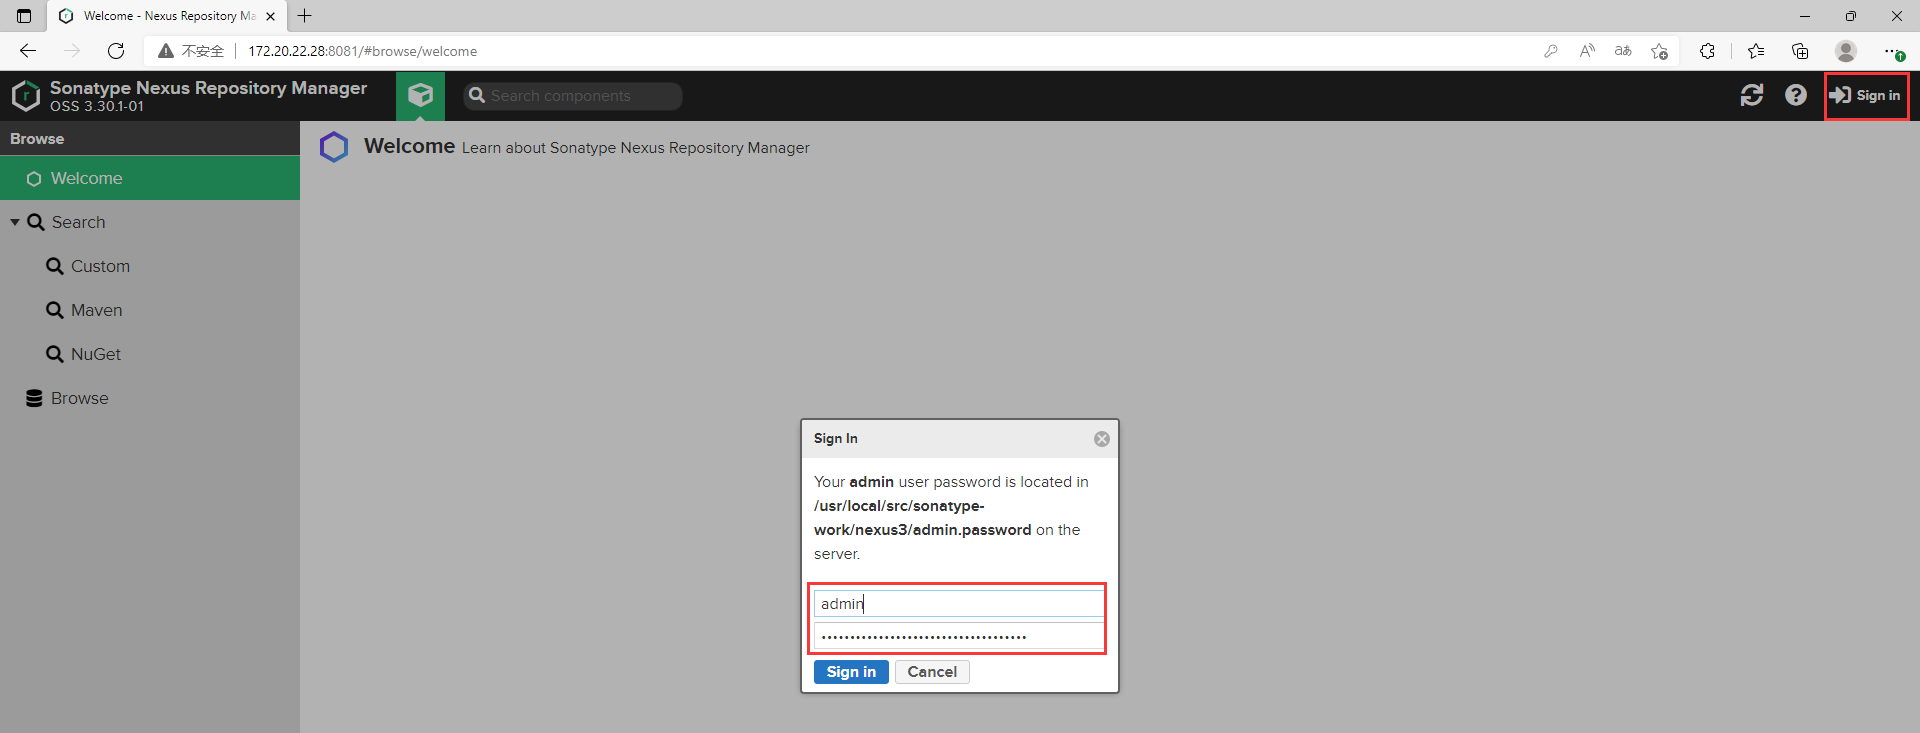
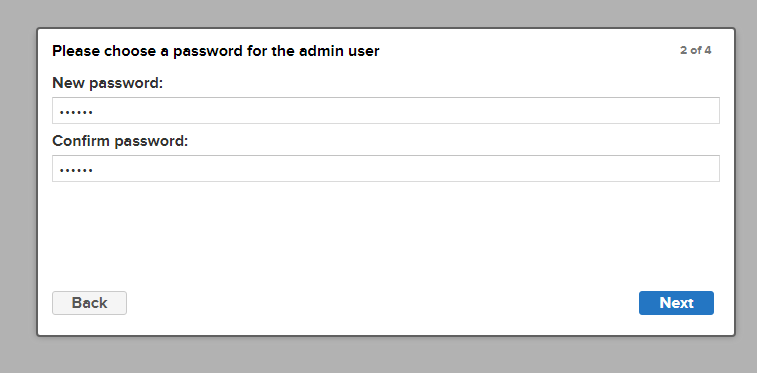
设置向导

设置密码
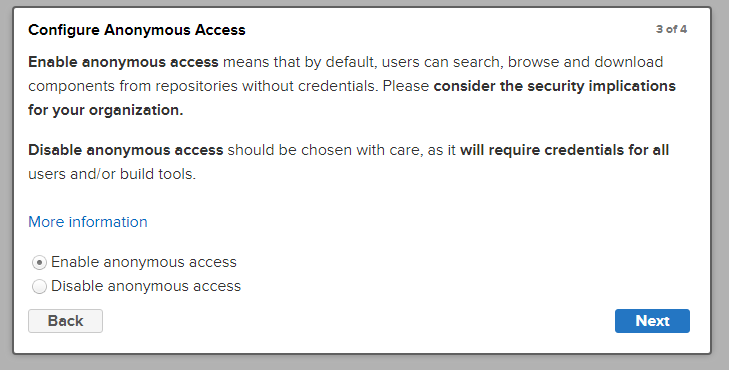
启用匿名下载
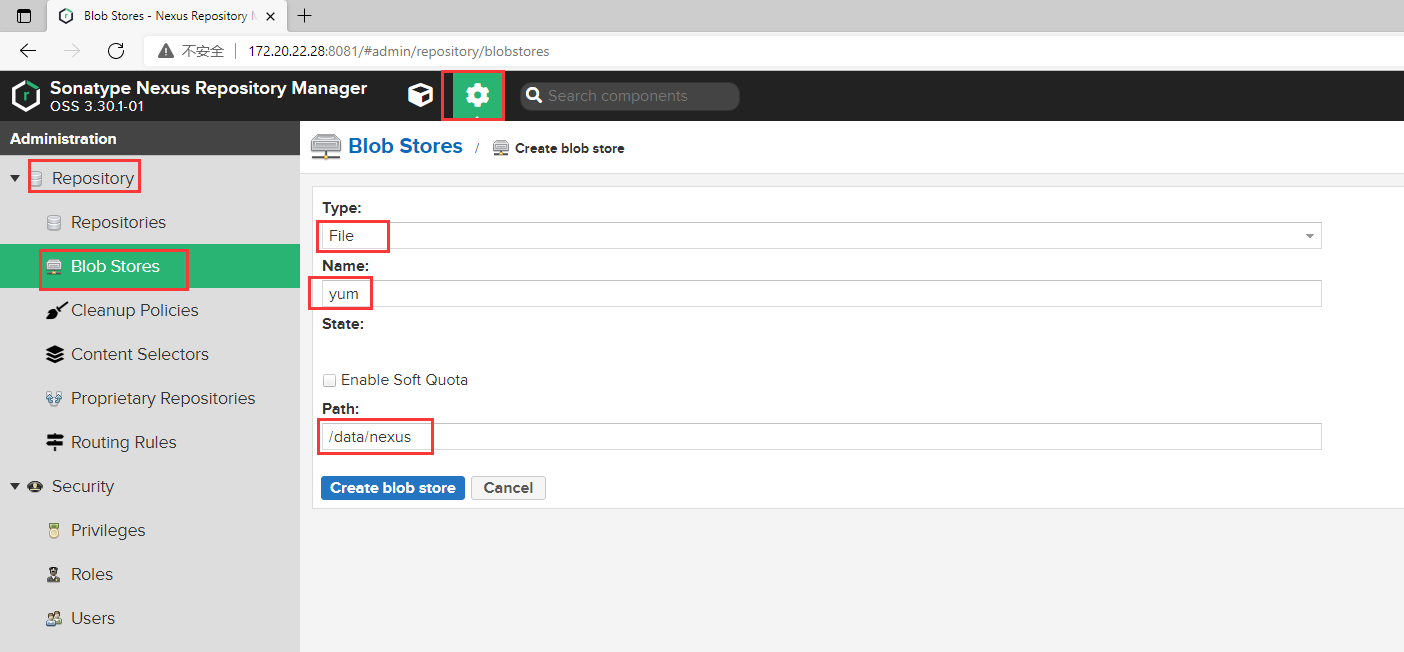
使用nexus构建私有yum仓库示例
新建存储
setting-->Blob Stores
####创建对应的目录
# mkdir /data/nexus
nexus仓库配置
通过nexus作为公司内网yum仓库,通过阿里云镜像安装包
阿里云开源镜像站资源目录 #zabbix阿里云镜像地址
setting-->Create repository -->yum(proxy)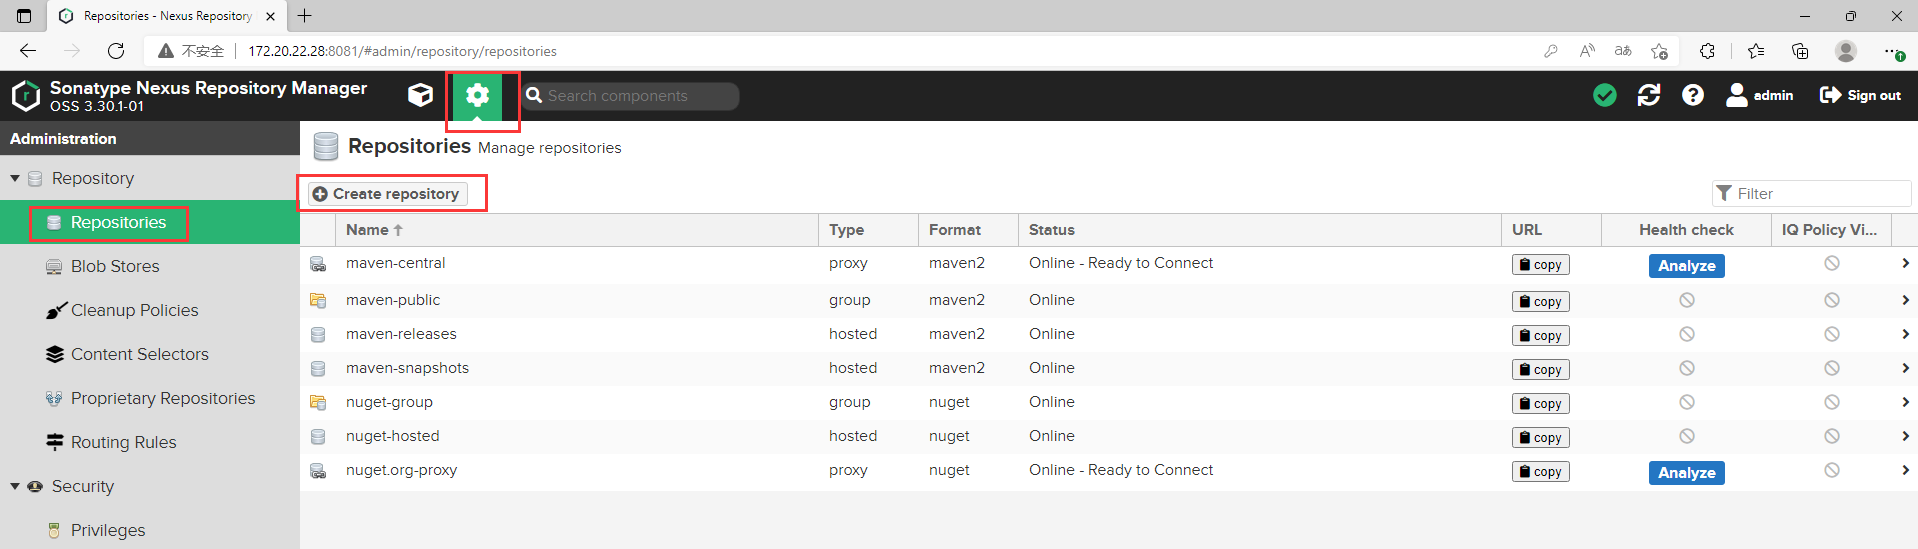
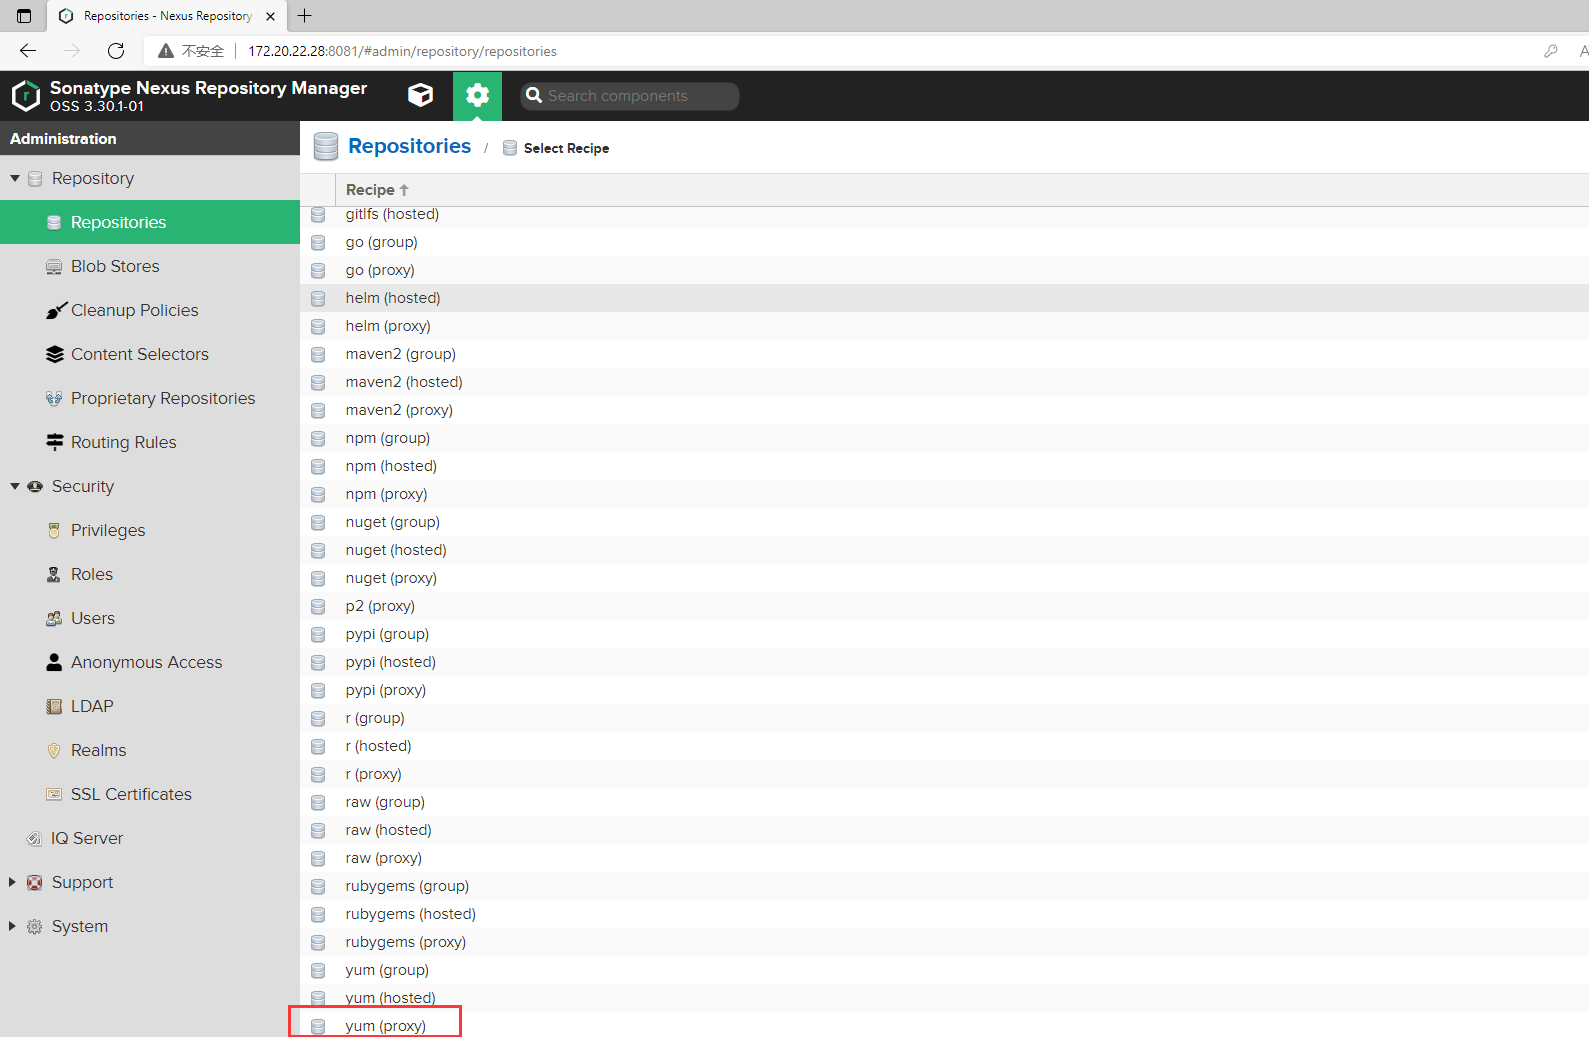
输入name:zabbix-nexus,Proxy-Remote storage:阿里云开源镜像站资源目录,Storage:选择刚创建的yum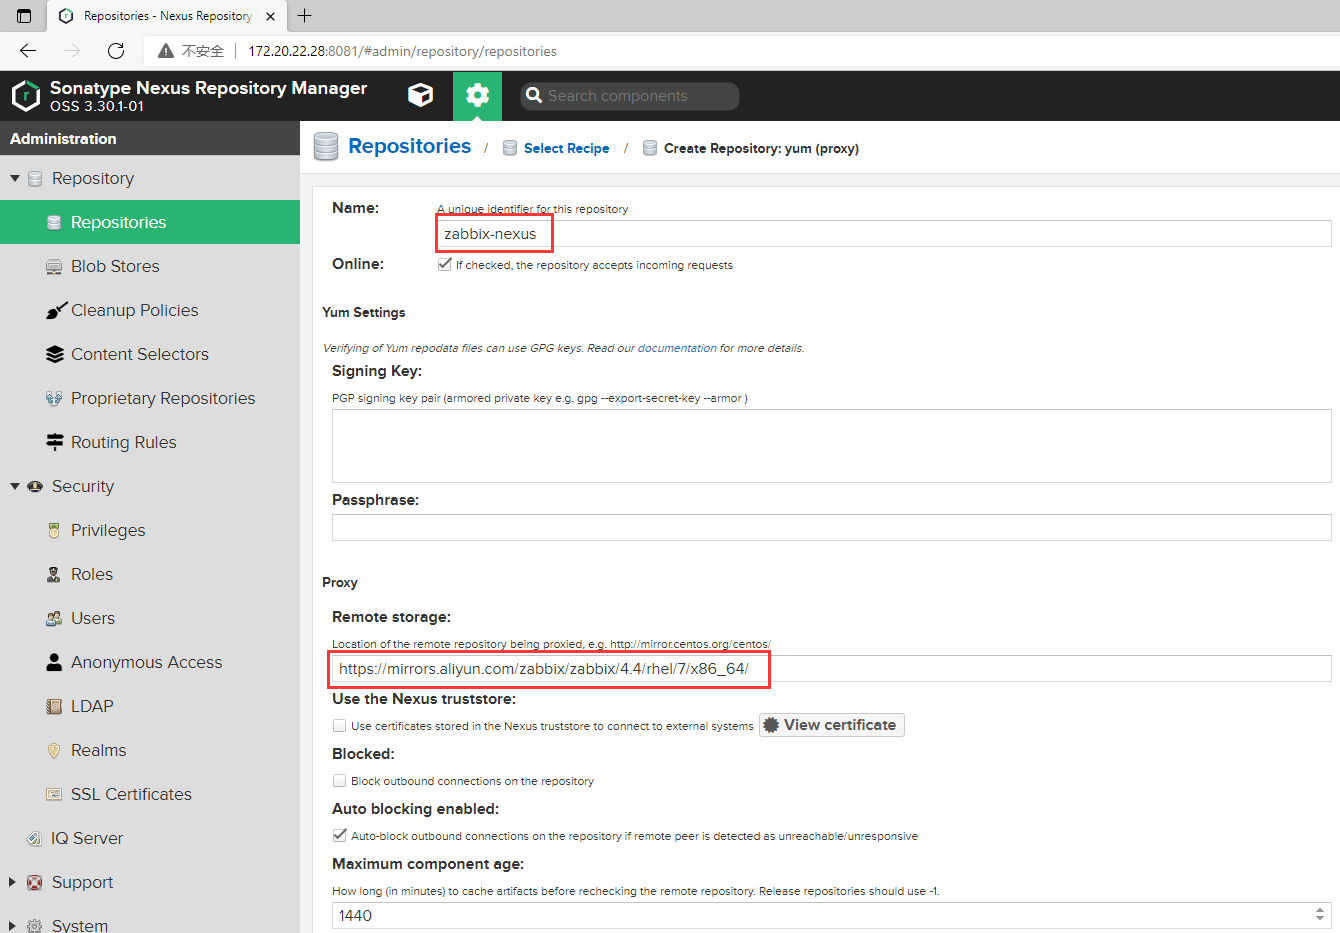
访问测试
http://172.20.22.28:8081/repository/zabbix-nexus/
Centos7.X配置yum仓库
# cat /etc/yum.repos.d/zabbix.repo
[zabbix]
name=zabbix
baseurl=http://172.20.22.28:8081/repository/zabbix-nexus/
enabled=1
gpgcheck=0

###安装测试
# yum list zabbix-*

# yum install -y zabbix-agent zabbix-proxy
验证nexus数据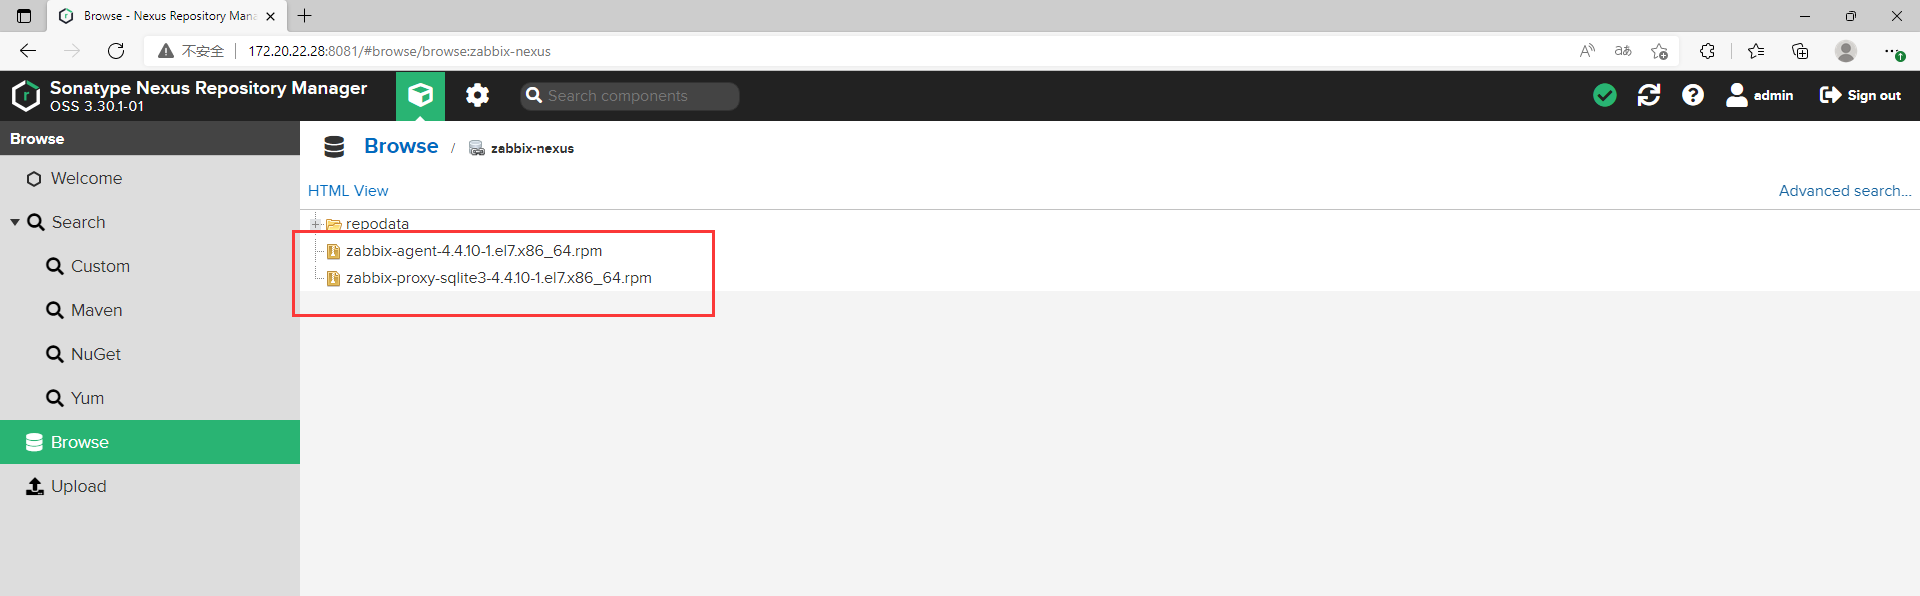
###nexus服务器
# cat /data/nexus/content/vol-06/chap-36/365b5a13-3c60-4a34-9279-019ba5fa7431.properties
#2022-04-11 06:46:25,606-0700
#Mon Apr 11 06:46:25 MST 2022
@BlobStore.created-by=anonymous
size=444804
@Bucket.repo-name=zabbix-nexus
creationTime=1649684785605
@BlobStore.created-by-ip=172.20.23.157
@BlobStore.content-type=application/x-rpm
@BlobStore.blob-name=zabbix-agent-4.4.10-1.el7.x86_64.rpm
sha1=826a4dcff341601aac3171837be51498fcf29d1f

# file /data/nexus/content/vol-06/chap-36/365b5a13-3c60-4a34-9279-019ba5fa7431.bytes
/data/nexus/content/vol-06/chap-36/365b5a13-3c60-4a34-9279-019ba5fa7431.bytes: RPM v3.0 bin i386/x86_64


###安装zabbix-get对比md5的值
###centos7.X
# vim /etc/yum.conf
....
keepcache=1   #修改此配置项
....

# yum install -y zabbix-get
# md5sum /var/cache/yum/x86_64/7/zabbix/packages/zabbix-get-4.4.10-1.el7.x86_64.rpm
3173d49ecb14918fefba83d28439dd1b  /var/cache/yum/x86_64/7/zabbix/packages/zabbix-get-4.4.10-1.el7.x86_64.rpm

###nexus服务器
# md5sum /data/nexus/content/vol-03/chap-40/d681ef7b-b1ff-4059-a11b-ef177585036f.bytes
3173d49ecb14918fefba83d28439dd1b  /data/nexus/content/vol-03/chap-40/d681ef7b-b1ff-4059-a11b-ef177585036f.bytes


 1473
1473

 被折叠的 条评论
为什么被折叠?
被折叠的 条评论
为什么被折叠?
 到【灌水乐园】发言


