


root面具相信很多玩家都不陌生。早期玩友大都使用第三方卡刷补丁来对系统进行各种修复和添加功能。目前面具补丁代替了这些操作。今天的帖子了解下面具各种模块的组成和几种普遍的代码组成。
Magisk中运行的每个单独的shell脚本都将在内部的BusyBox的shell中执行。对于与第三方开发者而言,这包括所有引导脚本和模块安装脚本。
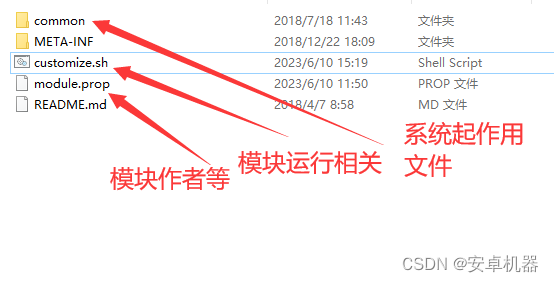
一个面具模块由/METAINF/*、/system/*、/customize.sh、/module.prop、/post-fs-data.sh、/service.sh、/system.prop、/uninstall.sh、/sepolicy.rule组成其中只有/META-INF/*和/module.prop是必须的其他的部分都是可选添加的,每个部分都有不同的作用.
💔💔💔以下是最简单的一个面具改机型模块的组成

对于那些想在Magisk之外使用此“独立模式”功能的人,有两种启用它的方法:
- 将环境变量
ASH_STANDALONE设置为1
示例:ASH_STANDALONE=1 /data/adb/magisk/busybox sh <script> - 切换命令行选项:
/data/adb/magisk/busybox sh -o standalone <script> - Magisk模块的文件在
/data/adb/modules中具有以下结构: -
/data/adb/modules ├── . ├── . | ├── $MODID <--- 该文件夹以模块的ID命名 │ │ │ │ *** 模块ID *** │ │ │ ├── module.prop <--- 该文件存储模块的基本信息 │ │ │ │ *** 主要内容 *** │ │ │ ├── system <--- 如果skip_mount不存在,则将挂载此文件夹 │ │ ├── ... │ │ ├── ... │ │ └── ... │ │ │ │ *** 状态标志 *** │ │ │ ├── skip_mount <--- 如果存在,Magisk将不会挂载你的system文件夹 │ ├── disable <--- 如果存在,该模块将被禁用 │ ├── remove <--- 如果存在,该模块将在下次重新启动时被删除 │ │ │ │ *** 可选文件 *** │ │ │ ├── post-fs-data.sh <--- 该脚本将在post-fs-data模式下执行 │ ├── service.sh <--- 该脚本将在late_start service模式执行 | ├── uninstall.sh <--- 当Magisk删除您的模块时,将执行此脚本 │ ├── system.prop <--- 该文件中的properties将通过resetprop作为系统properties加载 │ ├── sepolicy.rule <--- 添加自定义的sepolicy规则 │ │ │ │ *** 自动生成,请勿手动创建或修改 *** │ │ │ ├── vendor <--- 指向$MODID/system/vendor的链接 │ ├── product <--- 指向$MODID/system/product的链接 │ ├── system_ext <--- 指向$MODID/system/system_ext的链接 │ │ │ │ *** 允许任何其他文件/文件夹 *** │ │ │ ├── ... │ └── ... | ├── another_module💔💔💔module.prop记录了模块的ID,名称,版本,作者,简介等内容,module.prop的含义与简单的修改型号模块代码对比。
id=<string>
name=<string>
version=<string>
versionCode=<int>
author=<string>
description=<string>
id=三星9300 name=改机型为三星9300 version=Pro versionCode=1 author=孤独的小猫咪 description=改机型为三星9300 -
最简单的模块只要有
/META-INF/com/google/android/update-binary&updater-script
和/module.prop&/system
就足够了。当然,这样的模块的模块也只是刷入留下module.prop信息和替换/system/*中的文件而已,但这也足够满足替换类模块的需求,也就是说不需要用到指令的情况下这样就够了。对于最简单的改机型面具模块来说就是最鲜明的例子。 -
-
💔💔 common--system.prop里面的信息就是此模块的主要起作用文件.这玩意就是修改prop的值,属于重置/替换/添加,但是没有删除这个功能。其功能一目了然。修改prop里面的型号值
-
ro.product.model=XT2301-5 ro.product.brand=motorola ro.product.manufacturer=motorola ro.product.device=msi💔💔💔customize.sh,这个脚本是在模块刷入时执行的用于各种需要刷入进行准备使用的指令,像是检测设备机型,Android版本,或是音量键选择之类的都要写在这里面,
-
其中customize.sh代码。例如
-
##########################################################################################
#
# Magisk Module Installer Script
# 模块作者:孤独小猫咪
#
##########################################################################################
##########################################################################################
#
# Instructions:
#
# 1. Place your files into system folder (delete the placeholder file)
# 2. Fill in your module's info into module.prop
# 3. Configure the settings in this file (config.sh)
# 4. If you need boot scripts, add them into common/post-fs-data.sh or common/service.sh
# 5. Add your additional or modified system properties into common/system.prop
#
##########################################################################################

##########################################################################################
# Configs
##########################################################################################

# Set to true if you need to enable Magic Mount
# Most mods would like it to be enabled

##########################################################################################
# Installation Message
##########################################################################################

# Set what you want to show when installing your mod

print_modname() {
  ui_print "*******************************"
  ui_print "记得重启前将同类型模块关掉哦"
  ui_print "*******************************"
}

##########################################################################################
# Replace list
##########################################################################################

# List all directories you want to directly replace in the system
# Check the documentations for more info about how Magic Mount works, and why you need this

# This is an example
REPLACE="
/system/app/Youtube
/system/priv-app/SystemUI
/system/priv-app/Settings
/system/framework
"

# Construct your own list here, it will override the example above
# !DO NOT! remove this if you don't need to replace anything, leave it empty as it is now
REPLACE="

"
#添加您要精简的APP/文件夹目录
#例如:精简状态栏,找到状态栏目录为  /system/priv-app/SystemUI/SystemUI.apk
#转化加入:/system/priv-app/SystemUI
#(可以搭配高级设置获取APP目录)

##########################################################################################
# Permissions
##########################################################################################
#释放文件,普通shell命令
on_install() {
  ui_print "- 正在释放文件"
  unzip -o "$ZIPFILE" 'system/*' -d $MODPATH >&2
}

set_permissions() {
  # Only some special files require specific permissions
  # The default permissions should be good enough for most cases

  # Here are some examples for the set_perm functions:

  # set_perm_recursive  <dirname>                <owner> <group> <dirpermission> <filepermission> <contexts> (default: u:object_r:system_file:s0)
  # set_perm_recursive  $MODPATH/system/lib       0       0       0755            0644

  # set_perm  <filename>                         <owner> <group> <permission> <contexts> (default: u:object_r:system_file:s0)
  # set_perm  $MODPATH/system/bin/app_process32   0       2000    0755         u:object_r:zygote_exec:s0
  # set_perm  $MODPATH/system/bin/dex2oat         0       2000    0755         u:object_r:dex2oat_exec:s0
  # set_perm  $MODPATH/system/lib/libart.so       0       0       0644

  # The following is default permissions, DO NOT remove
  set_perm_recursive  $MODPATH  0  0  0755  0644

  #设置权限,基本不要去动
}

##########################################################################################
# Custom Functions
##########################################################################################

# This file (config.sh) will be sourced by the main flash script after util_functions.sh
# If you need custom logic, please add them here as functions, and call these functions in
# update-binary. Refrain from adding code directly into update-binary, as it will make it
# difficult for you to migrate your modules to newer template versions.
# Make update-binary as clean as possible, try to only do function calls in it.


CommonPath=$MODPATH/common
if [ ! -d ${CommonPath} ];then
  ui_print "模块高级设置不需要修复!"

elif [ "`ls -A ${CommonPath}`" = "" ];then
    ui_print "模块高级设置为空!"
    rm  -rf  ${CommonPath}
else

  ui_print "- 正在进行模块高级设置"
  mv  ${CommonPath}/*  $MODPATH
  rm  -rf ${CommonPath}

fi
这个应该是面具模块里面最简单的一个。其实目前有很多玩机工具里面有很多面具模块的初始模板.。
-
结合以上描述。应该可以初步了解面具模块的组成和其中各文件的作用。有兴趣的友友可以分解一些简单的模块对照了解其文件组成。原则上来说。面具模块可以完成很多第三方rec卡刷补丁的一些操作。而且操作也比较简单。更详细的可以参考:Developer Guides | Magisk各面具更新 更换等可以参考;玩机搞机----root面具的安装 更新 隐藏root 德尔塔面具等等综合解析_安卓机器的博客-CSDN博


 3830
3830

 被折叠的 条评论
为什么被折叠?
被折叠的 条评论
为什么被折叠?
 到【灌水乐园】发言


