


OpenCV除了使用光流算法与普通插值实现图像视频超分,还提供AI深度学习实现视频超分。算法模型包括:edsr、espcn、fsrcnn、lapsrn,实现超分的倍数有2、3、4、8。通过AI实现的视频超分比传统算法的效果更好,图像更清晰。
1、超分算法对比
在opencv_contrib外置库的dnn_superres模块,就是用AI实现的图像/视频超分。接下来,我们对比AI算法、双三次插值、最近邻插值、Lanczos插值的超分效果。通过计算图像的PSNR、SSIM来评估超分质量。
#include <iostream>
#include <opencv2/opencv_modules.hpp>
#include <opencv2/dnn_superres.hpp>
#include <opencv2/quality.hpp>
#include <opencv2/imgproc.hpp>

using namespace std;
using namespace cv;
using namespace dnn_superres;

static Vec2d getQualityValues(Mat orig, Mat upsampled)
{
    double psnr = PSNR(upsampled, orig);
    Scalar q = quality::QualitySSIM::compute(upsampled, orig, noArray());
    double ssim = mean(Vec3d((q[0]), q[1], q[2]))[0];
    return Vec2d(psnr, ssim);
}

int main(int argc, char *argv[])
{
    if (argc < 4) {
        cout << "usage:";
        cout << "Arg 1: image path  | Path to image\n";
        cout << "Arg 2: algorithm | edsr, espcn, fsrcnn or lapsrn\n";
        cout << "Arg 3: path to model file \n";
        cout << "Arg 4: scale  | 2, 3, 4 or 8 \n";
        cout << "-----------------------------------------------" << endl;
        return -1;
    }
    string path = string(argv[1]);
    string algorithm = string(argv[2]);
    string model = string(argv[3]);
    int scale = atoi(argv[4]);

    Mat img = imread(path);
    if (img.empty()) {
        cerr << "Couldn't load image: " << img << "\n";
        return -2;
    }

    // 裁剪图像
    int width = img.cols - (img.cols % scale);
    int height = img.rows - (img.rows % scale);
    Mat cropped = img(Rect(0, 0, width, height));

    Mat img_downscaled;
    resize(cropped, img_downscaled, Size(), 1.0 / scale, 1.0 / scale);

    Mat img_new;
    DnnSuperResImpl sr;
    vector <Mat> allImages;

    // 读取模型:以ESPCN为例,"models/ESPCN_x2.pb"
    sr.readModel(model);
    // 设置超分算法、超分倍数
    sr.setModel(algorithm, scale);
    sr.upsample(img_downscaled, img_new);

    vector<double> psnrValues = vector<double>();
    vector<double> ssimValues = vector<double>();

    // 1、深度学习模型
    Vec2f quality = getQualityValues(cropped, img_new);

    psnrValues.push_back(quality[0]);
    ssimValues.push_back(quality[1]);

    cout << sr.getAlgorithm() << ":" << endl;
    cout << "PSNR: " << quality[0] << " SSIM: " << quality[1] << endl;

    // 2、双三次插值
    Mat bicubic;
    resize(img_downscaled, bicubic, Size(), scale, scale, INTER_CUBIC);
    quality = getQualityValues(cropped, bicubic);

    psnrValues.push_back(quality[0]);
    ssimValues.push_back(quality[1]);

    cout << "Bicubic " << endl;
    cout << "PSNR: " << quality[0] << " SSIM: " << quality[1] << endl;

    // 3、最近邻插值
    Mat nearest;
    resize(img_downscaled, nearest, Size(), scale, scale, INTER_NEAREST);
    quality = getQualityValues(cropped, nearest);

    psnrValues.push_back(quality[0]);
    ssimValues.push_back(quality[1]);

    cout << "Nearest neighbor" << endl;
    cout << "PSNR: " << quality[0] << " SSIM: " << quality[1] << endl;

    // 4、LANCZOS插值
    Mat lanczos;
    resize(img_downscaled, lanczos, Size(), scale, scale, INTER_LANCZOS4);
    quality = getQualityValues(cropped, lanczos);

    psnrValues.push_back(quality[0]);
    ssimValues.push_back(quality[1]);

    cout << "Lanczos" << endl;
    cout << "PSNR: " << quality[0] << " SSIM: " << quality[1] << endl;

    return 0;
}
2、超分效果对比
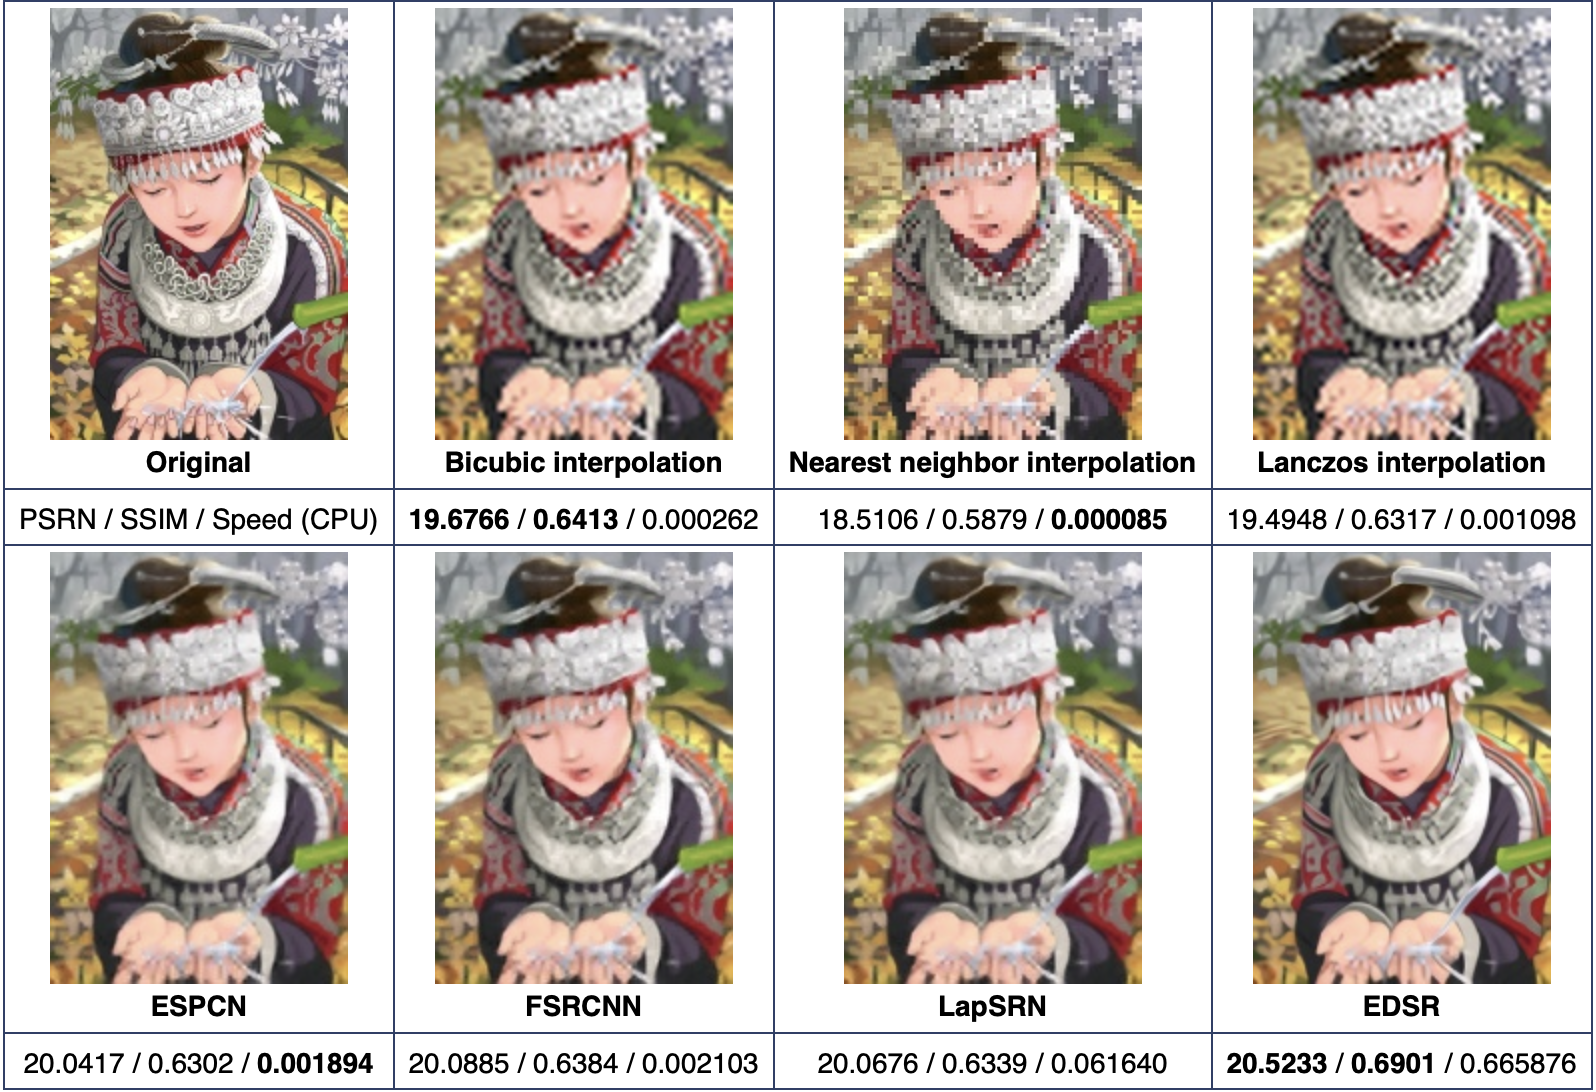
以4倍超分为例,各个算法实现超分的效果如下图所示。可以看到双三次插值、最近邻插值、Lanczos插值的图像有马赛克方块,而通过AI实现超分的图像比较清晰。
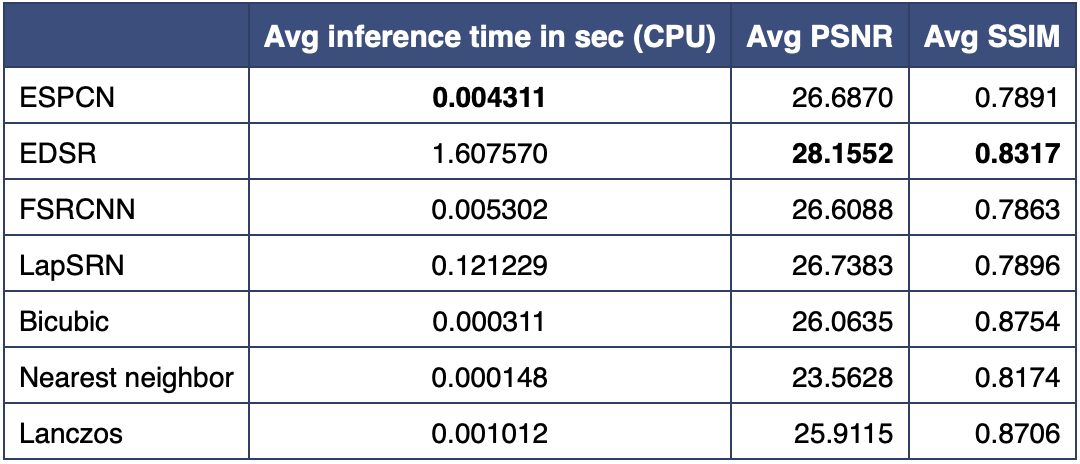
具体的耗时、PSNR、SSIM数据,如下表所示。可以看到,传统算法的耗时很少,PSNR值在26左右。而AI算法的耗时比较高,其中EDSR模型的耗时有1.6s,PSNR值最高(超过28)。
3、AI视频超分
通过VideoCapture来读取视频帧,然后使用DnnSuperResImpl实现逐帧超分,接着用VideoWriter写视频文件。完整的示例代码如下:
int main(int argc, char *argv[])
{
    if (argc < 4) {
        cout << "usage:   Arg 1: input video path" << endl;
        cout << "\t Arg 2: output video path" << endl;
        cout << "\t Arg 3: algorithm | edsr, espcn, fsrcnn or lapsrn" << endl;
        cout << "\t Arg 4: scale     | 2, 3, 4 or 8 \n";
        cout << "\t Arg 5: path to model file \n";
        return -1;
    }

    string input_path = string(argv[1]);
    string output_path = string(argv[2]);
    string algorithm = string(argv[3]);
    int scale = atoi(argv[4]);
    string path = string(argv[5]);

    VideoCapture input_video(input_path);
    int ex = static_cast<int>(input_video.get(CAP_PROP_FOURCC));
    Size S = Size((int) input_video.get(CAP_PROP_FRAME_WIDTH) * scale,
                  (int) input_video.get(CAP_PROP_FRAME_HEIGHT) * scale);

    VideoWriter output_video;
    output_video.open(output_path, ex, input_video.get(CAP_PROP_FPS), S, true);

    if (!input_video.isOpened())
    {
        std::cerr << "Could not open the video." << std::endl;
        return -1;
    }
    // 读取超分模型、设置超分倍数
    DnnSuperResImpl sr;
    sr.readModel(path);
    sr.setModel(algorithm, scale);

    for(;;)
    {
        Mat frame, output_frame;
        // 读取视频帧
        input_video >> frame;

        if ( frame.empty() )
            break;
        // 执行超分
        sr.upsample(frame, output_frame);
        // 写入超分后的视频帧
        output_video << output_frame;

        char c=(char)waitKey(25);
        if(c==27)
            break;
    }

    input_video.release();
    output_video.release();

    return 0;
}
4、AI超分源码
首先把图像转换为浮点格式,然后拆分YCbCr通道,传入深度学习网络进行超分,最后重建图像。源码如下:
void DnnSuperResImpl::upsample(InputArray img, OutputArray result)
{
    if (net.empty())
        CV_Error(Error::StsError, "Model not specified. Please set model via setModel().");

    if (this->alg == "espcn" || this->alg == "lapsrn" || this->alg == "fsrcnn")
    {
        // 预处理: 转成浮点格式
        Mat preproc_img;
        preprocess_YCrCb(img, preproc_img);

        // 拆分通道,仅用Y通道进行推理
        Mat ycbcr_channels[3];
        split(preproc_img, ycbcr_channels);

        Mat Y = ycbcr_channels[0];

        // 创建blob
        cv::Mat blob;
        dnn::blobFromImage(Y, blob, 1.0);

        // 使用神经网络进行超分
        this->net.setInput(blob);
        Mat blob_output = this->net.forward();

        // 从blob转换回image
        std::vector <Mat> model_outs;
        dnn::imagesFromBlob(blob_output, model_outs);
        Mat out_img = model_outs[0];

        // 重建图像: 对Cr、Cb进行超分,融合第三层网络
        reconstruct_YCrCb(out_img, preproc_img, result, this->sc);
    }
    else if (this->alg == "edsr")
    {
        // Div2K数据集的平均值
        Scalar mean = Scalar(103.1545782, 111.561547, 114.35629928);

        // 转成浮点格式
        Mat float_img;
        img.getMat().convertTo(float_img, CV_32F, 1.0);

        // 创建blob、抽取数据集的平均值
        cv::Mat blob;
        dnn::blobFromImage(float_img, blob, 1.0, Size(), mean);

        // 使用神经网络进行超分
        this->net.setInput(blob);
        Mat blob_output = this->net.forward();

        // 从blob转换回image
        std::vector <Mat> model_outs;
        dnn::imagesFromBlob(blob_output, model_outs);

        // 后处理: 添加平均值
        Mat(model_outs[0] + mean).convertTo(result, CV_8U);
    }
    else
    {
        CV_Error(cv::Error::StsNotImplemented, String("Unknown/unsupported superres algorithm: ") + this->alg);
    }
}


 693
693


 被折叠的 条评论
为什么被折叠?
被折叠的 条评论
为什么被折叠?
 到【灌水乐园】发言


