


上一篇博客初步认识了wpa_supplicant的作用和使用方法,并且尝试着梳理了wifi的大框架,不过,java层的框架我们忽略了,没有分析,也就是说上一篇博客简单的指出了wifi代码的大框架,那么这篇博客,将尝试梳理wifi的java层框架。
声明:本人使用的Android源码是6.0版本。
一.WifiService的启动
WifiService的启动可用如下简单时序图表示:
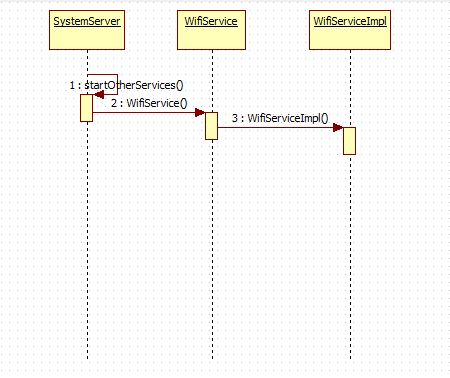
启动过程的图示画的比较简单,下面就顺着这个思路理一下代码的实现。
在SystemServer.java的 startOtherServices() 方法中,启动了WifiService,代码如下:
                mSystemServiceManager.startService(WIFI_P2P_SERVICE_CLASS);
                mSystemServiceManager.startService(WIFI_SERVICE_CLASS);
                mSystemServiceManager.startService(
                            "com.android.server.wifi.WifiScanningService");

                mSystemServiceManager.startService("com.android.server.wifi.RttService");
其中用到的WIFI_P2P_SERVICE_CLASS,WIFI_SERVICE_CLASS两个变量的值如下:
    private static final String WIFI_SERVICE_CLASS =
            "com.android.server.wifi.WifiService";
    private static final String WIFI_P2P_SERVICE_CLASS =
            "com.android.server.wifi.p2p.WifiP2pService";
以上代码可以看到,SystemServier中启动的Wifi相关的服务有四个,从上往下依次是P2P wifi服务,普通wifi,wifi扫描附近热点的服务以及以太网服务。
- p2p wifi服务主要为Wi-Fi Direct提供相应的服务,Wi-Fi Direct是一种全新的技术,即使在没有传统的Wi-Fi网络或Wi-Fi接入点的环境中,仍然能够在诸如智能手机和数码相机等设备间实现点对点Wi-Fi连接。
- wifi 服务这是我们关注的重点。
下面我们看下wifi服务的启动过程。
    @SuppressWarnings("unchecked")
    public SystemService startService(String className) {
        final Class<SystemService> serviceClass;
        try {
            serviceClass = (Class<SystemService>)Class.forName(className);
        } catch (ClassNotFoundException ex) {
            Slog.i(TAG, "Starting " + className);
            throw new RuntimeException("Failed to create service " + className
                    + ": service class not found, usually indicates that the caller should "
                    + "have called PackageManager.hasSystemFeature() to check whether the "
                    + "feature is available on this device before trying to start the "
                    + "services that implement it", ex);
        }
        return startService(serviceClass);
    }
startService方法中通过Class.forName获得一个Class实例,但是这还不是WifiService的实例,然后调用startService进一步处理。这两个startService方法是重载方法,他们的参数类型不同。
   public <T extends SystemService> T startService(Class<T> serviceClass) {
        final String name = serviceClass.getName();
        Slog.i(TAG, "Starting " + name);

        // Create the service.
        if (!SystemService.class.isAssignableFrom(serviceClass)) {
            throw new RuntimeException("Failed to create " + name
                    + ": service must extend " + SystemService.class.getName());
        }
        final T service;
        try {
            Constructor<T> constructor = serviceClass.getConstructor(Context.class);
            service = constructor.newInstance(mContext);
        } catch (InstantiationException ex) {
            throw new RuntimeException("Failed to create service " + name
                    + ": service could not be instantiated", ex);
        } catch (IllegalAccessException ex) {
            throw new RuntimeException("Failed to create service " + name
                    + ": service must have a public constructor with a Context argument", ex);
        } catch (NoSuchMethodException ex) {
            throw new RuntimeException("Failed to create service " + name
                    + ": service must have a public constructor with a Context argument", ex);
        } catch (InvocationTargetException ex) {
            throw new RuntimeException("Failed to create service " + name
                    + ": service constructor threw an exception", ex);
        }

        // Register it.
        mServices.add(service);

        // Start it.
        try {
            service.onStart();
        } catch (RuntimeException ex) {
            throw new RuntimeException("Failed to start service " + name
                    + ": onStart threw an exception", ex);
        }
        return service;
    }
在这个startService方法中,使用 Constructor constructor = serviceClass.getConstructor(Context.class);
service = constructor.newInstance(mContext);构建了一个WifiService的实例,然后使用mServices.add(service);向系统注册WifiService,并调用WifiService的onStart方法。构造WifiService会调用WifiService的构造方法,它的构造方法如下:
    public WifiService(Context context) {
        super(context);
        mImpl = new WifiServiceImpl(context);
    }
wifiService构造函数有新建了一个WifiServiceImpl实例,它才是Wifi管理服务真正的实现者,构造函数调用后不是调用了WifiService的onStart方法吗?
    @Override
    public void onStart() {
        Log.i(TAG, "Registering " + Context.WIFI_SERVICE);
        publishBinderService(Context.WIFI_SERVICE, mImpl);
    }
在onStart方法中发布了Wifi服务,发布的WifiServiceImpl的实例。发布的过程如下:
1.
    protected final void publishBinderService(String name, IBinder service) {
        publishBinderService(name, service, false);
    }
2.
    protected final void publishBinderService(String name, IBinder service,
            boolean allowIsolated) {
        ServiceManager.addService(name, service, allowIsolated);
    }
也就是说还是调用了ServiceManager的addService方法,这里就不再深入了,再深入就有点跑偏了。
通过以上分析,我们知道了真的wifi服务是WifiServiceImpl,它的构造方法如下:
    public WifiServiceImpl(Context context) {
        mContext = context;

        mInterfaceName =  SystemProperties.get("wifi.interface", "wlan0");

        mTrafficPoller = new WifiTrafficPoller(mContext, mInterfaceName);
        mWifiStateMachine = new WifiStateMachine(mContext, mInterfaceName, mTrafficPoller);
        mWifiStateMachine.enableRssiPolling(true);
        mBatteryStats = BatteryStatsService.getService();
        mPowerManager = context.getSystemService(PowerManager.class);
        mAppOps = (AppOpsManager)context.getSystemService(Context.APP_OPS_SERVICE);
        mUserManager = UserManager.get(mContext);

        mNotificationController = new WifiNotificationController(mContext, mWifiStateMachine);
        mSettingsStore = new WifiSettingsStore(mContext);

        HandlerThread wifiThread = new HandlerThread("WifiService");
        wifiThread.start();
        mClientHandler = new ClientHandler(wifiThread.getLooper());
        mWifiStateMachineHandler = new WifiStateMachineHandler(wifiThread.getLooper());
        mWifiController = new WifiController(mContext, this, wifiThread.getLooper());
    }
这里面做的事情还是很多的,主要有以下几点:
1.mInterfaceName 是从系统属性中获取的,它的值一般就是wlan0;
2.mTrafficPoller 这个实例的作用从其类的简介(Polls for traffic stats and notifies the clients )上可以看出他是用来查询流量统计信息比通知给客户端的。
3.mWifiStateMachine 这个实例代表着一个Wifi状态机,它定义了wifi的很多状态,通过消息驱动状态的转变。
4.mBatteryStats ,mPowerManager 用于wifi的电源管理,
5.mNotificationController 处理打开“打开wifi并且可以使用“的通知。
6.wifiThread 它是一个HandlerThread 的实例,HandlerThread 是一个内部有Looper的线程,wifiThread会一直监听消息,消息到来以后,通过mClientHandler 的handleMessage来处理消息。
7.WifiStateMachineHandler 用于发送和处理wifi状态机相关的消息。
8.mWifiController 是另一个状态机,它和mWifiStateMachine 不同,mWifiStateMachine 表述wifi具体的状态,比如supplicant启动/关闭状态,driver启动/关闭状态等,mWifiController 则更高一级的控制wifi设备的开关状态,wifi热点的开关状态等。
理解mWifiController 和mWifiStateMachine 对于理解Android wifi框架至关重要。所以接下来,我们就着重分析wifi状态机的工作原理。
二.wifi状态机工作原理
我们说mWifiController 是高级别的wifi状态机,因为它管理的状态是wifi开关,wifi热点开关等状态,只有在wifi开关等具体状态下,判断wifi处于启动扫描附近热点状态等才是有意义的。
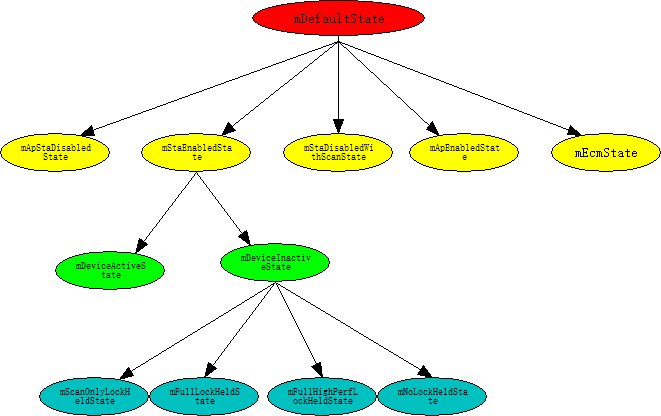
状态机无非就是一个定义了很多状态的机器,它收到消息后,会根据消息来切换这个机器的状态。mWifiController 的状态构造在它的构造方法中:
        addState(mDefaultState);
            addState(mApStaDisabledState, mDefaultState);
            addState(mStaEnabledState, mDefaultState);
                addState(mDeviceActiveState, mStaEnabledState);
                addState(mDeviceInactiveState, mStaEnabledState);
                    addState(mScanOnlyLockHeldState, mDeviceInactiveState);
                    addState(mFullLockHeldState, mDeviceInactiveState);
                    addState(mFullHighPerfLockHeldState, mDeviceInactiveState);
                    addState(mNoLockHeldState, mDeviceInactiveState);
            addState(mStaDisabledWithScanState, mDefaultState);
            addState(mApEnabledState, mDefaultState);
            addState(mEcmState, mDefaultState);
结构图如下:
每一个状态机都有一个初始状态:
        if (isScanningAlwaysAvailable) {
            setInitialState(mStaDisabledWithScanState);
        } else {
            setInitialState(mApStaDisabledState);
        }
mWifiStateMachine 则表述wifi更加细致的状态,它的状态构建也是在构造函数中:
        addState(mDefaultState);
            addState(mInitialState, mDefaultState);
            addState(mSupplicantStartingState, mDefaultState);
            addState(mSupplicantStartedState, mDefaultState);
                addState(mDriverStartingState, mSupplicantStartedState);
                addState(mDriverStartedState, mSupplicantStartedState);
                    addState(mScanModeState, mDriverStartedState);
                    addState(mConnectModeState, mDriverStartedState);
                        addState(mL2ConnectedState, mConnectModeState);
                            addState(mObtainingIpState, mL2ConnectedState);
                            addState(mVerifyingLinkState, mL2ConnectedState);
                            addState(mConnectedState, mL2ConnectedState);
                            addState(mRoamingState, mL2ConnectedState);
                        addState(mDisconnectingState, mConnectModeState);
                        addState(mDisconnectedState, mConnectModeState);
                        addState(mWpsRunningState, mConnectModeState);
                addState(mWaitForP2pDisableState, mSupplicantStartedState);
                addState(mDriverStoppingState, mSupplicantStartedState);
                addState(mDriverStoppedState, mSupplicantStartedState);
            addState(mSupplicantStoppingState, mDefaultState)
最低0.47元/天 解锁文章


 5144
5144


 被折叠的 条评论
为什么被折叠?
被折叠的 条评论
为什么被折叠?
 到【灌水乐园】发言


