


1. W5100S
1.1 简介
W5100S 是一款多功能的单芯片网络接口芯片,内部集成全硬件的TCP/IP协议栈,以太网MAC和 10Base-T/100Base-TX以太网控制器。主要应用于高集成、高稳定、高性能和低成本的嵌入式系统中。 使用W5100S,用户MCU可以方便的处理IPv4,TCP,UDP,ICMP,IGMP,ARP,PPPoE等各种TCP/IP协议。W5100S分别拥有8KB的发送缓存和接收缓存,可以最大限度地减少MCU的开销。 主机还可以同时使用W5100S的4个独立的硬件SOCKETs,并基于每个硬件SOCKET开发独立的互联网应用。
W5100S支持SPI接口和并行系统总线接口。 它还提供低功耗/低热量设计,WOL(Wake On LAN),以太网PHY掉电模式等。
W5100S是基于W5100改进的低成本网络接口芯片。W5100使用的任何固件及程序都可以直接在W5100S上使用,无需任何修改。 此外,W5100S采用48引脚LQFP和QFN无铅封装,明显小于W5100的80引脚封装,方便产品小型化
1.2 W5100S与W5100、W5500的区别
| 型号参数 | W5500 | W5100 | W5100S |
|---|---|---|---|
| 内部架构 | 全硬件TCP / IP协议栈+ MAC + PHY | 全硬件TCP / IP协议栈+ MAC + PHY | 全硬件TCP / IP协议栈+ MAC + PHY |
| 交互接口 | SPI | SPI,8bit bus | SPI,间接总线 |
| SOCKET数 | 8 | 4 | 4 |
| 收发缓存 | 32KB | 16KB | 16KB |
| MAX速率(Mbps) | 16 | 25 | 25 |
| Sleep mode | O | X | X |
| Hybrid mode | O | O | O |
| 工作温度 | -40℃ ~ 80℃ | -40℃ ~ 80℃ | -40℃ ~ 80℃ |
| 工作电压 | 3.3V/5V | 3.3V/5V | 3,3V/5V |
| 性能转换 | 不支持极性自动转换 | 支持极性自动转换 | 支持极性自动转换 |
| 支持的全硬件TCP\IP协议 | TCP、UDP、IP、ICMP、MAC、IGMP、PPPoE、Ethernet MAC | TCP、UDP、IP、ICMP、MAC、IGMP、PPPoE、Ethernet MAC | TCP、UDP、IP、ICMP、MAC、IGMP、PPPoE、WOL |
| 封装工艺 | LQFP48 无铅封装(7x7mm,间距 0.5mm) | LQFP80 无铅封装 | 48 管脚 LQFP 封装和 QFN 封装 (无铅,7x7mm, 0.5mm 间距) |
2. W5100S网卡的TCP-Client回环测试
2.1 CC2652RB硬件SPI的介绍
使用 CC2652RB 的 SDK 开发包提供的例程 ( spimaster ) 加以修改来驱动 W5100S 网卡.
SDK里已经把它所有外设的驱动都封装成库,只要按照 <ti/drivers/SPI.h> 文件中提供的说明,按顺序调用对应的API即可使用,例如:
/*!*****************************************************************************
 *  @file       SPI.h
 *
 *  @brief      Serial Peripheral Interface (SPI) Driver Interface
 *
 * @anchor ti_drivers_SPI_Overview
 *  # Overview
 *  The Serial Peripheral Interface (SPI) driver is a generic, full-duplex
 *  driver that transmits and receives data on a SPI bus.  SPI is sometimes
 *  called SSI (Synchronous Serial Interface).
 *  The SPI protocol defines the format of a data transfer over the SPI bus,
 *  but it leaves flow control, data formatting, and handshaking mechanisms
 *  to higher-level software layers.
 *
 *  The SPI driver operates on some key definitions and assumptions:
 *  - The driver operates transparently from the chip select. Some SPI
 *    controllers feature a hardware chip select to assert SPI slave
 *    peripherals. See the specific device implementations on chip
 *    select requirements.
 *
 *  - The SPI protocol does not account for a built-in handshaking mechanism
 *    and neither does this SPI driver. Therefore, when operating in
 *    #SPI_SLAVE mode, the application must provide such a mechanism to
 *    ensure that the SPI slave is ready for the SPI master. The SPI slave
 *    must call #SPI_transfer() *before* the SPI master starts transmitting.
 *    Some example application mechanisms could include:
 *    - Timed delays on the SPI master to guarantee the SPI slave is ready
 *      for a SPI transaction.
 *    - A form of GPIO flow control from the slave to the SPI master to notify
 *      the master when ready.
 *
 *  <hr>
 *  @anchor ti_drivers_SPI_Usage
 *  # Usage
 *
 *  To use the SPI driver to send data over the SPI bus, the application
 *  calls the following APIs:
 *    - SPI_init(): Initialize the SPI driver.
 *    - SPI_Params_init():  Initialize a #SPI_Params structure with default
 *      values.  Then change the parameters from non-default values as
 *      needed.
 *    - SPI_open():  Open an instance of the SPI driver, passing the
 *      initialized parameters, or NULL, and an index to the configuration to
 *      open (detailed later).
 *    - SPI_transfer():  Transmit/receive data.  This function takes a
 *      #SPI_Transaction argument that describes the transfer that is requested.
 *    - SPI_close():  De-initialize the SPI instance.
 *
 *  @anchor ti_drivers_SPI_Synopsis
 *  ## Synopsis
 *  The following code example opens a SPI instance as a master SPI,
 *  and issues a transaction.
 *
 *  @code
 *  SPI_Handle      spi;
 *  SPI_Params      spiParams;
 *  SPI_Transaction spiTransaction;
 *  uint8_t         transmitBuffer[MSGSIZE];
 *  uint8_t         receiveBuffer[MSGSIZE];
 *  bool            transferOK;
 *
 *  SPI_init();  // Initialize the SPI driver
 *
 *  SPI_Params_init(&spiParams);  // Initialize SPI parameters
 *  spiParams.dataSize = 8;       // 8-bit data size
 *
 *  spi = SPI_open(CONFIG_SPI0, &spiParams);
 *  if (spi == NULL) {
 *      while (1);  // SPI_open() failed
 *  }
 *
 *  // Fill in transmitBuffer
 *  spiTransaction.count = MSGSIZE;
 *  spiTransaction.txBuf = (void *)transmitBuffer;
 *  spiTransaction.rxBuf = (void *)receiveBuffer;
 *
 *  transferOK = SPI_transfer(spi, &spiTransaction);
 *  if (!transferOK) {
 *      // Error in SPI or transfer already in progress.
 *      while (1);
 *  }
 *  @endcode
这里仅贴出了一下部分,具体请到对应的 .h 文件中查阅.
2.2 初始化与W5100S连接的接口
-
通过 SysConfig 工具配置使用到的SPI以及一些控制引脚的IO

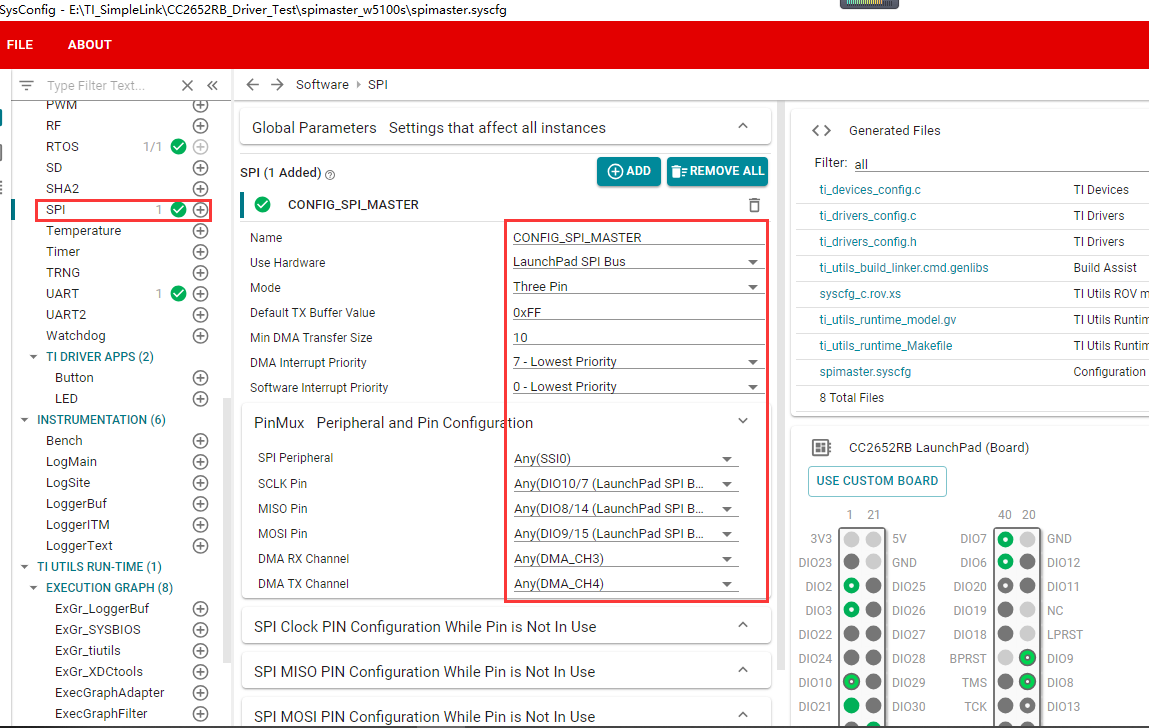
配置成功后,点击 FILE – Save 保存配置内容。 -
在 utility.h 文件中配置延时函数
注释掉 utility.c 文件中配置STM32滴答定时器用来延时的函数,并在 utility.h 中使用宏定义定义延时函数
#include <unistd.h>
#define delay_s(time_s)     sleep(time_s)
#define delay_us(time_us)   usleep(time_us)
#define delay_ms(time_ms)   usleep((time_ms * 1000))
- 在 w5100s_config.c 文件中配置复位和中断管脚
/**
*@brief  初始化W5100s的复位与中断管脚
*@param  无
*@return 无
*/
void reset_break_gpio_init(void)
{
    /* 请确保再此之前以调用过一次 GPIO_init(); */
    GPIO_setConfig(CONFIG_GPIO_SPI_SLAVE_RST, GPIO_CFG_OUT_STD | GPIO_CFG_OUT_HIGH);

    GPIO_setConfig(CONFIG_SPI_SLAVE_READY, GPIO_CFG_IN_PU | GPIO_CFG_IN_INT_FALLING);
    GPIO_setCallback(CONFIG_SPI_SLAVE_READY, slaveReadyFxn);
    GPIO_enableInt(CONFIG_SPI_SLAVE_READY);
}

/**
*@brief  W5100s复位设置函数
*@param  无
*@return 无
*/
void reset_w5100s(void)
{
    GPIO_write(CONFIG_GPIO_SPI_SLAVE_RST, 0);
    delay_ms(500);     //500ms
    GPIO_write(CONFIG_GPIO_SPI_SLAVE_RST, 1);
    delay_s(1);           //1s
}
- 配置 SPI 的读写函数及片选函数
#include "bsp_hard_spi.h"


static SPI_Handle  masterSpi;

/* 初始化SPI */
void bsp_HardSpiInit(void)
{
    SPI_Params      spiParams;
   /* Open SPI as master (default) */
    SPI_Params_init(&spiParams);
    spiParams.frameFormat = SPI_POL1_PHA1;
    spiParams.bitRate = 4000000;
    masterSpi = SPI_open(CONFIG_SPI_MASTER, &spiParams);
    if (masterSpi == NULL)
    {
        while (1);
    }
    else
    {

    }

    /* CS 引脚初始化 */
    GPIO_setConfig(CONFIG_GPIO_SPI_SLAVE_CS , GPIO_CFG_OUT_STD | GPIO_CFG_OUT_HIGH);
}

/* 关闭SPI */
void bsp_HardSpiClose(void)
{
    SPI_close(masterSpi);
}

/* 使用硬件SPI 发送一个字节 */
void bsp_HardSpi_SendByte(uint8_t byte)
{
    bool            transferOK;
    SPI_Transaction transaction;
    uint8_t recByte = 0;

    transaction.count = 1;
    transaction.txBuf = (void *) &byte;
    transaction.rxBuf = (void *) &recByte;
    /* Perform SPI transfer */
    transferOK = SPI_transfer(masterSpi, &transaction);
    if (transferOK) {

    }
    else {

    }
}

/* 使用硬件SPI 读取一个字节 */
uint8_t bsp_HardSpi_ReadByte(void)
{
    bool            transferOK;
    SPI_Transaction transaction;
    uint8_t byte    = 0;
    uint8_t recByte = 0;

    transaction.count = 1;
    transaction.txBuf = (void *) &byte;
    transaction.rxBuf = (void *) &recByte;
    /* Perform SPI transfer */
    transferOK = SPI_transfer(masterSpi, &transaction);
    if (transferOK) {

    }
    else {

    }
    return recByte;
}

/* 失能片选 */
void bsp_W5100sCS_High(void)
{
  GPIO_write(CONFIG_GPIO_SPI_SLAVE_CS, 1);
}

/* 使能片选 */
void bsp_W5100sCS_Low(void)
{
  GPIO_write(CONFIG_GPIO_SPI_SLAVE_CS, 0);
}
2.3 测试工程主函数
void *masterThread(void *arg0)
{
    int32_t         status;
//    status = sem_init(&masterSem, 0, 0);
//    if (status != 0) {
//        Display_printf(display, 0, 0, "Error creating masterSem\n");
//
//        while(1);
//    }
    bsp_HardSpiInit();
    //W5100S 初始化
    reset_break_gpio_init();
    reg_wizchip_spi_cbfunc(bsp_HardSpi_ReadByte,bsp_HardSpi_SendByte);          // SPI读写数据函数映射
    reg_wizchip_cs_cbfunc(bsp_W5100sCS_Low,bsp_W5100sCS_High);                        // SPI片选控制函数映射

    reset_w5100s();                       // W5100S硬件复位
    PHY_check();                          // 网线检测程序
    set_w5100s_mac();                     // 设置W5100SMAC地址
    set_w5100s_netinfo();                 // 设置W5100S网络参数
    sysinit(0x55,0x55);                   // 初始化4个Socket的发送接收缓存大小

    for(;;)
    {
        do_tcp_client();                    // TCP 客户端数据回环测试
    }

    bsp_HardSpiClose();

    /* Example complete - set pins to a known state */
    GPIO_disableInt(CONFIG_SPI_SLAVE_READY);
    GPIO_setConfig(CONFIG_SPI_SLAVE_READY, GPIO_CFG_OUTPUT | GPIO_CFG_OUT_LOW);


    Display_printf(display, 0, 0, "\nDone");

    return (NULL);
}
- 完整的工程下载,请点击 W5100S网卡的TCP-Client回环测试【资料中包含 STM32F103VET6 驱动 W5100S 的模板工程】,如果您没有积分可以留言,我单独发您。
PS:
- 使用IAR搭建CC2652RB的开发环境
- IAR FOR ARM 需要 8.50.9 及以上版本才能打开.
- 需要先安装 CC2652RB 的 SDK,且需要安装在默认位置(C:\ti).


 4078
4078


 被折叠的 条评论
为什么被折叠?
被折叠的 条评论
为什么被折叠?
 到【灌水乐园】发言


