pytorch实现图像remap

def gpu_remap(numpy_img,map_tensor):
    # 准备图像数据
    img_tensor = torch.from_numpy(numpy_img).contiguous().cuda(non_blocking=True)
    img_tensor = img_tensor.permute(2,0,1).unsqueeze(0).float()
    res = torch.nn.functional.grid_sample(img_tensor,map_tensor,
                                          mode='bilinear',
                                          padding_mode='zeros',
                                          align_corners=None)
    res = res.char()
    res = res[0].permute(1,2,0)
    res = res.cpu()
    res = res.numpy()
    res = np.uint8(res)
    return res
def cpu_remap(numpy_img,mapx,mapy):
    return cv2.remap(numpy_img,mapx,mapy,cv2.INTER_LINEAR)
if __name__=='__main__':
    mtx = np.asarray(
                      [[1.45400077e+03,0.00000000e+00,8.91370579e+02],
                       [0.00000000e+00,1.20949778e+03,3.22130436e+02],
                       [0.00000000e+00,0.00000000e+00,1.00000000e+00]])
    dist =np.asarray([[-0.45415106,0.42747461,0.04382156,0.003691,-0.29239333]])
    w,h = 1920,1080
    # 准备map
    mapx, mapy = cv2.initUndistortRectifyMap(mtx, dist, None, mtx, (w, h), 5)
        
    # 准备grid数据
    mapx_tensor = torch.from_numpy(mapx).unsqueeze(2)/1920*2-1
    mapy_tensor = torch.from_numpy(mapy).unsqueeze(2)/1080*2-1
    map_tensor = torch.cat([mapx_tensor,mapy_tensor],dim=2).unsqueeze(0).cuda() 
    img_org = cv2.imread('test.jpg')

    for i in range(100):
        cpu_res = cpu_remap(img_org,mapx,mapy)
   
    for i in range(100):
        cpu_res = gpu_remap(img_org,map_tensor)

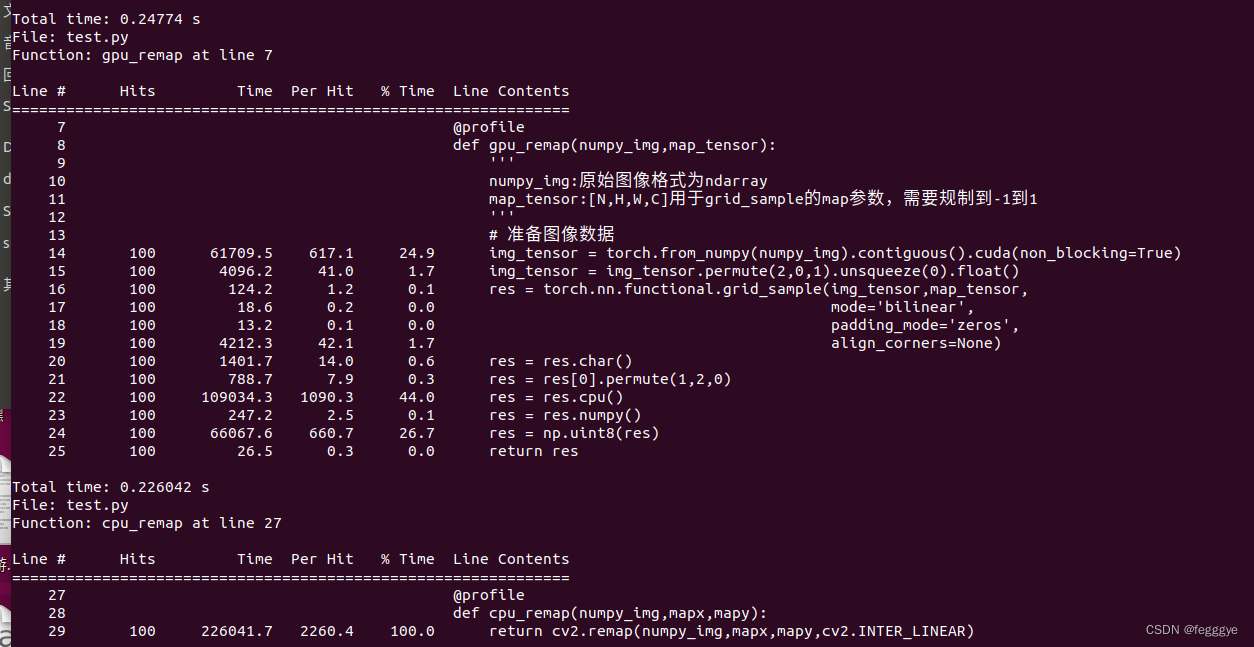
计算了下耗时,结果发现还是CPU->GPU数据拷贝是瓶颈。。。但是计算耗时确实少很多,后续看看如何优化吧。。。

  • 0
    点赞
  • 1
    收藏
    觉得还不错? 一键收藏
  • 0
    评论
PyTorch是一个非常适合进行图像处理的框架,它提供了许多用于图像处理的工具和函数。下面是一个简单的图像处理的例子: ``` import torch import torch.nn.functional as F from PIL import Image # 加载图像 img = Image.open('image.jpg') # 转换为张量 img_tensor = F.to_tensor(img) # 改变尺寸 resized_tensor = F.interpolate(img_tensor, size=(224, 224)) # 标准化 normalized_tensor = F.normalize(resized_tensor, mean=[0.485, 0.456, 0.406], std=[0.229, 0.224, 0.225]) # 增加批次维度 batched_tensor = torch.unsqueeze(normalized_tensor, dim=0) # 加载模型 model = torchvision.models.resnet18(pretrained=True) # 运行模型 output = model(batched_tensor) # 获取预测结果 pred = torch.argmax(output, dim=1) # 打印预测结果 print(pred) ``` 这个例子演示了如何使用PyTorch进行图像处理和分类。首先,我们加载了一张图像,并将其转换为张量。然后,我们通过插值方法将图像的尺寸改变为我们需要的大小。接下来,我们对图像进行标准化,这是因为预训练模型对输入数据进行了标准化。我们还需要将张量增加一个批次维度,因为模型需要一个批次的输入。 然后,我们加载了一个预训练的ResNet18模型,并将我们的张量输入到模型中。最后,我们获取预测结果并打印出来。 这个例子只是一个简单的图像处理和分类的例子,PyTorch还提供了许多其他的图像处理工具和函数,可以帮助您进行更复杂的图像处理任务。

“相关推荐”对你有帮助么?

  • 非常没帮助
  • 没帮助
  • 一般
  • 有帮助
  • 非常有帮助
提交
评论
添加红包

请填写红包祝福语或标题

红包个数最小为10个

红包金额最低5元

当前余额3.43前往充值 >
需支付:10.00
成就一亿技术人!
领取后你会自动成为博主和红包主的粉丝 规则
hope_wisdom
发出的红包
实付
使用余额支付
点击重新获取
扫码支付
钱包余额 0

抵扣说明:

1.余额是钱包充值的虚拟货币,按照1:1的比例进行支付金额的抵扣。
2.余额无法直接购买下载,可以购买VIP、付费专栏及课程。

余额充值