CGContext 图形上下文,相当于一块画布,以堆栈形式存放,只有在当前context上绘图才有效.iOS有分多种图形上下文,其中UIView 自带提供的在drawRect:方法中 通过UIGraphicsGetCurrentContext获取
注:本文是在q562679764的博客http://blog.csdn.net/q562679764/article/details/48289365的基础上完成的,非常感谢老王提供的代码
在自定义的视图中.m文件里 将- (void)drawRect:(CGRect)rect;方法解开注释.在该方法里画线;
- (void)drawRect:(CGRect)rect{
    [super drawRect:rect];
    //1. 获取上下文  (只有获取上下文,才能在上下文上画图 ,相当于一块画布)
    CGContextRef context = UIGraphicsGetCurrentContext();
    //2. 设置颜色,和线条宽度(相当于拿什么画笔来画)
    /*****参考下面设置颜色和线条宽度的方法*****/
     //3. 设置图像 (相当于你在画布上画的图像)
    /***** 参考下面画图像的方法*****/
    // 4.  渲染路径 (相当于最后的保存)
    CGContextStrokePath(context);
}
设置颜色和线条宽度
一. 设置颜色有三种: (默认为黑色)
前两种适合线条式图像,第三种适合填充式图像(当然还有其他设置颜色的方法,这里不讨论了,有兴趣的可以去文档CGContext.h里看看)
1⃣️   CGContextSetStrokeColorWithColor(context, [[UIColor redColor] CGColor]);//通过给定颜色设置
2⃣️   CGContextSetRGBStrokeColor(context, 1, 0, 0, 1);//通过RGB(红绿蓝三种基色)调和设置 最后一个参数为透明度
3⃣️   CGContextSetFillColorWithColor(context, [[UIColor redColor] CGColor]); //设置实心图像的颜色
二.设置线条宽度:(默认width为1)
CGContextSetLineWidth(context, 4.0); //填充式图像就没必要设置线条宽度了 画图像有2种 :
1.使用CGContextAdd......来画图像.(线条式图像)
1⃣️  **直线** :  起点 CGContextMoveToPoint(context, 0, 0);
            终点 CGContextAddLineToPoint(context, 100, 100);
另外可以根据直线绘制虚线
     CGFloat lengths[] = {10,10,5,5}; //数组里的元素: 奇数表示实线长度,偶数表示空白长度
     CGContextSetLineDash(context, 0, lengths, 4);//这里第二个参数表示从lengths[]中元素下标,第四个参数目前不太明白

2⃣️  **矩形边框** : CGContextAddRect(context, CGRectMake(0, 20, 50, 50));

3⃣️  **弧线** :
①:起点:CGContextMoveToPoint(context, 100, 0);
       CGContextAddArcToPoint(context, 100, 200, 300, 300,100);//这里参数分为2个点坐标和弧的半径.画弧线的规则是: 根据起点和第一个点的连线,第一个点和第二个点的连线,以radius参数为半径画弧,弧与这两条线相切 ,画出两个切点之间的弧,以及起点与第一个切点的直线.
这里写代码片②:  起点:CGContextMoveToPoint(context, 150, 200);
         CGContextAddArc(context, 100, 100, 50, M_PI_4, M_PI, 1);//这里前两个参数表示圆心点坐标,第四个参数表示半径,第五个参数表示从0度(位置为经过中心点的横轴与圆的交点,右边的那个)开始算起(顺时针为正)的弧度,为起点弧度,第六个参数为终点弧度.第七个参数,0表示逆时针,非零表示顺时针 .画出起点到起点弧度对应点的直线 再去掉起点弧度到终点弧度之间(按顺时针或逆时针)的弧线,留下剩下的弧线,这就是整个图像


4⃣️  **椭圆边框**:  CGContextAddEllipseInRect(context, CGRectMake(150, 150, 100, 120)); //(中心点(200,200), x轴半径50, y轴半径60);

//EllipseInRect表示这个椭圆内切于矩形<#CGRect rect#> 因此 其中心坐标为(x + width/2,y + height/2),x轴半径为width/2,y轴半径为height/2.如果已知中心点(x,y),x轴半径radiusX,y轴半径radiusY.那么CGRectMake(x-radiusX, y-radiusY, 2*radiusX, 2*radiusY);


5⃣️  **曲线**:   起点: CGContextMoveToPoint(context, 50, 50);
CGContextAddCurveToPoint(context, 100, 100, 150, 50, 200, 50);//这里的参数分为3组点的坐标,前面2个点为控制曲线点,第三个点为终点2.使用CGContextFill……来画图像(填充式图像),(fill表示封闭图形的内部都填满,即实心)
1⃣️ 矩形: CGContextFillRect(context, CGRectMake(0, 20, 50, 50));2⃣️ 椭圆: CGContextFillEllipseInRect(context, CGRectMake(100, 100, 50, 50)); 下面两句成对使用 用于保存和释放上次绘图的状态 每次绘制最好是用这两句话包起来 这样设置的颜色和线条宽度不会变成通用设置了
    //保存上下文的状态 压栈
    CGContextSaveGState(context);
    //出栈
    CGContextRestoreGState(context);
绘制文字
    //创建一个字体对象并设置大小 此方法无需引用上下文
    UIFont  *font = [UIFont boldSystemFontOfSize:24.0];
    //设置居中
    NSMutableParagraphStyle * parag = [[NSParagraphStyle defaultParagraphStyle] mutableCopy];
    parag.lineBreakMode = NSLineBreakByClipping;
    parag.alignment = NSTextAlignmentCenter;
    //创建一个字典 设置字体大小和文字颜色
    NSDictionary * dictionary = [[NSDictionary alloc] initWithObjectsAndKeys:font,NSFontAttributeName,[UIColor redColor],NSForegroundColorAttributeName, parag];
    //将文本内容渲染到view上
NSString  * str = @"文字";
 [str drawInRect:CGRectMake(20, 40, 320, 480) withAttributes:dictionary];
绘制图片
1:无上下文绘制
    //获取图片的地址 返回一个NSString类型地址  无需上下文
    NSString * imgPath = [[NSBundle mainBundle] pathForResource:@"地球" ofType:@"jpg"];
    //获取地址中的文件
    UIImage * myImg = [[UIImage alloc] initWithContentsOfFile:imgPath];
    //直接使用下面的这个效果一样
    UIImage * myImage = [UIImage imageNamed:@"地球.jpg"];
    //将图片渲染到view上
    [myImg drawInRect:CGRectMake(0, 0, 50, 50)];
2:上下文绘制
    //获取view的上下文  此方法绘出的图像是倒立的
    CGContextRef  context = UIGraphicsGetCurrentContext();
    //获取图片
    UIImage * img = [UIImage imageNamed:@"地球.jpg"];
    //获取位图
    CGImageRef image = img.CGImage;
    //保存上下文的状态 压栈
    CGContextSaveGState(context);
    //为视图设置大小
    CGRect touchRect = CGRectMake(0, 0, img.size.width, img.size.height);
    //绘图
    CGContextDrawImage(context, touchRect, image);
    //出栈
    CGContextRestoreGState(context);
3:旋转
    //获取图片
    UIImage * img = [UIImage imageNamed:@"地球.png"];
    //获取位图
    CGImageRef image = img.CGImage;
    //储存上下文的状态
    CGContextSaveGState(context);
    //设置旋转中心
    CGContextTranslateCTM(context, 160, 240);
    //设置绘图的大小和坐标 XY以中心为准
    CGRect touchRect  = CGRectMake(10,10, 50, 50);
    //旋转  这个方法写在设置中心和大小的前面和后面效果完全不同的
    CGContextRotateCTM(context,angle * M_PI/180);
    //绘制图片
    CGContextDrawImage(context, touchRect, image);
    //释放保存的上下文
    CGContextRestoreGState(context);
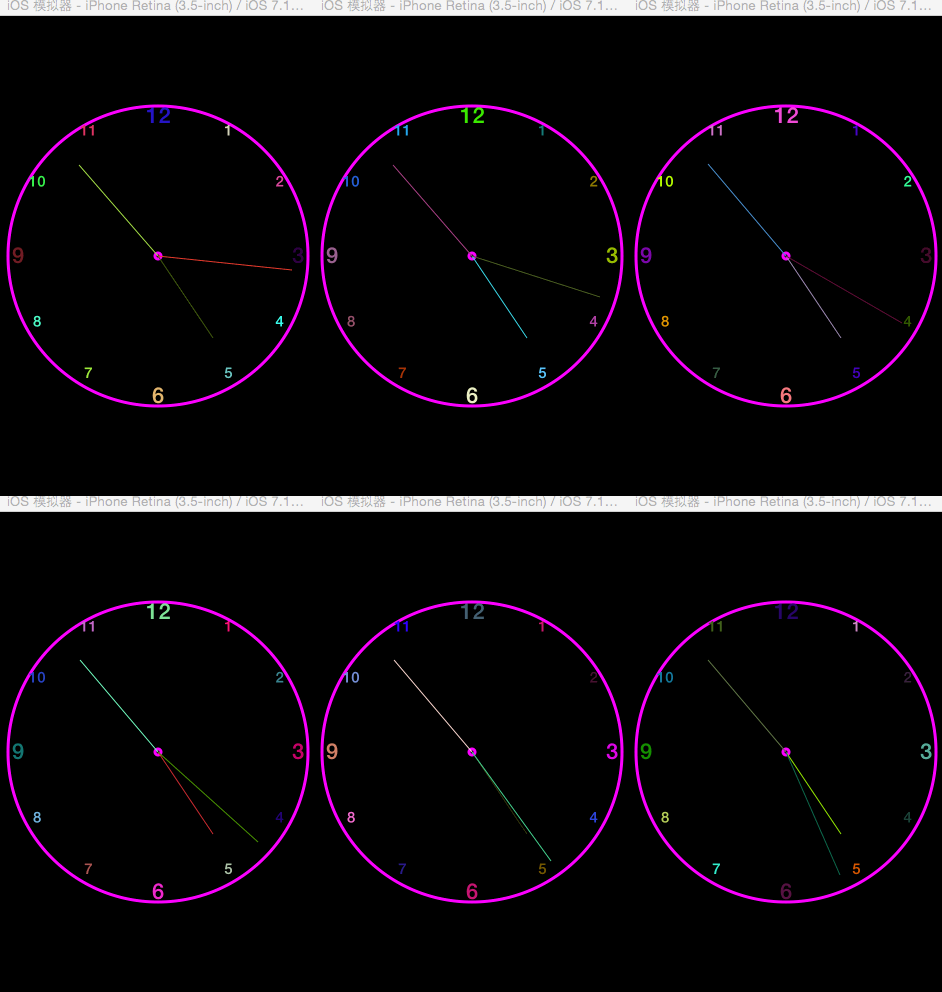
下面是一个时钟的绘制,内存方面存在一定的BUG(内存会随着时间增加而增加),这里仅是展示一下CGContext的画图
#import "ClockView.h"

#define angle2Radian(angle) (angle)*M_PI/180
@implementation ClockView

- (id)initWithFrame:(CGRect)frame
{
    self = [super initWithFrame:frame];
    if (self) {
        // Initialization code
    }
    return self;
}


// Only override drawRect: if you perform custom drawing.
// An empty implementation adversely affects performance during animation.
- (void)drawRect:(CGRect)rect
{
    // Drawing code
    [super drawRect:rect];
    CGContextRef context = UIGraphicsGetCurrentContext();

    //保存上下文的状态 压栈
    CGContextSaveGState(context);
    CGContextSetStrokeColorWithColor(context,[[UIColor magentaColor] CGColor]);

    CGContextAddEllipseInRect(context, CGRectMake(10, 90, 300, 300));//绘制外圆
    CGContextAddEllipseInRect(context, CGRectMake(157, 237, 6, 6));//绘制内圆
    CGContextSetLineWidth(context, 3);
    CGContextStrokePath(context);
    //出栈
    CGContextRestoreGState(context);


    //获取系统时间
    NSDate * date = [NSDate date];
    NSCalendar * calendar = [NSCalendar currentCalendar];
    NSUInteger unitFlags = NSHourCalendarUnit| NSMinuteCalendarUnit|NSSecondCalendarUnit;
    NSDateComponents * dateComponent = [calendar components:unitFlags fromDate:date];

    //    int hour = [dateComponent hour];
    //    int minute = [dateComponent minute];
    //    int second = [dateComponent second];
    //分离 时 分 秒
    int dates[3] = {[dateComponent hour]*30,[dateComponent minute]*6,[dateComponent second]*6};

    dates[0] += dates[1] / 6 / 2;
    dates[1] += dates[2] / 6 / 10;

    //三个指针的长度
    int indicatorLength[3] = {100,120,135};
    for (int i = 0; i < 3; i++) {
        //保存绘图之前的状态
        CGContextSaveGState(context);
        CGContextMoveToPoint(context, 160, 240);
        //设置随机颜色
        CGContextSetStrokeColorWithColor(context, [UIColor colorWithRed:arc4random()%256/255.0 green:arc4random()%256/255.0  blue:arc4random()%256/255.0  alpha:1].CGColor);
        int x = 160 + indicatorLength[i] * cos(angle2Radian(dates[i]-90));
        int y = 240 + indicatorLength[i] * sin(angle2Radian(dates[i]-90));

        CGContextAddLineToPoint(context, x, y);
        CGContextStrokePath(context);
        //恢复之前的状态
        CGContextRestoreGState(context);
    }
    //绘制时钟上1,2,3,...12等数字
    float fontSize;
    NSMutableParagraphStyle * parag = [[NSParagraphStyle defaultParagraphStyle] mutableCopy];
    parag.lineBreakMode = NSLineBreakByClipping;
    parag.alignment = NSTextAlignmentCenter;
    for (int i = 1; i < 13; i++) {
        if (i % 3 != 0) {
            fontSize = 15;
        }else{
            fontSize = 22;
        }
        float x = 148 + 140 *cos(angle2Radian((float)(i-3) * 30));
        float y = 226 + 140 *sin(angle2Radian((float)(i-3) * 30));
        UIFont * font =[UIFont boldSystemFontOfSize:fontSize];
        //设置字体的颜色 字体 居中
        NSDictionary * dic = @{NSForegroundColorAttributeName: [UIColor colorWithRed:arc4random()%256/255.0 green:arc4random()%256/255.0  blue:arc4random()%256/255.0  alpha:1],NSFontAttributeName:font,NSParagraphStyleAttributeName:parag};
        //获取显示文字
        NSString * str = [NSString stringWithFormat:@"%d",i];
        [str drawInRect:CGRectMake(x, y, 25, 25) withAttributes:dic];
    }
}


@end
#import "AppDelegate.h"
#import "ClockView.h"
@implementation AppDelegate
- (BOOL)application:(UIApplication *)application didFinishLaunchingWithOptions:(NSDictionary *)launchOptions
{
self.window = [[UIWindow alloc] initWithFrame:[[UIScreen mainScreen] bounds]];
// Override point for customization after application launch.
self.window.backgroundColor = [UIColor whiteColor];
[self.window makeKeyAndVisible];
ClockView * view = [[ClockView alloc] initWithFrame:CGRectMake(0, 0, 320, 480)];
view.backgroundColor = [UIColor blackColor]; //这里不设置背景的话会出现上一次的指针BUG,目前尚不知到原因,希望大家能指导一下
[self.window addSubview:view];
[NSTimer scheduledTimerWithTimeInterval:1 target:self selector:@selector(timer:) userInfo:view repeats:YES];
return YES;
}
-(void)timer:(id)sender{
ClockView * view = (ClockView *)[sender userInfo];
[view setNeedsDisplay];
}
@end效果图:


 2697
2697

 被折叠的 条评论
为什么被折叠?


