


概述
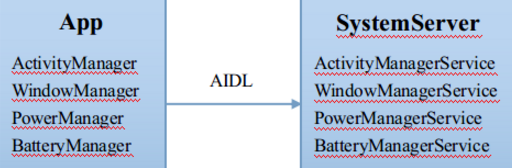
理解该文章,需要阅读者对Android进程间通信方式Binder有一定了解,理解Binder的方式之一便是找到一个系统中binder通信的例子,例如activity启动过程,该过程描述了应用进程的activity和系统进程,准确的说是SystemServer进程中的ActivityManagerService通信。其实,SystemServer进程中不仅仅运行着AMS,还运行着其他各种各样的系统服务,如WindowManagerService、PowerManagerService等。那么,我们平常写代码通过getSystemService获得的WindowManager又是怎么回事呢?ActivityManager、WindowManager等manager均是运行在应用进程。我们获取manager对象,manager持有能够与系统进程通信的BinderProxy(不明白的需要了解下binder通信),调用其逻辑方法,逻辑方法中便会与系统进程对应的Service进行通信,使用Service提供的服务。本篇文章,我们不探究具体的通信过程(说白了就是Binder)。而是学习下manager和manager分别是如何初始化的,如何组织的。
简单图示:
SystemServer
首先,我们了解下这些运行在SystemServer进程中的各种服务是如何起来的。SystemServer由zygote进程启动。启动后,会调用SystemServer.main()方法,如下:
    /**
     * The main entry point from zygote.
     */
    public static void main(String[] args) {
        new SystemServer().run();
    }
其中,创建SystemServer实例并调用run()方法,在run方法中进行了一些初始化的工作,例如调用createSystemContext创建系统Context。如下:
    private void createSystemContext() {
        ActivityThread activityThread = ActivityThread.systemMain();
        mSystemContext = activityThread.getSystemContext();
        mSystemContext.setTheme(DEFAULT_SYSTEM_THEME);
    }
也是在run()方法中,创建并启动了各项系统服务
创建SystemServerManager:
    // Create the system service manager.
    mSystemServiceManager = new SystemServiceManager(mSystemContext);
启动各种service:
 // Start services.
        try {
            Trace.traceBegin(Trace.TRACE_TAG_SYSTEM_SERVER, "StartServices");
            startBootstrapServices();
            startCoreServices();
            startOtherServices();
        } catch (Throwable ex) {
            Slog.e("System", "******************************************");
            Slog.e("System", "************ Failure starting system services", ex);
            throw ex;
        } finally {
            Trace.traceEnd(Trace.TRACE_TAG_SYSTEM_SERVER);
        }
startBootstrapServices部分代码:
// Activity manager runs the show.
mActivityManagerService = mSystemServiceManager.startService(
                ActivityManagerService.Lifecycle.class).getService();
mActivityManagerService.setSystemServiceManager(mSystemServiceManager);
mActivityManagerService.setInstaller(installer);

mPowerManagerService = mSystemServiceManager.startService(PowerManagerService.class);

// Display manager is needed to provide display metrics before package manager
// starts up.
mDisplayManagerService = mSystemServiceManager.startService(DisplayManagerService.class);
可以看到,各项服务均是通过mSystemServiceManager.startService()来启动,我们进入该方法:
SystemServiceManager.startService():
    /**
     * Starts a service by class name.
     *
     * @return The service instance.
     */
    @SuppressWarnings("unchecked")
    public SystemService startService(String className) {
        final Class<SystemService> serviceClass;
        try {
            serviceClass = (Class<SystemService>)Class.forName(className);
        } catch (ClassNotFoundException ex) {
            Slog.i(TAG, "Starting " + className);
            throw new RuntimeException("Failed to create service " + className
                    + ": service class not found, usually indicates that the caller should "
                    + "have called PackageManager.hasSystemFeature() to check whether the "
                    + "feature is available on this device before trying to start the "
                    + "services that implement it", ex);
        }
        return startService(serviceClass);
    }
这里通过类名反射拿到service类的class对象,接着调用重载方法,我们接着看:
 public <T extends SystemService> T startService(Class<T> serviceClass) {
        try {
            final String name = serviceClass.getName();
            Slog.i(TAG, "Starting " + name);
            Trace.traceBegin(Trace.TRACE_TAG_SYSTEM_SERVER, "StartService " + name);

            // Create the service.
            if (!SystemService.class.isAssignableFrom(serviceClass)) {
                throw new RuntimeException("Failed to create " + name
                        + ": service must extend " + SystemService.class.getName());
            }
            final T service;
            try {
                Constructor<T> constructor = serviceClass.getConstructor(Context.class);
                service = constructor.newInstance(mContext);
            } catch (InstantiationException ex) {
                throw new RuntimeException("Failed to create service " + name
                        + ": service could not be instantiated", ex);
            } catch (IllegalAccessException ex) {
                throw new RuntimeException("Failed to create service " + name
                        + ": service must have a public constructor with a Context argument", ex);
            } catch (NoSuchMethodException ex) {
                throw new RuntimeException("Failed to create service " + name
                        + ": service must have a public constructor with a Context argument", ex);
            } catch (InvocationTargetException ex) {
                throw new RuntimeException("Failed to create service " + name
                        + ": service constructor threw an exception", ex);
            }

            // Register it.
            mServices.add(service);

            // Start it.
            try {
                service.onStart();
            } catch (RuntimeException ex) {
                throw new RuntimeException("Failed to start service " + name
                        + ": onStart threw an exception", ex);
            }
            return service;
        } finally {
            Trace.traceEnd(Trace.TRACE_TAG_SYSTEM_SERVER);
        }
    }
可以看到,首先根据Class对象获取构造函数对象,并创建services实例,接着假如mServices中维护,最后启动服务。如此,各式各样的服务就在SystemServer进程中运行起来了。下面,我们来看APP端的manager是如何组织维护的。
App端
我们要获取manager实例,需要调用context.getSystemService()。那我们就将该方法作为入口来探究:
ContextImpl.getSystemService():
    @Override
    public Object getSystemService(String name) {
        return SystemServiceRegistry.getSystemService(this, name);
    }
进入SystemServiceRegistry.getSystemService():
    /**
     * Gets a system service from a given context.
     */
    public static Object getSystemService(ContextImpl ctx, String name) {
        ServiceFetcher<?> fetcher = SYSTEM_SERVICE_FETCHERS.get(name);
        return fetcher != null ? fetcher.getService(ctx) : null;
    }
可以看到这里通过name获取ServiceFetcher实例,从代码来看SYSTEM_SERVICE_FETCHERS应该是个map,果然:
    private static final HashMap<String, ServiceFetcher<?>> SYSTEM_SERVICE_FETCHERS =
            new HashMap<String, ServiceFetcher<?>>();
那么一定有put的地方,果然,在SystemServiceRegistory中存在如下方法:
    /**
     * Statically registers a system service with the context.
     * This method must be called during static initialization only.
     */
    private static <T> void registerService(String serviceName, Class<T> serviceClass,
            ServiceFetcher<T> serviceFetcher) {
        SYSTEM_SERVICE_NAMES.put(serviceClass, serviceName);
        SYSTEM_SERVICE_FETCHERS.put(serviceName, serviceFetcher);
    }
可以看到在SystemServiceRegistory存在静态代码块儿,其中调用registerService()方法注册了很多manager,静态块儿部分代码:
 static {
        registerService(Context.ACCESSIBILITY_SERVICE, AccessibilityManager.class,
                new CachedServiceFetcher<AccessibilityManager>() {
            @Override
            public AccessibilityManager createService(ContextImpl ctx) {
                return AccessibilityManager.getInstance(ctx);
            }});

        registerService(Context.CAPTIONING_SERVICE, CaptioningManager.class,
                new CachedServiceFetcher<CaptioningManager>() {
            @Override
            public CaptioningManager createService(ContextImpl ctx) {
                return new CaptioningManager(ctx);
            }});

        registerService(Context.ACCOUNT_SERVICE, AccountManager.class,
                new CachedServiceFetcher<AccountManager>() {
            @Override
            public AccountManager createService(ContextImpl ctx) {
                IBinder b = ServiceManager.getService(Context.ACCOUNT_SERVICE);
                IAccountManager service = IAccountManager.Stub.asInterface(b);
                return new AccountManager(ctx, service);
            }});

        registerService(Context.ACTIVITY_SERVICE, ActivityManager.class,
                new CachedServiceFetcher<ActivityManager>() {
            @Override
            public ActivityManager createService(ContextImpl ctx) {
                return new ActivityManager(ctx.getOuterContext(), ctx.mMainThread.getHandler());
            }});
}
也就是说,当加载SystemServiceRegistory类时,就已经注册了封装manager信息的fetcher,可以看到,在createService中创建了manager实例。
我们回到SystemServiceRegistry.getSystemService()中,拿到fetcher的下一步就是调用fetcher.getService()方法,如下:
@Override
        @SuppressWarnings("unchecked")
        public final T getService(ContextImpl ctx) {
            final Object[] cache = ctx.mServiceCache;
            synchronized (cache) {
                // Fetch or create the service.
                Object service = cache[mCacheIndex];
                if (service == null) {
                    service = createService(ctx);
                    cache[mCacheIndex] = service;
                }
                return (T)service;
            }
        }
其中,调用createService()方法创建manager对象并返回。至此,调用者拿到了manager,可以通过manager访问远端服务了。createService()这种写法实际上是实现了懒加载,当类加载时,并没有直接创建所有的mananger对象,而是通过实现抽象方法createService(),在createService()中new实例。这样,在使用时,通过调用createService()来创建实例,实现懒加载。
关于manager中如何封装了BinderProxy,XXmanager和XXmanagerServicebinder如何通信,请大家学习一下activity启动过程,就明白了。


 474
474


 被折叠的 条评论
为什么被折叠?
被折叠的 条评论
为什么被折叠?
 到【灌水乐园】发言


