


 本文介绍如何使用Plop.js简化前端开发流程,通过创建Generator自动化生成路由和视图代码,提升开发效率。
工程化、模块化让编码更加丝滑、让我们"懒"起来
这里记录plop.js的使用。plop.js可以通过命令行去生成、处理文件模板代码等,从而解放双手。
后更加复杂的yeoman、node cli自己去编写一套针对模板脚手架的工具等。这些后面慢慢探索。
安装plop
安装到项目
npm install --save-dev plop
全局安装plop(可选,建议安装方便使用)
npm install -g plop
如果没有全局安装plop,那么要在package.json中的script中增加脚本命令:
"scripts": {
    "p": "plop"
 },
plop使用
在项目的根目录下创建plopfile.js文件
module.exports = function (plop) {};
创建路由Generator
1、 根目录创建一个template文件夹,并创建一个router目录作为路由的generator
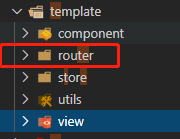
2、 并创建generator的js文件和hbs模板(Handlebars模板语法)

三、 generator之plop.js编写
在此之前,有几个概念:
description:(String)描述(这个generator是干什么的)
prompts:(Array)给出一些询问,让用户给出回答或选择
actions:(种类较多,后面给出描述),最后一步对上述的回答询问等做出决策,比如生成文件、替换文本、替换文件、或者自定义操作等等
const {
  isEmpty
} = require('../utils')

module.exports = {
  description: '创建根文件路由',
  prompts: [{
    type: 'input',
    name: 'moduleName',
    message: '模块名',
    validate: isEmpty('模块名')
  }, {
    type: 'input',
    name: 'path',
    message: '地址',
    validate: isEmpty('路由地址')
  }, {
    type: 'input',
    name: 'title',
    message: '左侧菜单显示名称',
    validate: isEmpty('路由地址')
  }],
  actions: function (data) {
    //其中这里的值可以使用data获取,比如获取和moduleName输入的值,可以是 const moduleName = data.moduleName  ,data就是一个包含name的对象,其中的属性key就是name的值
    const moduleName = '{{moduleName}}'
    const path = '{{path}}'
    const title = '{{title}}'
    const actions = [{
      type: 'add',
      path: `src/router/modules/${moduleName}.js`,
      templateFile: 'template/router/index.hbs',
      data: {
        moduleName: moduleName,
        path: path,
        title: title
      }
    }]
    return actions
  }
}
3、 hbs模板
import Layout from '@/layout'

const {{moduleName}} = {
  path:'/{{path}}',
  component: Layout,
  sort: 1,
  name: '{{path}}',
  meta: {
    title: '{{title}}',
    icon: 'example'
  }
}
export default {{moduleName}};
4、 设置到plopfile.js
const router = require('./template/router/plop.js')
module.exports = function(plop) {
   plop.setGenerator('router', router);
}
5、使用总结:
prompts:众多的参数不一一解释,都是集自inquirer,示例很多-传送门
action: 对询问做出反应
- type:类型,内置4中,
add:根据模板生成文件AddMany可以看成add的多个版本Modify:根据模板修改根据正则替换存在的文件或地方Append:将模板或者字符串根据正则添加到符合正则的地方
其他的如设置自定义的action type,可以参考传送门
上诉的action是其中一种动态的action,还有其他的直接返回actions 数组等等具体传送门
自动化创建view视图以及对应路由
上面初试创建一个action type为add的generator,接下来将更深入的结合其他的prompts以及node相关api制作更复杂的generator
想法: 创建一个模板,并增加其功能,比如查询、新增、编辑、详情的开关等,而且生成该模板的对应路由。
1、 创建view的generator以及对应的视图模板和路由模板()
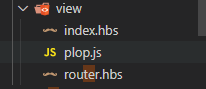
router.hbs:
  {
    path: '{{name}}',
    component: () => import('@/views/{{filepath}}/{{name}}'),
    name:'{{name}}',
    meta: {
      title: '{{menu}}'
    }
},
view index.hbs
<div>
    <header-search {{#if create}}:create="true" @create="handleCreate"{{/if}}>
      <template #search>
        <el-row>
          <el-col :span="6">
            <we-input v-model="query.name" label="名称" placeholder="输入名称" />
          </el-col>
          <el-col :span="6">
            <we-select v-model="query.model" :options="list" label="型号" placeholder="输入型号" />
          </el-col>
          <el-col :span="6">
            <we-date-picker v-model="query.begindate" label="开始时间" placeholder="选择时间" />
          </el-col>
        </el-row>
      </template>
    </header-search>
    ...省略
2 获取真实模块列表用于选择新建的模块挂载在哪里
const fs = require('fs');
const blackFileList = ['login', 'dashboard', 'error-page']// 不会被读取的文件模块
const fileList = [];
async function foundFiles() {
  const files = await fs.promises.readdir('src/views/');
  for (const file of files) {
    if (!blackFileList.includes(file)) {
      fileList.push(file)
    }
  }
}
3、 创建promoto以及action
module.exports = {
    description: '创建视图',
    prompts: [{
        type: 'input',
        name: 'name',
        message: '输入视图文件名',
        validate: isEmpty('文件名')
    }, {
      type: 'list',
      name: 'filepath',
      message: '选择加入的模块',
      choices: fileList
    }, {
      type: 'confirm',
      name: 'hasBtn',
      message: '列表是否有操作按钮',
      default: true
    }, {
      type: 'checkbox',
      name: 'functions',
      message: '选择需要加入的功能',
      choices: [{
        name: '新增',
        value: 'create',
        checked: false
      }, {
        name: '详情',
        value: 'detail',
        checked: true
      }]
    }, {
      type: 'input',
      name: 'menu',
      message: '输入左侧菜单显示名称',
      validate: isEmpty('菜单显示名称')
  }],
    actions: function (data) {
      const { functions, hasBtn } = data
      const actions = [{
        type: 'add',
        path: `src/views/{{filepath}}/{{name}}/index.vue`,
        templateFile: 'template/view/index.hbs',
        data: {
          name: '{{name}}',
          hasBtn: hasBtn, // 是否有操作按钮
          create: functions.includes('create'), // 是否开启新增(默认有新增就有编辑)
          detail: functions.includes('detail')// 是否开启详情
        }
      }, {
        type: 'append',
        path: `src/router/modules/{{filepath}}.js`,

        pattern: /\[/,
        templateFile: 'template/view/router.hbs',
        data: {
          name: '{{name}}',
          filepath: '{{filepath}}',
          menu: '{{menu}}'
        }
      }]
      return actions
    }
}
4、 设置到plopfile.js
const view = require('./template/view/plop.js')
const router = require('./template/router/plop.js')
module.exports = function(plop) {
   plop.setGenerator('router', router);
   plop.setGenerator('view', view);
}
5、运行plop(或者直接选择view 的generator 运行plop view)

6、 输入视图名以及选择加入的模块

7、 为视图添加列表页是否有操作按钮

8、为视图添加功能

9、为视图路由新增左侧名称
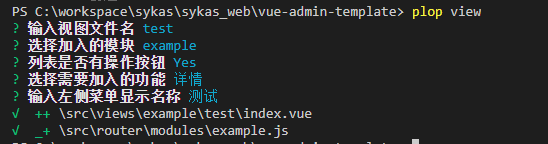
结果
路由生成
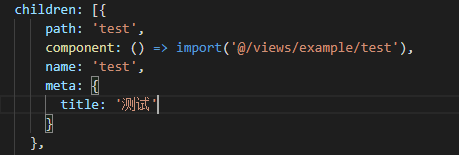
视图生成:

同一时间利用webpack require.context自动化生成左侧菜单
千里之行
始于足下


 5505
5505

 被折叠的 条评论
为什么被折叠?
被折叠的 条评论
为什么被折叠?
 到【灌水乐园】发言


