


这两天一直在写一个联系人界面,尝试实现按字母检索的功能。在查询了一些资料后,终于实现了这一功能,期间要感谢我导师和大牛华的一些帮助。
废话不多说,先上效果图:
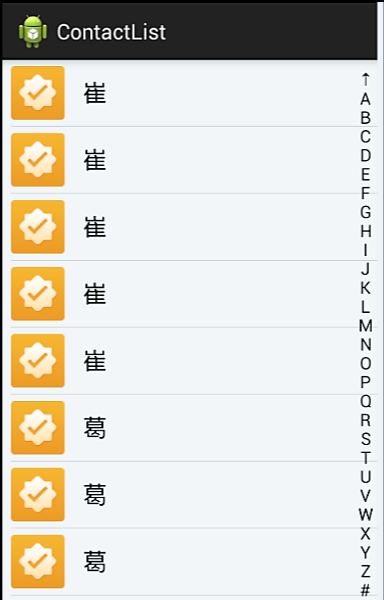
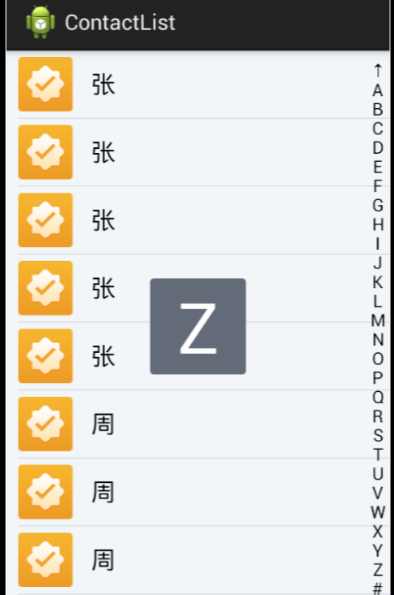
按住右侧的检索条可以跳到相应的位置,同时屏幕中间会出现一个相应的提示字符。
1、老规矩先写布局文件
这里就写一下主界面的xml
这里的字母索引框只是一个LinearLayout,具体的显示内容我们到主程序里面添加。
<?xml version="1.0" encoding="utf-8"?>
<LinearLayout xmlns:android="http://schemas.android.com/apk/res/android"
    android:layout_width="match_parent"
    android:layout_height="match_parent"
    android:orientation="vertical" >
    <FrameLayout
        android:id="@+id/car_lists_layout"
        android:layout_width="match_parent"
        android:layout_height="match_parent"
        android:background="#f2f6f8">
<!-- 结果列表 -->
        <ListView
            android:id="@+id/listView"
            android:layout_width="match_parent"
            android:layout_height="wrap_content"
            android:cacheColorHint="#00000000"
            android:divider="@null"
            android:fadingEdge="none"
            android:scrollbars="none" >
        </ListView>
        <!-- 选择字母的提示 -->
        <TextView
            android:id="@+id/index_hint"
            android:layout_width="80dp"
            android:layout_height="80dp"
            android:layout_gravity="center"
            android:background="@drawable/bg_contact_index"
            android:gravity="center"
            android:visibility="gone"
            android:textSize="51sp"
            android:textColor="#ffffff"/>
        <!-- 边框字母索引框 -->
        <LinearLayout
            android:id="@+id/layout"
            android:layout_width="20dip"
            android:layout_height="match_parent"
            android:layout_gravity="right"
            android:gravity="center"
            android:background="#00000000"
            android:orientation="vertical"
            android:visibility="invisible">
        </LinearLayout>
</FrameLayout>
</LinearLayout>
这里采用了FrameLayout,因为FrameLayout把所有控件都叠在左上角,在这里用非常方便。
2、写contact的数据结构
这里只有两个参数就好了,名字和拼音。
因为要用到字母排序,所以这里要实现Comparable接口,按字典序排序。
这里调用String的compareToIgnoreCase来实现无视大小写的字母排序比较。
后面只需调用一个Collections.sort()就可以实现。
public class ContactBean implements Comparable{
    String name;
    String pinyin;

    public String getPinyin(){
     return pinyin;
    }

    public void setPinyin(String pinyin)
    {
     this.pinyin=pinyin;
    }

 public String getName() {
  return name;
 }
 public void setName(String nickName) {
  this.name = nickName;
 }
 @Override
 public int compareTo(Object arg0) {
      return pinyin.compareToIgnoreCase(((ContactBean) arg0).pinyin);
  }
}
3、实现排序算法
3.1 这里,先理一下思路,一般获取的都是都是汉字。所以第一步要实现汉字转化拼音。
汉字转换拼音用的是第三方的库,点击这里下载
 /**
     * 将汉字转换为全拼
     *
     * @param src
     * @return String
     */
    public String getPinYin(String src) {
        char[] t1 = null;
        t1 = src.toCharArray();
        String[] t2 = new String[t1.length];
        // 设置汉字拼音输出的格式
        HanyuPinyinOutputFormat t3 = new HanyuPinyinOutputFormat();
        //设置小写输出
        t3.setCaseType(HanyuPinyinCaseType.LOWERCASE);
        //设置无声调
        t3.setToneType(HanyuPinyinToneType.WITHOUT_TONE);
        //用v代表ü
        t3.setVCharType(HanyuPinyinVCharType.WITH_V);
        String t4 = "";
        int t0 = t1.length;
        try {
            for (int i = 0; i < t0; i++) {
                // 判断能否为汉字字符
                if (Character.toString(t1[i]).matches("[\\u4E00-\\u9FA5]+")) {
                    t2 = PinyinHelper.toHanyuPinyinStringArray(t1[i], t3);// 将汉字的几种全拼都存到t2数组中
                    t4 += t2[0];// 取出该汉字全拼的第一种读音并连接到字符串t4后
                } else {
                    // 如果不是汉字字符,间接取出字符并连接到字符串t4后
                    t4 += Character.toString(t1[i]);
                }
            }
        } catch (BadHanyuPinyinOutputFormatCombination e) {
            e.printStackTrace();
        }
        return t4;
    }
3.2 接下来处理原始数据
对原始数据的进行处理,根据汉字设置ContactBean的pinyin。
 /**
  * 初始化每项的拼音
  *
  * @param contactBeans
  */
    public void initPinYinData(List<ContactBean> contactBeans){

     for(ContactBean contactBean :contactBeans)
     {
        contactBean.setPinyin( getPinYin(contactBean.getName()) );
     }

    }
3.3 可以对数据进行排序了
先在Activity里面定义一个两个list分别存放原始数据和排序后数据。
private List sourceData = new ArrayList();//原数据
private List datas;//保存转化后的数据(排序)
因为获取的原始数据可能含有数字,而按字典序排序之后,数字会出现在字母的前面,所以还需要一系列操作将数字放到字母后面。
 /**
     * 按字母排序
     * @param contactBeans
     * @return
     */
    public LinkedList<ContactBean> sortIndex(List<ContactBean> contactBeans)
    {
        LinkedList<ContactBean> lists = new LinkedList<ContactBean>(contactBeans);//保存排好序的数据
        Collections.sort(lists);
        for(int i=0;i<lists.size();i++)
        {
             ContactBean temp=lists.peekFirst();
             if(isNumeric(temp.getPinyin()))
             {
                   lists.pollFirst();
                   lists.add(temp);
             }
        }
     return lists;
    }
因为已经实现了Comparable接口,所以只需调用Collections.sort()函数就可以了。
下半部分的操作是为将数字放到末尾。同时采用LinkedList是因为当数据量很大时,LinkedList的运算速度会比ArrayList快很多。
peekFirst()是获取列表的第一个元素,但是不移除它。pollFirst()则为获取列表第一个元素的同时移除该元素。
3.4.到上面数据已经处理好了,要做的就是将上面排序好的数据和索引建立映射关系,为跳转做好准备。
用HashMap来实现。
/**
     * 建立索引
     * @param contactBeans
     */
    public void setDatas(List<ContactBean> contactBeans){
                datas= new ArrayList<ContactBean>( sortIndex(contactBeans) );
                selector = new HashMap<String, Integer>();
                //遍历排好序的数据,获取每个字母的位置
               for (int i = 0; i < indexStr.length; i++) {
                   for (int j = 0; j < datas.size(); j++) {
                       if (datas.get(j).getPinyin().toLowerCase(Locale.getDefault()).startsWith(indexStr[i].toLowerCase(Locale.getDefault())))
                        {
                            selector.put(indexStr[i], j);
                             break;
                        }
                 String pinyin = datas.get(j).getPinyin();
                 if( indexStr[i].equals("#") && isNumeric(pinyin.substring(0,1)))
                 {
                   selector.put(indexStr[i], j);
                    return;
                 }
              }
        }
    }
4.全部准备工作已经全部做好,可以绘制字母的索引框了。
同时绑定触摸到响应事件。
/**
     * 绘制右侧的检索条
     *
     *
     */

    public void drawIndexView(){
     LinearLayout.LayoutParams params = new LayoutParams(LayoutParams.MATCH_PARENT, height);

     for(int i=0;i<indexStr.length;i++)
     {
      TextView indexView=new TextView(this);
      indexView.setLayoutParams(params);
      indexView.setText(indexStr[i]);
      indexView.setGravity(Gravity.CENTER);
      indexView.setTextColor(Color.BLACK);
      indexView.setTextSize(13);
      layoutIndex.addView(indexView);
     }
     layoutIndex.setOnTouchListener(new OnTouchListener(){

   @Override
   public boolean onTouch(View view, MotionEvent event) {
    // TODO Auto-generated method stub
    float y = event.getY();
    int index = (int) y / height;// 得到点击字母位置的索引
    String key = "";
    if (index < indexStr.length && index > -1) {
     key = indexStr[index];
     if(selector.containsKey(key))
     {
      int position = selector.get(key);
      if (mListView.getHeaderViewsCount() > 0){// 防止ListView有标题栏。
       mListView.setSelectionFromTop(
         position + mListView.getHeaderViewsCount(), 0);
      } else {
       mListView.setSelectionFromTop(position, 0);// 滑动到该字母第一项
      }

     }
     if(key.equals("↑"))
     {
      mListView.setSelectionFromTop(0, 0);// 滑动到第一项
     }
     if(!key.equals(""))
     {
      indexHint.setText(key);
      indexHint.setVisibility(View.VISIBLE);
     }
     switch (event.getAction()) {
     case MotionEvent.ACTION_UP:
     case MotionEvent.ACTION_CANCEL:
     case MotionEvent.ACTION_OUTSIDE:
      indexHint.setVisibility(View.GONE);
      break;
     case MotionEvent.ACTION_DOWN:
      // layoutIndex.setBackground();
      break;
     }

    }

    return true;
   }

     });


    }
4.1再根据布局的大小算出高度即可。
public void onDrawIndexView(int h)
 {
  if (!flag) {
   height = h / indexStr.length;
   drawIndexView();
   flag = true;
   layoutIndex.setVisibility(View.VISIBLE);
  }
 }

 public void drawIndex()
 {
  new Handler().postDelayed(new Runnable() {

   @Override
   public void run() {
    // TODO Auto-generated method stub
    if(layoutIndex.getMeasuredHeight() != 0)
    {
     onDrawIndexView(layoutIndex.getMeasuredHeight());
    }
    else
    {
     drawIndex();
    }
   }
  }, 1000);
}如有错误,欢迎指正,不胜感激!


 565
565

 被折叠的 条评论
为什么被折叠?
被折叠的 条评论
为什么被折叠?
 到【灌水乐园】发言


