


Cocos2d-x-Lua 开发简单的小游戏(记数字踩白块)
本篇博客来给大家介绍如何使用Lua这门语言来开发一个简单的小游戏—记数字踩白块。
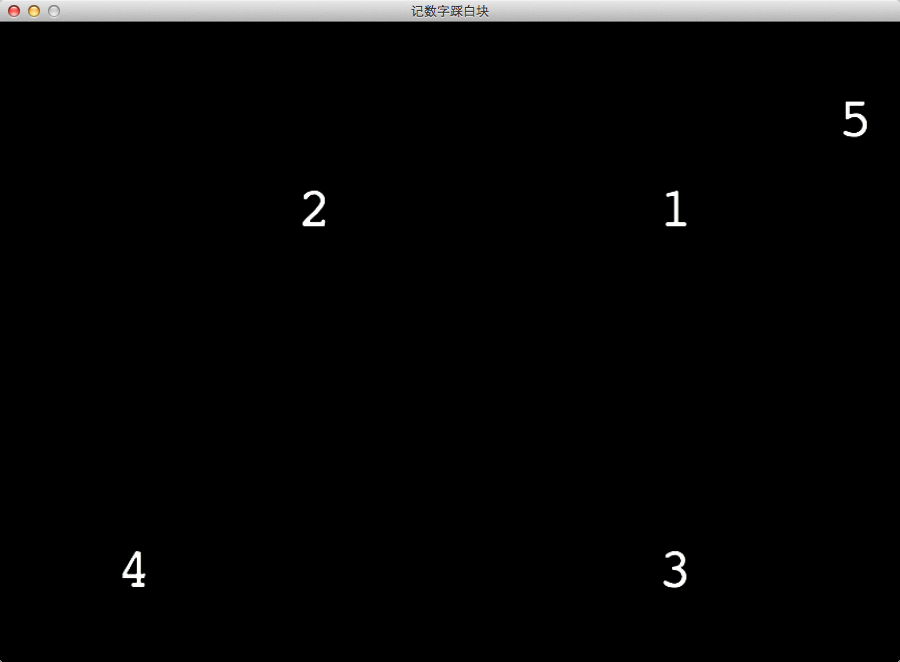
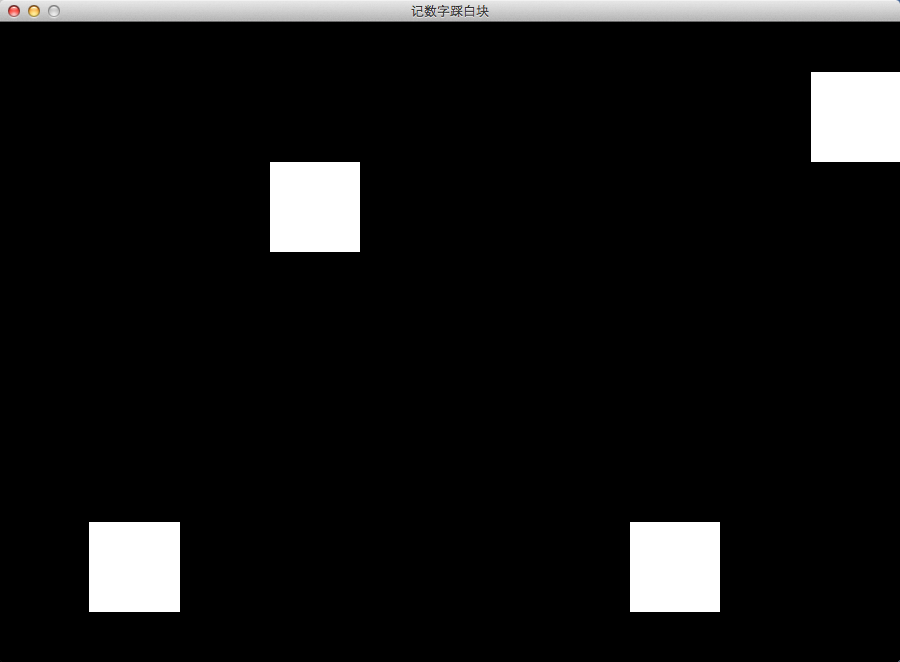
游戏的流程是这样的:在界面上生成5个数1~5字并显示在随机的位置上,点击第一个数字,其他数字会显示成白块数字消失,玩家可以通过记住数字的显示的位置点击按顺序消除白块,直到白块消除完,游戏成功。
效果图如下:
先说明一下笔者的开发环境:
- Xcode 5.1(Mac系统下的苹果开发工具)
- Cocos2d-x 3.1.1(Cocos2d-x游戏引擎)
- LDT(Lua集成开发环境)
首先你得创建一个Cocos2d-x项目,里面会多个平台代码,具体创建方法麻烦读者参考笔者前面所写的文章,如有疑问可以直接留言交流。
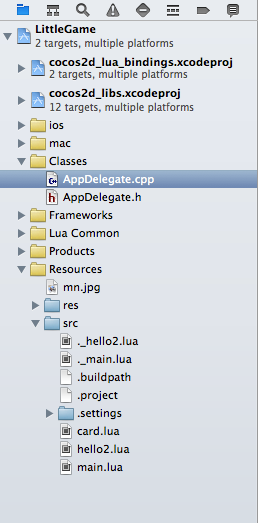
来看看我们项目结构:
》》AppDelegate.cpp
- #include "AppDelegate.h"
- #include "CCLuaEngine.h"
- #include "SimpleAudioEngine.h"
- #include "cocos2d.h"
- using namespace CocosDenshion;
- USING_NS_CC;
- using namespace std;
- AppDelegate::AppDelegate()
- {
- }
- AppDelegate::~AppDelegate()
- {
- SimpleAudioEngine::end();
- }
- bool AppDelegate::applicationDidFinishLaunching()
- {
- // initialize director
- auto director = Director::getInstance();
- auto glview = director->getOpenGLView();
- if(!glview) {
- // 创建可视区域,位置(0,0)宽:900,高:640
- glview = GLView::createWithRect("记数字踩白块", Rect(0,0,900,640));
- director->setOpenGLView(glview);
- }
- // 设置设计分辨率
- glview->setDesignResolutionSize(800, 480, ResolutionPolicy::SHOW_ALL);
- // turn on display FPS
- // 打开显示的FPS
- director->setDisplayStats(true);
- // set FPS. the default value is 1.0/60 if you don't call this
- director->setAnimationInterval(1.0 / 60);
- auto engine = LuaEngine::getInstance();
- ScriptEngineManager::getInstance()->setScriptEngine(engine);
- // 执行src目录下的main.lua脚本文件
- if (engine->executeScriptFile("src/main.lua")) {
- return false;
- }
- return true;
- }
- // This function will be called when the app is inactive. When comes a phone call,it's be invoked too
- void AppDelegate::applicationDidEnterBackground()
- {
- Director::getInstance()->stopAnimation();
- SimpleAudioEngine::getInstance()->pauseBackgroundMusic();
- }
- // this function will be called when the app is active again
- void AppDelegate::applicationWillEnterForeground()
- {
- Director::getInstance()->startAnimation();
- SimpleAudioEngine::getInstance()->resumeBackgroundMusic();
- }
#include "AppDelegate.h"
#include "CCLuaEngine.h"
#include "SimpleAudioEngine.h"
#include "cocos2d.h"

using namespace CocosDenshion;

USING_NS_CC;
using namespace std;

AppDelegate::AppDelegate()
{
}

AppDelegate::~AppDelegate()
{
    SimpleAudioEngine::end();
}

bool AppDelegate::applicationDidFinishLaunching()
{
    // initialize director
    auto director = Director::getInstance();
	auto glview = director->getOpenGLView();
	if(!glview) {
        // 创建可视区域,位置(0,0)宽:900,高:640
		glview = GLView::createWithRect("记数字踩白块", Rect(0,0,900,640));
		director->setOpenGLView(glview);
	}

    // 设置设计分辨率
    glview->setDesignResolutionSize(800, 480, ResolutionPolicy::SHOW_ALL);

    // turn on display FPS
    // 打开显示的FPS
    director->setDisplayStats(true);

    // set FPS. the default value is 1.0/60 if you don't call this
    director->setAnimationInterval(1.0 / 60);


    auto engine = LuaEngine::getInstance();
    ScriptEngineManager::getInstance()->setScriptEngine(engine);
    // 执行src目录下的main.lua脚本文件
    if (engine->executeScriptFile("src/main.lua")) {
        return false;
    }

    return true;
}

// This function will be called when the app is inactive. When comes a phone call,it's be invoked too
void AppDelegate::applicationDidEnterBackground()
{
    Director::getInstance()->stopAnimation();

    SimpleAudioEngine::getInstance()->pauseBackgroundMusic();
}

// this function will be called when the app is active again
void AppDelegate::applicationWillEnterForeground()
{
    Director::getInstance()->startAnimation();

    SimpleAudioEngine::getInstance()->resumeBackgroundMusic();
}
我们主要在Lua文件中实现我们的逻辑,如何开始呢,首先我们要想象一个场景6*10的方格,一共60个方格,每个方格一个卡片,我们要做的是如何在这60个方格里放入我们的卡片,并且要随机放上去的。
我们先定义卡片类》》card.lua
- --[[
- 卡片
- card.lua
- ]]--
- function card(num)
- -- 创建一个精灵,代表一张卡片
- local self = cc.Sprite:create()
- local txt,bg -- 卡片文本和背景
- --初始化方法
- local function init()
- self.num = num
- --设置内容尺寸
- self:setContentSize( cc.size( 80, 80 ) )
- --设置锚点
- self:setAnchorPoint( cc.p( 0, 0 ) )
- --设置显示数字的文本
- txt = cc.Label:create()
- txt:setString( num )
- txt:setSystemFontSize( 50 )
- txt:setSystemFontName( "Courier" )
- --设置文本显示的位置,这里是中间
- txt:setPosition( cc.p( self:getContentSize().width / 2, self:getContentSize().height / 2 ) )
- --添加到表
- self:addChild(txt)
- --创建一个精灵,代表背景
- bg = cc.Sprite:create()
- --颜色块
- bg:setTextureRect( cc.rect( 0, 0, 80, 80 ) )
- --默认为白色,这里设置为白色
- bg:setColor( cc.c3b( 255, 255, 255 ) )
- --bg:setPosition( cc.p(0, 0))
- --设置锚点
- bg:setAnchorPoint( cc.p( 0, 0 ) )
- self:addChild(bg)
- --显示文本
- self:showTxt()
- end
- --定义显示文本的方法
- self.showTxt = function()
- txt:setVisible(true)
- bg:setVisible(false)
- end
- --定义显示背景的方法
- self.showBg = function()
- txt:setVisible(false)
- bg:setVisible(true)
- end
- init()
- return self
- end
--[[
卡片
card.lua
]]--


function card(num)
  -- 创建一个精灵,代表一张卡片
  local self = cc.Sprite:create()
  local txt,bg -- 卡片文本和背景

  --初始化方法
  local function init()
    self.num = num
    --设置内容尺寸
    self:setContentSize( cc.size( 80, 80 ) )
    --设置锚点
    self:setAnchorPoint(  cc.p( 0, 0 ) )

    --设置显示数字的文本
    txt = cc.Label:create()
    txt:setString( num )
    txt:setSystemFontSize( 50 )
    txt:setSystemFontName( "Courier" )
    --设置文本显示的位置,这里是中间
    txt:setPosition( cc.p( self:getContentSize().width / 2,  self:getContentSize().height / 2 ) )
    --添加到表
    self:addChild(txt)

    --创建一个精灵,代表背景
    bg = cc.Sprite:create()
    --颜色块
    bg:setTextureRect( cc.rect( 0, 0, 80, 80 ) )
    --默认为白色,这里设置为白色
    bg:setColor( cc.c3b( 255, 255, 255 ) )
    --bg:setPosition( cc.p(0, 0))
    --设置锚点
    bg:setAnchorPoint(  cc.p( 0, 0 ) )
    self:addChild(bg)

    --显示文本
    self:showTxt()
  end

  --定义显示文本的方法
  self.showTxt = function()
    txt:setVisible(true)
    bg:setVisible(false)
  end

  --定义显示背景的方法
  self.showBg = function()
    txt:setVisible(false)
    bg:setVisible(true)
  end
  init()

  return self
end
从卡片类我们可以知道,我们需要传入一个数字,然后对卡片类进行初始化,显示相应的数字,我们的卡片是一个Sprite(我们所说的精灵),我们要往Sprite添加数字(用Label来显示),还要添加我们的背景(同样也是一个Sprite)
。
卡片类定义好之后,我们就要实现我们想要的效果了,定义我们的入口
》》》main.lua
- --[[
- 记数字踩白块小游戏
- 2014/6/22
- main.lua
- ]]
- -- 引入card.lua文件
- require( "src/card" )
- --主方法
- function Main()
- -- 创建一个场景
- local self = cc.Scene:create()
- -- 声明一个层
- local layer
- local allPoints -- 存储所有点
- local allCards = {} -- 存储所有卡片
- local currentNum -- 当前数字
- -- 生成可用点
- local function genPoints()
- allPoints = {}
- -- 6行*10列
- for i = 0, 9 do
- for j = 0, 5 do
- -- 插入点到allPoints数组当中
- table.insert( allPoints, 1, cc.p( i * 80, j * 80 ) )
- end
- end
- end
- -- 添加卡片
- local function addCards()
- -- 设置随机种子
- math.randomseed( os.time() )
- local c -- 卡片
- local randNum -- 随机数
- local p -- 所在点
- -- 添加5张卡片
- for var = 1, 5do
- c = card( var ) -- 生成一张卡片
- layer:addChild( c ) -- 添加到层当中
- -- 根据数组最大值生成随机数
- randNum = math.random( table.maxn(allPoints) )
- p = table.remove( allPoints, randNum )
- c:setPosition( p )
- c:setAnchorPoint( cc.p( 0, 0 ) )
- print("p.x:"..p.x..",p.y:"..p.y);
- -- 插入到卡片数组
- table.insert( allCards, 1, c )
- end
- end
- -- 开始游戏
- local function startGame()
- -- 初始值为1
- currentNum = 1
- -- 先生成可用点
- genPoints()
- -- 然后添加卡片
- addCards()
- end
- -- 显示所有卡片背景
- local function showAllCardsBg()
- for key, varin pairs(allCards)do
- var:showBg()
- end
- end
- -- 触摸事件,第一个参数为事件类型,第二个参数为x坐标,第二个为y坐标
- local function onTouch( type, x, y )
- -- 根据x,y生成一个点
- local p = cc.p(x,y)
- for key, varin pairs(allCards)do
- print(var:getPosition())
- -- 判断是否是点击范围
- local pX,pY = var:getPosition()
- if (p.x < (pX + 80)) and (p.y < (pY + 80) and (p.x > pX) and (p.y > pY)) then
- --if var:getBoundingBox():containsPoint(p) then
- if currentNum ==var.num then
- -- 如果是点击的数字,则移除卡片
- table.remove(allCards, key)
- layer:removeChild(var, true)
- -- 点击了1之后,其他数字翻过背景
- if currentNum == 1 then
- showAllCardsBg()
- end
- -- 当所有卡片都被顺序点击了,提示成功
- if table.maxn( allCards ) <= 0 then
- print( "Success" )
- end
- -- 每次增加1
- currentNum = currentNum + 1
- end
- end
- end
- end
- -- 初始化方法
- local function init()
- -- 创建一个层
- layer = cc.Layer:create()
- -- 将层添加到场景
- self:addChild( layer )
- -- 设置可点击
- layer:setTouchEnabled( true )
- -- 注册监听事件
- layer:registerScriptTouchHandler( onTouch )
- -- 开始游戏
- startGame()
- -- self:addChild(layer)
- -- --测试代码
- -- local s = cc.Sprite:create("res/mn.jpg")
- -- s:setPosition(cc.p(0,0))
- -- s:setAnchorPoint( cc.p( 0, 0 ) )
- -- layer:addChild(s)
- --
- -- layer:setTouchEnabled(true)
- -- layer:registerScriptTouchHandler( function (type,x,y)
- --
- -- if s:getBoundingBox():containsPoint(cc.p(x,y)) then
- -- print("mn clicked")
- -- end
- -- print(type)
- -- return true
- -- end )
- --
- -- self:addChild(layer)
- end
- init()
- return self
- end
- --入口方法
- local function _main()
- -- 获得导演类实例
- local dir = cc.Director:getInstance()
- -- 设置不显示帧
- dir:setDisplayStats(false)
- -- 运行场景
- dir:runWithScene(Main())
- end
- -- 调用入口方法
- _main()
--[[

记数字踩白块小游戏

2014/6/22
main.lua

]]
-- 引入card.lua文件
require( "src/card" )

--主方法
function Main()
  -- 创建一个场景
  local self = cc.Scene:create()

  -- 声明一个层
  local layer
  local allPoints -- 存储所有点
  local allCards = {} -- 存储所有卡片
  local currentNum -- 当前数字

  -- 生成可用点
  local function genPoints()
    allPoints = {}
    -- 6行*10列
    for i = 0, 9 do
      for j = 0, 5 do
        -- 插入点到allPoints数组当中
        table.insert( allPoints, 1, cc.p( i * 80, j * 80 ) )
      end
    end

  end

  -- 添加卡片
  local function addCards()

    -- 设置随机种子
    math.randomseed( os.time() )

    local c  -- 卡片
    local randNum -- 随机数
    local p -- 所在点

    -- 添加5张卡片
    for var = 1, 5 do
      c = card( var ) -- 生成一张卡片
      layer:addChild( c ) -- 添加到层当中
      -- 根据数组最大值生成随机数
      randNum = math.random( table.maxn(allPoints)  )
      p = table.remove( allPoints, randNum )
      c:setPosition( p )
      c:setAnchorPoint(  cc.p( 0, 0 ) )
      print("p.x:"..p.x..",p.y:"..p.y);

      -- 插入到卡片数组
      table.insert( allCards, 1, c )
    end

  end

  -- 开始游戏
  local function startGame()
    -- 初始值为1
    currentNum = 1
    -- 先生成可用点
    genPoints()
    -- 然后添加卡片
    addCards()
  end


  -- 显示所有卡片背景
  local function showAllCardsBg()
    for key, var in pairs(allCards) do
      var:showBg()
    end
  end

  -- 触摸事件,第一个参数为事件类型,第二个参数为x坐标,第二个为y坐标
  local function onTouch( type, x, y )
    -- 根据x,y生成一个点
    local p = cc.p(x,y)
    for key, var in pairs(allCards) do
      print(var:getPosition())
      -- 判断是否是点击范围
      local pX,pY = var:getPosition()
      if (p.x < (pX + 80)) and (p.y < (pY + 80) and (p.x > pX) and (p.y > pY)) then
      --if var:getBoundingBox():containsPoint(p) then
        if currentNum == var.num then
          -- 如果是点击的数字,则移除卡片
          table.remove(allCards, key)
          layer:removeChild(var, true)

          -- 点击了1之后,其他数字翻过背景
          if currentNum == 1 then
            showAllCardsBg()
          end

          -- 当所有卡片都被顺序点击了,提示成功
          if table.maxn( allCards ) <= 0 then
            print( "Success" )

          end

          -- 每次增加1
          currentNum = currentNum + 1
        end
      end
    end
  end

  -- 初始化方法
  local function init()

    -- 创建一个层
    layer = cc.Layer:create()
    -- 将层添加到场景
    self:addChild( layer )
    -- 设置可点击
    layer:setTouchEnabled( true )
    -- 注册监听事件
    layer:registerScriptTouchHandler( onTouch )
    -- 开始游戏
    startGame()
    -- self:addChild(layer)

    --    --测试代码
    --    local s = cc.Sprite:create("res/mn.jpg")
    --    s:setPosition(cc.p(0,0))
    --    s:setAnchorPoint( cc.p( 0, 0 ) )
    --    layer:addChild(s)
    --
    --    layer:setTouchEnabled(true)
    --    layer:registerScriptTouchHandler( function (type,x,y)
    --
    --        if s:getBoundingBox():containsPoint(cc.p(x,y)) then
    --          print("mn clicked")
    --        end
    --        print(type)
    --        return true
    --    end )
    --
    --    self:addChild(layer)
  end

  init()

  return self
end


--入口方法
local function _main()
  -- 获得导演类实例
  local dir = cc.Director:getInstance()
  -- 设置不显示帧
  dir:setDisplayStats(false)
  -- 运行场景
  dir:runWithScene(Main())

end

-- 调用入口方法
_main()
以上代码已经很详尽,笔者就不多做解释,主要在这里提一下,如果使用笔者的开发环境的话,需要注意以下几个问题:
1. XCode不能很好的支持Lua的编辑,所以我们使用LDT来进行编码,但会遇到XCode运行程序没有呈现最新效果,这时我们需要对XCode进行Clean,然后再编译。这个过程很麻烦,笔者正在在寻求其他更好的解决方案。
2. 因为Cocos2d-x版本的变化,使用Lua编写C++逻辑代码也发生了相应的变化,一些API被新版本抛弃,比如之前CCDirector会以cc.Director的形式呈现。笔者在网上也没有找到相应的说明,只能通过查看Cocos2d-x提供的示例程序查找相关API的使用。
IT_xiao小巫
原文地址:http://blog.csdn.net/wwj_748/article/details/37054671


 901
901


 被折叠的 条评论
为什么被折叠?
被折叠的 条评论
为什么被折叠?
 到【灌水乐园】发言


