


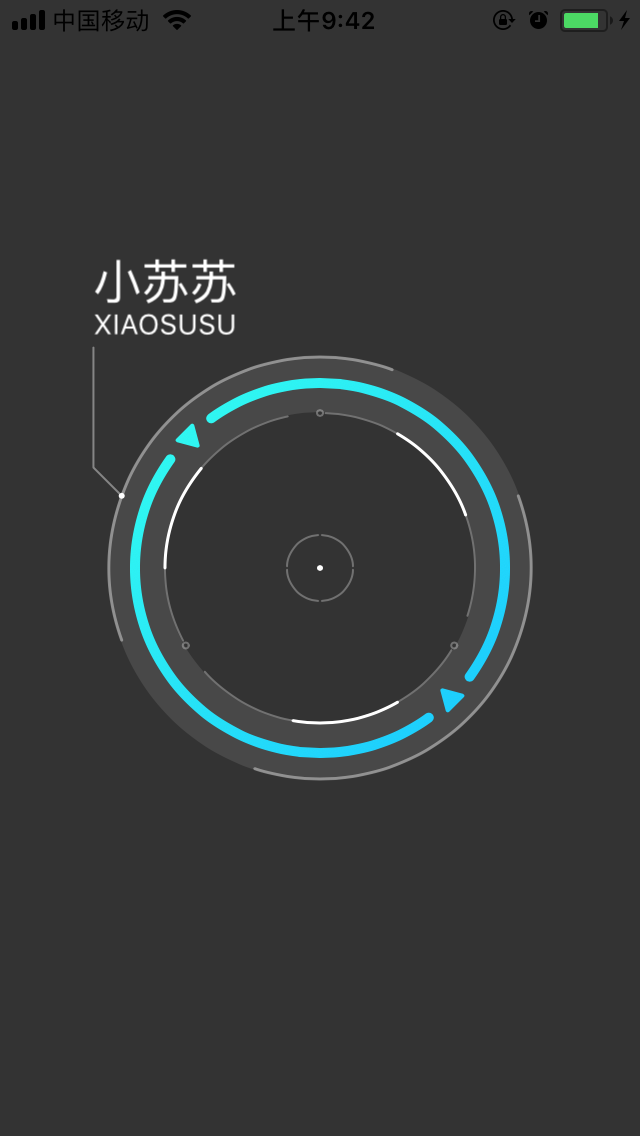
今天看了一篇腾讯分享的QQ人脸识别动画实现,觉得动画很棒就想自己实现一下。动画主要使用CABaseAnimation + CAShapeLayer 实现,涉及大部分的基本动画(旋转、缩放、淡入淡出、颜色变化等),颜色渐变是通过CAGradientLayer来实现的。我们先来看一下实现的动画效果:
动画效果:

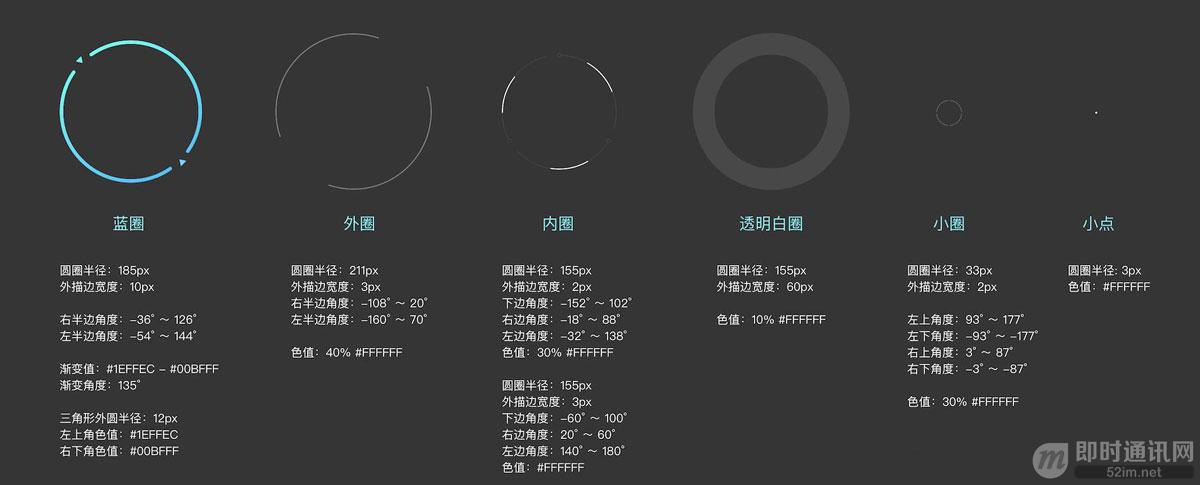
动画图层拆分:
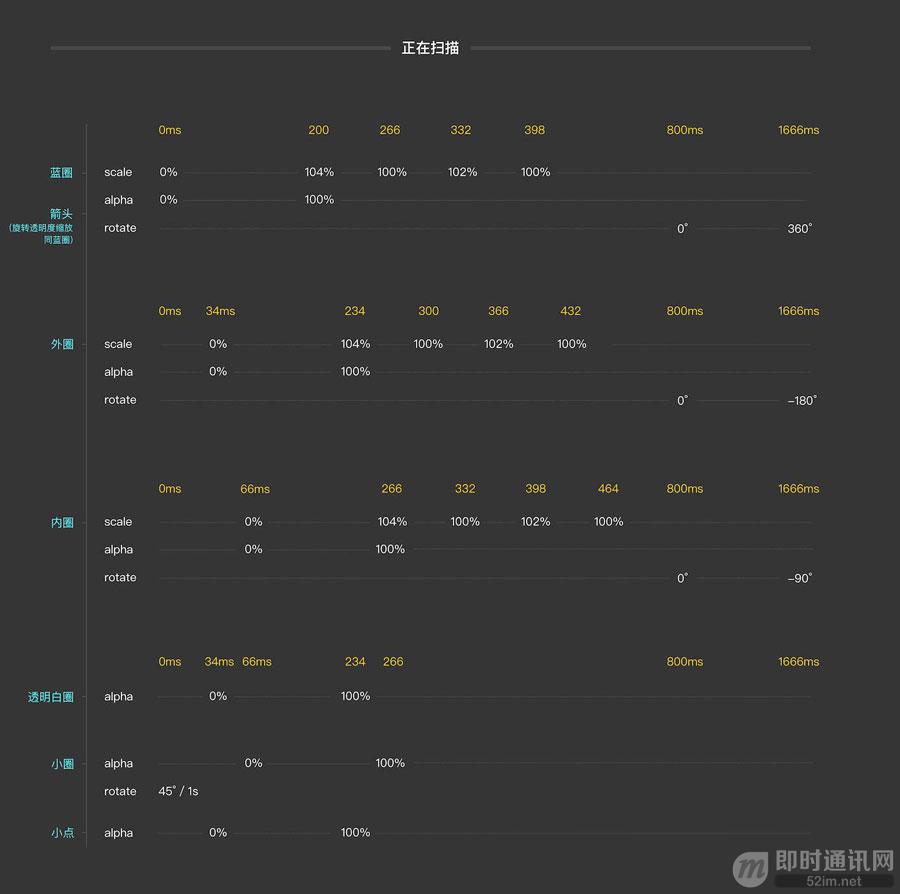
动画运行分析:
1. 动画正在扫描的过程
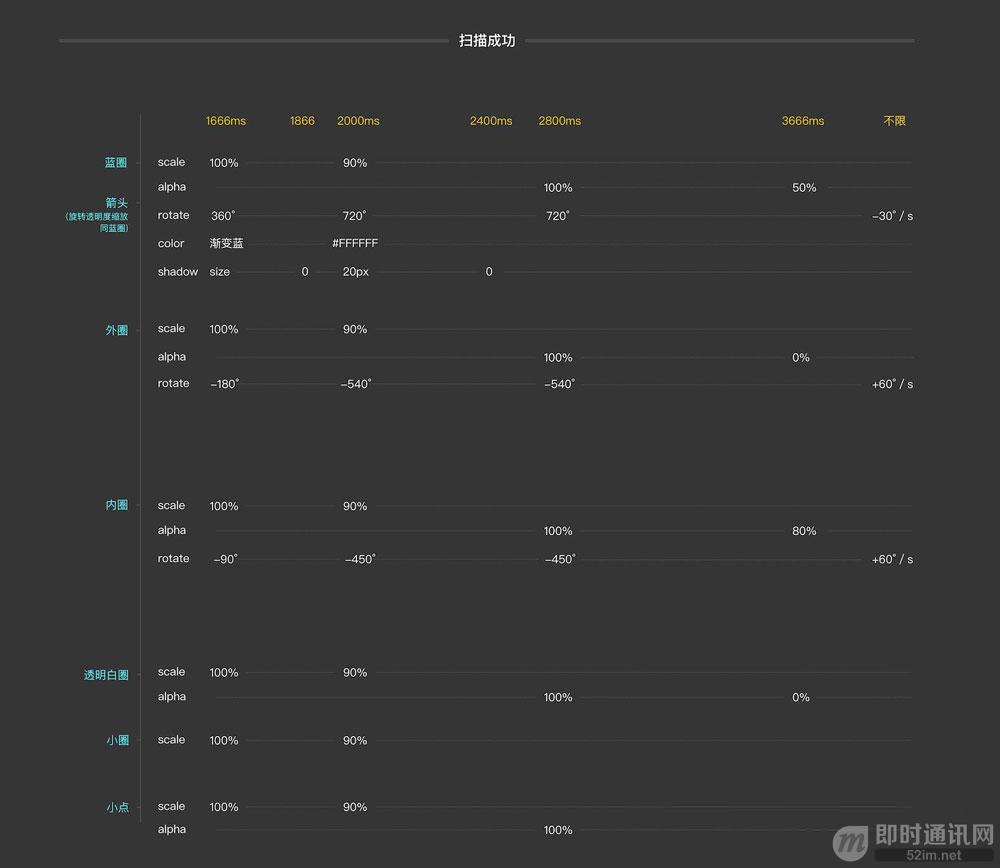
2. 动画扫描完成的过程
代码实现-》图层绘制
一、绘制篮圈
func drawBlueLayer() -> Void {

        //绘制画布
        self.blueLayer = CALayer()
        let layerWidth = (_blueLayerRadius + _blueLayerWidth)
        self.blueLayer?.frame = CGRect(x: _viewWidth/2.0 - layerWidth,
                             y: _viewheight/2.0 - layerWidth,
                             width: layerWidth*2,
                             height: layerWidth*2)
        self.blueLayer?.backgroundColor = UIColor.clear.cgColor

        //绘制弧线
        let center = CGPoint(x: layerWidth, y: layerWidth)
        let arcShape = ArcShape(radius: _blueLayerRadius,
                             lineWidth: _blueLayerWidth,
                             opacity: 1.0,
                             fillColor: UIColor.clear,
                             strokeColor: kBlueLayerColor)

        let arcDegrees = [ArcDegree(fromDegree: -126, toDegree: 36),
                       ArcDegree(fromDegree: 54, toDegree: -144)]
        for arcDegree in arcDegrees {

            let shapeLayer = ARShapeLayer.addArcLayerAt(center: center,
                                                        degree: arcDegree,
                                                        shape: arcShape)
//            self.blueLayer?.addSublayer(shapeLayer)
            ARShapeLayer.addGradientLayerTo(layer: self.blueLayer!, msakLayer: shapeLayer, colors: [kBlueLayerColor.cgColor, kBlue2LayerColor.cgColor])
        }

        //绘制小三角
        let triangleShape = TriangleShape(radius: _triangleLayerRadius,
                                          lineWidth: _triangleLayerWidth,
                                          opacity: 1.0,
                                          fillColor: kBlueLayerColor,
                                          strokeColor: kBlueLayerColor)


        let topTriangleCenter = getPointAtCircle(centerPoint: center, radius: _blueLayerRadius, angle: -135.0)
        let bottomTriangleCenter = getPointAtCircle(centerPoint: center, radius: _blueLayerRadius, angle: 45.0)
        let triangles = [TrianglePosition(centerPoint: topTriangleCenter, vertex1: 45.0, vertex2: 165.0, vertex3: 285.0),
                         TrianglePosition(centerPoint: bottomTriangleCenter, vertex1: -135.0, vertex2: -15.0, vertex3: 105.0)]
        for position in triangles {

            let shapeLayer = ARShapeLayer.addTriangleLayer(position: position, shape: triangleShape)

//            self.blueLayer?.addSublayer(shapeLayer)
            ARShapeLayer.addGradientLayerTo(layer: self.blueLayer!, msakLayer: shapeLayer, colors: [kBlueLayerColor.cgColor, kBlue2LayerColor.cgColor])
        }

        //将画布添加到视图层
        self.parnentView?.layer.addSublayer(self.blueLayer!)
    }
注意:绘制小三角的重点是根据三角形的外接圆以及圆心坐标求取三角形的三个顶点。公式如下:
/// 获取圆上点的坐标
///
/// - Parameters:
///   - centerPoint: 圆心(a, b)
///   - radius: 半径r
///   - angle: 顶点角度m
/// - Returns: 顶点数组
/// 顶点坐标计算公式:
/// (r*cos(m*.pi/180)+a, r*sin(m*.pi/180) +b)
func getPointAtCircle(centerPoint: CGPoint, radius: CGFloat, angle: CGFloat) -> CGPoint {

    let pointX = radius * cos(angle * .pi/180) + centerPoint.x
    let pointY = radius * sin(angle * .pi/180) + centerPoint.y

    return CGPoint.init(x: pointX, y: pointY)
}
二、绘制外圈
func drawOutLayer() -> Void {

        //绘制画布
        self.outLayer = CALayer()
        let layerWidth = (_outLayerRadius + _outLayerWidth)
        self.outLayer?.frame = CGRect(x: _viewWidth/2.0 - layerWidth,
                                       y: _viewheight/2.0 - layerWidth,
                                       width: layerWidth*2,
                                       height: layerWidth*2)
        self.outLayer?.backgroundColor = UIColor.clear.cgColor

        //绘制弧线
        let center = CGPoint(x: layerWidth, y: layerWidth)
        let arcShape = ArcShape(radius: _outLayerRadius,
                                lineWidth: _outLayerWidth,
                                opacity: 0.4,
                                fillColor: UIColor.clear,
                                strokeColor: kWhiteLayerColor)

        let arcDegrees = [ArcDegree(fromDegree: -20, toDegree: 108),
                          ArcDegree(fromDegree: 160, toDegree: -70)]
        for arcDegree in arcDegrees {

            let shapeLayer = ARShapeLayer.addArcLayerAt(center: center,
                                                        degree: arcDegree,
                                                        shape: arcShape)
            self.outLayer?.addSublayer(shapeLayer)
        }

        //将画布添加到视图层
        self.parnentView?.layer.addSublayer(self.outLayer!)
    }
三、绘制内圈
func drawInlayer() -> Void {

        //绘制画布
        self.inLayer = CALayer()
        let layerWidth = (_inLayerRadius + _inLayerWidth2)
        self.inLayer?.frame = CGRect(x: _viewWidth/2.0 - layerWidth,
                                      y: _viewheight/2.0 - layerWidth,
                                      width: layerWidth*2,
                                      height: layerWidth*2)
        self.inLayer?.backgroundColor = UIColor.clear.cgColor

        //绘制弧线
        let center = CGPoint(x: layerWidth, y: layerWidth)
        let arcShape1 = ArcShape(radius: _inLayerRadius,
                                lineWidth: _inLayerWidth1,
                                opacity: 0.3,
                                fillColor: UIColor.clear,
                                strokeColor: UIColor.white)

        let arcShape2 = ArcShape(radius: _inLayerRadius,
                                 lineWidth: _inLayerWidth2,
                                 opacity: 1.0,
                                 fillColor: UIColor.clear,
                                 strokeColor: UIColor.white)

        let arcDegrees = [ArcDegree(fromDegree: -88, toDegree: 18),
                          ArcDegree(fromDegree: 32, toDegree: 138),
                          ArcDegree(fromDegree: 152, toDegree: 258),

                          ArcDegree(fromDegree: -60, toDegree: -20),
                          ArcDegree(fromDegree: 60, toDegree: 100),
                          ArcDegree(fromDegree: 180, toDegree: 220)]

        var index: Int = 0
        var shape = arcShape1
        for arcDegree in arcDegrees {

            if index > 2 {
                shape = arcShape2
            }
            let shapeLayer = ARShapeLayer.addArcLayerAt(center: center,
                                                        degree: arcDegree,
                                                        shape: shape)
            self.inLayer?.addSublayer(shapeLayer)

            index += 1
        }

        //绘制弧线起点处小圆圈
        let circleCenter1 = getPointAtCircle(centerPoint: center, radius: _inLayerRadius, angle: 30)
        let circleCenter2 = getPointAtCircle(centerPoint: center, radius: _inLayerRadius, angle: 150)
        let circleCenter3 = getPointAtCircle(centerPoint: center, radius: _inLayerRadius, angle: -90)

        let centers = [circleCenter1, circleCenter2, circleCenter3]
        for center in centers {

            let shapeLayer = ARShapeLayer.addCircleLayer(centerPoint: center)
            self.inLayer?.addSublayer(shapeLayer)
        }

        //将画布添加到视图层
        self.parnentView?.layer.addSublayer(self.inLayer!)
    }
四、绘制透明白圈
func drawWhiteLayer() -> Void {

        //绘制画布
        self.whiteLayer = CALayer()
        let layerWidth = (_whiteLayerRadius + _whiteLayerWidth)
        self.whiteLayer?.frame = CGRect(x: _viewWidth/2.0 - layerWidth,
                                      y: _viewheight/2.0 - layerWidth,
                                      width: layerWidth*2,
                                      height: layerWidth*2)
        self.whiteLayer?.backgroundColor = UIColor.clear.cgColor

        //绘制白圈
        let center = CGPoint(x: layerWidth, y: layerWidth)
        let shapeLayer = ARShapeLayer.addCircleLayer(centerPoint: center, radius: _whiteLayerRadius, opacity: 0.1, lineWidth: _whiteLayerWidth)
        self.whiteLayer?.addSublayer(shapeLayer)

        //将画布添加到视图层
        self.parnentView?.layer.addSublayer(self.whiteLayer!)
    }
五、绘制中心小圈
func drawCenterCircle() -> Void {

        //绘制画布
        self.centerCircleLayer = CALayer()
        let layerWidth = (_centerCircleLayerRadius + 1.0)
        self.centerCircleLayer?.frame = CGRect(x: _viewWidth/2.0 - layerWidth,
                                      y: _viewheight/2.0 - layerWidth,
                                      width: layerWidth*2,
                                      height: layerWidth*2)
        self.centerCircleLayer?.backgroundColor = UIColor.clear.cgColor

        //绘制弧线
        let center = CGPoint(x: layerWidth, y: layerWidth)
        let arcShape = ArcShape(radius: _centerCircleLayerRadius,
                                lineWidth: 1.0,
                                opacity: 0.3,
                                fillColor: UIColor.clear,
                                strokeColor: UIColor.white)

        let arcDegrees = [ArcDegree(fromDegree: 3, toDegree: 87),
                          ArcDegree(fromDegree: 93, toDegree: 177),
                          ArcDegree(fromDegree: 183, toDegree: 267),
                          ArcDegree(fromDegree: 273, toDegree: 357)]
        for arcDegree in arcDegrees {

            let shapeLayer = ARShapeLayer.addArcLayerAt(center: center,
                                                        degree: arcDegree,
                                                        shape: arcShape)
            self.centerCircleLayer?.addSublayer(shapeLayer)
        }

        //将画布添加到视图层
        self.parnentView?.layer.addSublayer(self.centerCircleLayer!)
    }
六、绘制中心小点
func drawCenterPoint() -> Void {

        //绘制画布
        self.centerPointLayer = CALayer()
        let layerWidth = _centerPointLayerRadius
        self.centerPointLayer?.frame = CGRect(x: _viewWidth/2.0 - layerWidth,
                                        y: _viewheight/2.0 - layerWidth,
                                        width: layerWidth*2,
                                        height: layerWidth*2)
        self.centerPointLayer?.backgroundColor = UIColor.clear.cgColor

        //绘制白圈
        let center = CGPoint(x: layerWidth, y: layerWidth)
        let shapeLayer = ARShapeLayer.addCircleLayer(centerPoint: center, radius: _centerPointLayerRadius, opacity: 1.0, lineWidth: 0.0, isFill: true)
        self.centerPointLayer?.addSublayer(shapeLayer)

        //将画布添加到视图层
        self.parnentView?.layer.addSublayer(self.centerPointLayer!)
    }
图层绘制完成展示:
代码实现-》图层动画
图层绘制完成后我们开始为每一个图层添加动画效果。
一、添加篮圈图层动画
1. 开始扫描时篮圈的动画:
func startScanningBlueLayerAnimations(layer: CALayer) -> Void {

        var groups = Array<CABasicAnimation>()

        let scales = [ARScanningScale(fromRate: 0.0, toRate: 1.04, duration: 0.2),
                      ARScanningScale(fromRate: 1.04, toRate: 1.0, duration: 0.066),
                      ARScanningScale(fromRate: 1.0, toRate: 1.02, duration: 0.066),
                      ARScanningScale(fromRate: 1.02, toRate: 1.0, duration: 0.066)]
        groups += addScaleAnimations(scales: scales, delayTime: 0.0)

        let alphas = [ARScanningAlpha(fromAlpha: 0.0, toAlpha: 1.0, duration: 0.2)]
        groups += addAlphaAnimations(alphas: alphas, delayTime: 0.0)

        let rotations = [ARScanningRotation(clockwise: true, speedTime: 0.866, beginTime: 0.8)]
        groups += addRotationAnimations(rotations: rotations)

        addGroupAniamtionsTo(layer: layer, groups: groups, animationKey: "BlueLayerScanning")
    }
2. 扫描完成后篮圈的动画:
func startScanEndBlueLayerAnimations(layer: CALayer) -> Void {

        layer.removeAllAnimations()

        var groups = Array<CABasicAnimation>()

        let scales = [ARScanningScale(fromRate: 1.0, toRate: 0.9, duration: 0.334)]
        groups += addScaleAnimations(scales: scales, delayTime: 0.0)

        let alphas = [ARScanningAlpha(fromAlpha: 1.0, toAlpha: 0.9, duration: 0.866)]
        groups += addAlphaAnimations(alphas: alphas, delayTime: 1.134)

        let rotations = [ARScanningRotation(clockwise: true, speedTime: 0.334, beginTime: 0.0, repeatCount: 1.0),
                         ARScanningRotation(clockwise: true, speedTime: 0.0, beginTime: 0.334, repeatCount: 1.0),
                         ARScanningRotation(clockwise: false, speedTime: 12.0, beginTime: 1.134, repeatCount: MAXFLOAT)]
        groups += addRotationAnimations(rotations: rotations)

        addGroupAniamtionsTo(layer: layer, groups: groups, animationKey: "BlueLayerScanEnd", duration: TimeInterval(MAXFLOAT))

        addBlueGradientLayerColorAnimations(layer: layer, delayTime: 0.0)
        addBlueArcLayerShadowAnimations(layer: layer,  delayTime: 0.2)
    }
扫描结束之后蓝圈的动画中包含一个颜色(Color)和阴影(Shadow)的变化过程。做这两个动画需要将动画的对象找出来添加对应的动画才行。
颜色渐变动画:
我是通过遍历子layer找出CAGradientLayer, 设置"colors"属性动画
func addBlueGradientLayerColorAnimations(layer: CALayer, delayTime: TimeInterval) -> Void {

        let sublayers = layer.sublayers

        var index: Int = 0
        for sublayer in sublayers! {

            if sublayer is CAGradientLayer {

                if index > 1 {
                    return
                }
                //渐变色
                let gradientLayer = sublayer as! CAGradientLayer
                let animation = self.gradientColor(toColors: [UIColor.white.cgColor, UIColor.white.cgColor], duration: 0.334, beginTime: delayTime)
                gradientLayer.add(animation, forKey: "GradientLayerColor")

                index += 1
            }
        }

        layer.needsDisplay()
    }
阴影动画:
同上,遍历子layer 找出对应的CAShapeLayer, 设置“shadowRadius”属性动画
func addBlueArcLayerShadowAnimations(layer: CALayer,  delayTime: TimeInterval) -> Void {

        var groups = Array<CABasicAnimation>()

        let sublayers = layer.sublayers
        for sublayer in sublayers! {

            var index: Int = 0
            if sublayer is CAGradientLayer {

                if index > 1 {
                    return
                }

                let shapeLayer = sublayer.mask as! CAShapeLayer
                //阴影
                let shadows = [ARScanningRadius(fromRadius: 0, toRadius: 5.0, duration: 0.134),
                               ARScanningRadius(fromRadius: 5.0, toRadius: 0.0, duration: 0.4)]
                groups += addShadowRadiusAnimations(radiuses: shadows, delayTime: delayTime)
                addGroupAniamtionsTo(layer: shapeLayer, groups: groups, animationKey: "BlueArcLayerShadow", duration: 2.4)

                index += 1
            }
        }

        layer.needsDisplay()
    }
二、其他图层
其他图层的动画设置基本和篮圈的动画设置类似,就不再重新贴代码了。Demo下载地址,喜欢的话帮忙点个赞!


 499
499

 被折叠的 条评论
为什么被折叠?
被折叠的 条评论
为什么被折叠?
 到【灌水乐园】发言


