


一、前言
在Redis 4.0 版本之前,Redis是单线程程序,主要是指Redis的网络I/O线程。Redis的持久化、集群同步等操作,则是由另外的线程来执行的。但在Redis 4.0 版本之后,Redis添加了多线程的支持,这时的多线程主要体现在大数据的异步删除功能上。在Redis 6.0 版本之后,又新增了多线程I/O的读写并发能力。
Redis的运算是在内存中进行的,单个节点跑满一个CPU核心的QPS(每秒查询率,Queries-per-second,是对一个特定的查询服务器在规定时间内所处理流量多少的衡量标准)可以达到 10w/s。
如果在面试中,面试官问到Redis有哪些数据类型(Data types),你说有5种:Strings(字符串)、Lists(列表)、Hashes(哈希)、Sets(集合)、Sorted sets(有序集合),面试官会微微一笑而不语。记得哈,不是有5种,而是有超过5种数据类型,上面5种数据类型只是最常用的5种,还有Bitmaps(位图)、HyperLogLog(超级日志日志)、Streams(流)、Geospatial(地理空间)、Bitfields(位域)。本文主要介绍 位图(Bitmaps) 这种数据类型和其一些妙用。
Redis官网和非官方Redis中文网:
Redis官网:https://redis.io/
Redis非官方中文网:https://www.redis.com.cn/
与 Redis 相关的安装部署博客如下:
Docker安装最新Redis6(redis-6.2.7)(参考官方文档)
Docker安装最新稳定版Redis7(redis-7.0.5)(参考官方文档)
写最好的最新Redis6(redis-6.2.7)在云服务器Centos7安装部署教程(参考官方文档)
写最好的最新稳定版Redis7(redis-7.0.5)在云服务器Centos7安装部署教程(参考官方文档)
Redis官方版本发行说明(附谷歌翻译)如下:
Redis-7.0.x版本官方发行说明(附谷歌翻译)【持续更新】
Redis-6.2.x版本官方发行说明(附谷歌翻译)【持续更新】
《Redis对不起是我肤浅了》系列文章:
1、Redis对不起是我肤浅了(原理篇):数据传输协议RESP
2、Redis对不起是我肤浅了(基础和应用篇):位图(Bitmaps)的妙用和深入分析每个命令的用法
本文由 @大白有点菜 原创,请勿盗用,转载请说明出处!如果觉得文章还不错,请点点赞,加关注,谢谢!
二、位图(Bitmaps)介绍
在开发过程,假设我们有这么一个开发需求:App需要设计一个每日签到功能,类似支付宝的“会员签到赚积分”,如下所示,你会想到如何使用Redis去设计这个功能呢?有人说了,使用普通的 key/value 可以做到,签了是 1 ,没签是 0 ,记录一年365天,即每个用户一年保存365条记录。如果用户数很少,这样子做不会占用很大存储空间,但是,如果用户数达到上亿,那么需要的存储空间就很恐怖了!

为了解决这个问题,Redis诞生了位图(Bitmaps)这种数据类型。这样每天签到,已签到为 1 ,没签到为 0 ,要么为1,要么为 0 ,只占用一个位(bit),一个用户一年365天才占用365个位(bit),字节大小为 46 byte(365 ÷ 8 ≈ 46),这种位图(Bitmaps)数据类型节省了大量的存储空间。
位图是一种特殊的数据结构吗?并不是,它其实是普通字符串的扩展,我们可以将字符串视为位向量,还可以对一个或多个字符串执行按位运算,底层是 byte 数组,可认为是“位数组”。
【位图(Bitmaps)介绍 - 官方文档】:
https://redis.io/docs/data-types/bitmaps/
Redis位图(Bitmaps)介绍(谷歌翻译):
Redis bitmaps are an extension of the string data type that lets you treat a string like a bit vector. You can also perform bitwise operations on one or more strings. Some examples of bitmap use cases include:
Redis 位图是字符串数据类型的扩展,可让您将字符串视为位向量。您还可以对一个或多个字符串执行按位运算。位图用例的一些示例包括:
- Efficient set representations for cases where the members of a set correspond to the integers 0-N.
集合成员对应于整数 0-N 的情况的有效集合表示。- Object permissions, where each bit represents a particular permission, similar to the way that file systems store permissions.
对象权限,其中每一位代表一个特定的权限,类似于文件系统存储权限的方式。
三、位图(Bitmaps)应用
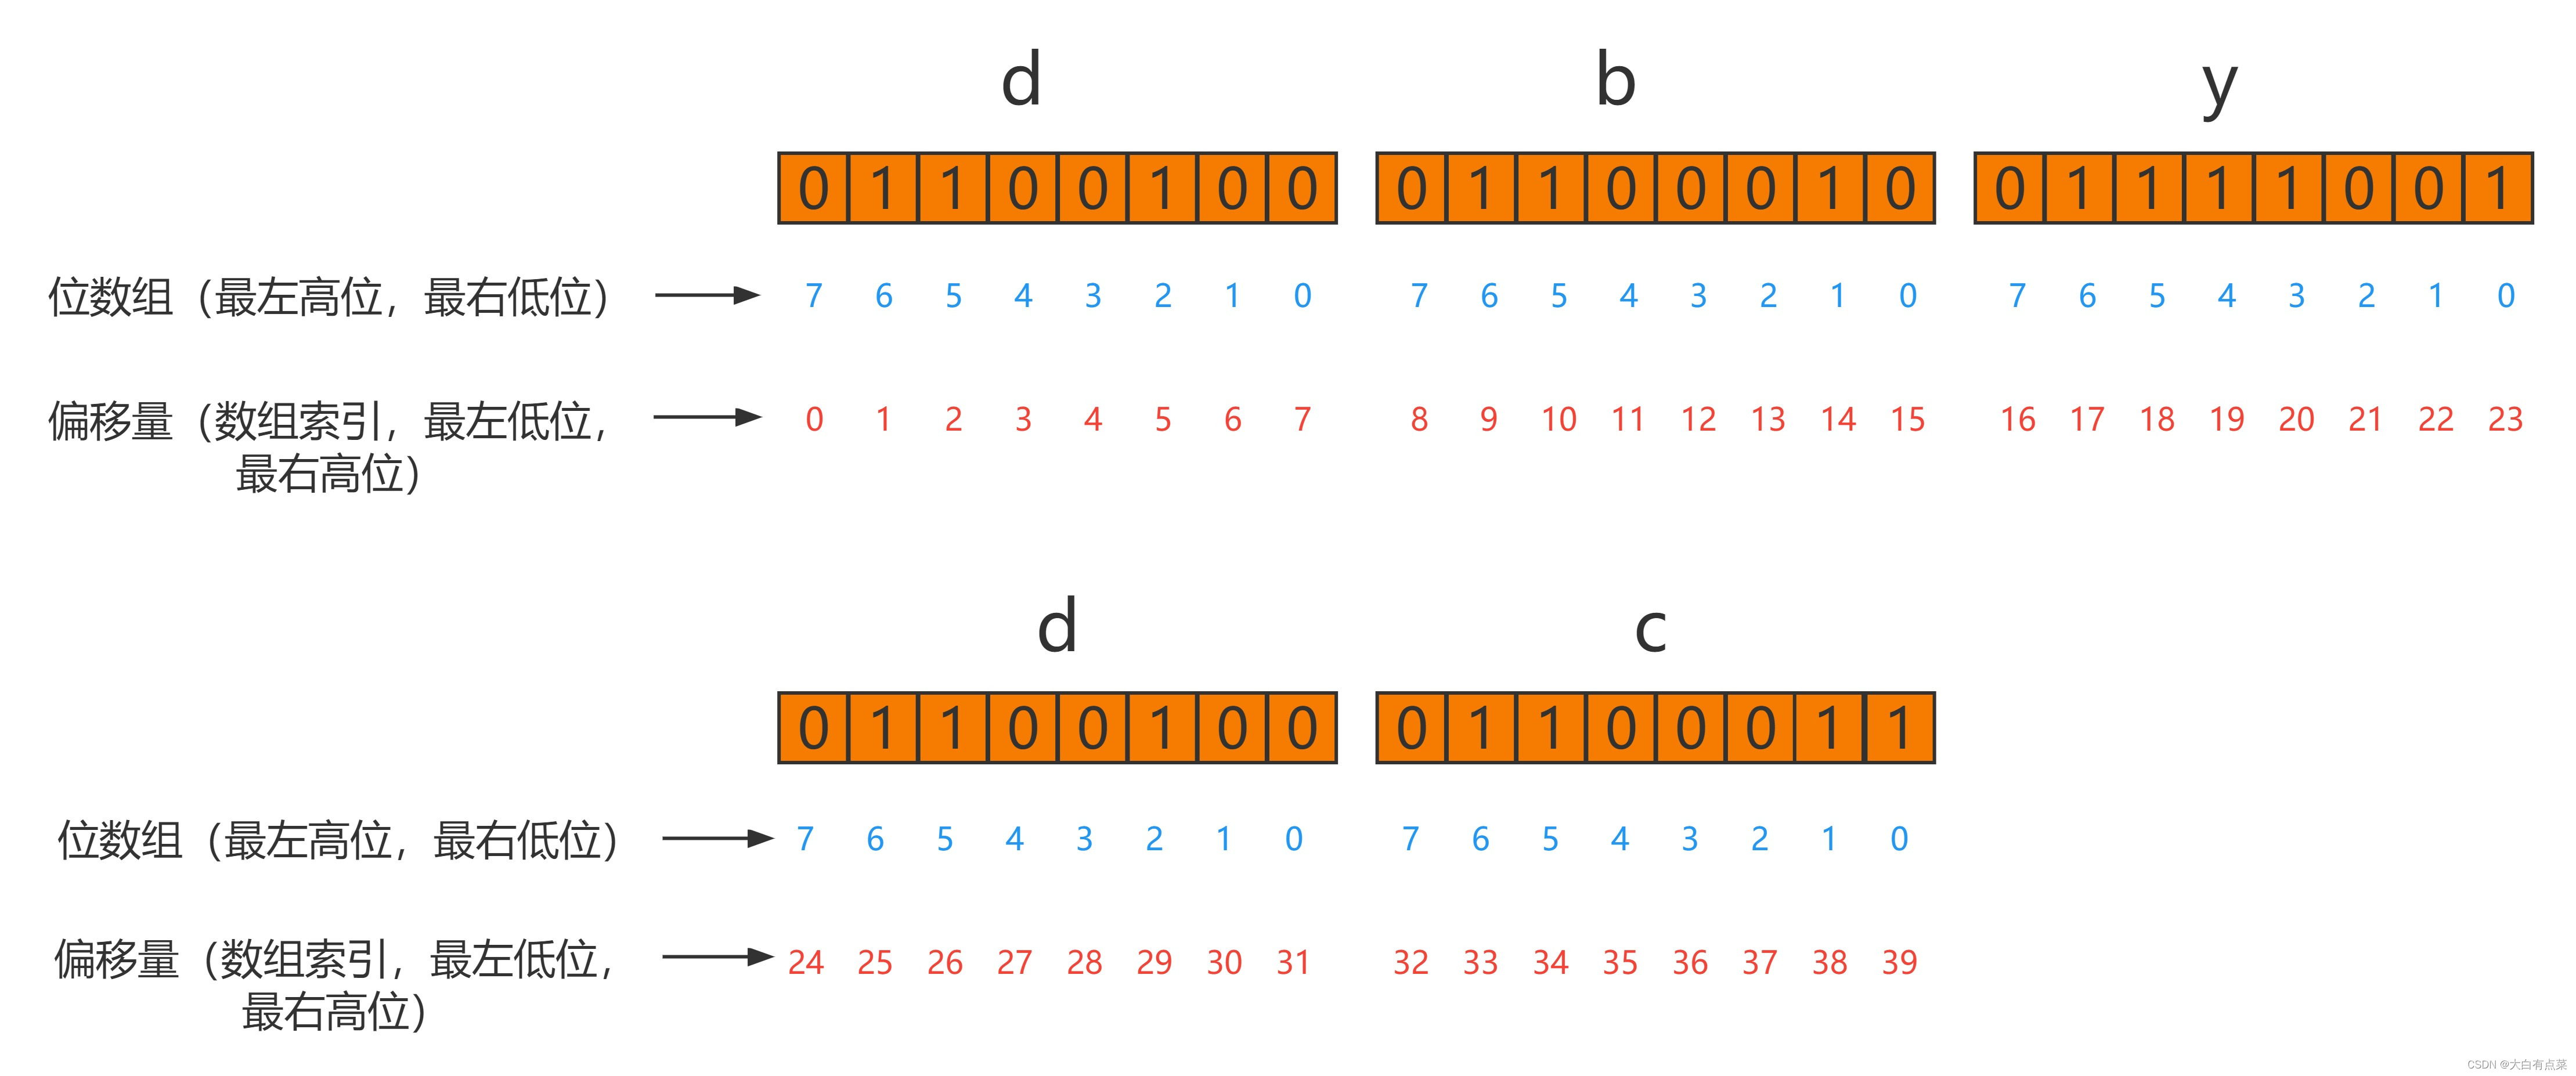
1、字符串在位数组中的存储
Redis的位数组是自动扩展的,如果设置了某个偏移位置超出了现有的内容范围,就会自动将位数组进行 0(零)扩充。
我们使用位操作将字符串设置为“dbydc”,首先得到“dbydc”对应的ASCII码,再转换为二进制。ASCII码表如下:

字符串 dbydc 转换后的二进制如下,可使用在线进制转换工具(https://tool.oschina.net/hexconvert):
| 字符 | ASCII码 | 二进制 |
|---|---|---|
| d | 100 | 01100100 |
| b | 98 | 01100010 |
| y | 121 | 01111001 |
| d | 100 | 01100100 |
| c | 99 | 01100011 |
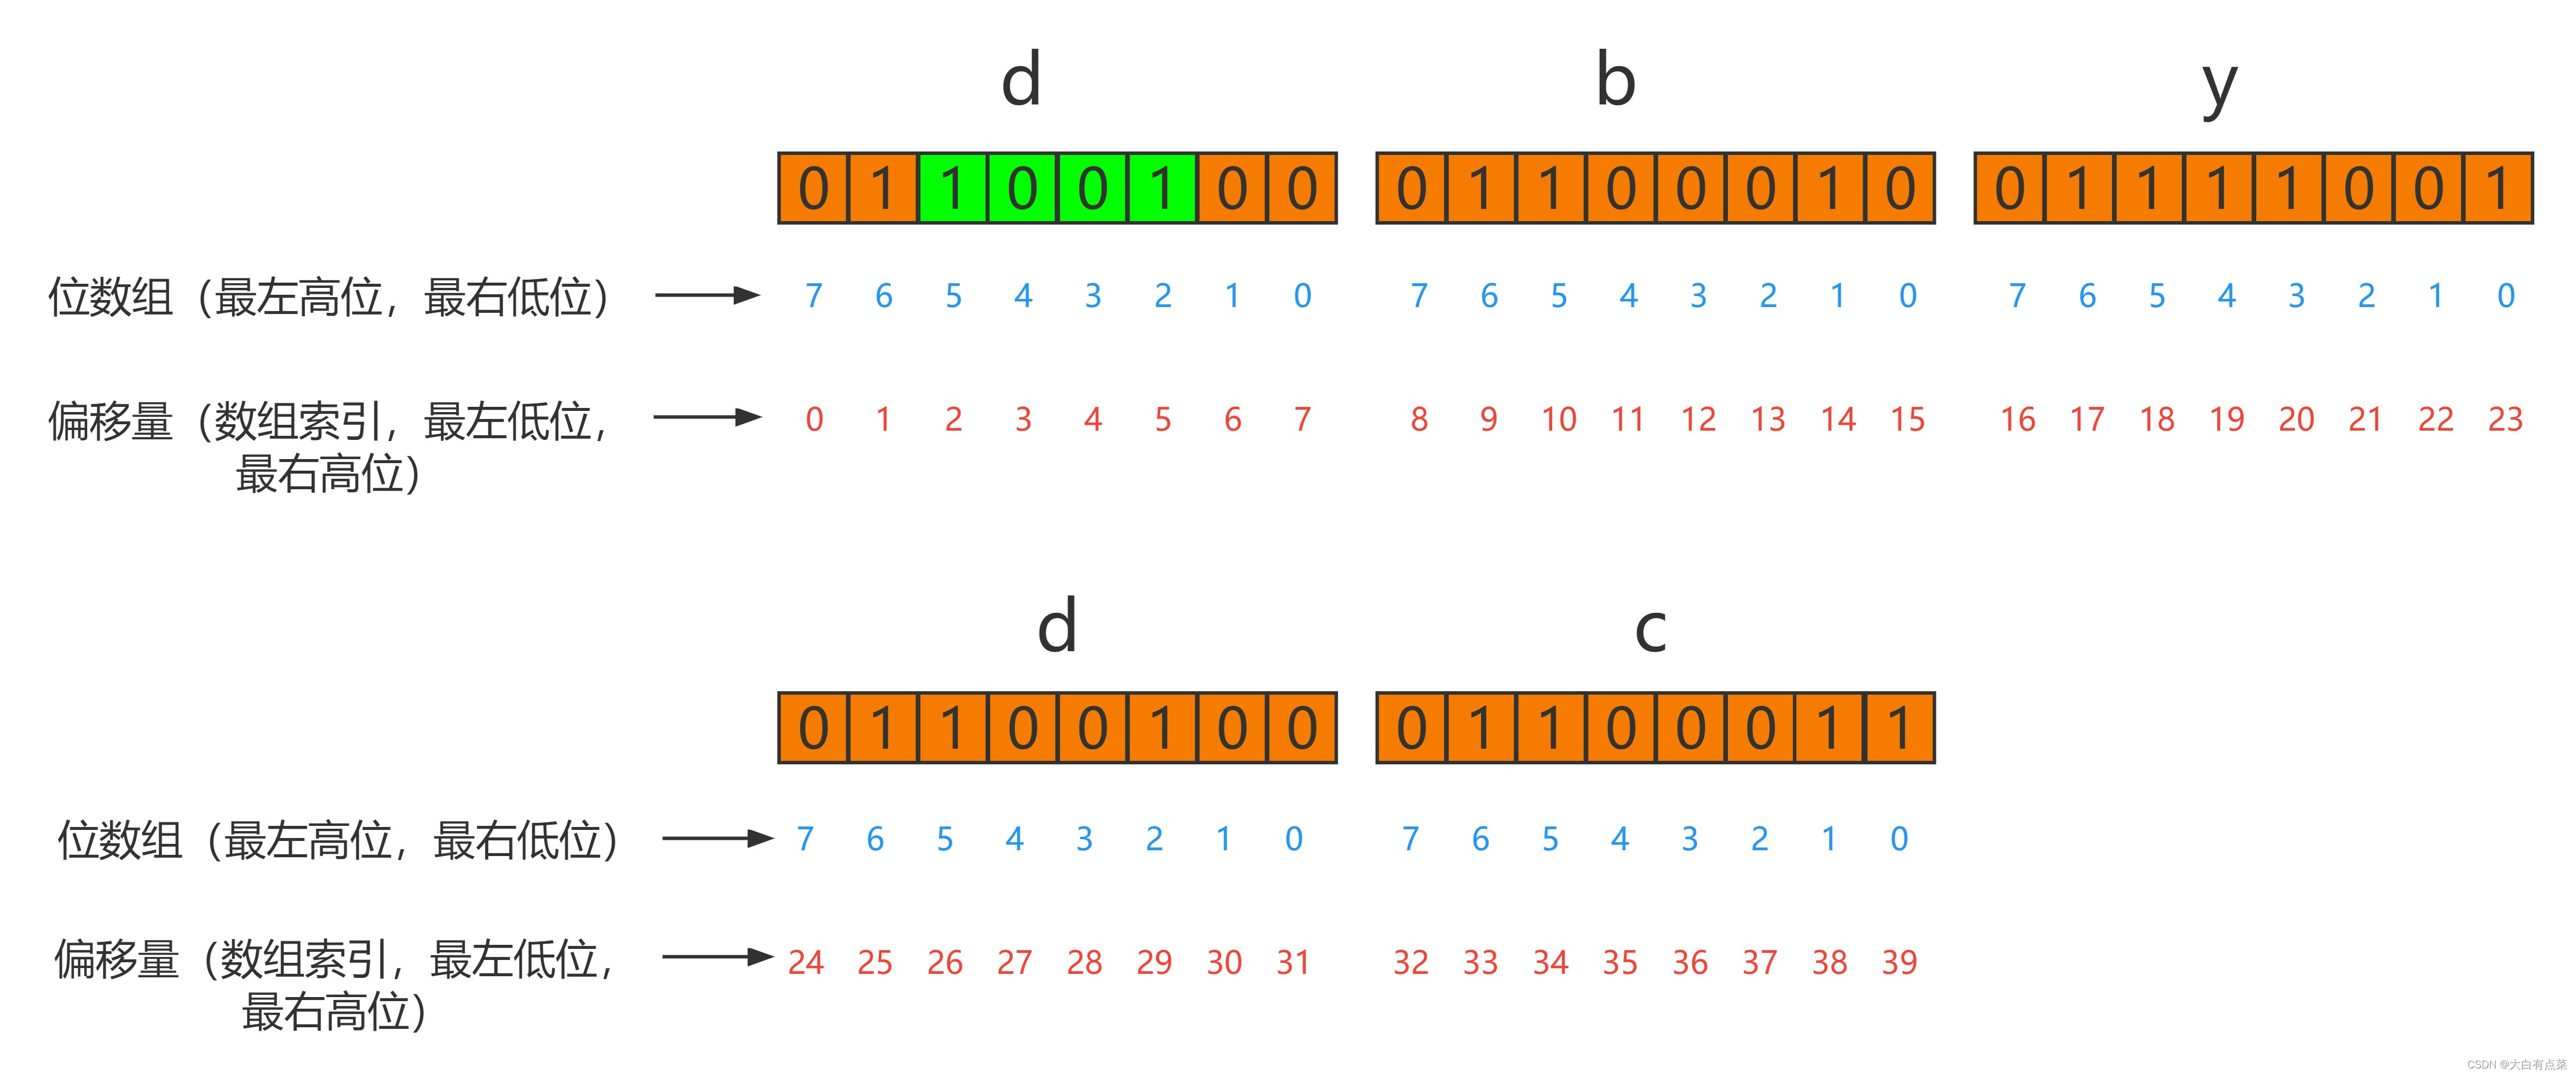
一个字符占8位(bit),不够就在最高位补 0(零),我们只需设置值为 1 的位。如图所示,二进制最高位是在最左边的,但数组索引最高位是在最右边。字符“d”只需在偏移量(offset,即数组索引)第 1、2、5 位设置 1 ;字符“b”只需在偏移量(offset,即数组索引)第 9、10、14 位设置 1 ;字符“y”只需在偏移量(offset,即数组索引)第 17、18、19、20、23 位设置 1 ;字符“d”只需在偏移量(offset,即数组索引)第 25、26、29 位设置 1 ;字符“c”只需在偏移量(offset,即数组索引)第 33、34、38、39 位设置 1 。
2、命令应用
2.1 基本命令(Basic commands)
SETBITsets a bit at the provided offset to 0 or 1.SETBIT 将提供的偏移量处的位设置为 0 或 1。
GETBITreturns the value of a bit at a given offset.GETBIT 返回给定偏移量处的位值。
BITOPlets you perform bitwise operations against one or more strings.BITOP 允许您对一个或多个字符串执行按位运算。
2.2 位图命令的完整列表(The complete list of bitmap commands)
2.2.1 SETBIT 命令
2.2.1.1 【SETBIT 命令 - 官方文档】:
https://redis.io/commands/setbit/
语法(Syntax):
SETBIT key offset value
可用起始版本(Available since):2.2.0
时间复杂度(Time complexity):O(1)
ACL类别(ACL categories):@write, @bitmap, @slow
Sets or clears the bit at offset in the string value stored at key.
设置或清除存储在键中的字符串值中偏移处的位。
The bit is either set or cleared depending on value, which can be either 0 or 1.
该位根据值设置或清除,值可以是 0 或 1。
When key does not exist, a new string value is created. The string is grown to make sure it can hold a bit at offset. The offset argument is required to be greater than or equal to 0, and smaller than 232 (this limits bitmaps to 512MB). When the string at key is grown, added bits are set to 0.
当键不存在时,将创建一个新的字符串值。字符串会增长以确保它可以保持一定的偏移量。 offset 参数必须大于或等于 0,并且小于 2^32(这将位图限制为 512MB)。当 key 处的字符串增长时,添加的位设置为 0。
Warning: When setting the last possible bit (offset equal to 232 -1) and the string value stored at key does not yet hold a string value, or holds a small string value, Redis needs to allocate all intermediate memory which can block the server for some time. On a 2010 MacBook Pro, setting bit number 232 -1 (512MB allocation) takes ~300ms, setting bit number 230 -1 (128MB allocation) takes ~80ms, setting bit number 228 -1 (32MB allocation) takes ~30ms and setting bit number 226 -1 (8MB allocation) takes ~8ms. Note that once this first allocation is done, subsequent calls to SETBIT for the same key will not have the allocation overhead.
警告:当设置最后一个可能的位(偏移量等于2^32-1)并且存储在key处的字符串值还没有保存字符串值,或者保存的字符串值很小时,Redis需要分配所有可以阻塞的中间内存服务器一段时间。在 2010 MacBook Pro 上,设置位数 2^32-1(512MB 分配)需要 ~300ms,设置位数 2^30-1(128MB 分配)需要 ~80ms,设置位数 2^28-1(32MB 分配)需要 ~30ms,设置位号 2^26-1(8MB 分配)需要 ~8ms。请注意,一旦完成第一次分配,后续对同一键的 SETBIT 调用将不会产生分配开销。
2.2.1.2 返回(Return)
Integer reply: the original bit value stored at offset.
整数回复:偏移量处存储的原始位值。
2.2.1.3 例子(Examples)
1.字符“d”存储(第 1、2、5 位设置1)
127.0.0.1:6379> setbit mykey 1 1
(integer) 0
127.0.0.1:6379> setbit mykey 2 1
(integer) 0
127.0.0.1:6379> setbit mykey 5 1
(integer) 0
2.字符“b”存储(第 9、10、14 位设置1)
127.0.0.1:6379> setbit mykey 9 1
(integer) 0
127.0.0.1:6379> setbit mykey 10 1
(integer) 0
127.0.0.1:6379> setbit mykey 14 1
(integer) 0
3.字符“y”存储(第 17、18、19、20、23 位设置1)
127.0.0.1:6379> setbit mykey 17 1
(integer) 0
127.0.0.1:6379> setbit mykey 18 1
(integer) 0
127.0.0.1:6379> setbit mykey 19 1
(integer) 0
127.0.0.1:6379> setbit mykey 20 1
(integer) 0
127.0.0.1:6379> setbit mykey 23 1
(integer) 0
4.字符“d”存储(第 25、26、29 位设置1)
127.0.0.1:6379> setbit mykey 25 1
(integer) 0
127.0.0.1:6379> setbit mykey 26 1
(integer) 0
127.0.0.1:6379> setbit mykey 29 1
(integer) 0
5.字符“c”存储(第 33、34、38、39 位设置1)
127.0.0.1:6379> setbit mykey 33 1
(integer) 0
127.0.0.1:6379> setbit mykey 34 1
(integer) 0
127.0.0.1:6379> setbit mykey 38 1
(integer) 0
127.0.0.1:6379> setbit mykey 39 1
(integer) 0
6.获取键 mykey 对应的值
127.0.0.1:6379> get mykey
“dbydc”
2.2.1.4 模式(Pattern):访问整个位图(accessing the entire bitmap)
There are cases when you need to set all the bits of single bitmap at once, for example when initializing it to a default non-zero value. It is possible to do this with multiple calls to the SETBIT command, one for each bit that needs to be set. However, so as an optimization you can use a single SET command to set the entire bitmap.
在某些情况下,您需要一次设置单个位图的所有位,例如将其初始化为默认的非零值时。可以通过多次调用 SETBIT 命令来完成此操作,每个调用对应需要设置的一位。然而,作为一种优化,您可以使用单个 SET 命令来设置整个位图。
Bitmaps are not an actual data type, but a set of bit-oriented operations defined on the String type (for more information refer to the Bitmaps section of the Data Types Introduction page). This means that bitmaps can be used with string commands, and most importantly with SET and GET.
位图不是实际的数据类型,而是一组定义在 String 类型上的面向位的操作(有关更多信息,请参阅数据类型介绍页面的位图部分)。这意味着位图可以与字符串命令一起使用,最重要的是与 SET 和 GET 一起使用。
Because Redis’ strings are binary-safe, a bitmap is trivially encoded as a bytes stream. The first byte of the string corresponds to offsets 0…7 of the bitmap, the second byte to the 8…15 range, and so forth.
因为 Redis 的字符串是二进制安全的,所以位图被简单地编码为字节流。字符串的第一个字节对应于位图的偏移量 0...7,第二个字节对应于 8...15 范围,依此类推。
For example, after setting a few bits, getting the string value of the bitmap would look like this:
例如,设置几个位后,获取位图的字符串值将如下所示:
127.0.0.1:6379> SETBIT bitmapsarestrings 2 1
(integer) 0
127.0.0.1:6379> SETBIT bitmapsarestrings 3 1
(integer) 0
127.0.0.1:6379> SETBIT bitmapsarestrings 5 1
(integer) 0
127.0.0.1:6379> SETBIT bitmapsarestrings 10 1
(integer) 0
127.0.0.1:6379> SETBIT bitmapsarestrings 11 1
(integer) 0
127.0.0.1:6379> SETBIT bitmapsarestrings 14 1
(integer) 0
127.0.0.1:6379> get bitmapsarestrings
“42”
By getting the string representation of a bitmap, the client can then parse the response’s bytes by extracting the bit values using native bit operations in its native programming language. Symmetrically, it is also possible to set an entire bitmap by performing the bits-to-bytes encoding in the client and calling SET with the resultant string.
通过获取位图的字符串表示形式,客户端然后可以通过使用其本地编程语言中的本地位操作提取位值来解析响应的字节。同样地,也可以通过在客户端执行位到字节编码并使用结果字符串调用 SET 来设置整个位图。
2.2.1.35 模式(Pattern):设置多个位(setting multiple bits)
SETBIT excels at setting single bits, and can be called several times when multiple bits need to be set. To optimize this operation you can replace multiple SETBIT calls with a single call to the variadic BITFIELD command and the use of fields of type u1.
SETBIT 擅长设置单个位,需要设置多个位时可以多次调用。要优化此操作,您可以将多个 SETBIT 调用替换为对可变参数 BITFIELD 命令的单个调用并使用类型为 u1 的字段。
For example, the example above could be replaced by:
例如,上面的示例可以替换为:
127.0.0.1:6379> BITFIELD bitsinabitmap SET u1 2 1 SET u1 3 1 SET u1 5 1 SET u1 10 1 SET u1 11 1 SET u1 14 1
(integer) 0
127.0.0.1:6379> get bitmapsarestrings
“42”
By getting the string representation of a bitmap, the client can then parse the response’s bytes by extracting the bit values using native bit operations in its native programming language. Symmetrically, it is also possible to set an entire bitmap by performing the bits-to-bytes encoding in the client and calling SET with the resultant string.
通过获取位图的字符串表示形式,客户端然后可以通过使用其本地编程语言中的本地位操作提取位值来解析响应的字节。同样地,也可以通过在客户端执行位到字节编码并使用结果字符串调用 SET 来设置整个位图。
2.2.2 GETBIT 命令
2.2.2.1 【GETBIT 命令 - 官方文档】:
https://redis.io/commands/getbit/
语法(Syntax):
GETBIT key offset
可用起始版本(Available since):2.2.0
时间复杂度(Time complexity):O(1)
ACL类别(ACL categories):@read, @bitmap, @fast
Returns the bit value at offset in the string value stored at key.
返回存储在 key 处的字符串值中 偏移量(offset) 处的位值。
When offset is beyond the string length, the string is assumed to be a contiguous space with 0 bits. When key does not exist it is assumed to be an empty string, so offset is always out of range and the value is also assumed to be a contiguous space with 0 bits.
当 offset 超出字符串长度时,字符串被假定为一个连续的 0 位空间。当 key 不存在时,它被假定为空字符串,因此 offset 总是超出范围,并且 value 也被假定为具有 0 位的连续空间。
2.2.2.2 返回(Return)
Integer reply: the bit value stored at offset.
返回:整数回复:偏移量处存储的位值。
2.2.2.3 例子(Examples)
127.0.0.1:6379> getbit mykey 0
(integer) 0
127.0.0.1:6379> getbit mykey 1
(integer) 1
127.0.0.1:6379> getbit mykey 2
(integer) 1
127.0.0.1:6379> getbit mykey 3
(integer) 0
127.0.0.1:6379> getbit mykey 4
(integer) 0
127.0.0.1:6379> getbit mykey 5
(integer) 1
前面已经设置字符“d”在键 mykey 存储(第 1、2、5 位设置1),由结果可以看出,获取到具体位值的返回 1 ,不存在具体位值的返回 0 ,GETBIT 命令行中最后一个数字代表偏移量(即数组索引)。
2.2.3 BITCOUNT 命令
2.2.3.1 【BITCOUNT 命令 - 官方文档】:
https://redis.io/commands/bitcount/
BITCOUNT 命令用来统计指定范围内(start 和 end 之间)1 的个数。比如我们用 BITCOUNT 统计用户一共签到了多少天,如果指定范围参数[start, end],就可以统计用户在某个时间范围内签到的天数。从Redis 7.0 版本开始,新增了两个可选参数:BYTE 和 BIT。
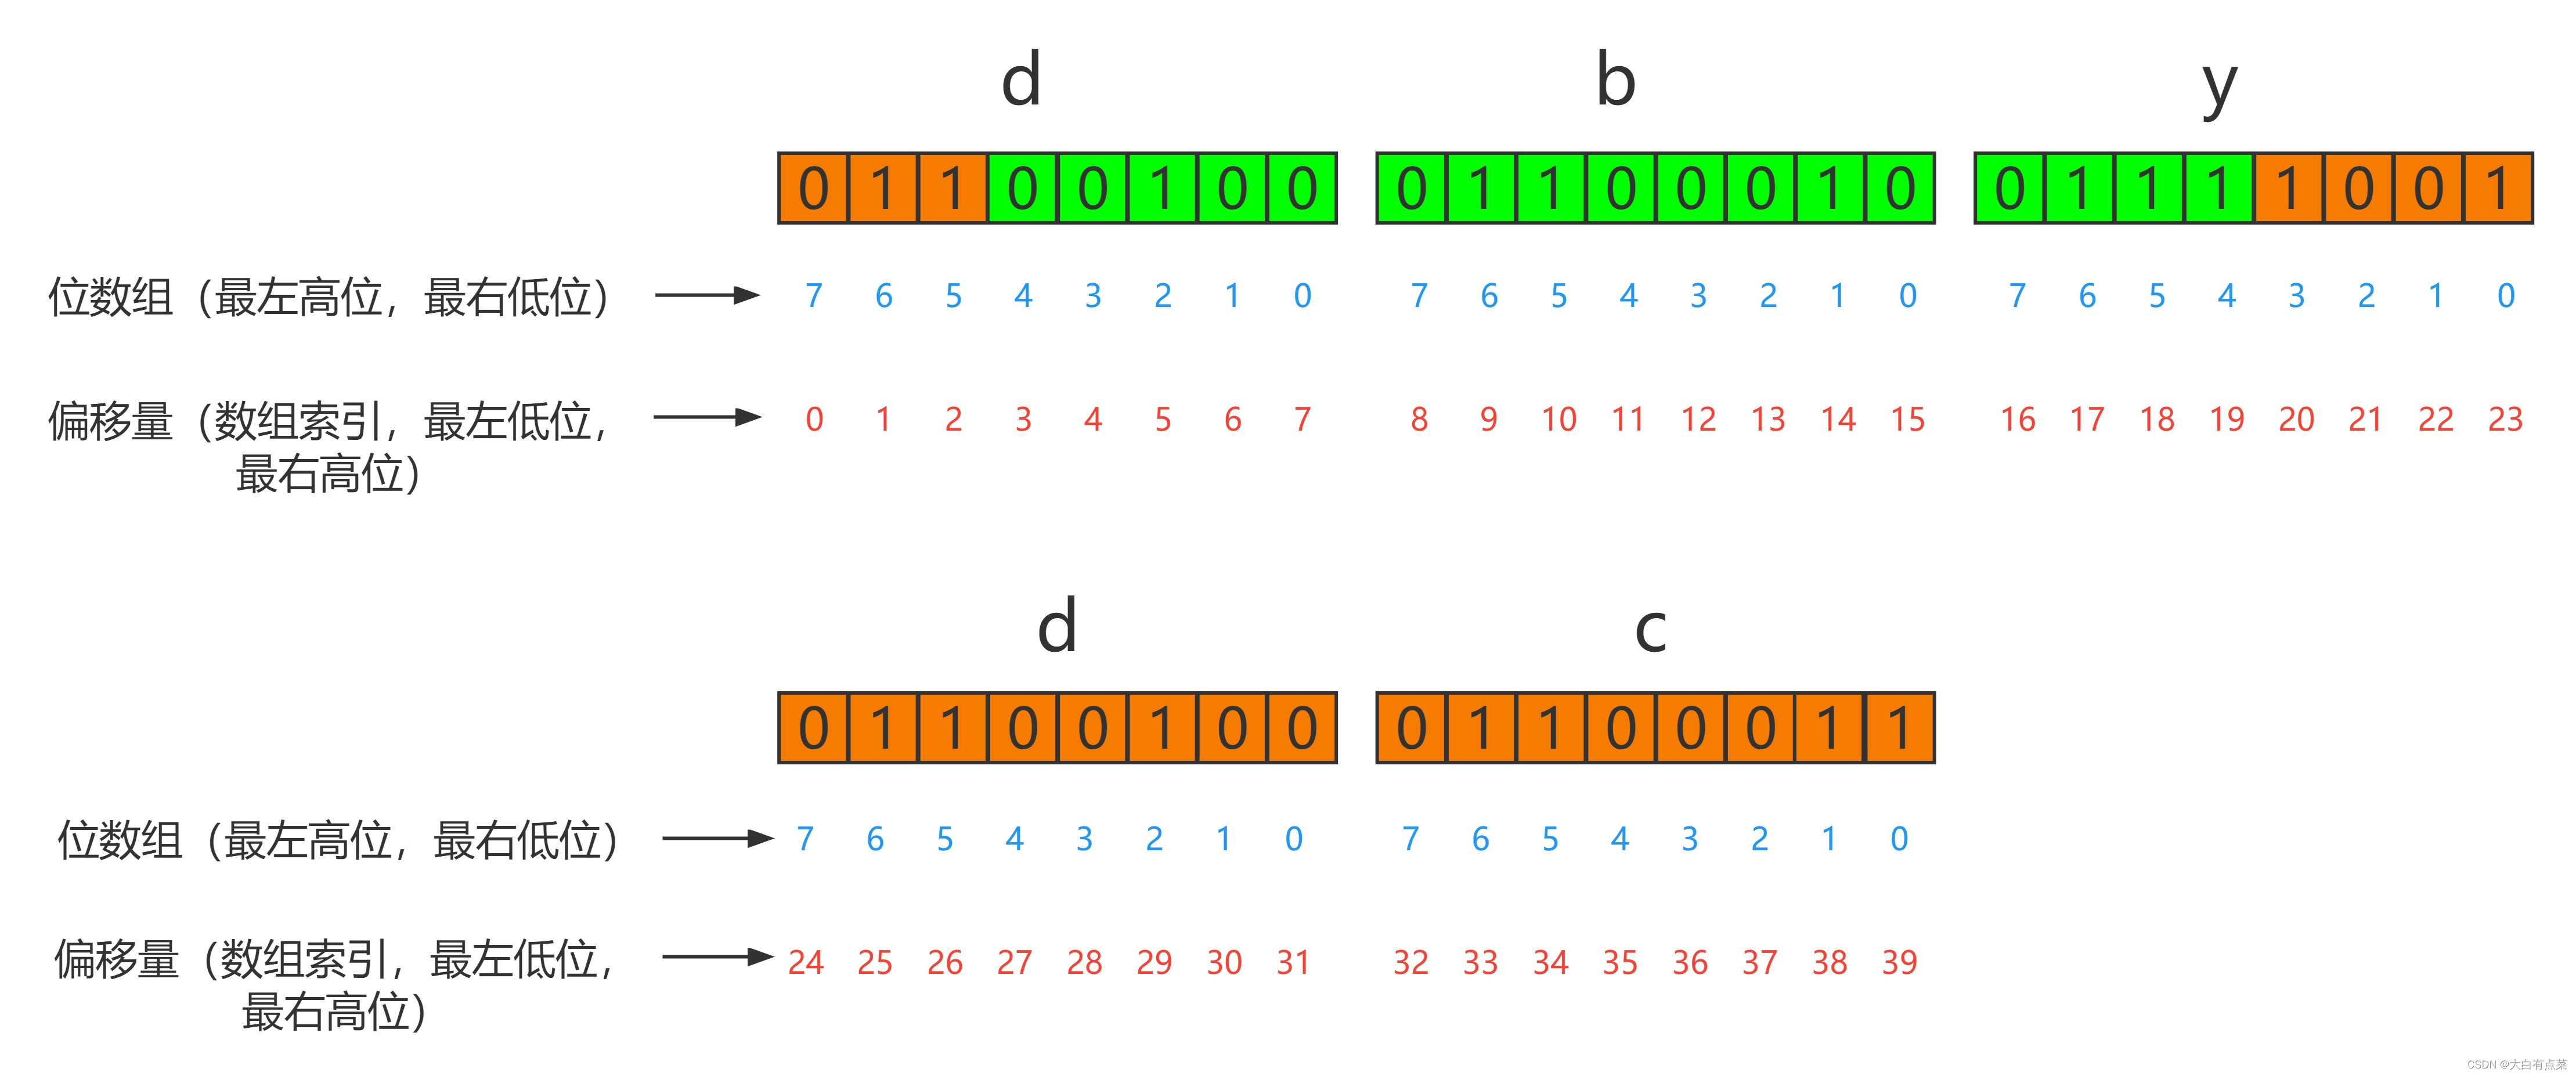
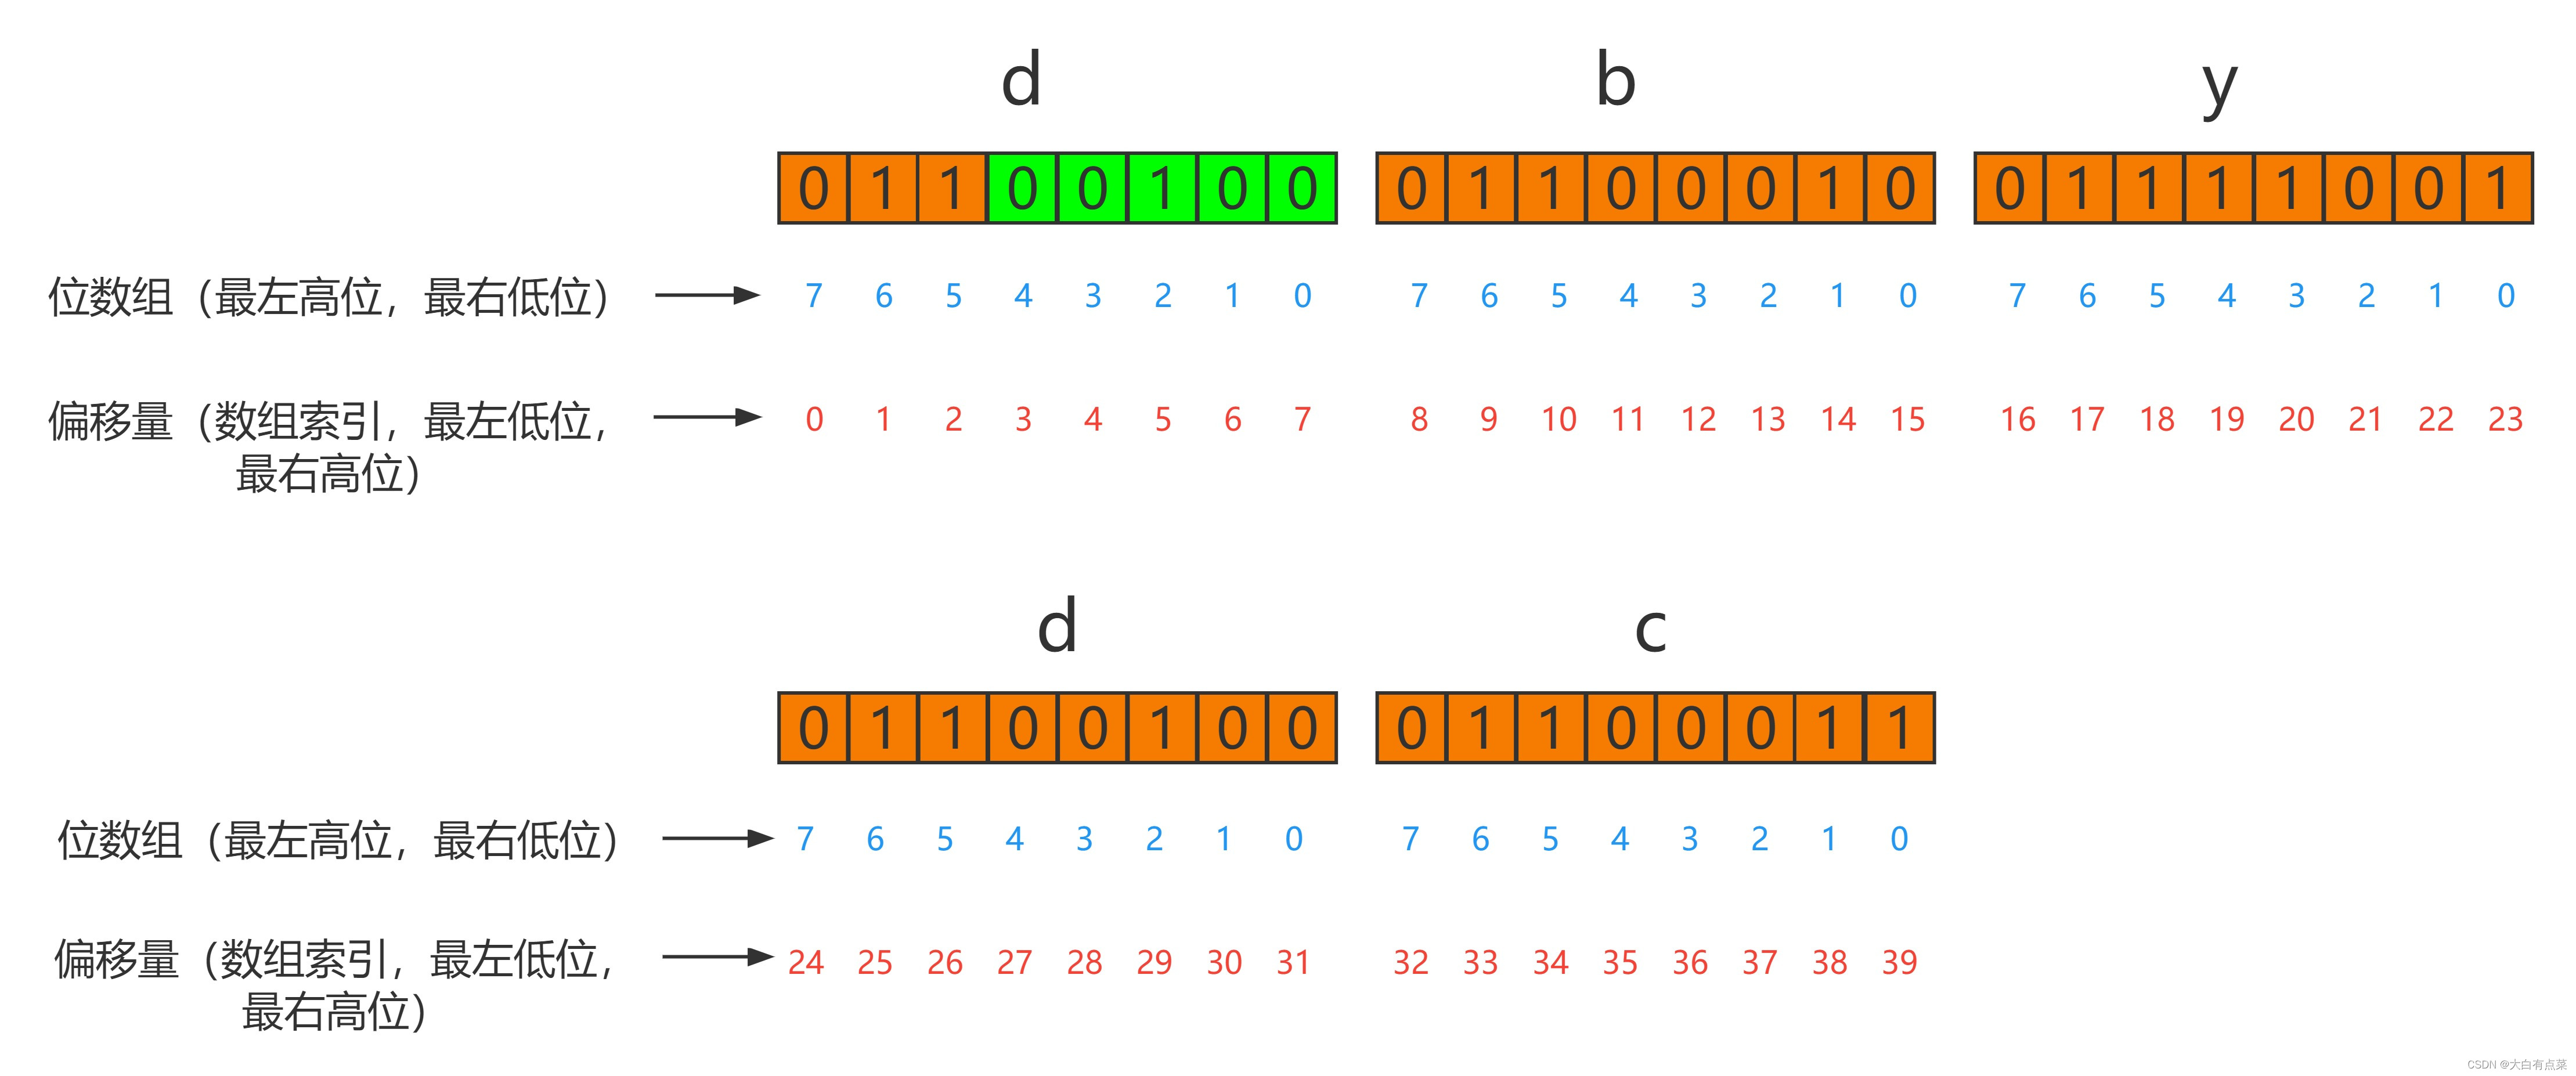
在默认或者添加“BYTE”参数下,start 和 end 参数的范围是字节范围,如何理解呢?就拿字符串“dbydc”来说,如果 start = 0 , end = 2 ,那么范围就是取“dby”这三个字符。
如果添加的是“BIT”参数,那么start 和 end 参数的范围是位范围而不是字节范围了,又如何理解呢?还是拿字符串“dbydc”来说,如果 start = 3 , end = 12 ,由于一个字符占 8 位(bit),那么范围就是第一个字符“d”(01100100)的第 4 位到第二个字符“b”(01100010)的第 13 位之间的位值(01100100 01100010),即黄色部分内容。
我们可以直接计算第100天至第200天之间的签到天数,但无法直接计算某个月内用户签到了多少天,必须将这个月所包含的字节内容全部取出来(GETRANGE 命令可以取出字符串的子字符串,类似 Java 的 String 类的 substring 方法)。这里指的是不能直接根据第几月份计算签到天数,当然啦,是可以通过其它换算,算出签到天数的。
字符串 dbydc 转换后的二进制如下,可使用在线进制转换工具(https://tool.oschina.net/hexconvert):
| 字符 | ASCII码 | 二进制 |
|---|---|---|
| d | 100 | 01100100 |
| b | 98 | 01100010 |
| y | 121 | 01111001 |
| d | 100 | 01100100 |
| c | 99 | 01100011 |
语法(Syntax):
BITCOUNT key [start end [BYTE | BIT]]
可用起始版本(Available since):2.6.0
时间复杂度(Time complexity):O(N)
ACL类别(ACL categories):@read, @bitmap, @slow
Count the number of set bits (population counting) in a string.
计算字符串中设置位的数量(人口计数)。
By default all the bytes contained in the string are examined. It is possible to specify the counting operation only in an interval passing the additional arguments start and end.
默认情况下检查字符串中包含的所有字节。可以仅在传递附加参数 start 和 end 的间隔中指定计数操作。
Like for the GETRANGE command start and end can contain negative values in order to index bytes starting from the end of the string, where -1 is the last byte, -2 is the penultimate, and so forth.
与 GETRANGE 命令一样,start 和 end 可以包含负值,以便从字符串末尾开始索引字节,其中 -1 是最后一个字节,-2 是倒数第二个字节,依此类推。
Non-existent keys are treated as empty strings, so the command will return zero.
不存在的键被视为空字符串,因此该命令将返回 0(零)。
By default, the additional arguments start and end specify a byte index. We can use an additional argument BIT to specify a bit index. So 0 is the first bit, 1 is the second bit, and so forth. For negative values, -1 is the last bit, -2 is the penultimate, and so forth.
默认情况下,附加参数 start 和 end 指定一个字节索引。我们可以使用附加参数 BIT 来指定位索引。所以 0 是第一位,1 是第二位,依此类推。对于负值,-1 是最后一位,-2 是倒数第二位,依此类推。
2.2.3.2 返回(Return)
Integer reply: The number of bits set to 1.
返回:整数回复:设置为 1 的位数。
2.2.3.3 例子(Examples)
127.0.0.1:6379> set mykey1 dbydc
OK
127.0.0.1:6379> bitcount mykey1 0 0#第一个字符“d”(二进制:01100100)中 1 的个数
(integer) 3
127.0.0.1:6379> bitcount mykey1 0 1#前两个字符,“d”(二进制:01100100)和“b”(二进制:01100010)中 1 的总个数
(integer) 6
127.0.0.1:6379> bitcount mykey1 0 1 byte#和指令 bitcount mykey1 0 1 效果一致
(integer) 6
127.0.0.1:6379> bitcount mykey1 3 12 bit#从位数组(每个字符占 8 位,而且是连续的数组索引)第 4 位算起到第 13 位之间 1 的总数
(integer) 3
2.2.3.4 模式(Pattern):使用位图的实时指标(real-time metrics using bitmaps)
Bitmaps are a very space-efficient representation of certain kinds of information. One example is a Web application that needs the history of user visits, so that for instance it is possible to determine what users are good targets of beta features.
位图是某些类型信息的非常节省空间的表示。一个示例是需要用户访问历史记录的 Web 应用程序,因此可以确定哪些用户是测试版功能的良好目标。
Using the SETBIT command this is trivial to accomplish, identifying every day with a small progressive integer. For instance day 0 is the first day the application was put online, day 1 the next day, and so forth.
使用 SETBIT 命令这很容易完成,用一个小的累进整数标识每一天。例如,第 0 天是应用程序上线的第一天,第 1 天是第二天,依此类推。
Every time a user performs a page view, the application can register that in the current day the user visited the web site using the SETBIT command setting the bit corresponding to the current day.
每次用户执行页面查看时,应用程序都可以使用 SETBIT 命令设置与当天对应的位来注册用户在当天访问网站。
Later it will be trivial to know the number of single days the user visited the web site simply calling the BITCOUNT command against the bitmap.
之后只需针对位图调用 BITCOUNT 命令,就可以轻松知道用户访问该网站的单天数。
A similar pattern where user IDs are used instead of days is described in the article called “Fast easy realtime metrics using Redis bitmaps”.
在名为“Fast easy realtime metrics using Redis bitmaps”的文章中描述了使用用户 ID 而不是天数的类似模式。
【扩展阅读(附谷歌翻译),即上面提到的“Fast easy realtime metrics using Redis bitmaps” - REDIS BITMAPS – FAST, EASY, REALTIME METRICS 博客】
At Spool, we calculate our key metrics in real time. Traditionally, metrics are performed by a batch job (running hourly, daily, etc.). Redis backed bitmaps allow us to perform such calculations in realtime and are extremely space efficient. In a simulation of 128 million users, a typical metric such as “daily unique users” takes less than 50 ms on a MacBook Pro and only takes 16 MB of memory. Spool doesn’t have 128 million users yet but it’s nice to know our approach will scale. We thought we’d share how we do it, in case other startups find our approach useful.
在 Spool,我们实时计算关键指标。传统上,指标由批处理作业执行(每小时、每天等运行)。 Redis 支持的位图使我们能够实时执行此类计算,并且非常节省空间。在对 1.28 亿用户的模拟中,“每日独立用户”等典型指标在 MacBook Pro 上花费的时间不到 50 毫秒,并且仅占用 16 MB 内存。 Spool 还没有 1.28 亿用户,但很高兴知道我们的方法将会扩展。我们认为我们会分享我们的做法,以防其他初创公司发现我们的方法有用。
Bitmap (aka Bitset)
位图(又名位集)
A Bitmap or bitset is an array of zeros and ones. A bit in a bitset can be set to either 0 or 1, and each position in the array is referred to as an offset. Operations such as logical AND, OR, XOR, etc. and other bitwise operations are fair game for Bitmaps.
位图或位集是 0 和 1 的数组。位集中的位可以设置为 0 或 1,数组中的每个位置都称为偏移量。诸如逻辑 AND、OR、XOR 等运算和其他位运算对于 Bitmaps 来说是公平的游戏。
Population Count
人口计数
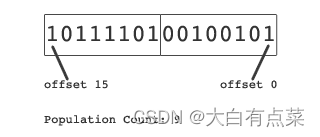
The population count of a Bitmap is the number of bits set to 1. There are efficient algorithms for calculating population count. For instance, the population count of a 90% filled bitset containing 1 billion bits took 21.1 ms on a MacBook Pro. There is even a hardware instruction in SSE4 for the population count of an integer.
Bitmap 的人口计数是设置为 1 的位数。有计算人口计数的有效算法。例如,包含 10 亿位的 90% 填充位集的填充计数在 MacBook Pro 上花费了 21.1 毫秒。 SSE4 中甚至有一个硬件指令用于整数的总体计数。
Bitmaps in Redis
Redis 中的位图
Redis allows binary keys and binary values. Bitmaps are nothing but binary values. The setbit(key, offset, value) operation, which takes O(1) time, sets the value of a bit to 0 or 1 at the specified offset for a given key.
Redis 允许二进制键和二进制值。位图不过是二进制值。 setbit(key, offset, value) 操作需要 O(1) 时间,将给定键的指定偏移量处的位值设置为 0 或 1。
A simple example: Daily Active Users
一个简单的例子:每日活跃用户
To count unique users that logged in today, we set up a bitmap where each user is identified by an offset value. When a user visits a page or performs an action, which warrants it to be counted, set the bit to 1 at the offset representing user id. The key for the bitmap is a function of the name of the action user performed and the timestamp.
为了计算今天登录的唯一用户,我们设置了一个位图,其中每个用户都由一个偏移值标识。当用户访问页面或执行操作时,保证将其计算在内,将表示用户 ID 的偏移量处的位设置为 1。位图的键是用户执行的操作名称和时间戳的函数。
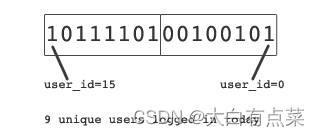
In this simple example, every time a user logs in we perform a redis.setbit(daily_active_users, user_id, 1). This flips the appropriate offset in the daily_active_users bitmap to 1. This is an O(1) operation. Doing a population count on this results in 9 unique users that logged in today. The key is daily_active_users and the value is 1011110100100101.
在这个简单的示例中,每次用户登录时,我们都会执行 redis.setbit(daily_active_users, user_id, 1)。这会将 daily_active_users 位图中的适当偏移量翻转为 1。这是一个 O(1) 操作。以此为基础进行人口统计,结果是今天有 9 个唯一用户登录。键为 daily_active_users,值为 1011110100100101。
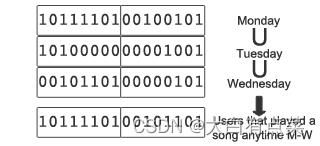
Of course, since the daily active users will change every day we need a way to create a new bitmap every day. We do this by simply appending the date to the bitmap key. For example, if we want to calculate the daily unique users who have played at least 1 song in a music app for a given day, we can set the key name to be play:yyyy-mm-dd. If we want to calculate the number of unique users playing a song each hour, we can name the key name will be play:yyyy-mm-dd-hh. For the rest of the discussion, we will stick with daily unique users that played a song. To collect daily metrics, we will simple set the user’s bit to 1 in the play:yyyy-mm-dd key whenever a user plays a song. This is an O(1) operation.
当然,由于每日活跃用户每天都会发生变化,因此我们需要一种方法来每天创建一个新的位图。我们通过简单地将日期附加到位图键来做到这一点。例如,如果我们要计算给定日期在音乐应用中至少播放过 1 首歌曲的每日唯一身份用户,我们可以将键名称设置为 play:yyyy-mm-dd。如果我们想计算每小时播放一首歌的唯一用户数,我们可以将键名命名为 play:yyyy-mm-dd-hh。在接下来的讨论中,我们将坚持每天播放歌曲的唯一身份用户。为了收集每日指标,我们将在播放中简单地将用户位设置为 1:yyyy-mm-dd 键,每当用户播放歌曲时。这是一个 O(1) 操作。
redis.setbit(play:yyyy-mm-dd, user_id, 1)
The unique users that played a song today is the population count of the bitmap stored as the value for the play:yyyy-mm-dd key.To calculate weekly or monthly metrics, we can simply compute the union of all the daily Bitmaps over the week or the month, and then calculate the population count of the resulting bitmap.
今天播放歌曲的唯一用户是存储为 play:yyyy-mm-dd 键值的位图的人口计数。要计算每周或每月指标,我们可以简单地计算所有每日位图的并集周或月,然后计算生成的位图的人口数。
You can also extract more complex metrics very easily. For example, the premium account holders who played a song in November would be:
您还可以非常轻松地提取更复杂的指标。例如,在 11 月播放歌曲的高级帐户持有人将是:
(play:2011-11-01 ∪ play:2011-11-02 ∪…∪play:2011-11-30) ∩ premium:2011-11
(播放:2011-11-01 ∪ 播放:2011-11-02 ∪...∪播放:2011-11-30) ∩ 高级:2011-11
Performance comparison using 128 million users
使用 1.28 亿用户的性能比较
The table below shows a comparison of daily unique action calculations calculated over 1 day, 7 days and 30 days for 128 million users. The 7 and 30 metrics are calculated by combining daily bitmaps.
下表显示了 1.28 亿用户在 1 天、7 天和 30 天内计算的每日唯一操作计算的比较。 7 和 30 指标是通过组合每日位图计算的。
PERIOD(周期) | TIME (MS)(时间(毫秒)) |
|---|---|
Daily(每日) | 50.2 |
Weekly(每周) | 392.0 |
Monthly(每月) | 1624.8 |
Optimizations
优化
In the above example, we can optimize the weekly and monthly computations by caching the calculated daily, weekly, monthly counts in Redis.
在上面的示例中,我们可以通过在 Redis 中缓存计算的每日、每周、每月计数来优化每周和每月的计算。
This is a very flexible approach. An added bonus of caching is that it allows fast cohort analysis, such as weekly unique users who are also mobile users — the intersection of a mobile users bitmap with a weekly active users bitmap. Or, if we want to compute rolling unique users over the last n days, having cached daily unique counts makes this easy — simply grab the previous n-1 days from your cache and union it with the real time daily count, which only takes 50ms.
这是一种非常灵活的方法。缓存的另一个好处是它允许快速群组分析,例如同时也是移动用户的每周唯一用户 - 移动用户位图与每周活跃用户位图的交集。或者,如果我们想计算过去 n 天的滚动唯一用户数,缓存每日唯一用户数可以让这变得简单——只需从缓存中获取前 n-1 天并将其与实时每日计数合并,这只需要 50 毫秒。
Sample Code
示例代码
A Java code snippet below computes unique users for a given user action and date.
下面的 Java 代码片段计算给定用户操作和日期的唯一用户。
import redis.clients.jedis.Jedis;
import java.util.BitSet;
...
  Jedis redis = new Jedis("localhost");
...
  public int uniqueCount(String action, String date) {
    String key = action + ":" + date;
    BitSet users = BitSet.valueOf(redis.get(key.getBytes()));
    return users.cardinality();
  }
The code snippet below computes the unique users for a given given user action and a list of dates.
下面的代码片段针对给定的给定用户操作和日期列表计算唯一用户数。
import redis.clients.jedis.Jedis;
import java.util.BitSet;
...
  Jedis redis = new Jedis("localhost");
...
  public int uniqueCount(String action, String... dates) {
    BitSet all = new BitSet();
    for (String date : dates) {
      String key = action + ":" + date;
      BitSet users = BitSet.valueOf(redis.get(key.getBytes()));
      all.or(users);
    }
    return all.cardinality();
  }
2.2.3.5 性能考虑(Performance considerations)
In the above example of counting days, even after 10 years the application is online we still have just 365*10 bits of data per user, that is just 456 bytes per user. With this amount of data BITCOUNT is still as fast as any other O(1) Redis command like GET or INCR.
在上面计算天数的示例中,即使应用程序在线 10 年后,每个用户仍然只有 365*10 位数据,即每个用户只有 456 字节。有了这个数据量,BITCOUNT 仍然与任何其他 O(1) Redis 命令(如 GET 或 INCR)一样快。
When the bitmap is big, there are two alternatives:
当位图很大时,有两种选择:
1、Taking a separated key that is incremented every time the bitmap is modified. This can be very efficient and atomic using a small Redis Lua script.
1、采用每次修改位图时递增的单独键。使用小型 Redis Lua 脚本可以非常高效且原子化。
2、Running the bitmap incrementally using the BITCOUNT start and end optional parameters, accumulating the results client-side, and optionally caching the result into a key.
2、使用 BITCOUNT 开始和结束可选参数增量运行位图,在客户端累积结果,并可选择将结果缓存到键中。
2.2.3.6 历史(History)
Starting with Redis version 7.0.0: Added the BYTE|BIT option.
从 Redis 版本 7.0.0 开始:添加了 BYTE|BIT 选项。
2.2.4 BITPOS 命令
2.2.4.1 【BITPOS 命令 - 官方文档】:
https://redis.io/commands/bitpos/
BITPOS 命令用来查找指定范围内出现的第一个 0 或 1。比如我们用 BITPOS 查找用户从哪一天开始第一天签到,可以指定范围参数[start, end],从 Redis 7.0版本开始新增两个可选参数:BYTE 和 BIT。
在默认或者添加“BYTE”参数下,start 和 end 参数的范围是字节范围,如何理解呢?就拿字符串“dbydc”来说,如果 start = 0 , end = 2 ,那么范围就是取“dby”这三个字符。
如果添加的是“BIT”参数,那么start 和 end 参数的范围是位范围而不是字节范围了,又如何理解呢?还是拿字符串“dbydc”来说,如果 start = 3 , end = 12 ,由于一个字符占 8 位(bit),那么范围就是第一个字符“d”(01100100)的第 4 位到第二个字符“b”(01100010)的第 13 位之间的位值(01100100 01100010),即黄色部分内容。
字符串 dbydc 转换后的二进制如下,可使用在线进制转换工具(https://tool.oschina.net/hexconvert):
| 字符 | ASCII码 | 二进制 |
|---|---|---|
| d | 100 | 01100100 |
| b | 98 | 01100010 |
| y | 121 | 01111001 |
| d | 100 | 01100100 |
| c | 99 | 01100011 |
语法(Syntax):
BITPOS key bit [start [end [BYTE | BIT]]]
可用起始版本(Available since):2.8.7
时间复杂度(Time complexity):O(N)
ACL类别(ACL categories):@read, @bitmap, @slow
Return the position of the first bit set to 1 or 0 in a string.
返回设置为 1 或 0 的第一个位在字符串中的位置。
The position is returned, thinking of the string as an array of bits from left to right, where the first byte’s most significant bit is at position 0, the second byte’s most significant bit is at position 8, and so forth.
返回位置,将字符串视为从左到右的位数组,其中第一个字节的最高有效位在位置 0,第二个字节的最高有效位在位置 8,依此类推。
The same bit position convention is followed by GETBIT and SETBIT.
GETBIT 和 SETBIT 遵循相同的位位置约定。
By default, all the bytes contained in the string are examined. It is possible to look for bits only in a specified interval passing the additional arguments start and end (it is possible to just pass start, the operation will assume that the end is the last byte of the string. However there are semantic differences as explained later). By default, the range is interpreted as a range of bytes and not a range of bits, so start=0 and end=2 means to look at the first three bytes.
默认情况下,检查字符串中包含的所有字节。可以通过附加参数开始和结束仅在指定的间隔中查找位(可以只通过开始,操作将假定结束是字符串的最后一个字节。但是如解释的那样存在语义差异之后)。默认情况下,范围被解释为字节范围而不是位范围,所以 start=0 和 end=2 表示看前三个字节。
You can use the optional BIT modifier to specify that the range should be interpreted as a range of bits. So start=0 and end=2 means to look at the first three bits.
您可以使用可选的 BIT 修饰符来指定应将范围解释为位范围。所以start=0和end=2的意思就是看前三位。
Note that bit positions are returned always as absolute values starting from bit zero even when start and end are used to specify a range.
请注意,位位置始终作为从位零开始的绝对值返回,即使在开始和结束用于指定范围时也是如此。
Like for the GETRANGE command start and end can contain negative values in order to index bytes starting from the end of the string, where -1 is the last byte, -2 is the penultimate, and so forth. When BIT is specified, -1 is the last bit, -2 is the penultimate, and so forth.
与 GETRANGE 命令一样,start 和 end 可以包含负值,以便从字符串末尾开始索引字节,其中 -1 是最后一个字节,-2 是倒数第二个字节,依此类推。当指定 BIT 时,-1 是最后一位,-2 是倒数第二位,依此类推。
Non-existent keys are treated as empty strings.
不存在的键被视为空字符串。
2.2.4.2 返回(Return)
Integer reply(
整数回复)
The command returns the position of the first bit set to 1 or 0 according to the request.
该命令根据请求返回第一个位设置为 1 或 0 的位置。
If we look for set bits (the bit argument is 1) and the string is empty or composed of just zero bytes, -1 is returned.
如果我们查找设置位(位参数为 1)并且字符串为空或仅由零字节组成,则返回 -1。
If we look for clear bits (the bit argument is 0) and the string only contains bit set to 1, the function returns the first bit not part of the string on the right. So if the string is three bytes set to the value 0xff the command BITPOS key 0 will return 24, since up to bit 23 all the bits are 1.
如果我们寻找明确的位(位参数为 0)并且字符串仅包含设置为 1 的位,则该函数返回第一个位而不是右侧字符串的一部分。因此,如果字符串是三个字节并设置为值 0xff,则命令 BITPOS key 0 将返回 24,因为直到第 23 位所有位都是 1。
Basically, the function considers the right of the string as padded with zeros if you look for clear bits and specify no range or the start argument only.
基本上,如果您寻找清晰的位并且不指定范围或仅指定起始参数,则该函数会将字符串的右侧视为用零填充。
However, this behavior changes if you are looking for clear bits and specify a range with both start and end. If no clear bit is found in the specified range, the function returns -1 as the user specified a clear range and there are no 0 bits in that range.
但是,如果您正在寻找清除位并指定具有开始和结束的范围,则此行为会发生变化。如果在指定范围内未找到清除位,则该函数返回 -1,因为用户指定了一个清除范围并且该范围内没有 0 位。
2.2.4.3 例子(Examples)
127.0.0.1:6379> set testkey dbydc
OK
127.0.0.1:6379> bitpos testkey 0#第一个 0 对应的偏移量(即数组索引)
(integer) 0
127.0.0.1:6379> bitpos testkey 1#第一个 1 对应的偏移量(即数组索引)
(integer) 1
127.0.0.1:6379> bitpos testkey 1 1 1#从第二个字符“b”算起,第一个 1 对应的偏移量(即数组索引)
(integer) 9
127.0.0.1:6379> bitpos testkey 1 2 2#从第三个字符“y”算起,第一个 1 对应的偏移量(即数组索引)
(integer) 17
127.0.0.1:6379> bitpos testkey 1 3 15 bit#从位数组(每个字符占 8 位,而且是连续的数组索引)第 4 位算起到第 16 位,第一个 1 对应的偏移量(即数组索引)
(integer) 5
127.0.0.1:6379> bitpos testkey 1 2 2 byte#和指令 bitpos testkey 1 2 2 效果一致
(integer) 17
上面的例子中,指令“bitpos testkey 1 1 1”,第一个“1”代表“位(bit),要么为 0 ,要么为 1”,第二个“1”代表“start”,第三个“1”代表“end”,“start”和“end”的默认范围属于“字节范围”。若start = 1,end = 1,代表第二个字符“b”;若start = 1,end = 2,代表第三个字符“b”和第四个字符“y”。如何算出整数为 9 的呢?第一个字符“d”占 8 bit(用零填充最高位变为 8 位,01100100,数组索引为 0~7),第二个字符“b”占 8 bit(用零填充最高位变为 8 位,01100010,数组索引为 8~15),那么字符“b”第一次出现 1 的位置为位数组(01100010)的第 10 位置,即索引为 9 。
指令“bitpos testkey 1 3 15 bit”添加了参数“bit”后,范围被解释为“位范围”而不是字节范围,第一个“1”代表“位(bit),要么为 0 ,要么为 1”,第二个“3”代表“start,在位数组的第 4 位”,第三个“15”代表“end,在位数组的第 16 位”。如何算出整数为 5 的呢?start = 3,end = 15,意味着是从第一个字符“d”(占 8 bit,用零填充最高位变为 8 位,01100100,数组索引为 0~7)的第 4 位算起,到第二个字符“b”(占 8 bit,用零填充最高位变为 8 位,01100010,数组索引为 8~15)的第 16 位结束,第一次出现 1 的位置为第一个字符“d”对应的位数组(01100100)的第 6 位置。由于索引是从 0 算起的,所以第 6 位置对应的就是整数 5 。
2.2.4.4 历史(History)
Starting with Redis version 7.0.0: Added the BYTE|BIT option.
从 Redis 版本 7.0.0 开始:添加了 BYTE|BIT 选项。
2.2.5 BITOP 命令
2.2.5.1 【BITOP 命令 - 官方文档】:
https://redis.io/commands/bitop/
BITOP 命令用来执行多个键(包含字符串值)之间的按位运算,并将结果存储在目标键中,支持四种按位运算:AND、OR、XOR 和 NOT。
语法(Syntax):
BITOP operation destkey key [key ...]
可用起始版本(Available since):2.6.0
时间复杂度(Time complexity):O(N)
ACL类别(ACL categories):@write, @bitmap, @slow
Perform a bitwise operation between multiple keys (containing string values) and store the result in the destination key.
在多个键(包含字符串值)之间执行按位运算,并将结果存储在目标键中。
The BITOP command supports four bitwise operations: AND, OR, XOR and NOT, thus the valid forms to call the command are:
BITOP 命令支持四种按位运算:AND、OR、XOR 和 NOT,因此调用该命令的有效形式为:
(1)BITOP AND destkey srckey1 srckey2 srckey3 … srckeyN
(2)BITOP OR destkey srckey1 srckey2 srckey3 … srckeyN
(3)BITOP XOR destkey srckey1 srckey2 srckey3 … srckeyN
(4)BITOP NOT destkey srckey
As you can see NOT is special as it only takes an input key, because it performs inversion of bits so it only makes sense as a unary operator.
正如您所看到的,NOT 是特殊的,因为它只需要一个输入键,因为它执行位反转,所以它只作为一元运算符才有意义。
The result of the operation is always stored at destkey.
操作的结果总是存储在 destkey 中。
2.2.5.2 处理不同长度的字符串(Handling of strings with different lengths)
When an operation is performed between strings having different lengths, all the strings shorter than the longest string in the set are treated as if they were zero-padded up to the length of the longest string.
当在具有不同长度的字符串之间执行操作时,所有短于集合中最长字符串的字符串都被视为好像它们被零填充到最长字符串的长度。
The same holds true for non-existent keys, that are considered as a stream of zero bytes up to the length of the longest string.
这同样适用于不存在的键,它们被视为零字节流,直到最长字符串的长度。
2.2.5.3 返回(Return)
Integer reply(
整数回复)
The size of the string stored in the destination key, that is equal to the size of the longest input string.
目标键中存储的字符串的大小,即等于最长输入字符串的大小。
2.2.5.4 例子(Examples):
127.0.0.1:6379> set key1 “foobar”
OK
127.0.0.1:6379> set key2 “abcdef”
OK
127.0.0.1:6379> bitop and dest key1 key2
(integer) 6
127.0.0.1:6379> get dest
“`bc`ab”
2.2.5.5 模式(Pattern):使用位图的实时指标(real time metrics using bitmaps)
BITOP is a good complement to the pattern documented in the BITCOUNT command documentation. Different bitmaps can be combined in order to obtain a target bitmap where the population counting operation is performed.
BITOP 是对 BITCOUNT 命令文档中记录的模式的很好补充。可以组合不同的位图以获得执行人口计数操作的目标位图。
See the article called “Fast easy realtime metrics using Redis bitmaps” for an interesting use cases.
有关有趣的用例,请参阅名为“使用 Redis 位图的快速简单实时指标”的文章。
2.2.5.6 性能考虑(Performance considerations)
BITOP is a potentially slow command as it runs in O(N) time. Care should be taken when running it against long input strings.
BITOP 是一个潜在的慢命令,因为它在 O(N) 时间内运行。针对长输入字符串运行它时应小心。
For real-time metrics and statistics involving large inputs a good approach is to use a replica (with replica-read-only option enabled) where the bit-wise operations are performed to avoid blocking the master instance.
对于涉及大量输入的实时指标和统计数据,一个好的方法是使用副本(启用副本只读选项),在其中执行按位操作以避免阻塞主实例。
2.2.6 BITFIELD_RO 命令
2.2.6.1 【BITFIELD_RO 命令 - 官方文档】:
https://redis.io/commands/bitfield_ro/
BITFIELD_RO 命令是 BITFIELD 命令的只读变体,只接受 GET 子命令并且可以安全地用于只读副本。
语法(Syntax):
BITFIELD_RO key GET encoding offset [GET encoding offset ...]
可用起始版本(Available since):6.0.0
时间复杂度(Time complexity):指定的每个子命令的复杂度为 O(1)
ACL类别(ACL categories):@read, @bitmap, @fast
Read-only variant of the BITFIELD command. It is like the original BITFIELD but only accepts GET subcommand and can safely be used in read-only replicas.
BITFIELD 命令的只读变体。它类似于原始的 BITFIELD,但只接受 GET 子命令并且可以安全地用于只读副本。
Since the original BITFIELD has SET and INCRBY options it is technically flagged as a writing command in the Redis command table. For this reason read-only replicas in a Redis Cluster will redirect it to the master instance even if the connection is in read-only mode (see the READONLY command of Redis Cluster).
由于原始的 BITFIELD 具有 SET 和 INCRBY 选项,因此从技术上讲,它在 Redis 命令表中被标记为写入命令。因此,即使连接处于只读模式,Redis 集群中的只读副本也会将其重定向到主实例(请参阅 Redis 集群的 READONLY 命令)。
Since Redis 6.2, the BITFIELD_RO variant was introduced in order to allow BITFIELD behavior in read-only replicas without breaking compatibility on command flags.
自 Redis 6.2 以来,引入了 BITFIELD_RO 变体,以便在不破坏命令标志兼容性的情况下允许只读副本中的 BITFIELD 行为。
See original BITFIELD for more details.
有关详细信息,请参阅原始 BITFIELD。
2.2.6.2 返回(Return)
Array reply: An array with each entry being the corresponding result of the subcommand given at the same position.
数组回复:一个数组,每个条目都是在同一位置给出的子命令的相应结果。
2.2.6.3 例子(Examples):
127.0.0.1:6379> BITFIELD_RO mykey GET i8 16
1) (integer) 121
2.2.7 BITFIELD 命令
2.2.7.1-1 【BITFIELD 命令 - 官方文档】:
https://redis.io/commands/bitfield/
2.2.7.1-2 【BITFIELD 命令 - 非官方的文档,翻译官方页面还不错,整体翻译语法通顺】:
https://www.redis.com.cn/commands/bitfield.html
BITFIELD 命令可以做到一次操作多个位,而前面提到的 SETBIT 和 GETBIT 只能操作单个位的值。GET、SET、INCRBY 是 BITFIELD 的子命令,可以对指定位进行读写,但最多只能处理 64 个连续的位,如果超过 64 位,就要使用多个子命令,BITFIELD 支持一次执行多个子命令。
语法(Syntax):
BITFIELD key <GET encoding offset | [OVERFLOW <WRAP | SAT | FAIL>] <SET encoding offset value | INCRBY encoding offset increment> [GET encoding offset | [OVERFLOW <WRAP | SAT | FAIL>] <SET encoding offset value | INCRBY encoding offset increment> ...]>
可用起始版本(Available since):3.2.0
时间复杂度(Time complexity):指定的每个子命令的复杂度为 O(1)
ACL类别(ACL categories):@write, @bitmap, @slow
The command treats a Redis string as an array of bits, and is capable of addressing specific integer fields of varying bit widths and arbitrary non (necessary) aligned offset. In practical terms using this command you can set, for example, a signed 5 bits integer at bit offset 1234 to a specific value, retrieve a 31 bit unsigned integer from offset 4567. Similarly the command handles increments and decrements of the specified integers, providing guaranteed and well specified overflow and underflow behavior that the user can configure.
该命令将 Redis 字符串视为位数组,并且能够寻址不同位宽和任意非(必要)对齐偏移量的特定整数字段。实际上,使用此命令,您可以将位偏移量 1234 处的带符号 5 位整数设置为特定值,从偏移量 4567 检索 31 位无符号整数。类似地,该命令处理指定整数的递增和递减,提供用户可以配置的保证和明确指定的上溢和下溢行为。
BITFIELD is able to operate with multiple bit fields in the same command call. It takes a list of operations to perform, and returns an array of replies, where each array matches the corresponding operation in the list of arguments.
BITFIELD 能够在同一个命令调用中操作多个位字段。它接受要执行的操作列表,并返回一个回复数组,其中每个数组与参数列表中的相应操作相匹配。
Note that:
注意:
1. Addressing with GET bits outside the current string length (including the case the key does not exist at all), results in the operation to be performed like the missing part all consists of bits set to 0.
1. 使用当前字符串长度之外的 GET 位寻址(包括密钥根本不存在的情况),导致执行的操作就像缺少的部分都由设置为 0 的位组成。
2. Addressing with SET or INCRBY bits outside the current string length will enlarge the string, zero-padding it, as needed, for the minimal length needed, according to the most far bit touched.
2. 使用当前字符串长度之外的 SET 或 INCRBY 位寻址将扩大字符串,并根据需要根据最远位触摸到所需的最小长度对其进行零填充。
2.2.7.2 返回(Return)
The command returns an array with each entry being the corresponding result of the sub command given at the same position. OVERFLOW subcommands don’t count as generating a reply.
该命令返回一个数组,其中每个条目都是在同一位置给出的子命令的相应结果。 OVERFLOW 子命令不算作生成回复。
127.0.0.1:6379> BITFIELD mykey3 OVERFLOW FAIL incrby u2 102 1
1) (nil)
2.2.7.3 支持的子命令和整数编码(Supported subcommands and integer encoding):
- GET <encoding> <offset> – Returns the specified bit field.
GET <encoding> <offset> -- 返回指定的位字段。
- SET <encoding> <offset> <value> – Set the specified bit field and returns its old value.
SET <encoding> <offset> <value> -- 设置指定的位字段并返回其旧值。
- INCRBY <encoding> <offset> <increment> – Increments or decrements (if a negative increment is given) the specified bit field and returns the new value.
INCRBY <encoding> <offset> <increment> -- 增加或减少(如果给定负增量)指定的位字段并返回新值。
There is another subcommand that only changes the behavior of successive INCRBY and SET subcommands calls by setting the overflow behavior:
还有另一个子命令通过设置溢出行为只改变连续的 INCRBY 和 SET 子命令调用的行为:
- OVERFLOW [WRAP|SAT|FAIL]
Where an integer encoding is expected, it can be composed by prefixing with i for signed integers and u for unsigned integers with the number of bits of our integer encoding. So for example u8 is an unsigned integer of 8 bits and i16 is a signed integer of 16 bits.
在需要整数编码的地方,它可以通过为有符号整数加上前缀 i 和为无符号整数加上前缀 u 以及我们的整数编码的位数来组成。因此,例如 u8 是一个 8 位的无符号整数,而 i16 是一个 16 位的有符号整数。
The supported encodings are up to 64 bits for signed integers, and up to 63 bits for unsigned integers. This limitation with unsigned integers is due to the fact that currently the Redis protocol is unable to return 64 bit unsigned integers as replies.
支持的编码对于有符号整数最多为 64 位,对于无符号整数最多为 63 位。无符号整数的这种限制是由于目前 Redis 协议无法返回 64 位无符号整数作为回复。
上面只是翻译官网的页面内容,不好理解是怎么使用 GET、SET、INCRBY 这三个子命令,此处创建一个 String 类型键值对,键(key)为 mykey2 , 值(value)为“dbydc”,来演示是怎么玩转这几个命令的。
字符串 dbydc 转换后的二进制如下,可使用在线进制转换工具(https://tool.oschina.net/hexconvert):
| 字符 | ASCII码 | 二进制 |
|---|---|---|
| d | 100 | 01100100 |
| b | 98 | 01100010 |
| y | 121 | 01111001 |
| d | 100 | 01100100 |
| c | 99 | 01100011 |
2.2.7.3-1 GET 子命令用法 - 取位值并返回无符号整数
如图所示,假设从字符“d”的第 3 位开始,获取 4 个连续的位(1001),获取无符号的位值,那么返回的整数值是 9(对应的二进制是 1001)。对应的命令写法如下:
127.0.0.1:6379> bitfield mykey2 get u4 2
1) (integer) 9
其中u4代表4 位无符号整数,最后的2代表数组索引(偏移量)第 3 位。
前面的例子只涉及一个字符“d”,那就再举一个例子,跨三个字符“dby”,验证处理方式是不是正确的。如下图所示,从字符“d”第 4 位开始,连续取 17 个位值,同样也是无符号整数取位值,返回的整数是 17959(对应的二进制是 100 01100010 0111,使用工具换算记得移除空格)。对应的命令写法如下:
127.0.0.1:6379> bitfield mykey2 get u17 3
1) (integer) 17959
其中u17代表17 位无符号整数,最后的3代表数组索引(偏移量)第 4 位。
2.2.7.3-2 GET 子命令用法 - 取位值并返回有符号整数
有符号取位值的情况分为两种:第一位位值为 0 和第一位位值为 1 。第一位为 0 的代表正整数,第一位为 1 的代表负整数。如果是正整数,直接换算出正整数就行,比较简单。若是负整数,换算的话就比较复杂了。还是拿例子来说明返回的正整数或负整数是怎样换算出来的吧,不然很难理解计算过程。
(1)正整数:第一位位值为 0
【正整数 - 例子1】
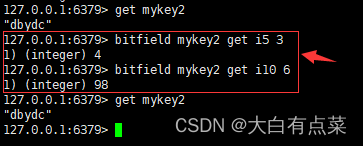
127.0.0.1:6379> bitfield mykey2 get i5 3
1) (integer) 4
其中i5代表5 位有符号整数,最后的3代表数组索引(偏移量)第 4 位。
如图所示,从第 3 位至第 7 位取连续 5 个位值,得到 00100,由于第一个位为 0,所以直接换算(移除最高位的 0 )得到正整数 4(对应二进制 100)。
【正整数 - 例子2】
127.0.0.1:6379> bitfield mykey2 get i10 6
1) (integer) 98
其中i10代表10 位有符号整数,最后的6代表数组索引(偏移量)第 6 位。
如图所示,这个例子中是从第 6 位开始取连续 10 个位值,得到 0001100010,由于第一个位为 0,所以直接换算(移除最高位的 0 )得到正整数 98(对应二进制 1100010)。
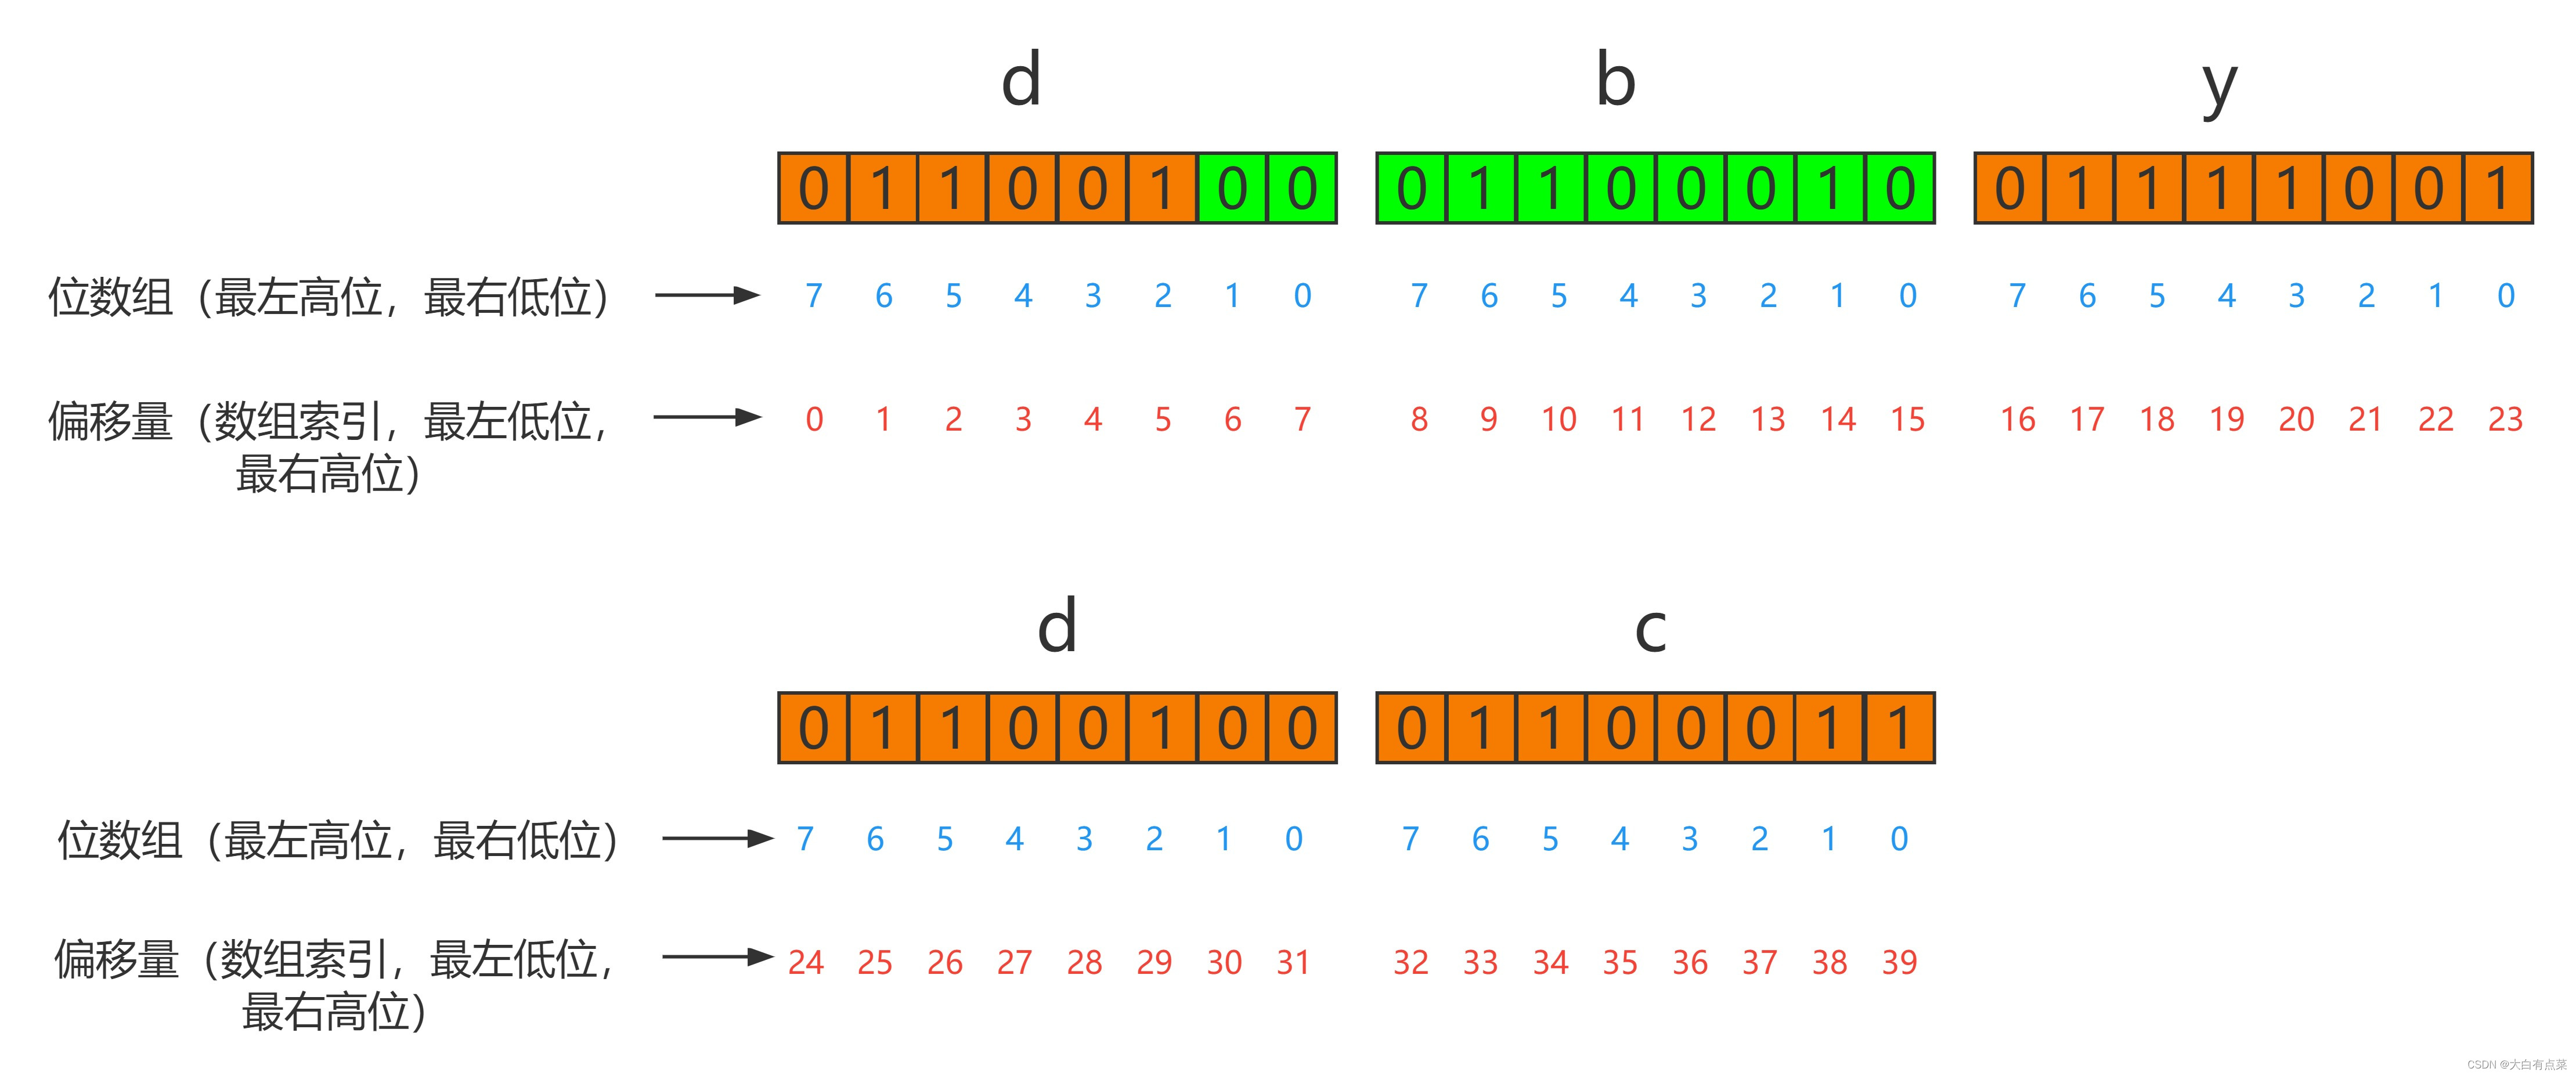
(2)负整数:第一位位值为 1
负整数换算和正整数是一样的吗?当然不是啦!在计算机中,负数是用补码表示的,就是说,GET 子命令获取无符号整数,是由补码换算回原码而计算出整数的。还是用例子说明吧,那样理解就很容易了。
【补充点计算机基础】
- 负数在计算机内部是用补码表示的,例如 -1
- 1 的原码是 0000 0001
- 则 1 的反码是 1111 1110
- 补码是反码 + 1,得到补码 1111 1111
- 所以 -1 在计算机中表示为 1111 1111
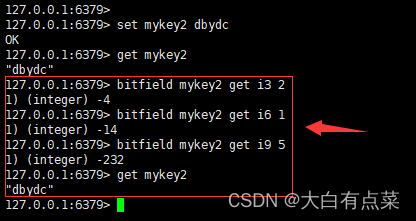
【负整数 - 例子1】
127.0.0.1:6379> bitfield mykey2 get i3 2
1) (integer) -4
其中i3代表3 位有符号整数,最后的2代表数组索引(偏移量)第 2 位。
如图所示,从第 2 位开始取连续 3 个位值,得到 100,由于第一个位为 1,所以100代表的是负整数,此时100是补码。补码100是由反码011加 1 得到,反码011的原码是100,换算得到正整数 4(二进制 100),最后得到负整数 -4 。

【负整数 - 例子2】
127.0.0.1:6379> bitfield mykey2 get i6 1
1) (integer) -14
其中i6代表6 位有符号整数,最后的1代表数组索引(偏移量)第 1 位。
如图所示,从第 1 位开始取连续 6 个位值,得到 110010,代表的是负整数。补码110010是由反码110001加 1 得到的,反码110001的原码是001110,换算得到正整数 14(二进制 1110),最后得到负整数 -14 。

【负整数 - 例子3】
127.0.0.1:6379> bitfield mykey2 get i9 5
1) (integer) -232
其中i9代表9 位有符号整数,最后的5代表数组索引(偏移量)第 5 位。
如图所示,从第 5 位开始取连续 9 个位值,得到 100011000,代表的是负整数。补码100011000是由反码100010111加 1 得到的,反码100010111的原码是011101000,换算得到正整数 232(二进制 11101000),最后得到负整数 -232 。
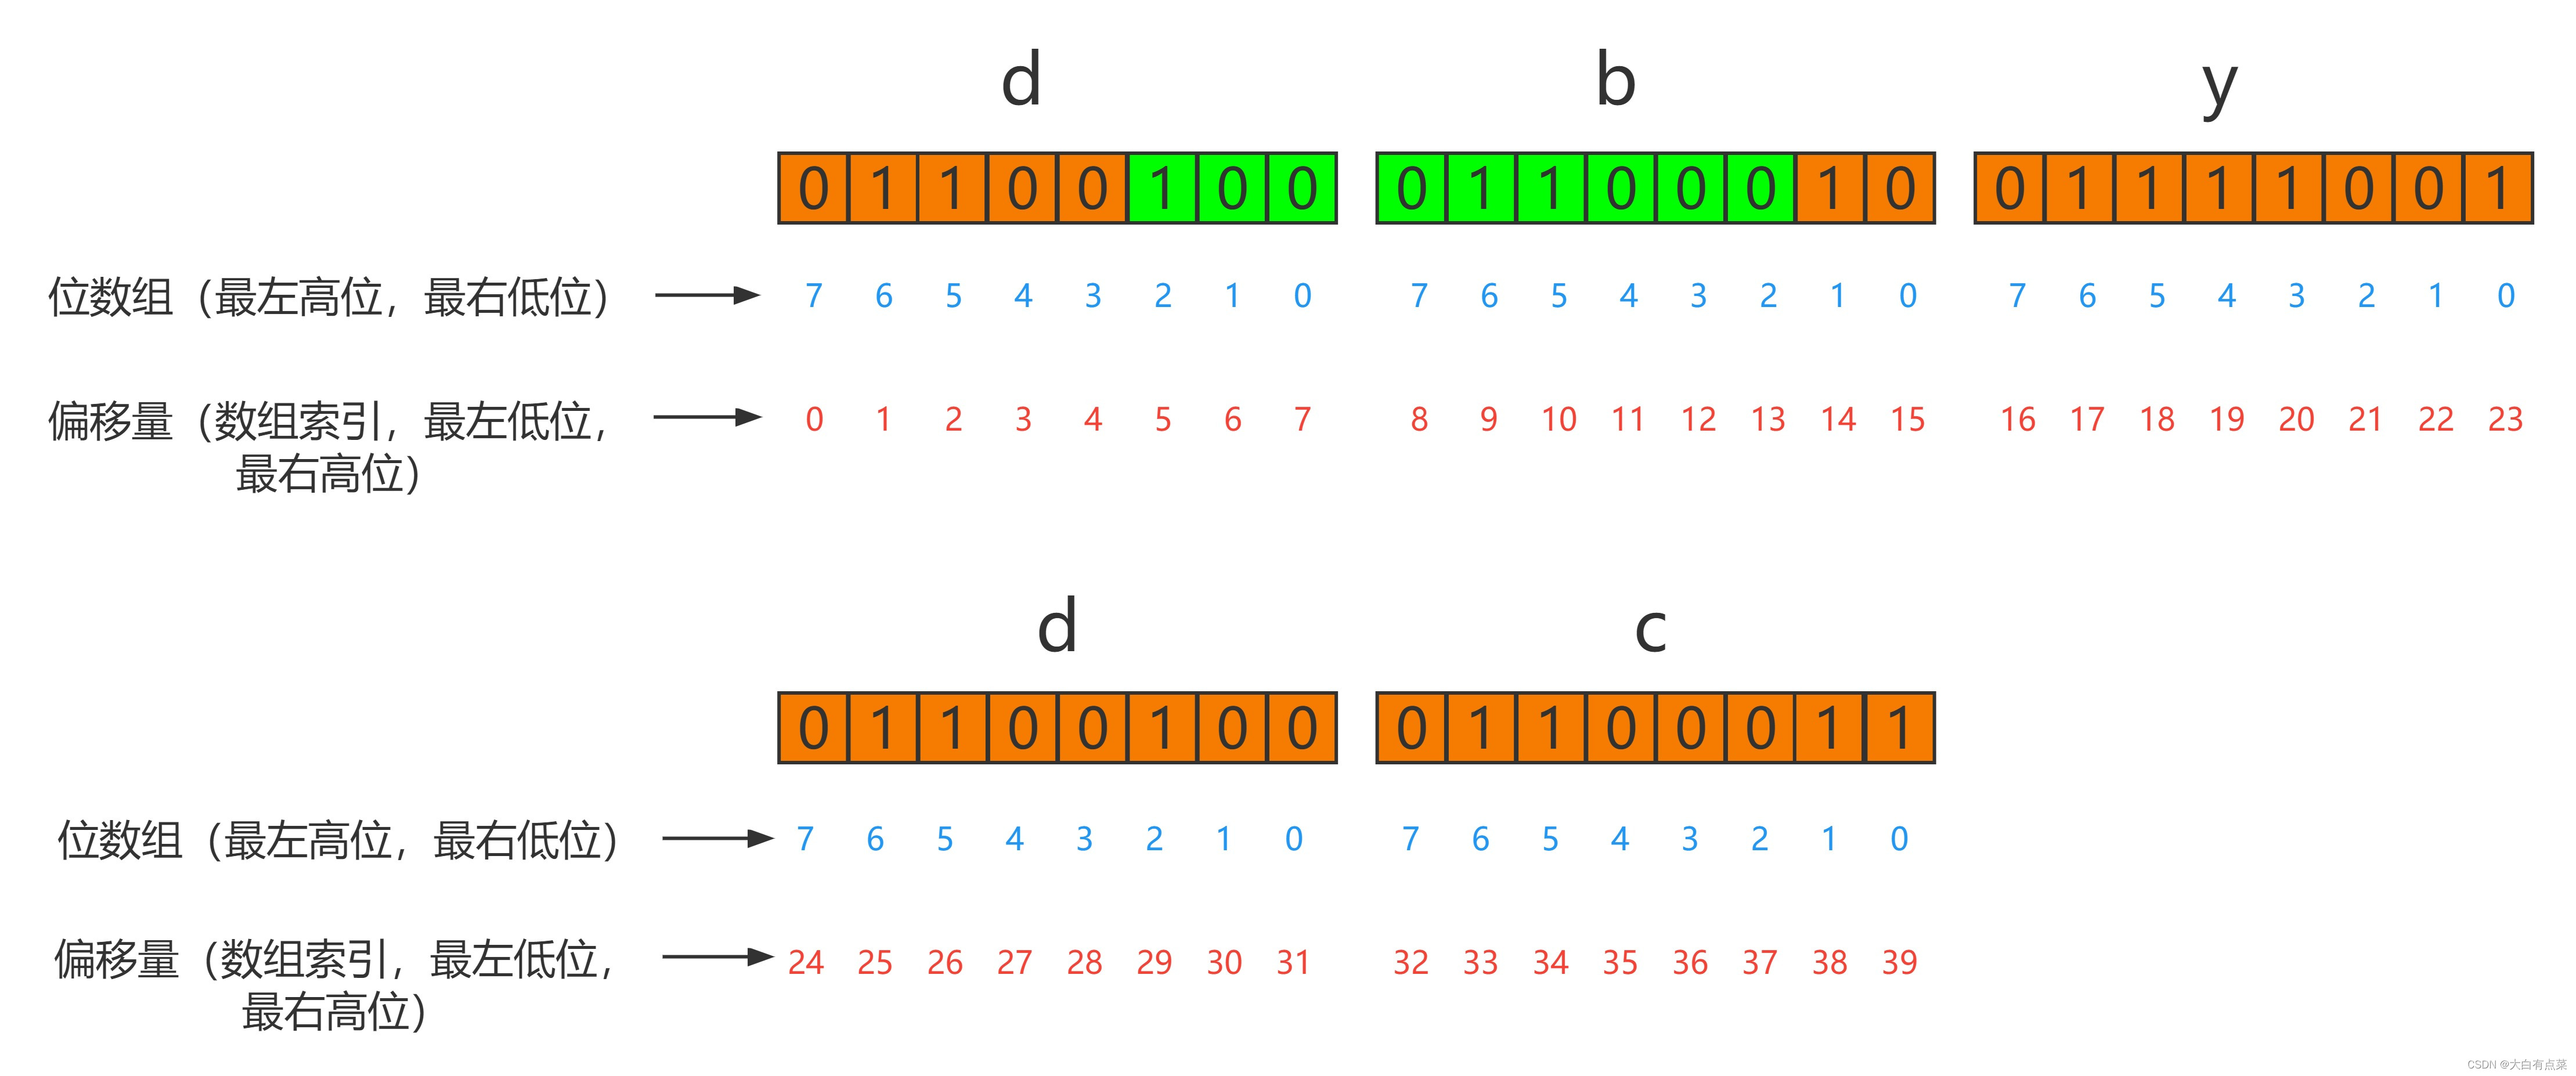
2.2.7.3-3 SET 子命令用法
可以使用 SET 子命令将某个字符替换成指定的字符,例如将“dbydc”中第一个字符“d”替换成“c”,那么 offset(偏移量)需要设置为 8 的倍数,即 0 、8、16…,每次操作 8 位位值,因为一个非汉字字符占 8 位。最后一个参数是字符对应的ASCII码。命令如下:
127.0.0.1:6379> bitfield mykey2 set u8 0 99
1) (integer) 100
127.0.0.1:6379> get mykey2
“cbydc”
其中u8代表8 位无符号整数,0代表数组索引(偏移量)第 0 位,最后的99代表字符“c”对应的ASCII码是99。
2.2.7.3-4 一次执行多个子命令
127.0.0.1:6379> bitfield mykey1 get u4 2 get u17 3 get i5 3 get i10 6 get i3 2 get i6 1 get i9 5
1) (integer) 9
2) (integer) 17959
3) (integer) 4
4) (integer) 98
5) (integer) -4
6) (integer) -14
7) (integer) -232
2.2.7.3-5 INCRBY 子命令用法
INCRBY 子命令对指定的位字段进行自增操作。自增是会存在溢出问题的,如果增加的是正数,会出现上溢出;如果增加的是负数,那出现的是下溢出。命令如下:
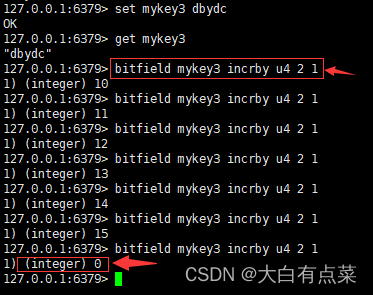
127.0.0.1:6379> bitfield mykey3 incrby u4 2 1
1) (integer) 10
127.0.0.1:6379> bitfield mykey3 incrby u4 2 1
1) (integer) 11
127.0.0.1:6379> bitfield mykey3 incrby u4 2 1
1) (integer) 12
127.0.0.1:6379> bitfield mykey3 incrby u4 2 1
1) (integer) 13
127.0.0.1:6379> bitfield mykey3 incrby u4 2 1
1) (integer) 14
127.0.0.1:6379> bitfield mykey3 incrby u4 2 1
1) (integer) 15
127.0.0.1:6379> bitfield mykey3 incrby u4 2 1
1) (integer) 0
其中u4代表4 位无符号整数,2代表数组索引(偏移量)第 2 位,最后的1代表每次自增 1 。
由于操作的 4 位最大值为 15 ,再继续自增 1 ,那么就会溢出而折返了,所以看到返回整数 0 。
2.2.7.4 溢出控制(Overflow control):
INCRBY 子命令可能会导致溢出,Redis默认的处理是 WRAP(回绕、折返、环绕)。如果出现了溢出,就将溢出的符号位丢弃。如果是 8 位无符号整数 255 ,加 1 后溢出,会全部变为 0 。如果是 8 位有符号整数 127 ,加 1 后溢出变为 -128 。OVERFLOW指令只影响跟在它后面的 INCRBY 和 SET 子命令,即它们所在同一条指令,指令执行完后溢出策略会变成默认的 WRAP(环绕、折返、回绕)。
Using the OVERFLOW command the user is able to fine-tune the behavior of the increment or decrement overflow (or underflow) by specifying one of the following behaviors:
使用 OVERFLOW 命令,用户可以通过指定以下行为之一来微调递增或递减溢出(或下溢)的行为:
- WRAP: wrap around, both with signed and unsigned integers. In the case of unsigned integers, wrapping is like performing the operation modulo the maximum value the integer can contain (the C standard behavior). With signed integers instead wrapping means that overflows restart towards the most negative value and underflows towards the most positive ones, so for example if an i8 integer is set to the value 127, incrementing it by 1 will yield -128.
WRAP:环绕(折返、回绕),包括有符号和无符号整数。在无符号整数的情况下,环绕(折返、回绕)就像对整数可以包含的最大值执行模运算(C 语言的标准行为)。使用有符号整数而不是环绕(折返、回绕)意味着上溢重新开始朝向最负值并且下溢朝向最正值,因此例如如果 i8 整数设置为值 127,则将其递增 1 将产生 -128。
- SAT: uses saturation arithmetic, that is, on underflows the value is set to the minimum integer value, and on overflows to the maximum integer value. For example incrementing an i8 integer starting from value 120 with an increment of 10, will result into the value 127, and further increments will always keep the value at 127. The same happens on underflows, but towards the value is blocked at the most negative value.
SAT:使用饱和算法,即在下溢时将值设置为最小整数值,在溢出时设置为最大整数值。例如,从值 120 开始递增 i8 整数,增量为 10,将得到值 127,并且进一步递增将始终保持值在 127。同样的情况发生在下溢上,但朝向该值被阻塞在最负的位置价值。
- FAIL: in this mode no operation is performed on overflows or underflows detected. The corresponding return value is set to NULL to signal the condition to the caller.
FAIL:在此模式下,不对检测到的上溢或下溢执行任何操作。相应的返回值设置为 NULL 以向调用者发出条件信号。
Note that each OVERFLOW statement only affects the INCRBY and SET commands that follow it in the list of subcommands, up to the next OVERFLOW statement.
使用 OVERFLOW 命令,用户可以通过指定以下行为之一来微调递增或递减溢出(或下溢)的行为:
By default, WRAP is used if not otherwise specified.
默认情况下,如果没有另外指定,则使用 WRAP。
2.2.7.4-1 饱和截断(SAT):
该 SAT 子命令超过了范围就停留在最大或最小值。
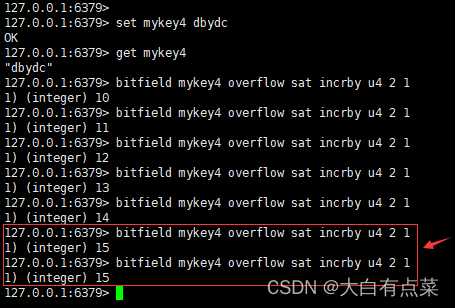
127.0.0.1:6379> bitfield mykey4 overflow sat incrby u4 2 1
1) (integer) 10
127.0.0.1:6379> bitfield mykey4 overflow sat incrby u4 2 1
1) (integer) 11
127.0.0.1:6379> bitfield mykey4 overflow sat incrby u4 2 1
1) (integer) 12
127.0.0.1:6379> bitfield mykey4 overflow sat incrby u4 2 1
1) (integer) 13
127.0.0.1:6379> bitfield mykey4 overflow sat incrby u4 2 1
1) (integer) 14
127.0.0.1:6379> bitfield mykey4 overflow sat incrby u4 2 1
1) (integer) 15
127.0.0.1:6379> bitfield mykey4 overflow sat incrby u4 2 1
1) (integer) 15
其中u4代表4 位无符号整数,2代表数组索引(偏移量)第 2 位,最后的1代表每次自增 1 。
2.2.7.4-2 失败不执行(FAIL):
该 FAIL 子命令发现自增失败,不会继续执行指令。
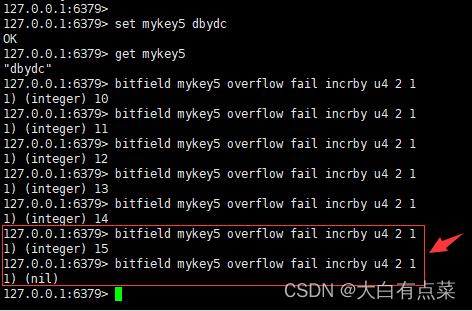
127.0.0.1:6379> bitfield mykey5 overflow fail incrby u4 2 1
1) (integer) 10
127.0.0.1:6379> bitfield mykey5 overflow fail incrby u4 2 1
1) (integer) 11
127.0.0.1:6379> bitfield mykey5 overflow fail incrby u4 2 1
1) (integer) 12
127.0.0.1:6379> bitfield mykey5 overflow fail incrby u4 2 1
1) (integer) 13
127.0.0.1:6379> bitfield mykey5 overflow fail incrby u4 2 1
1) (integer) 14
127.0.0.1:6379> bitfield mykey5 overflow fail incrby u4 2 1
1) (integer) 15
127.0.0.1:6379> bitfield mykey5 overflow fail incrby u4 2 1
1) (nil)
其中u4代表4 位无符号整数,2代表数组索引(偏移量)第 2 位,最后的1代表每次自增 1 。
2.2.7.5 位和位置偏移(Bits and positional offsets):
There are two ways in order to specify offsets in the bitfield command. If a number without any prefix is specified, it is used just as a zero based bit offset inside the string.
有两种方法可以在位域命令中指定偏移量。如果指定了没有任何前缀的数字,则它仅用作字符串内从零开始的位偏移量。
However if the offset is prefixed with a # character, the specified offset is multiplied by the integer encoding’s width, so for example:
但是,如果偏移量以 # 字符为前缀,则指定的偏移量将乘以整数编码的宽度,例如:
127.0.0.1:6379> BITFIELD mystring SET i8 #0 100 SET i8 #1 200
Will set the first i8 integer at offset 0 and the second at offset 8. This way you don’t have to do the math yourself inside your client if what you want is a plain array of integers of a given size.
将在偏移量 0 处设置第一个 i8 整数,在偏移量 8 处设置第二个整数。这样,如果您想要的是给定大小的普通整数数组,则不必在客户端内部进行数学运算。
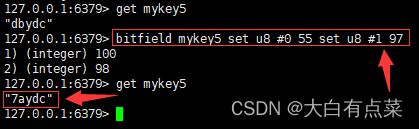
上面的例子是官方提供的,单看内容说明,是不好理解“#”的用法。其实呢,在偏移量前面添加符号“#”,代表第 N 个字符,假设字符串为“dbydc”,那么 #0 代表第一个字符“d”,#2 代表第三个字符“y”,其它同理。
如图所示,字符“7”对应的 ASCII 码为 55 ,字符“a”对应的 ASCII 码为 97 ,如果要替换“dbydc”字符串的第一个字符“d”和第二个字符“b”,变为“7aydc”,那么可以执行如下指令:bitfield mykey5 set u8 #0 55 set u8 #1 97
2.2.7.6 动机(Motivations):
The motivation for this command is that the ability to store many small integers as a single large bitmap (or segmented over a few keys to avoid having huge keys) is extremely memory efficient, and opens new use cases for Redis to be applied, especially in the field of real time analytics. This use cases are supported by the ability to specify the overflow in a controlled way.
此命令的动机是将许多小整数存储为单个大位图(或分割成几个键以避免拥有巨大的键)的能力具有极高的内存效率,并为要应用的 Redis 开辟了新的用例,尤其是在实时分析领域。以受控方式指定溢出的能力支持此用例。
Fun fact: Reddit’s 2017 April fools’ project r/place was built using the Redis BITFIELD command in order to take an in-memory representation of the collaborative canvas.
有趣的事实:Reddit 的 2017 年愚人节项目 r/place 是使用 Redis BITFIELD 命令构建的,目的是获取协作画布的内存表示。
2.2.7.7 性能考虑(Performance considerations):
Usually BITFIELD is a fast command, however note that addressing far bits of currently short strings will trigger an allocation that may be more costly than executing the command on bits already existing.
通常 BITFIELD 是一个快速命令,但请注意,寻址当前较短字符串的远位将触发分配,这可能比在已存在的位上执行命令的成本更高。
2.2.7.8 位的顺序(Orders of bits):
The representation used by BITFIELD considers the bitmap as having the bit number 0 to be the most significant bit of the first byte, and so forth, so for example setting a 5 bits unsigned integer to value 23 at offset 7 into a bitmap previously set to all zeroes, will produce the following representation:
BITFIELD 使用的表示将位图视为具有位编号 0 的第一个字节的最高有效位,依此类推,因此例如将 5 位无符号整数设置为偏移量 7 处的值 23 到先前设置为的位图中全为零,将产生以下表示:
00000001 01110000
When offsets and integer sizes are aligned to bytes boundaries, this is the same as big endian, however when such alignment does not exist, its important to also understand how the bits inside a byte are ordered.
当偏移量和整数大小与字节边界对齐时,这与大端相同,但是当不存在这种对齐方式时,了解字节内的位是如何排序的也很重要。
四、资料参考
- 《Redis深度历险 核心原理与应用实践》,作者:钱文品


 7076
7076


 被折叠的 条评论
为什么被折叠?
被折叠的 条评论
为什么被折叠?
 到【灌水乐园】发言


