


 这篇博客介绍了如何在Android应用中使用Fragment来实现底部导航栏功能。通过展示实现流程图和详细代码,作者逐步讲解了如何创建布局、初始化组件、处理点击事件以及切换Fragment,帮助读者理解这一常见UI设计的实现过程。
Android实习札记(5)---Fragment之底部导航栏的实现
——转载请注明出处:coder-pig
在Part 4我们回顾了一下Fragment的基本概念,在本节中我们就来学习Fragment应用的简单例子吧!
就是使用Fragment来实现简单的底部导航栏,先贴下效果图:
看上去很简单,实现起来也是很简单的哈!那么接着下来就看下实现的流程图吧:
实现流程图:
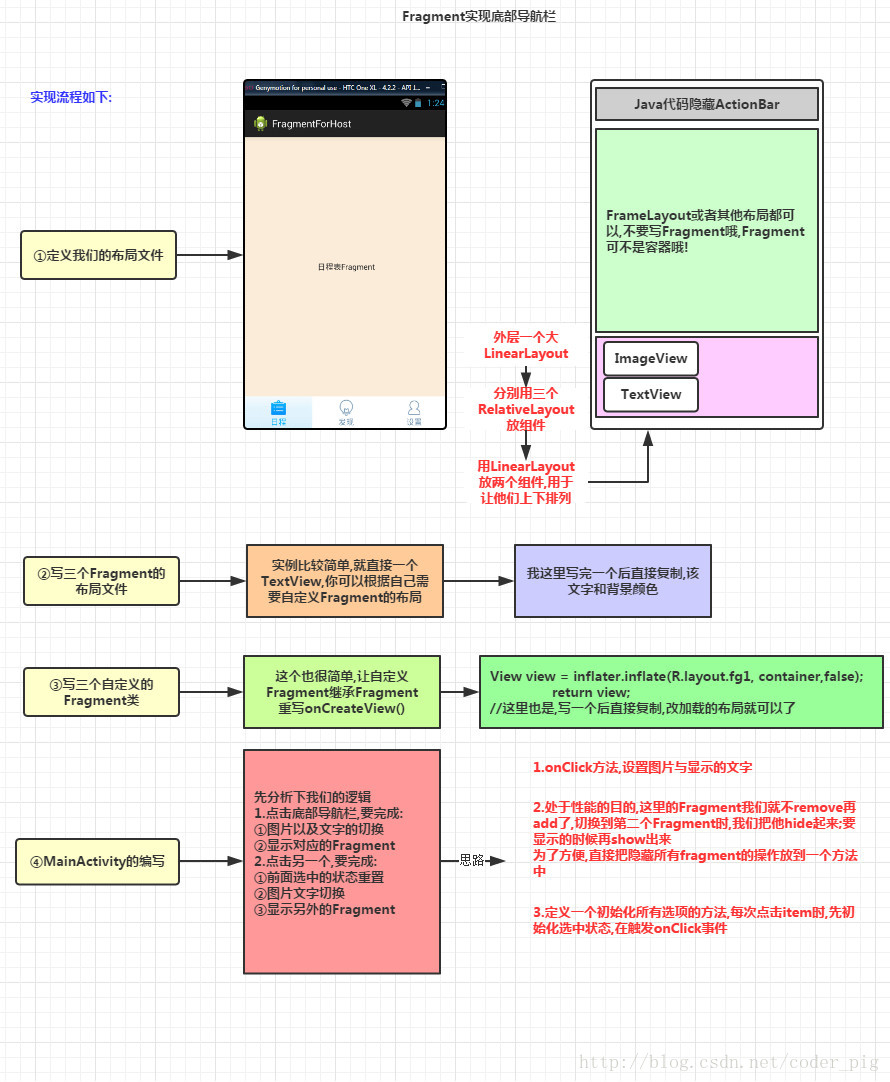
看完流程图是不是有大概的思路了,那么接着就开始代码的编写吧:
代码实现:
①先写布局,布局的话很简单,一个FrameLayout用来放Fragment,底部一个大的LinearLayout
放着三个小Item,每个Item的布局如下:
- <RelativeLayout
- android:id="@+id/setting_layout"
- android:layout_width="0dp"
- android:layout_height="match_parent"
- android:layout_weight="1" >
- <LinearLayout
- android:layout_width="match_parent"
- android:layout_height="wrap_content"
- android:layout_centerVertical="true"
- android:orientation="vertical" >
- <ImageView
- android:id="@+id/setting_image"
- android:layout_width="wrap_content"
- android:layout_height="wrap_content"
- android:layout_gravity="center_horizontal"
- android:src="@drawable/ic_tabbar_settings_normal" />
- <TextView
- android:id="@+id/setting_text"
- android:layout_width="wrap_content"
- android:layout_height="wrap_content"
- android:layout_gravity="center_horizontal"
- android:text="设置"
- android:textColor="#7597B3" />
- </LinearLayout>
- </RelativeLayout>
copy多两个,改下图片,文本资源就可以了,完整布局代码如下:
activity_main.xml
- <LinearLayout xmlns:android="http://schemas.android.com/apk/res/android"
- android:layout_width="match_parent"
- android:layout_height="match_parent"
- android:orientation="vertical" >
- <FrameLayout
- android:id="@+id/content"
- android:layout_width="match_parent"
- android:layout_height="0dp"
- android:layout_weight="1" >
- </FrameLayout>
- <LinearLayout
- android:layout_width="match_parent"
- android:layout_height="60dp"
- android:background="#FFFFFF" >
- <RelativeLayout
- android:id="@+id/course_layout"
- android:layout_width="0dp"
- android:layout_height="match_parent"
 最低0.47元/天 解锁文章


 700
700

 被折叠的 条评论
为什么被折叠?
被折叠的 条评论
为什么被折叠?
 到【灌水乐园】发言


