


学习React-Native有一段时间了。今天就从源码的角度来分析下React-Native底层的通信机制。了解下底层是如何通信的对开发也有所好处。
概要
先大概讲一下React-Native的通信过程。RN主要的通信在于java与js之间,平常我们写的jsx代码最终会调用到原生的View。上一篇博客我们也了解到了要新建一个原生模块需要在java层和js层分别写一个Module,那这彼此之间联系是如何实现的呢?
层次结构
RN总共分为三层,java层,C++层,js层。借用一幅图来看下:
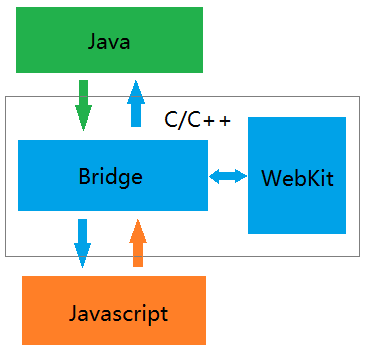
Java层:java层就是app原生代码,它通过启动C++层的javascript解析器javascriptCore来执行js代码,从而构建原生UI等。java层依赖于众多优秀开源库,在图片处理使用的是Fresco,网络通信使用的是okhttp,Json解析工具用jackson,动画库用NineOldAndroids等,在java层原生的功能均封装为Module,如Toast和Log等。
C++层:c++层最主要是封装了JavaScriptCore,它是一个全新的支持ES6的webKit。Bridge连接了java与js之间的通信。解析js文件是通过JSCExectutor进行的。
Js层:主要处理事件分发及UI Layout,平常开发最常用的。通用jsx来写业务代码,通过flexbox来实现布局。不依赖DOM。由于react有 DOM diff这个算法,所以它的效率非常高。
通信机制
在Java层与Js层的bridge分别存有相同一份模块配置表,Java与Js互相通信时,通过将里配置表中的moduleID,methodID转换成json数据的形式传递给到C++层,C++层传送到js层,通过js层的的模块配置表找到对应的方法进行执行,如果有callback,则回传给java层。这里只是大概介绍,后面会有详细讲解。
主要流程与主要类
先看下java层的流程图:
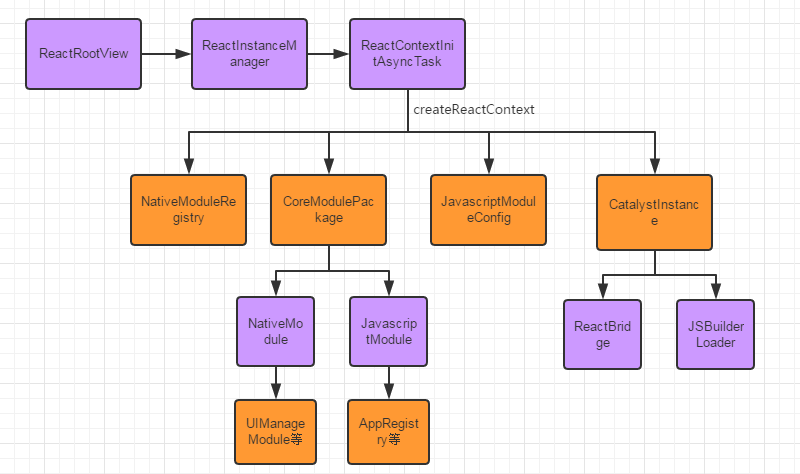
- ReactInstanceManager:主要是用来创建及管理CatalyInstance的实例的上层接口,控制开发调试,生命周期与ReactRootView所在activity保持一致。
- ReactRootView:为启动入口核心类,负责监听及分发事件并重新渲染元素,App启动后,其将作为App的root view。
- CatalystInstance:提供Java与Js互通的环境,创建Java模块注册表及Javascript模块注册表,并遍历实例化模块,最后通过ReactBridge将Js Bundle传送到Js引擎。
- JSBuilderLoader:缓存了JsBundle的信息,封装了上层加载JsBundle相关接口,CatalystInstance通过其间接调用ReactBridge去加载文件。
- NativeModuleRegistry:Java层模块注册表,即暴露给Js的API集合。
- JavascriptModuleRegistry:Js层模块注册表,负责将所有JavaScriptModule注册到CatalystInstance。
- CoreModulePackage:CoreModulesPackage里面定义了RN框架核心的一些Java和JS的module,创建NativeModules&JsModules组件模块。
源码分析
加载Module
首先看MainActivity的
  protected List<ReactPackage> getPackages() {
        return Arrays.<ReactPackage>asList(
            new MainReactPackage(),
        new  AppReactPackage()
        );
    }
AppReactPackage是我们自定义的一个ReactPackage,也就是说如果自己定义了新组件,要在这里添加。看下ReactActivity,看它的onCreate方法:
 protected void onCreate(Bundle savedInstanceState) {
        super.onCreate(savedInstanceState);
        if(this.getUseDeveloperSupport() && VERSION.SDK_INT >= 23 && !Settings.canDrawOverlays(this)) {
            Intent mReactRootView = new Intent("android.settings.action.MANAGE_OVERLAY_PERMISSION");
            this.startActivity(mReactRootView);
            FLog.w("React", "Overlay permissions needs to be granted in order for react native apps to run in dev mode");
            Toast.makeText(this, "Overlay permissions needs to be granted in order for react native apps to run in dev mode", 1).show();
        }

        this.mReactInstanceManager = this.createReactInstanceManager();
        ReactRootView mReactRootView1 = this.createRootView();
        mReactRootView1.startReactApplication(this.mReactInstanceManager, this.getMainComponentName(), this.getLaunchOptions());
        this.setContentView(mReactRootView1);
    }
主要完成三个功能,通过createReactInstanceManager创建ReactInstanceManager,它主要是用来创建及管理CatalyInstance的实例的上层接口。第二步是通过createRootView来创建ReactRootView。最后调用ReactRootView的startReactApplication来启动应用,并把它当作rootview setContentView到界面上。重点看startReactApplication方法:
   public void startReactApplication(ReactInstanceManager reactInstanceManager, String moduleName, @Nullable Bundle launchOptions) {
        UiThreadUtil.assertOnUiThread();
        Assertions.assertCondition(this.mReactInstanceManager == null, "This root view has already been attached to a catalyst instance manager");
        this.mReactInstanceManager = reactInstanceManager;
        this.mJSModuleName = moduleName;
        this.mLaunchOptions = launchOptions;
        if(!this.mReactInstanceManager.hasStartedCreatingInitialContext()) {
            this.mReactInstanceManager.createReactContextInBackground();
        }

        if(this.mWasMeasured && this.mIsAttachedToWindow) {
            this.mReactInstanceManager.attachMeasuredRootView(this);
            this.mIsAttachedToInstance = true;
            this.getViewTreeObserver().addOnGlobalLayoutListener(this.getKeyboardListener());
        } else {
            this.mAttachScheduled = true;
        }

    }
mJSModuleName是与前端约定好所要启动的JS Application Name。先看createReactContextInBackground方法,它位于ReactInstanceManager的实现类ReactInstanceManagerImpl中:
public void recreateReactContextInBackground() {
    Assertions.assertCondition(this .mHasStartedCreatingInitialContext , "recreateReactContextInBackground should only be called after the initial createReactContextInBackground call.") ;
    this. recreateReactContextInBackgroundInner() ;
}
createReactContextInBackground最终调用到recreateReactContextInBackgroundInner:
private void recreateReactContextInBackgroundInner() {
    UiThreadUtil.assertOnUiThread();
    if( this.mUseDeveloperSupport && this.mJSMainModuleName != null) {
        if (this.mDevSupportManager.hasUpToDateJSBundleInCache()) {
            this .onJSBundleLoadedFromServer() ;
        } else if(this .mJSBundleFile == null) {
            this .mDevSupportManager.handleReloadJS() ;
        } else {
            this .mDevSupportManager.isPackagerRunning( new PackagerStatusCallback() {
                public void onPackagerStatusFetched( final boolean packagerIsRunning) {
                    UiThreadUtil.runOnUiThread( new Runnable() {
                        public void run() {
                            if(packagerIsRunning) {
                                ReactInstanceManagerImpl.this .mDevSupportManager.handleReloadJS() ;
                            } else {
                                ReactInstanceManagerImpl.this .recreateReactContextInBackgroundFromBundleFile() ;
                            }

                        }
                    }) ;
                }
            });
        }

    } else {
        this .recreateReactContextInBackgroundFromBundleFile() ;
    }
}
接着调用recreateReactContextInBackgroundFromBundleFile:
   private void recreateReactContextInBackgroundFromBundleFile() {
        this.recreateReactContextInBackground(new com.facebook.react.bridge.JSCJavaScriptExecutor.Factory(), JSBundleLoader.createFileLoader(this.mApplicationContext, this.mJSBundleFile));
    }
经过一系列的周转,最后调用到了recreateReactContextInBackground:
private void recreateReactContextInBackground(com.facebook.react.bridge.JavaScriptExecutor.Factory jsExecutorFactory, JSBundleLoader jsBundleLoader) {
    UiThreadUtil.assertOnUiThread();
    ReactInstanceManagerImpl.ReactContextInitParams initParams = new ReactInstanceManagerImpl.ReactContextInitParams(jsExecutorFactory , jsBundleLoader);
    if( this.mReactContextInitAsyncTask == null) {
        this .mReactContextInitAsyncTask = new ReactInstanceManagerImpl.ReactContextInitAsyncTask( null);
        this.mReactContextInitAsyncTask.execute( new ReactInstanceManagerImpl.ReactContextInitParams[]{initParams}) ;
    } else {
        this .mPendingReactContextInitParams = initParams ;
    }

}
上面代码通过ReactContextInitAsyncTask这个AsyncTask来初始化ReactCotext。
 private final class ReactContextInitAsyncTask extends AsyncTask<ReactInstanceManagerImpl.ReactContextInitParams, Void, ReactInstanceManagerImpl.Result<ReactApplicationContext>> {
        private ReactContextInitAsyncTask() {
        }

        protected void onPreExecute() {
            if(ReactInstanceManagerImpl.this.mCurrentReactContext != null) {
                ReactInstanceManagerImpl.this.tearDownReactContext(ReactInstanceManagerImpl.this.mCurrentReactContext);
                ReactInstanceManagerImpl.this.mCurrentReactContext = null;
            }

        }

        protected ReactInstanceManagerImpl.Result<ReactApplicationContext> doInBackground(ReactInstanceManagerImpl.ReactContextInitParams... params) {
            Assertions.assertCondition(params != null && params.length > 0 && params[0] != null);

            try {
                JavaScriptExecutor e = params[0].getJsExecutorFactory().create(ReactInstanceManagerImpl.this.mJSCConfig == null?new WritableNativeMap():ReactInstanceManagerImpl.this.mJSCConfig.getConfigMap());
                return ReactInstanceManagerImpl.Result.of((Object)ReactInstanceManagerImpl.this.createReactContext(e, params[0].getJsBundleLoader()));
            } catch (Exception var3) {
                return ReactInstanceManagerImpl.Result.of(var3);
            }
        }

        protected void onPostExecute(ReactInstanceManagerImpl.Result<ReactApplicationContext> result) {
            try {
                ReactInstanceManagerImpl.this.setupReactContext((ReactApplicationContext)result.get());
            } catch (Exception var6) {
                ReactInstanceManagerImpl.this.mDevSupportManager.handleException(var6);
            } finally {
                ReactInstanceManagerImpl.this.mReactContextInitAsyncTask = null;
            }

            if(ReactInstanceManagerImpl.this.mPendingReactContextInitParams != null) {
                ReactInstanceManagerImpl.this.recreateReactContextInBackground(ReactInstanceManagerImpl.this.mPendingReactContextInitParams.getJsExecutorFactory(), ReactInstanceManagerImpl.this.mPendingReactContextInitParams.getJsBundleLoader());
                ReactInstanceManagerImpl.this.mPendingReactContextInitParams = null;
            }

        }
ReactContextInitAsyncTask为创建ReactContext的核心类,随后,调用createReactContext进一步创建ReactContext。在创建完React Context后会调用setUpReactContext,将ReactRootView做为Root View传递给UIManagerModule,调用AppRegistry的runApplication去启动Js Application等。看createReactContext的代码:
private ReactApplicationContext createReactContext(JavaScriptExecutor jsExecutor , JSBundleLoader jsBundleLoader) {
    FLog.i("React" , "Creating react context.");
    ReactMarker.logMarker( "CREATE_REACT_CONTEXT_START" );
    this.mSourceUrl = jsBundleLoader.getSourceUrl() ;
    Builder nativeRegistryBuilder = new Builder();
    com.facebook.react.bridge.JavaScriptModulesConfig.Builder jsModulesBuilder = new
最低0.47元/天 解锁文章


 1090
1090

 被折叠的 条评论
为什么被折叠?
被折叠的 条评论
为什么被折叠?
 到【灌水乐园】发言


