叠加utm投影的tif文件到google earth方法

1、 打开arcgis,在工具箱data management tools下找到“投影和变换”工具栏,点击定义投影,如图所示


指定utm-wgs84投影的南北半球以及条带号等信息,自动完成投影的定义。此时,图像可以显示为经纬度,也可以显示为米格式。

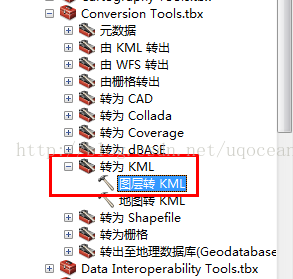
2、同样在arcgis的工具箱中,找到conversion tools,点击“转为KML”,设置图层转换比例为1,自动生成kmz文件。


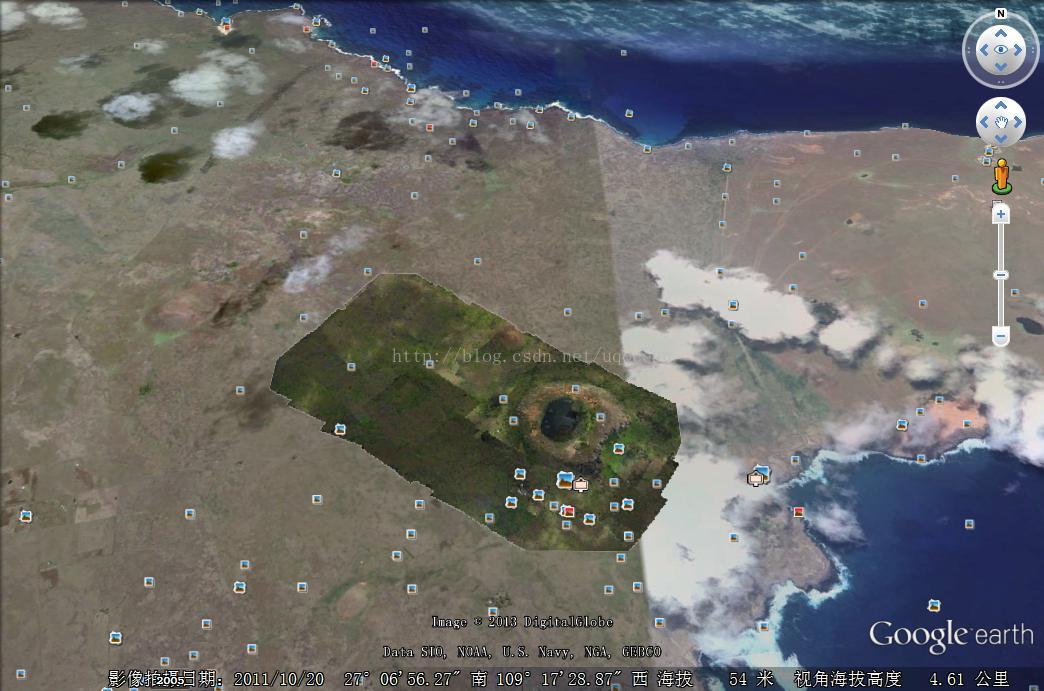
3、双击生成的kmz文件后,将自动叠加到google earth地图上。


  • 0
    点赞
  • 4
    收藏
    觉得还不错? 一键收藏
  • 1
    评论
使用GDAL进行投影变换可以实现对TIF文件的重投影,以下是一个基本的C++代码示例: ```c++ #include "gdal_priv.h" #include "cpl_conv.h" // for CPLMalloc() int main() { GDALAllRegister(); // Open the source dataset GDALDatasetH hSrcDS = GDALOpen("input.tif", GA_ReadOnly); if (hSrcDS == NULL) { printf("Open input file failed.\n"); return -1; } // Get the source projection const char* srcProjection = GDALGetProjectionRef(hSrcDS); // Get the source geotransform double srcGeoTransform[6]; GDALGetGeoTransform(hSrcDS, srcGeoTransform); // Create the destination dataset GDALDriverH hDriver = GDALGetDriverByName("GTiff"); GDALDatasetH hDstDS = GDALCreateCopy(hDriver, "output.tif", hSrcDS, FALSE, NULL, NULL, NULL); if (hDstDS == NULL) { printf("Create output file failed.\n"); return -1; } // Set the destination projection const char* dstProjection = "PROJCS[\"WGS 84 / UTM zone 49N\",GEOGCS[\"WGS 84\",DATUM[\"WGS_1984\",SPHEROID[\"WGS 84\",6378137,298.257223563,AUTHORITY[\"EPSG\",\"7030\"]],AUTHORITY[\"EPSG\",\"6326\"]],PRIMEM[\"Greenwich\",0,AUTHORITY[\"EPSG\",\"8901\"]],UNIT[\"degree\",0.0174532925199433,AUTHORITY[\"EPSG\",\"9122\"]],AUTHORITY[\"EPSG\",\"4326\"]],PROJECTION[\"Transverse_Mercator\"],PARAMETER[\"latitude_of_origin\",0],PARAMETER[\"central_meridian\",111],PARAMETER[\"scale_factor\",0.9996],PARAMETER[\"false_easting\",500000],PARAMETER[\"false_northing\",0],UNIT[\"metre\",1,AUTHORITY[\"EPSG\",\"9001\"]],AXIS[\"Easting\",EAST],AXIS[\"Northing\",NORTH],AUTHORITY[\"EPSG\",\"32649\"]]"; GDALSetProjection(hDstDS, dstProjection); // Set the destination geotransform double dstGeoTransform[6]; GDALRasterIO(hSrcDS, GF_Read, 0, 0, 1, 1, GDT_Float32, NULL, 0, 0, NULL); GDALApplyGeoTransform(srcGeoTransform, 0.0, 0.0, &dstGeoTransform[0], &dstGeoTransform[1]); GDALApplyGeoTransform(srcGeoTransform, 0.0, 1.0, &dstGeoTransform[2], &dstGeoTransform[3]); GDALApplyGeoTransform(srcGeoTransform, 1.0, 1.0, &dstGeoTransform[4], &dstGeoTransform[5]); GDALSetGeoTransform(hDstDS, dstGeoTransform); // Create the transformation object GDALCoordinateTransformationH hTransform = GDALCreateGenImgProjTransformer(hSrcDS, srcProjection, hDstDS, dstProjection, FALSE, 0, 1); if (hTransform == NULL) { printf("Create transformation failed.\n"); return -1; } // Perform the transformation int nXSize = GDALGetRasterXSize(hSrcDS); int nYSize = GDALGetRasterYSize(hSrcDS); float* pSrcData = (float*)CPLMalloc(nXSize * nYSize * sizeof(float)); float* pDstData = (float*)CPLMalloc(nXSize * nYSize * sizeof(float)); GDALRasterIO(hSrcDS, GF_Read, 0, 0, nXSize, nYSize, GDT_Float32, pSrcData, nXSize, nYSize, 0, 0); GDALApplyCoordinateTransformation(hTransform, nXSize, nYSize, pSrcData, pSrcData, NULL); GDALRasterIO(hDstDS, GF_Write, 0, 0, nXSize, nYSize, GDT_Float32, pSrcData, nXSize, nYSize, 0, 0); // Clean up CPLFree(pSrcData); CPLFree(pDstData); GDALDestroyCoordinateTransformation(hTransform); GDALClose(hDstDS); GDALClose(hSrcDS); return 0; } ``` 需要注意的是,这个示例将源文件和目标文件都设置为了GeoTIFF格式,如果你需要将其它格式的文件进行投影变换,需要相应地修改代码。此外,示例中的目标投影UTM 49N,你需要根据实际情况修改为你需要的投影

“相关推荐”对你有帮助么?

  • 非常没帮助
  • 没帮助
  • 一般
  • 有帮助
  • 非常有帮助
提交
评论 1
添加红包

请填写红包祝福语或标题

红包个数最小为10个

红包金额最低5元

当前余额3.43前往充值 >
需支付:10.00
成就一亿技术人!
领取后你会自动成为博主和红包主的粉丝 规则
hope_wisdom
发出的红包
实付
使用余额支付
点击重新获取
扫码支付
钱包余额 0

抵扣说明:

1.余额是钱包充值的虚拟货币,按照1:1的比例进行支付金额的抵扣。
2.余额无法直接购买下载,可以购买VIP、付费专栏及课程。

余额充值