写在前面
之前学习了2D纹理映射,实际上还有其他类型的纹理有待我们进一步学习,本节将要学习的立方体纹理(cubemaps),是一种将多个纹理图片复合到一个立方体表面的技术。在游戏中应用得较多的天空包围盒可以使用cubemap实现。本节示例程序均可以在我的github下载。
本节内容整理自:
1.Tutorial 25:SkyBox
2.www.learnopengl.com Cubemaps
创建Cubemap
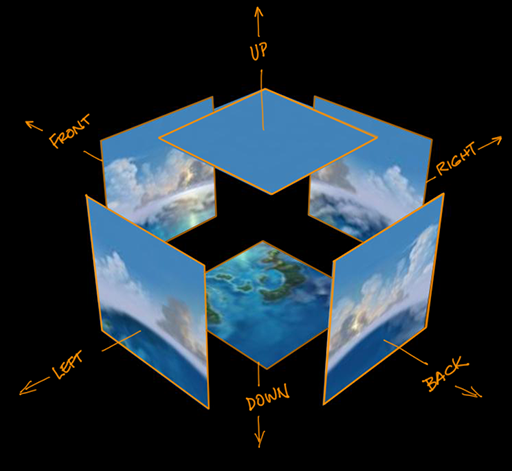
cubemap是使用6张2D纹理绑定到GL_TEXTURE_CUBE_MAP目标而创建的纹理。GL_TEXTURE_CUBE_MAP包含6个面,分别是:
| 绑定目标 | 纹理方向 |
|---|---|
| GL_TEXTURE_CUBE_MAP_POSITIVE_X | 右边 |
| GL_TEXTURE_CUBE_MAP_NEGATIVE_X | 左边 |
| GL_TEXTURE_CUBE_MAP_POSITIVE_Y | 顶部 |
| GL_TEXTURE_CUBE_MAP_NEGATIVE_Y | 底部 |
| GL_TEXTURE_CUBE_MAP_POSITIVE_Z | 背面 |
| GL_TEXTURE_CUBE_MAP_NEGATIVE_Z | 前面 |
如下图所示,形成一个立方体纹理(来自[Cubemaps]
(https://scalibq.wordpress.com/2013/06/23/cubemaps/)):
需要注意的是,OpenGL中相机默认朝向-z方向,因此GL_TEXTURE_CUBE_MAP_NEGATIVE_Z表示前面,而GL_TEXTURE_CUBE_MAP_POSITIVE_Z表示背面。在构建cubemaps,一般利用枚举常量递增的特性,一次绑定到上述6个目标。例如在OpenGL中枚举常量定义为:
#define GL_TEXTURE_CUBE_MAP_POSITIVE_X 0x8515
#define GL_TEXTURE_CUBE_MAP_NEGATIVE_X 0x8516
#define GL_TEXTURE_CUBE_MAP_POSITIVE_Y 0x8517
#define GL_TEXTURE_CUBE_MAP_NEGATIVE_Y 0x8518
#define GL_TEXTURE_CUBE_MAP_POSITIVE_Z 0x8519
#define GL_TEXTURE_CUBE_MAP_NEGATIVE_Z 0x851A可以看到上述6个枚举常量一次递增,我们可以使用循环来创建这个立方体纹理,将这个函数封装到texture.h中如下:
   /*
    * 加载一个cubeMap
    */
static GLuint loadCubeMapTexture(std::vector<const char*> picFilePathVec,
GLint internalFormat = GL_RGB,
 GLenum picFormat = GL_RGB,
GLenum picDataType = GL_UNSIGNED_BYTE,
int loadChannels = SOIL_LOAD_RGB)
{
    GLuint textId;
    glGenTextures(1, &textId);
    glBindTexture(GL_TEXTURE_CUBE_MAP, textId);
    GLubyte *imageData = NULL;
    int picWidth, picHeight;
for (std::vector<const char*>::size_type  i =0; i < picFilePathVec.size(); ++i)
    {
        int channels = 0;
        imageData = SOIL_load_image(picFilePathVec[i], &picWidth,
            &picHeight, &channels, loadChannels);
        if (imageData == NULL)
        {
            std::cerr << "Error::loadCubeMapTexture could not load texture file:"
                << picFilePathVec[i] << std::endl;
            return 0;
        }
        glTexImage2D(GL_TEXTURE_CUBE_MAP_POSITIVE_X + i,
0, internalFormat, picWidth, 


 本文介绍了OpenGL中的立方体纹理(cubemaps)技术,详细讲解了如何创建和使用cubemaps,以及如何利用cubemaps实现天空包围盒,以营造广阔的游戏场景效果。通过修改深度测试函数和顶点着色器,优化了天空包围盒的绘制,避免了不必要的性能损失。此外,还探讨了天空包围盒的常见问题和解决方案。

 最低0.47元/天 解锁文章


 被折叠的 条评论
为什么被折叠?


