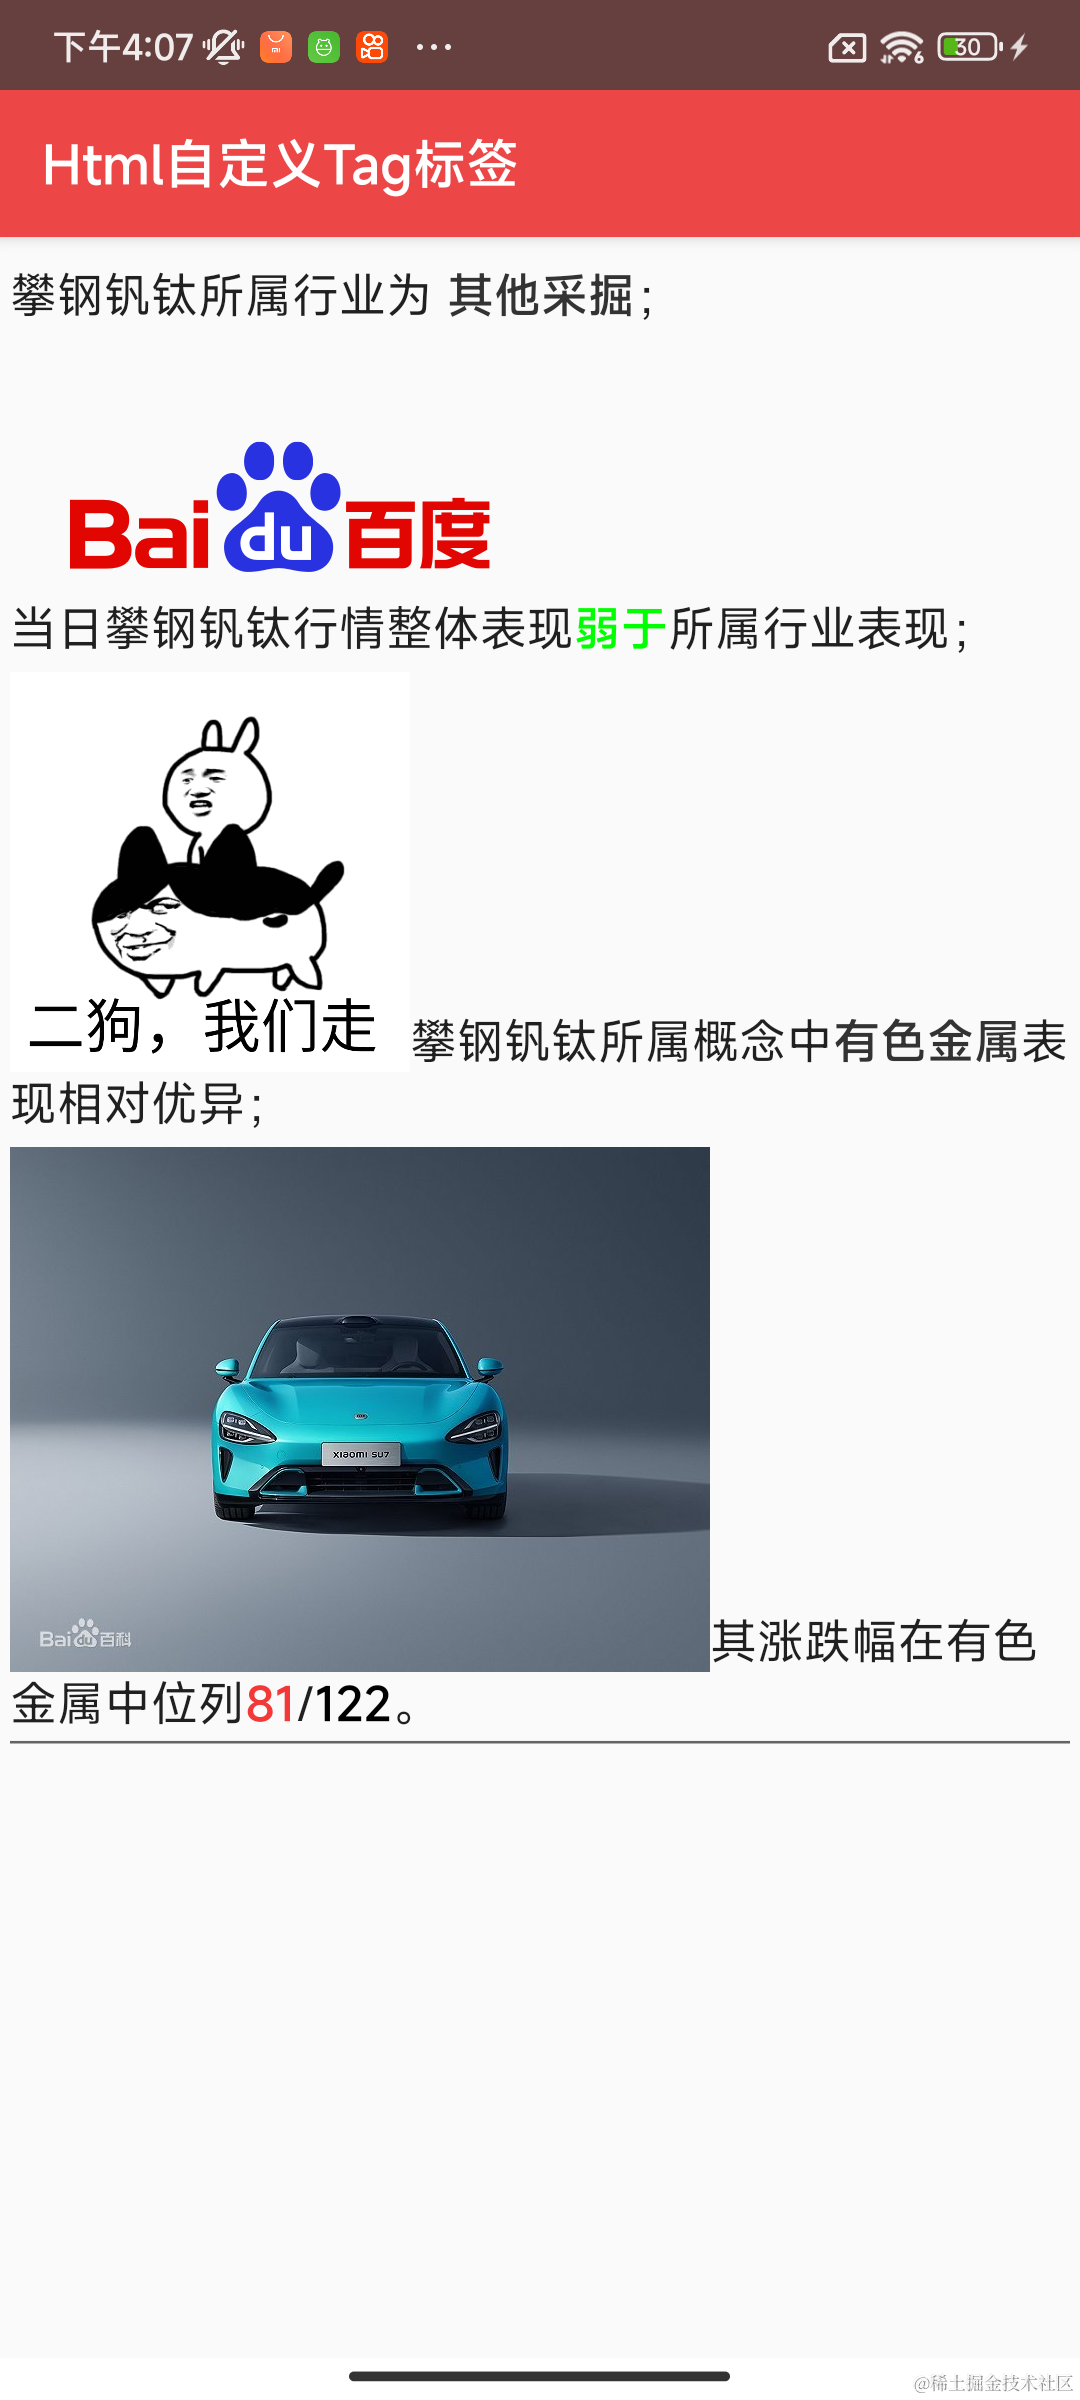
今天实现的内容,就是上图的效果,通过Span方式展示图片,需要支持文字颜色改变、加粗。支持style=\"color:green; font-weight:bold;\"展示。尤其style标签中的font-size、font-weight是在原生中不被支持的。
所以我们今天需要使用自定义的方式来实现实现。
val result = "<spanExt>攀钢钒钛所属行业为\n" +
"<spanExt style=\"color:#333333; font-weight:bold; font-size:18px;\">其他采掘</spanExt>;\n" +
"</spanExt>\n" +
"<img src=\"https://www.baidu.com/img/PCtm_d9c8750bed0b3c7d089fa7d55720d6cf.png\">" +
"<br/>\n" +
"<spanExt>当日攀钢钒钛行情整体表现<spanExt style=\"color:green; font-weight:bold;\">弱于</spanExt>所属行业表现;</spanExt>\n" +
"<br/>\n" +
"<img src=\"https://hbimg.huaban.com/4829401262ba0574fe8328b9f7f4b871d53850df7cd4-wVjrLB_fw658\">" +
"<spanExt>攀钢钒钛所属概念中<spanExt style=\"color:#333333; font-weight:bold; \">有色金属</spanExt>表现相对优异;</spanExt>\n" +
"<br/>\n" +
"<img src=\"https://bkimg.cdn.bcebos.com/pic/50da81cb39dbb6fd526675ca147cbc18972bd507999d?x-bce-process=image/watermark,image_d2F0ZXIvYmFpa2U5Mg==,g_7,xp_5,yp_5/format,f_auto\">" +
"<spanExt>其涨跌幅在有色金属中位列<spanExt style=\"color:#F43737; font-weight:bold; \">81</spanExt>/<spanExt style=\"color:black; font-weight:bold; \">122</spanExt>。</spanExt>"
计划渲染的目标内容,这里的spanExt是由于系统本身是支持span标签,但是对于span标签的支持不够完善,我需要自定义一个新的标签,但是html解析的时候,是识别的标签,所以需要将展示内容的span标签替换为了spanExt。防止被系统的span标签直接解析了。
渲染内容中,主要是需要自定义span标签和图片的展示。接下来就从这两个方面出发说明。
自定义tag优化span标签
package org.fireking.basic.textview.html;

import android.content.Context;
import android.content.res.ColorStateList;
import android.content.res.Resources;
import android.graphics.Color;
import android.graphics.Typeface;
import android.text.Editable;
import android.text.Html;
import android.text.Spannable;
import android.text.Spanned;
import android.text.TextUtils;
import android.text.style.AbsoluteSizeSpan;
import android.text.style.ForegroundColorSpan;
import android.text.style.StyleSpan;
import android.text.style.TextAppearanceSpan;
import android.util.Log;

import org.xml.sax.XMLReader;

import java.lang.reflect.Field;
import java.util.HashMap;
import java.util.Map;

public class SpanExtTagHandler implements Html.TagHandler {

    private final String TAG = "CustomTagHandler";

    private int startIndex = 0;
    private int stopIndex = 0;

    private final ColorStateList mOriginColors;
    private final Context mContext;

    public SpanExtTagHandler(Context context, ColorStateList originColors) {
        mContext = context;
        mOriginColors = originColors;
    }

    @Override
    public void handleTag(boolean opening, String tag, Editable output,
                          XMLReader xmlReader) {
        processAttributes(xmlReader);

        if (tag.equalsIgnoreCase("spanExt")) {
            if (opening) {
                startSpan(tag, output, xmlReader);
            } else {
                endSpan(tag, output, xmlReader);
                attributes.clear();
            }
        }
    }

    public void startSpan(String tag, Editable output, XMLReader xmlReader) {
        startIndex = output.length();
    }

    public void endSpan(String tag, Editable output, XMLReader xmlReader) {
        stopIndex = output.length();

        String color = attributes.get("color");
        String size = attributes.get("size");
        String style = attributes.get("style");
        if (!TextUtils.isEmpty(style)) {
            analysisStyle(startIndex, stopIndex, output, style);
        }
        if (!TextUtils.isEmpty(size)) {
            size = size.split("px")[0];
        }
        if (!TextUtils.isEmpty(color)) {
            if (color.startsWith("@")) {
                Resources res = Resources.getSystem();
                String name = color.substring(1);
                int colorRes = res.getIdentifier(name, "color", "android");
                if (colorRes != 0) {
                    output.setSpan(new ForegroundColorSpan(colorRes), startIndex, stopIndex, Spanned.SPAN_EXCLUSIVE_EXCLUSIVE);
                }
            } else {
                try {
                    output.setSpan(new ForegroundColorSpan(Color.parseColor(color)), startIndex, stopIndex, Spanned.SPAN_EXCLUSIVE_EXCLUSIVE);
                } catch (Exception e) {
                    e.printStackTrace();
                    reductionFontColor(startIndex, stopIndex, output);
                }
            }
        }
        if (!TextUtils.isEmpty(size)) {
            int fontSizePx = 16;
            if (null != mContext) {
                fontSizePx = DisplayUtil.sp2px(mContext, Integer.parseInt(size));
            }
            output.setSpan(new AbsoluteSizeSpan(fontSizePx), startIndex, stopIndex, Spanned.SPAN_EXCLUSIVE_EXCLUSIVE);
        }
    }

    final HashMap<String, String> attributes = new HashMap<String, String>();

    private void processAttributes(final XMLReader xmlReader) {
        try {
            Field elementField = xmlReader.getClass().getDeclaredField("theNewElement");
            elementField.setAccessible(true);
            Object element = elementField.get(xmlReader);
            Field attsField = element.getClass().getDeclaredField("theAtts");
            attsField.setAccessible(true);
            Object atts = attsField.get(element);
            Field dataField = atts.getClass().getDeclaredField("data");
            dataField.setAccessible(true);
            String[] data = (String[]) dataField.get(atts);
            Field lengthField = atts.getClass().getDeclaredField("length");
            lengthField.setAccessible(true);
            int len = (Integer) lengthField.get(atts);
            for (int i = 0; i < len; i++)
                attributes.put(data[i * 5 + 1], data[i * 5 + 4]);
        } catch (Exception e) {
            e.printStackTrace();
        }
    }

    /**
     * 还原为原来的颜色
     */
    private void reductionFontColor(int startIndex, int stopIndex, Editable editable) {
        if (null != mOriginColors) {
            editable.setSpan(new TextAppearanceSpan(null, 0, 0, mOriginColors, null),
                    startIndex, stopIndex,
                    Spannable.SPAN_EXCLUSIVE_EXCLUSIVE);
        } else {
            editable.setSpan(new ForegroundColorSpan(0xff2b2b2b), startIndex, stopIndex, Spanned.SPAN_EXCLUSIVE_EXCLUSIVE);
        }
    }

    /**
     * 解析style属性
     */
    private void analysisStyle(int startIndex, int stopIndex, Editable editable, String style) {
        Log.e(TAG, "style:" + style);
        String[] attrArray = style.split(";");
        Map<String, String> attrMap = new HashMap<>();
        if (null != attrArray) {
            for (String attr : attrArray) {
                String[] keyValueArray = attr.split(":");
                if (null != keyValueArray && keyValueArray.length == 2) {
                    // 记住要去除前后空格
                    attrMap.put(keyValueArray[0].trim(), keyValueArray[1].trim());
                }
            }
        }
        Log.e(TAG, "attrMap:" + attrMap.toString());

        String color = attrMap.get("color");
        String fontSize = attrMap.get("font-size");
        String fontWeight = attrMap.get("font-weight");
        if (!TextUtils.isEmpty(fontWeight) && "bold".equalsIgnoreCase(fontWeight)) {
            editable.setSpan(new StyleSpan(Typeface.BOLD), startIndex, stopIndex, Spanned.SPAN_EXCLUSIVE_EXCLUSIVE);
        } else if (!TextUtils.isEmpty(fontWeight) && "italic".equalsIgnoreCase(fontWeight)) {
            editable.setSpan(new StyleSpan(Typeface.ITALIC), startIndex, stopIndex, Spanned.SPAN_EXCLUSIVE_EXCLUSIVE);
        }
        if (!TextUtils.isEmpty(fontSize)) {
            fontSize = fontSize.split("px")[0];
        }
        if (!TextUtils.isEmpty(color)) {
            if (color.startsWith("@")) {
                Resources res = Resources.getSystem();
                String name = color.substring(1);
                int colorRes = res.getIdentifier(name, "color", "android");
                if (colorRes != 0) {
                    editable.setSpan(new ForegroundColorSpan(colorRes), startIndex, stopIndex, Spanned.SPAN_EXCLUSIVE_EXCLUSIVE);
                }
            } else {
                try {
                    editable.setSpan(new ForegroundColorSpan(Color.parseColor(color)), startIndex, stopIndex, Spanned.SPAN_EXCLUSIVE_EXCLUSIVE);
                } catch (Exception e) {
                    e.printStackTrace();
                    reductionFontColor(startIndex, stopIndex, editable);
                }
            }
        }
        if (!TextUtils.isEmpty(fontSize)) {
            int fontSizePx = 16;
            if (null != mContext) {
                fontSizePx = DisplayUtil.sp2px(mContext, Integer.parseInt(fontSize));
            }
            editable.setSpan(new AbsoluteSizeSpan(fontSizePx), startIndex, stopIndex, Spanned.SPAN_EXCLUSIVE_EXCLUSIVE);
        }
    }
}
代码整体上非常简单,首先判断需要解析的标签。根据#public void handleTag(boolean opening, String tag, Editable output, XMLReader xmlReader)的isOpen判断是开标签还是关标签。
> 开标签<span
> 关标签</span>
对于开标签,不需要过多关注,只需要知道开始的位置即可。重点关注的还是关标签。
这里需要使用xmlReader解析出来对应的属性和文本内容,然后将内容转换为对应的span设置给Editable output即可。
自定义Html.ImageGetter支持加载网络图片
- BitmapTarget.java
BitmapTarget用户装载Glide加载的图片对象
public class BitmapTarget extends SimpleTarget<Bitmap> {

    private final DrawableWrapper drawableWrapper;
    private Context context;
    private TextView textView;

    public BitmapTarget(TextView textView, DrawableWrapper drawableWrapper, Context context) {
        this.drawableWrapper = drawableWrapper;
        this.context = context;
        this.textView = textView;
    }

@Override
    public void onResourceReady(@NonNull Bitmap resource, @Nullable Transition<? super Bitmap> transition) {
        Drawable drawable = new BitmapDrawable(context.getResources(), resource);
        int width = drawable.getIntrinsicWidth();
        int height = drawable.getIntrinsicHeight();
        drawable.setBounds(0, 0, width, height);
        drawableWrapper.setBounds(0, 0, width, height);
        drawableWrapper.setDrawable(drawable);
        textView.setText(textView.getText());
        textView.invalidate();
    }
}
- DrawableWrapper.java
DrawableWrapper用来承接渲染到ImageSpan的drawable
public class DrawableWrapper extends BitmapDrawable {

    private Drawable drawable;

    DrawableWrapper() {

    }

    @Override
    public void draw(Canvas canvas) {
        if (drawable != null){
            drawable.draw(canvas);
        }
    }

    public Drawable getDrawable() {
        return drawable;
    }

    public void setDrawable(Drawable drawable) {
        this.drawable = drawable;
    }
}
- MyImageGetter.java
MyImageGetter 使用Glide进行图片的下载,并且渲染到drawable中,用于ImageSpan展示使用。
public class MyImageGetter implements Html.ImageGetter {

    private Context context;
    private TextView textView;

    public MyImageGetter(Context context, TextView textView) {
        this.context = context;
        this.textView = textView;
    }

    @Override
    public Drawable getDrawable(String source) {
        DrawableWrapper drawableWrapper = new DrawableWrapper();
        Drawable drawable = new BitmapDrawable(Bitmap.createBitmap(200, 200, Bitmap.Config.ARGB_8888));
        drawable.setBounds(0, 0, drawable.getIntrinsicWidth(), drawable.getIntrinsicHeight());
        drawableWrapper.setDrawable(drawable);
        Glide.with(context).asBitmap().load(source).into(new BitmapTarget(textView, drawableWrapper, context));
        return drawableWrapper;
    }
}


 595
595


 被折叠的 条评论
为什么被折叠?


