


使用FFmpeg的libavdevice库,可以读取电脑(或其他设备上)的多媒体设备的数据,或者输出到指定的多媒体设备上。
使用ffmpeg -hide_banner -devices命令查看本机支持的输入输出设备,以windows和linux为例,如下。D解码支持,可以作为输入;E为编码支持,可以作为输出。
Devices:
 D. = Demuxing supported
 .E = Muxing supported
 --
 D  dshow           DirectShow capture
 D  lavfi           Libavfilter virtual input device
  E sdl,sdl2        SDL2 output device
 D  vfwcap          VfW video capture
Devices:
 D. = Demuxing supported
 .E = Muxing supported
 --
 DE alsa            ALSA audio output
  E caca            caca (color ASCII art) output device
 DE fbdev           Linux framebuffer
 D  iec61883        libiec61883 (new DV1394) A/V input device
 D  jack            JACK Audio Connection Kit
 D  kmsgrab         KMS screen capture
 D  lavfi           Libavfilter virtual input device
 D  libcdio
 D  libdc1394       dc1394 v.2 A/V grab
 D  openal          OpenAL audio capture device
  E opengl          OpenGL output
 DE oss             OSS (Open Sound System) playback
 DE pulse           Pulse audio output
  E sdl,sdl2        SDL2 output device
 DE sndio           sndio audio playback
 DE video4linux2,v4l2 Video4Linux2 output device
  E vout_rpi        Rpi (mmal) video output device
 D  x11grab         X11 screen capture, using XCB
  E xv              XV (XVideo) output device
使用ffmpeg命令查看设备信息
Windows平台
windows下使用vfwcap明显感觉效果比dshow差,后续均以dshow为例说明。首先通过ffmpeg -h demuxer=dshow 查看支持的操作参数
Demuxer dshow [DirectShow capture]:
dshow indev AVOptions:
  -video_size        <image_size> .D....... set video size given a string such as 640x480 or hd720.
  -pixel_format      <pix_fmt>    .D....... set video pixel format (default none)
  -framerate         <string>     .D....... set video frame rate
  -sample_rate       <int>        .D....... set audio sample rate (from 0 to INT_MAX) (default 0)
  -sample_size       <int>        .D....... set audio sample size (from 0 to 16) (default 0)
  -channels          <int>        .D....... set number of audio channels, such as 1 or 2 (from 0 to INT_MAX) (default 0)
  -audio_buffer_size <int>        .D....... set audio device buffer latency size in milliseconds (default is the device's default) (from 0 to INT_MAX) (default 0)
  -list_devices      <boolean>    .D....... list available devices (default false)
  -list_options      <boolean>    .D....... list available options for specified device (default false)
  -video_device_number <int>        .D....... set video device number for devices with same name (starts at 0) (from 0 to INT_MAX) (default 0)
  -audio_device_number <int>        .D....... set audio device number for devices with same name (starts at 0) (from 0 to INT_MAX) (default 0)
  -crossbar_video_input_pin_number <int>        .D....... set video input pin number for crossbar device (from -1 to INT_MAX) (default -1)
  -crossbar_audio_input_pin_number <int>        .D....... set audio input pin number for crossbar device (from -1 to INT_MAX) (default -1)
  -show_video_device_dialog <boolean>    .D....... display property dialog for video capture device (default false)
  -show_audio_device_dialog <boolean>    .D....... display property dialog for audio capture device (default false)
  -show_video_crossbar_connection_dialog <boolean>    .D....... display property dialog for crossbar connecting pins filter on video device (default false)
  -show_audio_crossbar_connection_dialog <boolean>    .D....... display property dialog for crossbar connecting pins filter on audio device (default false)
  -show_analog_tv_tuner_dialog <boolean>    .D....... display property dialog for analog tuner filter (default false)
  -show_analog_tv_tuner_audio_dialog <boolean>    .D....... display property dialog for analog tuner audio filter (default false)
  -audio_device_load <string>     .D....... load audio capture filter device (and properties) from file
  -audio_device_save <string>     .D....... save audio capture filter device (and properties) to file
  -video_device_load <string>     .D....... load video capture filter device (and properties) from file
  -video_device_save <string>     .D....... save video capture filter device (and properties) to file
支持查看设备列表、选项列表,以及可以设置设备输出的视频分辨率、帧率等。
ffmpeg -list_devices true -f dshow -i dummy
ffmpeg -list_options true -f dshow -i video=“USB2.0 PC CAMERA”

使用命令ffmpeg -f dshow -i "video=USB2.0 PC CAMERA"打开设备,查看流信息

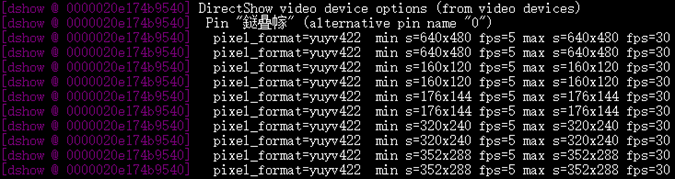
查询本机dshow设备、查看USB2.0摄像头的信息,只能输出yuyv422压缩编码数据(认为是rawvideo编码器,像素格式为yuyv422),经过解码后获得yuyv422编码的图像数据,所以,这种情况下可以不需要解码(代码逻辑上,直接获取的AVPacket和解码的AVFrame都是相同编码格式的图像数据)。
另一台机器,查询本机dshow设备、查看USB2.0摄像头的信息。
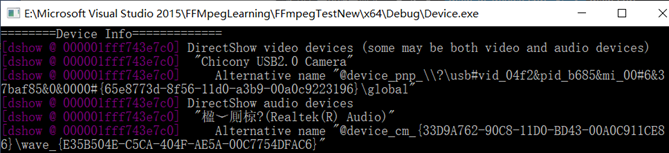

不设置任何选项,直接打开设备查看流信息

可以看到,该相机支持输出:
(1)原始图像数据(rawvideo编码器),像素格式为yuyv422;
(2)mjpeg压缩编码数据(mjpeg编码器),像素格式为yuvj422p。
注意,从上图中看到每一项中最小、最大帧率相同,也就在当前分辨率下的帧率固定,不支持其他大小的帧率。
当设置pixel_forma时, 1280*720帧率只能为10fps, 其他分辨率只能为30。 设置两者,必须匹配。若仅设置分辨率,这帧率自动匹配。若仅设置fps为10或30,分辨率自动为1280*720或640*480(30fps下最大的分辨率)。
若mjpeg编码,帧率只能为30,分辨率默认为最大值1280*720。
Linux平台
Linux下多使用video4linux2/v4l2设备,通过 ffmpeg -h demuxer=v4l2 查看相关的操作参数
Demuxer video4linux2,v4l2 [Video4Linux2 device grab]:
V4L2 indev AVOptions:
  -standard          <string>     .D....... set TV standard, used only by analog frame grabber
  -channel           <int>        .D....... set TV channel, used only by frame grabber (from -1 to INT_MAX) (default -1)
  -video_size        <image_size> .D....... set frame size
  -pixel_format      <string>     .D....... set preferred pixel format
  -input_format      <string>     .D....... set preferred pixel format (for raw video) or codec name
  -framerate         <string>     .D....... set frame rate
  -list_formats      <int>        .D....... list available formats and exit (from 0 to INT_MAX) (default 0)
     all                          .D....... show all available formats
     raw                          .D....... show only non-compressed formats
     compressed                   .D....... show only compressed formats
  -list_standards    <int>        .D....... list supported standards and exit (from 0 to 1) (default 0)
     all                          .D....... show all supported standards
  -timestamps        <int>        .D....... set type of timestamps for grabbed frames (from 0 to 2) (default default)
     default                      .D....... use timestamps from the kernel
     abs                          .D....... use absolute timestamps (wall clock)
     mono2abs                     .D....... force conversion from monotonic to absolute timestamps
  -ts                <int>        .D....... set type of timestamps for grabbed frames (from 0 to 2) (default default)
     default                      .D....... use timestamps from the kernel
     abs                          .D....... use absolute timestamps (wall clock)
     mono2abs                     .D....... force conversion from monotonic to absolute timestamps
  -use_libv4l2       <boolean>    .D....... use libv4l2 (v4l-utils) conversion functions (default false)
当前机器上挂载了csi接口的相机,ffmpeg -hide_banner -f v4l2 -list_formats all -i /dev/video0 查看其支持的格式
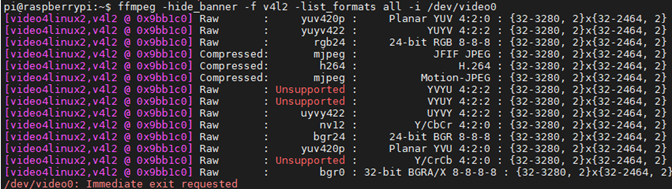
该相机支持多种非压缩编码格式,也支持JFIF JPEG、Motion JPEG、H.264(硬件支持)。
读取摄像头
前面已经介绍了dshow设备的信息获取,这里直接给出命令行将
ffmpeg -f dshow -i video="USB2.0 PC CAMERA" -vcodec h264 xxxx.h264
ffmpeg -f dshow -framerate 15 -i video="USB2.0 PC CAMERA" -vcodec h264 xxxx.mp4

ffmpeg -f v4l2 -i video=/dev/video0 -vcodec h264 xxxx.h264
在实时流推送中需要提高libx264的编码速度,添加-preset:v ultrafast 和 -tune:v zerolatency两个选项。
使用vlc播放封装文件如mp4比h264裸流文件感觉要正常一些。
读取屏幕
Windows下使用gdigrab设备录制desktop。先给出gdigrab支持的选项
$ ffmpeg -h demuxer=gdigrab

Demuxer gdigrab [GDI API Windows frame grabber]:
GDIgrab indev AVOptions:
  -draw_mouse        <int>        .D....... draw the mouse pointer (from 0 to 1) (default 1)
  -show_region       <int>        .D....... draw border around capture area (from 0 to 1) (default 0)
  -framerate         <video_rate> .D....... set video frame rate (default "ntsc")
  -video_size        <image_size> .D....... set video frame size
  -offset_x          <int>        .D....... capture area x offset (from INT_MIN to INT_MAX) (default 0)
  -offset_y          <int>        .D....... capture area y offset (from INT_MIN to INT_MAX) (default 0)
(1)录屏并保存为264编码文件
ffmpeg -f gdigrab -i desktop -vcodec h264 xxxx.h264
提高libx264的编码速度,添加-preset:v ultrafast 和 -tune:v zerolatency两个选项。
(2)显示鼠标,从屏幕左上角(100,200)的640x480区域以帧率25保存视频
ffmpeg -f gdigrab -draw_mouse -framerate 25 -offset_x 100 -offset_y 200 \
-video_size 640x480 -i desktop out.mpg
linux下类似,使用 x11grab 设备,支持的选项有
$ ffmpeg -h demuxer=x11grab

Demuxer x11grab [X11 screen capture, using XCB]:
xcbgrab indev AVOptions:
  -x                 <int>        .D...... Initial x coordinate. (from 0 to INT_MAX) (default 0)
  -y                 <int>        .D...... Initial y coordinate. (from 0 to INT_MAX) (default 0)
  -grab_x            <int>        .D...... Initial x coordinate. (from 0 to INT_MAX) (default 0)
  -grab_y            <int>        .D...... Initial y coordinate. (from 0 to INT_MAX) (default 0)
  -video_size        <string>     .D...... A string describing frame size, such as 640x480 or hd720. (default "vga")
  -framerate         <string>     .D......  (default "ntsc")
  -draw_mouse        <int>        .D...... Draw the mouse pointer. (from 0 to 1) (default 1)
  -follow_mouse      <int>        .D...... Move the grabbing region when the mouse pointer reaches within specified amount of pixels to the edge of region. (from -1 to INT_MAX) (default 0)
     centered                     .D...... Keep the mouse pointer at the center of grabbing region when following.
  -show_region       <int>        .D...... Show the grabbing region. (from 0 to 1) (default 0)
  -region_border     <int>        .D...... Set the region border thickness. (from 1 to 128) (default 3)
录屏并捕获鼠标
ffmpeg -f x11grab -draw_mouse -framerate 25 - x 100 -y 200 \
-video_size 640x480 -i :0.0 out.mpg


 2060
2060


 被折叠的 条评论
为什么被折叠?
被折叠的 条评论
为什么被折叠?
 到【灌水乐园】发言


