


本文转载自:http://blog.csdn.net/gubenpeiyuan/article/details/19548019?utm_source=tuicool
本文概要:
本文介绍著名开源音视频编解码库ffmpeg如何解码h264码流,比较详细阐述了其h264码流输入过程,解码原理,解码过程。同时,大部分应用环境下,以原始码流视频大小展示并不是最佳方式,因此,开发者不仅仅需要对视频流解码,并且需要缩放图像以展示于不同窗体下。
综上,本文除介绍ffmpeg解码h264,同时阐述如何使用swscale缩放视频流。
文章使用的开发环境Ubuntu12.04.。交流邮箱:leoluopy@gmail.com。转载请注明出处 CSDN--固本培元。
ffmpeg介绍:
FFmpeg是一个开源免费跨平台的视频和音频流方案,属于自由软件,采用LGPL或GPL许可证(依据你选择的组件)。它提供了录制、转换以及流化音视频的完整解决方案。它包含了非常先进的音频/视频编解码库libavcodec,为了保证高可移植性和编解码质量,libavcodec里很多codec都是从头开发的。
开始解码
好了,不多说了。直接上工程和代码吧。(注意在链接工程时,引用库有连接顺序,因为他们有相互依赖关系,如果缺少将不能通过编译。)
需要连接的库: VS代码如下
- #pragma comment (lib,"..\\FFMPEG_lib\\avformat.lib")
- #pragma comment (lib,"..\\FFMPEG_lib\\avutil.lib")
- #pragma comment (lib,"..\\FFMPEG_lib\\swscale.lib")
- #pragma comment (lib,"..\\FFMPEG_lib\\avcodec.lib")
- #pragma comment (lib,"..\\FFMPEG_lib\\avdevice.lib")
- #pragma comment (lib,"..\\FFMPEG_lib\\avfilter.lib")
需要的头文件:
- #include "libavcodec\\avcodec.h"
- #include "libswscale/swscale.h"
环境初始化代码:(参考了api-example.c)ubuntu上使用的ffmpeg版本是0.6
- avcodec_init(); //首先,main函数中一开始会去调用avcodec_init()函数,该函数的作用是初始化libavcodec,而我们在使用avcodec编解码库时,该函数必须被调用。
- avcodec_register_all();//注册所有的编解码器(codecs),解析器(parsers)以及码流过滤器(bitstream filters)。当然我们也可以使用个别的注册函数来注册我们所要支持的格式。
- AVCodec *codec;
- AVCodecContext *c= NULL;
- int frame, size, got_picture, len;
- FILE *fin, *fout;
- AVFrame *picture,*dst_picture;
- uint8_t inbuf[INBUF_SIZE + FF_INPUT_BUFFER_PADDING_SIZE], *inbuf_ptr;
- char buf[1024];
- /* set end of buffer to 0 (this ensures that no overreading happens for damaged mpeg streams) */
- memset(inbuf + INBUF_SIZE, 0, FF_INPUT_BUFFER_PADDING_SIZE);
- printf("Video decoding\n");
- /* find the mpeg1 video decoder */
- codec = avcodec_find_decoder(CODEC_ID_H264);
- if (!codec){
- fprintf(stderr, "codec not found\n");
- exit(1);
- }
- c= avcodec_alloc_context();
- picture= avcodec_alloc_frame();
- if(codec->capabilities&CODEC_CAP_TRUNCATED){
- c->flags|= CODEC_FLAG_TRUNCATED; /* we dont send complete frames */
- }
- /* for some codecs, such as msmpeg4 and mpeg4, width and height
- MUST be initialized there because these info are not available
- in the bitstream */
- /* open it */
- if (avcodec_open(c, codec) < 0){
- fprintf(stderr, "could not open codec\n");
- exit(1);
- }
avcodec_init和avcodec_register_all初始化了相关的解码器,申请了解码需要的空间等。
其他解码需要具备的是AVcontext、AVCodec、以及AVFrame。
AVContext是解码需要的环境,其中存储了比如长宽,编码器算法,位图格式等信息。
AVCondec就是你所选择的的编解码器了,使用枚举来索引,申请空间后与解码函数配合使用。
AVFrame与AVPicture比较像,都存储解码后的位图信息。
解码:
avcodec_decode_video需要输入参数,AVContext,AVFrame,数据首地址以及数据长度。同时传入一个int指针用于记录解码返回的解码成功帧数。
len记录本次解码消耗的字节数。
- len = avcodec_decode_video(c, picture, &got_picture,
- inbuf_ptr, size);
同时,h264码流分IPB帧,只有I帧是比较全面的图像信息。如果在解码I帧完成后,清空解码环境context,后续解码将持续返回错误信息,直至下一个I帧出现。作者亲测,望看到此文的朋友在做解码时不会再走这条弯路。
自此,解码部分阐述完毕。
缩放:
利用ffmpeg进行图像数据格式的转换以及图片的缩放应用中,主要用到了swscale.h文件中的三个函数,分别是:
- struct SwsContext *sws_getContext(int srcW, int srcH, enum AVPixelFormat srcFormat,
- int dstW, int dstH, enum AVPixelFormat dstFormat,
- int flags, SwsFilter *srcFilter,
- SwsFilter *dstFilter, const double *param);
- int sws_scale(struct SwsContext *c, const uint8_t *const srcSlice[],
- const int srcStride[], int srcSliceY, int srcSliceH,
- uint8_t *const dst[], const int dstStride[]);
- void sws_freeContext(struct SwsContext *swsContext);
sws_getContext函数可以看做是初始化函数,它的参数定义分别为:
int srcW,int srcH 为原始图像数据的高和宽;
int dstW,int dstH 为输出图像数据的高和宽;
enum AVPixelFormat srcFormat 为输入和输出图片数据的类型;eg:AV_PIX_FMT_YUV420、PAV_PIX_FMT_RGB24;
int flags 为scale算法种类;eg:SWS_BICUBIC、SWS_BICUBLIN、SWS_POINT、SWS_SINC;
SwsFilter *srcFilter ,SwsFilter *dstFilter,const double *param 可以不用管,全为NULL即可;
sws_scale函数则为执行函数,它的参数定义分别为:
struct SwsContext *c 为sws_getContext函数返回的值;
const uint8_t *const srcSlice[],uint8_t *const dst[] 为输入输出图像数据各颜色通道的buffer指针数组;
const int srcStride[],const int dstStride[] 为输入输出图像数据各颜色通道每行存储的字节数数组;
int srcSliceY 为从输入图像数据的第多少列开始逐行扫描,通常设为0;
int srcSliceH 为需要扫描多少行,通常为输入图像数据的高度;
sws_freeContext函数为结束函数,它的参数即为sws_getContext函数返回的值;
做一个实际缩放YUV420函数打包实例如下:
- int ScaleImg(AVCodecContext *pCodecCtx,AVFrame *src_picture,AVFrame *dst_picture,int nDstH ,int nDstW )
- {
- int i ;
- int nSrcStride[3];
- int nDstStride[3];
- int nSrcH = pCodecCtx->height;
- int nSrcW = pCodecCtx->width;
- struct SwsContext* m_pSwsContext;
- uint8_t *pSrcBuff[3] = {src_picture->data[0],src_picture->data[1], src_picture->data[2]};
- nSrcStride[0] = nSrcW ;
- nSrcStride[1] = nSrcW/2 ;
- nSrcStride[2] = nSrcW/2 ;
- dst_picture->linesize[0] = nDstW;
- dst_picture->linesize[1] = nDstW / 2;
- dst_picture->linesize[2] = nDstW / 2;
- printf("nSrcW%d\n",nSrcW);
- m_pSwsContext = sws_getContext(nSrcW, nSrcH, PIX_FMT_YUV420P,
- nDstW, nDstH, PIX_FMT_YUV420P,
- SWS_BICUBIC,
- NULL, NULL, NULL);
- if (NULL == m_pSwsContext)
- {
- printf("ffmpeg get context error!\n");
- exit (-1);
- }
- sws_scale(m_pSwsContext, src_picture->data,src_picture->linesize, 0, pCodecCtx->height,dst_picture->data,dst_picture->linesize);
- printf("line0:%d line1:%d line2:%d\n",dst_picture->linesize[0] ,dst_picture->linesize[1] ,dst_picture->linesize[2]);
- sws_freeContext(m_pSwsContext);
- return 1 ;
- }
函数很简单,申请环境初始指针,后缩放即可。读到此文的朋友,这个函数可以直接拷贝使用哟。如果有疑问可以留言或者邮件:leoluopy@gmail.com
RGB的缩放可以参考下面:
- int ScaleYUVImgToRGB(int nSrcW,int nSrcH ,uint8_t* src_data,int *linesize,int nDstW ,int nDstH )
- {
- int i ; int ret ; FILE *nRGB_file ;
- AVFrame *nDst_picture ;
- struct SwsContext* m_pSwsContext;
- nDst_picture = avcodec_alloc_frame();
- if (!nDst_picture){
- printf("nDst_picture avcodec_alloc_frame failed\n");
- exit(1);
- }
- if(avpicture_alloc((AVPicture *)nDst_picture,PIX_FMT_RGB24,nDstW, nDstH)<0){
- printf("dst_picture avpicture_alloc failed\n");
- exit(1);
- }
- m_pSwsContext = sws_getContext(nSrcW, nSrcH, PIX_FMT_YUV420P,
- nDstW, nDstH, PIX_FMT_RGB24,
- SWS_BICUBIC,
- NULL, NULL, NULL);
- if (NULL == m_pSwsContext)
- {
- printf("ffmpeg get context error!\n");
- exit (-1);
- }
- ret = sws_scale(m_pSwsContext, src_data,linesize, 0,nSrcH,nDst_picture->data,nDst_picture->linesize);
- nRGB_file = fopen("..\\YUV_STREAM\\RGBFile.rgb","ab+");
- fwrite(nDst_picture->data[0],nDstW*nDstH*3,1,nRGB_file);
- fclose(nRGB_file);
- sws_freeContext(m_pSwsContext);
- avpicture_free((AVPicture *)nDst_picture);
- return 0;
- }
参数data 和 linesize 参考yuv平面指针即可。
同时如果不想使用AVPicture结构的话,可以参考下面的:(注意不同图像类型,linesize一定要写对)
- char* H264Decoder_c::ScaleYUVImgToRGB(int nSrcW,int nSrcH ,uint8_t** src_data,int *linesize,int nDstW ,int nDstH )
- {
- int i ; int ret ; FILE *nRGB_file ;
- struct SwsContext* m_pSwsContext;
- char* out_Img[3];
- int out_linesize[3];
- out_linesize[0] = 2*nDstW ; //out_linesize[1] = nDstW ;out_linesize[2] = nDstW ;
- out_Img[0] = g_RGBImg ;
- m_pSwsContext = sws_getContext(nSrcW, nSrcH, PIX_FMT_YUV420P,
- nDstW, nDstH, PIX_FMT_RGB565,
- SWS_BICUBIC,
- NULL, NULL, NULL);
- if (NULL == m_pSwsContext)
- {
- printf("ffmpeg get context error!\n");
- exit (-1);
- }
- ret = sws_scale(m_pSwsContext, src_data,linesize, 0,nSrcH,(uint8_t**)out_Img,out_linesize);
- #if 0
- nRGB_file = fopen("./RGBFile.rgb","ab+");
- fwrite(out_Img[0],nDstW*nDstH*2,1,nRGB_file);
- fclose(nRGB_file);
- #endif
- sws_freeContext(m_pSwsContext);
- return out_Img[0];
- }
下面有一个缩放图像的效果图:
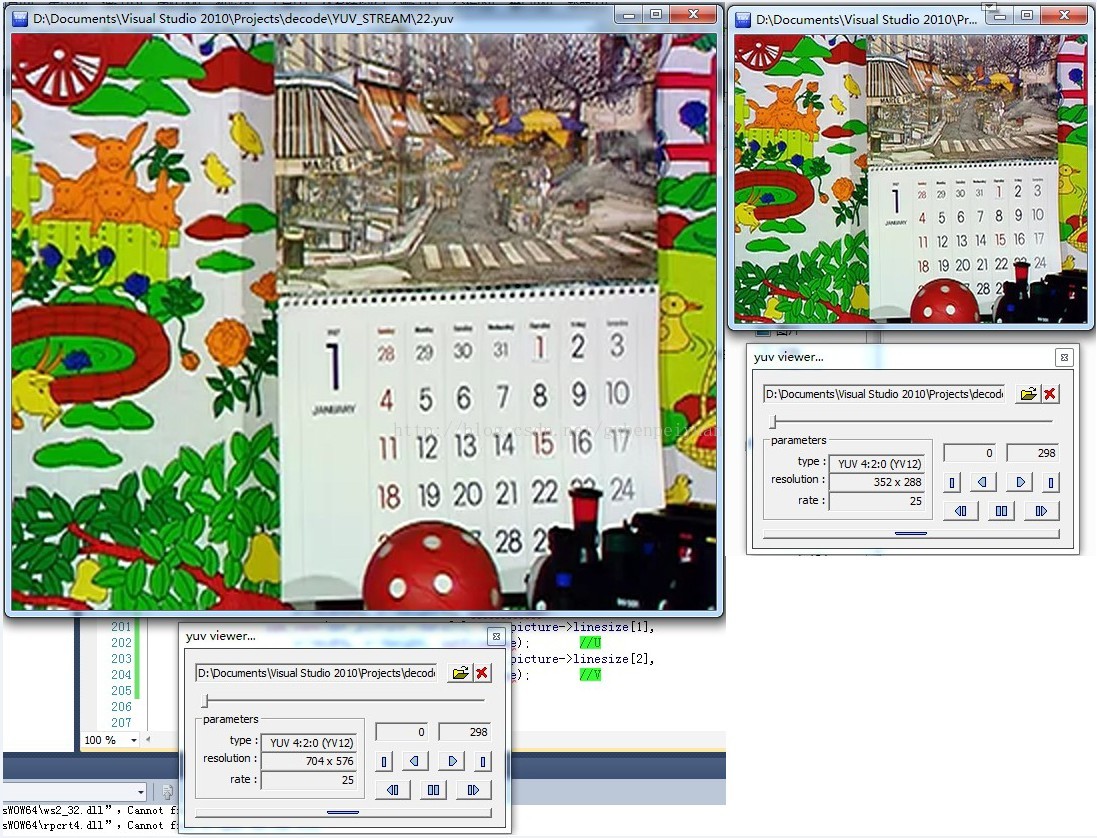
目的位图的空间申请:
注意:上面的缩放函数如果直接使用而在没有解码成功或者没有申请目的位图空间时,将报段错误。
原因:没有解码成功,位图源地址将是指向空的地址,目的位图地址同样。
申请目的位图的方式:
- dst_picture = avcodec_alloc_frame();
- if (!dst_picture){
- return ;
- }
- if(avpicture_alloc((AVPicture *)dst_picture, c->pix_fmt,c->width*2, c->height*2)<0){
- printf("dst_picture allocate failed\n");
- exit(1);
- }
图像的内存Dump方法:
上文已经比较详细的阐述了ffmpeg的解码以及缩放原理及流程,然而在实际运用环境中,无论是从实时播放或者是从历史回放来看,我们需要的是像素位图,而不是ffmpeg的结构体。那么怎么转换呢?下文介绍了相关的内容。作为实际运用环境中,像素位图格式,笔者使用的是比较常用的YUV格式。
编解码图像格式
YV12:
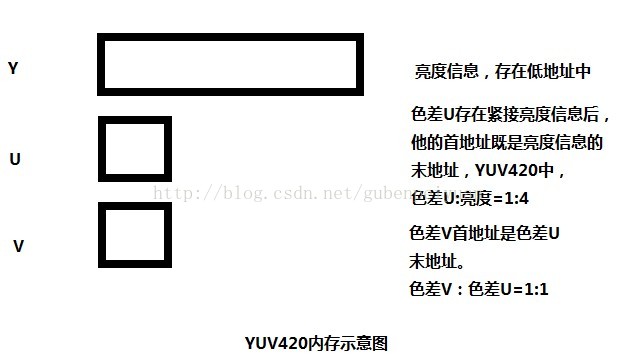
IYUV
http://blog.csdn.net/searchsun/article/details/2443867
如何Dump
好了,对YUV格式又初步了解后,下面介绍如果导出这像素位图数据。ffmpeg将图像的亮度以及色差信息保存在AVFrame中的data[0]、data[1]、data[2]中。
详细参考:
AVFrame和AVPicture对比:
http://yul100887.blog.163.com/blog/static/200336135201211143525930/
所有操作均是针对这三个指针展开的,如下:
- pgm_save(picture->data[0], picture->linesize[0], //Y
- c->width, c->height, outfilename);
- pgm_save(picture->data[1], picture->linesize[1],
- c->width/2, c->height/2, outfilename); //U
- pgm_save(picture->data[2], picture->linesize[2],
- c->width/2, c->height/2, outfilename); //V
- void pgm_save(unsigned char *buf,int wrap, int xsize,int ysize,char *filename)
- {
- FILE *f;
- int i;
- f=fopen(filename,"ab+");
- for(i=0;i<ysize;i++)
- {
- fwrite(buf + i * wrap, 1, xsize, f );
- }
- fclose(f);
- }
最后需要注意的是:linesize总是容易被遗忘,livesize[0]=height ,livesize[1]=height/2 ,livesize[2]=height /2,
此文到此结束,感谢阅读。
---------------------leoluopy
参考文章:
使用ffmpeg进行图像格式转换及缩放
http://blog.csdn.net/skys_broyal/article/details/10337147
AVFrame和AVPicture对比:
http://yul100887.blog.163.com/blog/static/200336135201211143525930/
FFMPEG 实现 YUV,RGB各种图像原始数据之间的转换(swscale)
http://blog.csdn.net/leixiaohua1020/article/details/14215391
http://blog.csdn.net/chinabinlang/article/details/7088590
http://blog.csdn.net/zgyulongfei/article/details/7558031


 1817
1817

 被折叠的 条评论
为什么被折叠?
被折叠的 条评论
为什么被折叠?
 到【灌水乐园】发言


