


aws lambda使用
Amazon announced the general availability of AWS Lambda support for Amazon Elastic File System. Amazon EFS is a fully managed, elastic, shared file system and designed to be consumed by other AWS services.
亚马逊宣布将对Amazon Elastic File System的AWS Lambda支持全面上市。 Amazon EFS是一个完全托管的,弹性的共享文件系统,旨在供其他AWS服务使用。
With the release of Amazon EFS for Lambda, we can now easily share data across function invocations. It also opens new capabilities, such as building/importing large libraries and machine learning models directly into Lambda functions. Let’s go over how to build a serverless conversational AI chatbot using Lambda function and EFS.
通过适用于Lambda的Amazon EFS版本,我们现在可以轻松地在函数调用之间共享数据。 它还开放了新功能,例如将大型库和机器学习模型直接构建/导入到Lambda函数中。 让我们研究一下如何使用Lambda函数和EFS构建无服务器的对话式AI聊天机器人。
In this post, we will:
在这篇文章中,我们将:
- Create an Amazon Elastic File System 创建一个Amazon Elastic File System
- Deploy and run a SageMaker notebook instance and Mount EFS to instance. 部署并运行SageMaker笔记本实例,然后将EFS挂载到实例。
- Download PyTorch libraries and ConvAI pre-trained model to EFS. 将PyTorch库和ConvAI预先训练的模型下载到EFS。
- Add dialog history DynamoDB table and Gateway endpoint to save & retrieve conversation history. 添加对话框历史记录DynamoDB表和网关端点以保存和检索对话历史记录。
- Deploy a chatbot engine Lambda function and enable EFS for it. 部署聊天机器人引擎Lambda函数并为其启用EFS。
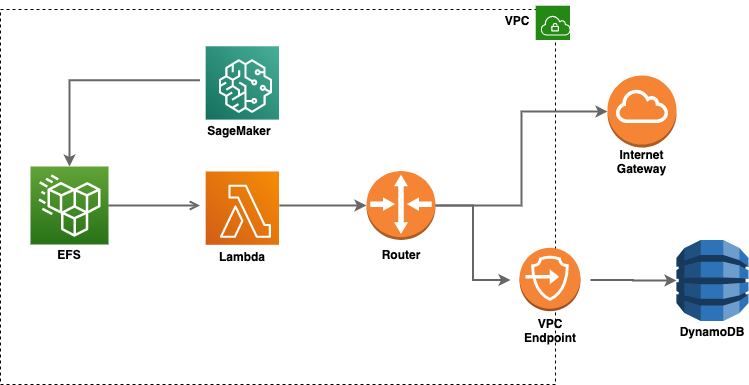
Here’s the architecture diagram:
这是架构图:
创建一个EFS文件系统 (Creating an EFS file system)
In this example we will use CloudFormation to create EFS and EFS access point, the configuration is defined as follows:
在此示例中,我们将使用CloudFormation创建EFS和EFS访问点,其配置定义如下:
Note that we will use EFS General Purpose performance mode since it has lower latency than Max I/O.
请注意,我们将使用EFS 通用性能模式,因为它的延迟低于最大I / O的延迟。
使用Amazon SageMaker (Working with Amazon SageMaker)
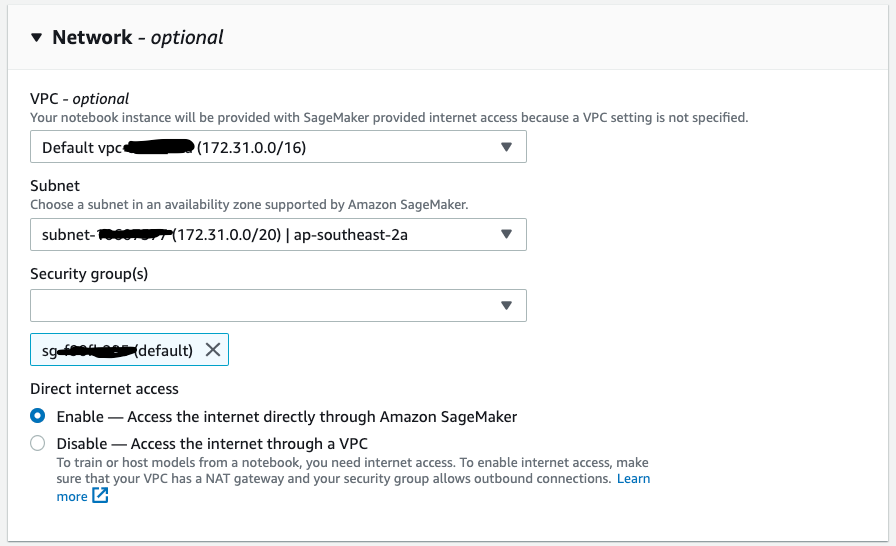
We will mount EFS on Amazon SageMaker on a SageMaker notebook and Install PyTorch and ConvAI model on EFS.
我们将在SageMaker笔记本的Amazon SageMaker上安装EFS 并在EFS上安装PyTorch和ConvAI模型。
The notebook instance must have access to the same security group and reside in the same VPC as the EFS file system.
笔记本实例必须有权访问相同的安全组,并且必须与EFS文件系统位于同一VPC中。
Let’s mount EFS path /py-libs to /home/ec2-user/SageMaker/libs directory:
让我们将EFS路径/py-libs挂载到/home/ec2-user/SageMaker/libs目录:
Then, install PyTorch and simpletransformers to lib/py-libs directory:
然后,将PyTorch和simpletransformers安装到lib/py-libs目录:
!sudo pip --no-cache-dir install torch -t libs/py-libs
!sudo pip --no-cache-dir install torchvision -t libs/py-libs
!sudo pip --no-cache-dir install simpletransformers -t libs/py-libs
Once we have all packages installed, download pre-trained model provided by Hugging Face, then extract the archive to convai-model directory on EFS.
安装convai-model所有软件包后,下载Hugging Face提供的预训练模型 ,然后将存档convai-model压缩到EFS上的convai-model目录。
!sudo wget https://s3.amazonaws.com/models.huggingface.co/transfer-learning-chatbot/gpt_personachat_cache.tar.gz
!sudo tar -xvf gpt_personachat_cache.tar.gz -C libs/convai-model
!sudo chmod -R g+rw libs/convai-model
We are now ready to talk to the pre-trained model, simply call model.interact().
现在,我们准备讨论预先训练的模型,只需调用model.interact() 。
The pre-trained model provided by Hugging Face performs well out-of-the-box and will likely require less fine-tuning when creating chatbot.
Hugging Face提供的预训练模型开箱即用,并且在创建聊天机器人时可能需要较少的微调。
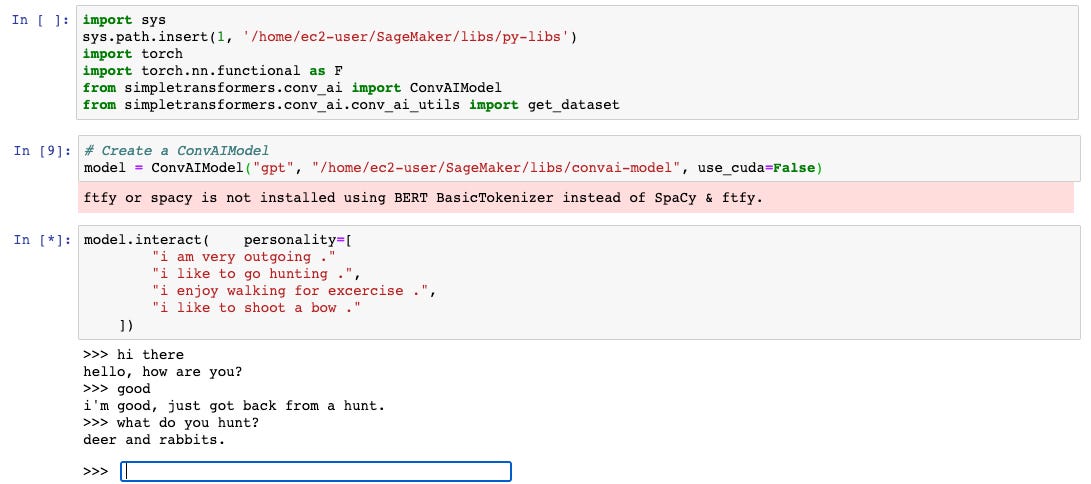
We can see that python packages and model consumed from EFS correctly and we are able to start the conversation with pre-trained model.
我们可以看到EFS正确使用了python软件包和模型,并且我们能够使用预先训练的模型开始对话。
创建AWS DynamoDB表 (Creating AWS DynamoDB table)
Create a DialogHistory table to store dialog history with at least the last utterance from user. We can use sample CloudFormation templates to configure the DynamoDB table.
创建一个DialogHistory表来存储对话框历史记录,至少包含用户的最后一次讲话。 我们可以用 示例CloudFormation模板以配置DynamoDB表。
Please note that We have to create a VPC endpoint for DynamoDB even though the Lambda function is running inside a public subnet of a VPC.
请注意 我们必须创建一个 即使Lambda函数在VPC的公共子网中运行,DynamoDB的VPC终结点 。
配置AWS Lambda以使用EFS (Configuring AWS Lambda to use EFS)
We will use AWS SAM to create Lambda functions and mount EFS access points to Lambda function.
我们将使用AWS SAM创建Lambda函数并将EFS访问点安装到Lambda函数。
First, create a Lambda function resource, then setup EFS File System for Lambda. Make sure that EFS and Lambda are in the same VPC:
首先,创建Lambda函数资源,然后为Lambda设置EFS文件系统。 确保EFS和Lambda在同一VPC中:
添加对话引擎:AWS Lambda (Adding the conversation engine: AWS Lambda)
In this section, we will create a Lambda function for communication between users and conversation AI model.
在本节中,我们将创建一个Lambda函数,用于用户和会话AI模型之间的通信。
We will contain the following source code in src/api.py :
我们将在src/api.py包含以下源代码:
Note that simpletransformers library allows us to interact with the models locally with input(). To build our chat engine, we need to override the default method interact and sample_sequenc in conv_ai :
注意, simpletransformers库允许我们使用input()在本地与模型进行交互。 要构建我们的聊天引擎,我们需要覆盖conv_ai的默认方法interact和sample_sequenc :
部署chatbot服务 (Deploying the chatbot service)
We are almost there! Now we have to deploy our bot. Run the following command to deploy:
我们就快到了! 现在我们必须部署我们的机器人。 运行以下命令进行部署:
$sam deploy --capabilities CAPABILITY_NAMED_IAM --guided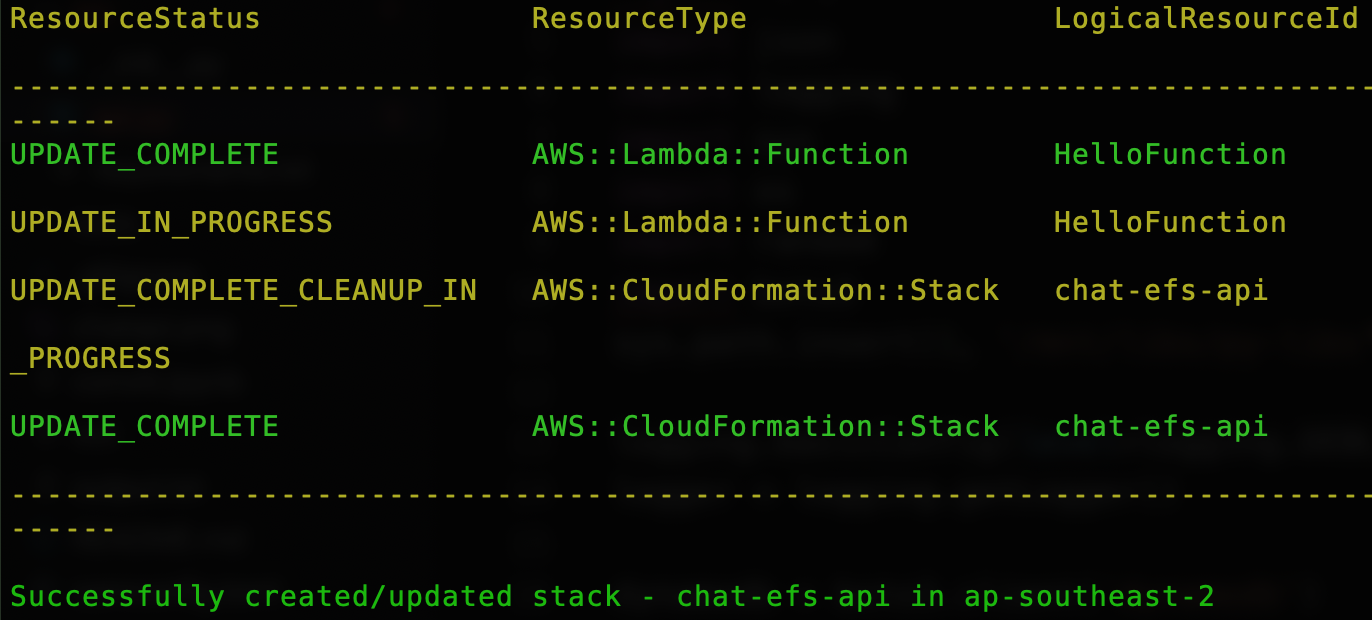
From the output above, we can see the chatbot is now deployed.
从上面的输出中,我们可以看到chatbot已被部署。
Now it’s time to test our bot. Go to CloudFormation Resources list in the AWS Management Console to find the Lambda function name and Invoke lambda function using following command:
现在是时候测试我们的机器人了。 转到AWS管理控制台中的CloudFormation资源列表以找到Lambda函数名称并使用以下命令调用lambda函数:
$aws lambda invoke --function-name "chat-efs-api-HelloFunction-KQSNKF5K0IY8" out --log-type Tail \--query 'LogResult' --output text | base64 -dThe output will look like below:
输出将如下所示:
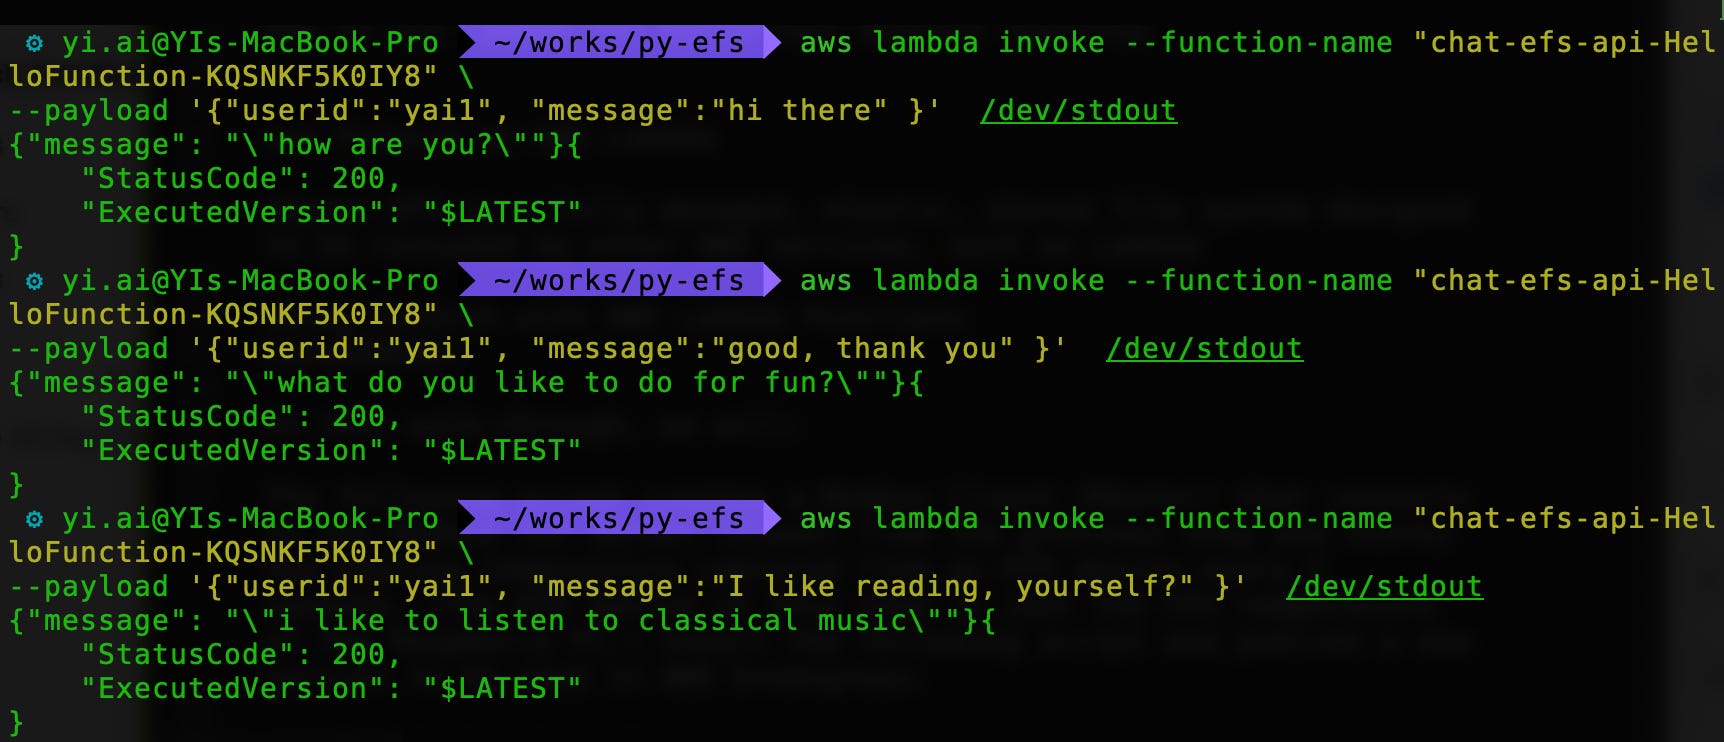
Here is an example of dialog:
这是对话框的示例:
>>hi there
how are you?
>>good, thank you
what do you like to do for fun?
>>I like reading, yourself?
i like to listen to classical music
......
It works! As we can see from above screenshot, a chatbot returns response based on input from a user.
有用! 从上面的屏幕截图可以看出,聊天机器人根据用户的输入返回响应。
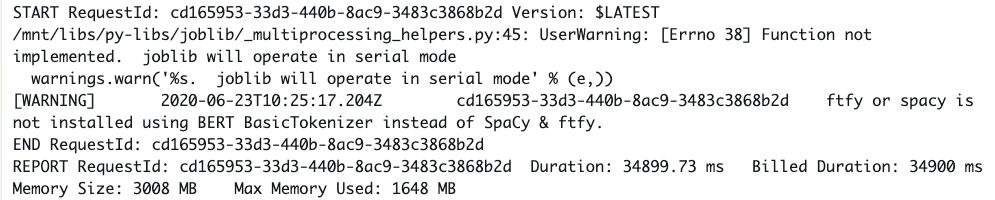
However, I am aware of the impact of cold starts on response times. The first request took ~30 secs for cold starts to complete. To prevent cold start in our Lambda functions, we can use Provisioned Concurrency to keep functions warm:
但是,我知道冷启动对响应时间的影响。 第一个请求大约需要30秒才能完成冷启动 。 为了防止Lambda函数冷启动,我们可以使用预配置并发 使功能保持温暖:
As a result, the latency of warmed-up function is reduced to ~3 seconds:
结果,预热功能的等待时间减少到约3秒:

That’s it! I hope you have found this article useful, The source code for this post can be found in my GitHub repo.
而已! 希望本文对您有用,这篇文章的源代码可以在我的GitHub repo中找到。
aws lambda使用


 635
635

 被折叠的 条评论
为什么被折叠?
被折叠的 条评论
为什么被折叠?
 到【灌水乐园】发言


